These are referred to as ‘Bill of Materials’ or ‘Shopping Lists’ depending on your Nutritics licence type.
Generate an inventory list for your recipes, meal plans or menus and export the report.
This guide will cover
- Creating a shopping list or inventory list for recipes
- Exporting a shopping list
- Creating a shopping list for menus
- Creating a shopping list from live orders
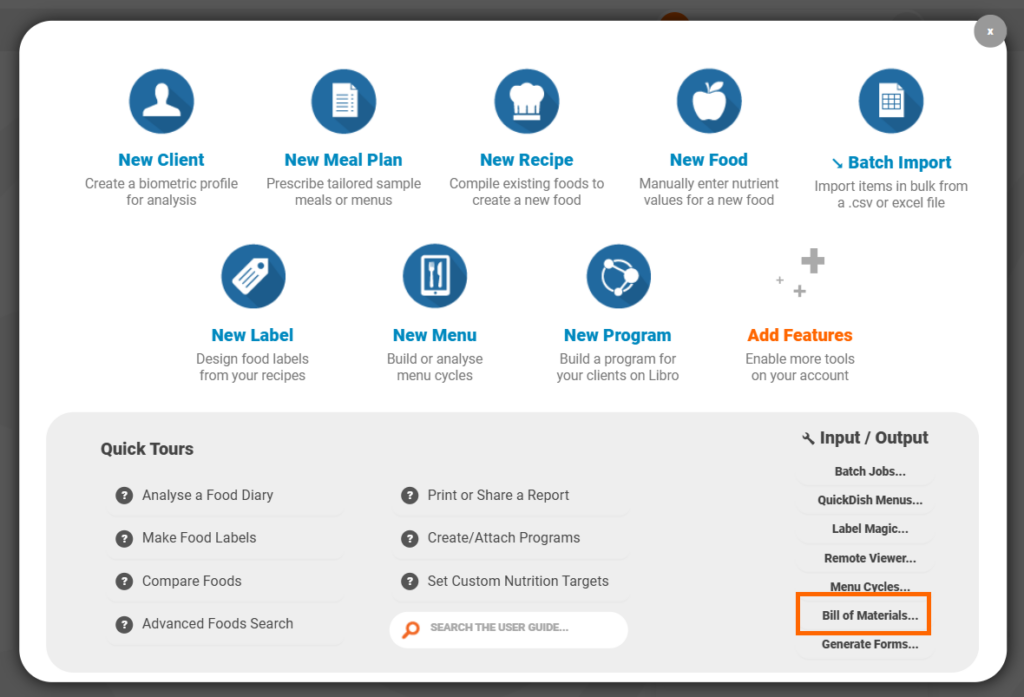
CREATING A SHOPPING LIST
- Click ‘Start’ and select either ‘Bill of Materials’ or ‘Shopping List’ under the input/output heading. Please note this is dependent on your Nutritics plan:
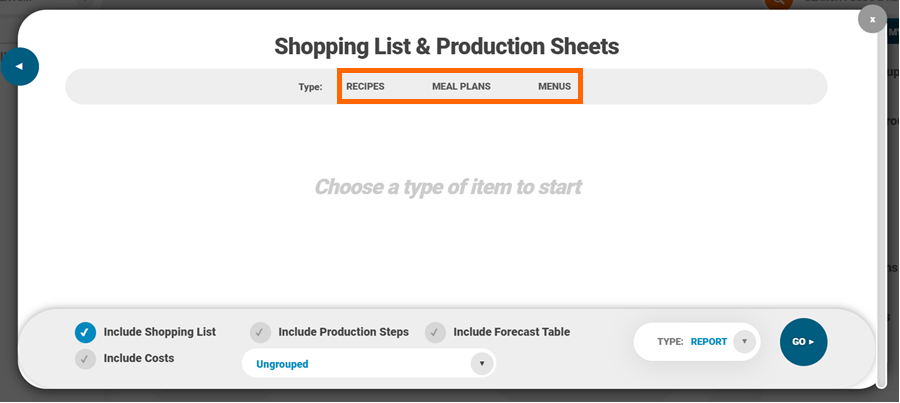
- Choose where you would like to export from using the tabs along the top:
- Any groups created in your Nutritics account will be visible and allow for easy filtering of data:
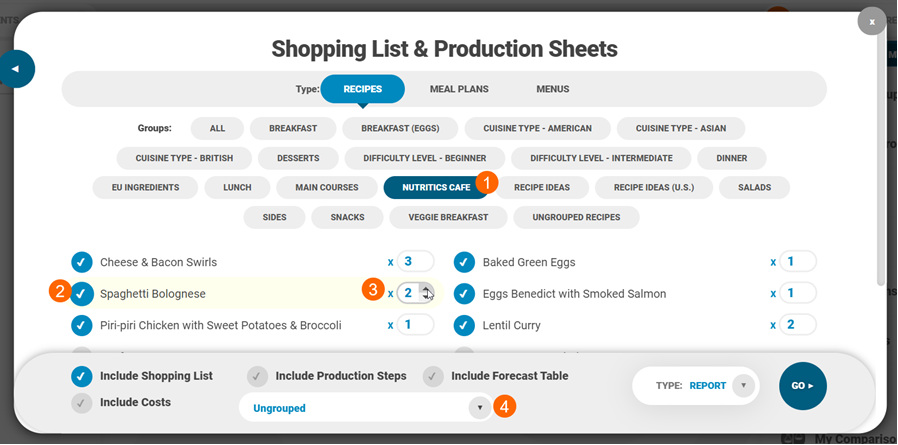
- Click on a group to expand it (1)
- Tick any items to be included in the export (2)
- Specify the number of servings the shopping list should include (3)
- Select how the shopping list should be organised in the dropdown menu (4)
- Group By Food Category: Group ingredients with the same category together under category headings e.g. fruits & vegetables or nuts & seeds.
- Group By Recipe: List recipes in alphabetical order, with an ingredient list under each recipe heading.
- Group By Supplier/Data Source: Group ingredients by the supplier of the item or the data source e.g. our main UK database will have the datasource ‘GB15’, or branded items might come from the database ‘BRANDB’.
- Group By Custom Field: If custom fields are used in your account, you can choose a custom field and group ingredients attached to it. Multiple custom fields can be enabled on your export at once.
- Ungrouped: This will list all ingredients in alphabetical order.
If the costing feature is enabled on your account, ingredient costs can be added to the export by ticking ‘Include Costs‘.
EXPORTING A SHOPPING LIST
After creating the desired list choose a type of report:
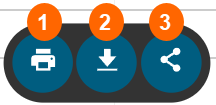
- Report: Preview the data in a new tab. Further share this report via printing (1), downloading as a PDF (2) or using the share link (3):
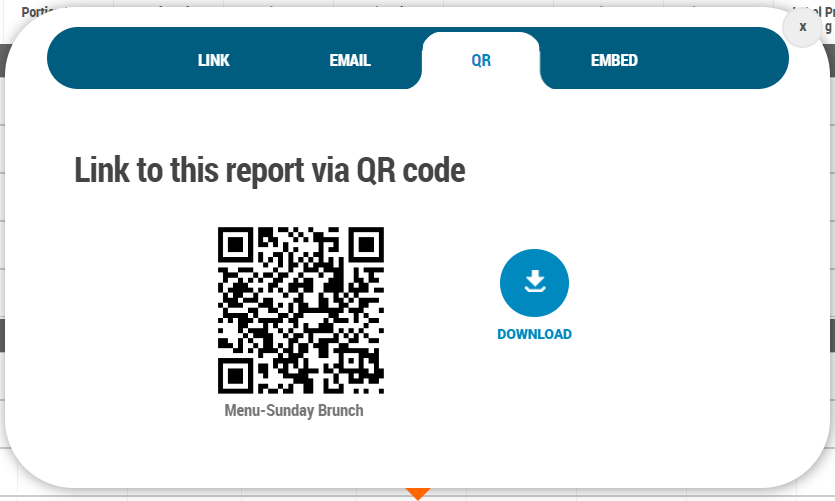
- Share: Share the list via a live link. You can also share this link directly to a person’s email address under the Email tab. Download a QR code under the QR tab or view the Embed link under the Embed tab:
- Print: Print a snapshot of the list and selected elements directly from Nutritics
- PDF: Download a PDF of the menu report
- Excel: Download the data into Excel. This is only an option for shopping lists and costs, not production steps or forecasting tables
- Order: Depending on your account set up, an inventory list can be generated and sent directly to a designated kitchen station for a specified date.
Shopping lists include a food code column (IFC), custom codes, the ingredient names, quantities and notes:
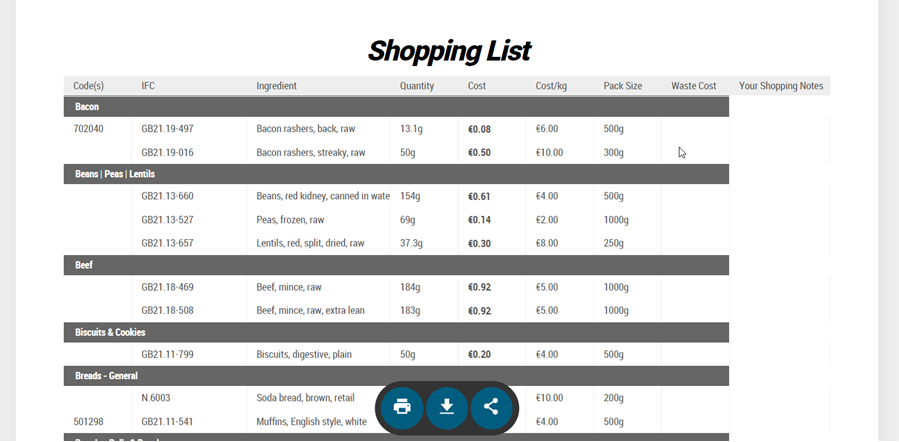
You can customise the export by including ingredient costs. This will include ingredient cost per kg and waste costs associated with the items. Click ‘Include Production Steps’ to create a production sheet. This element can be generated alone or accompany the shopping list. Production steps will be noted for items syncing directly from the recipe’s notes & instructions:

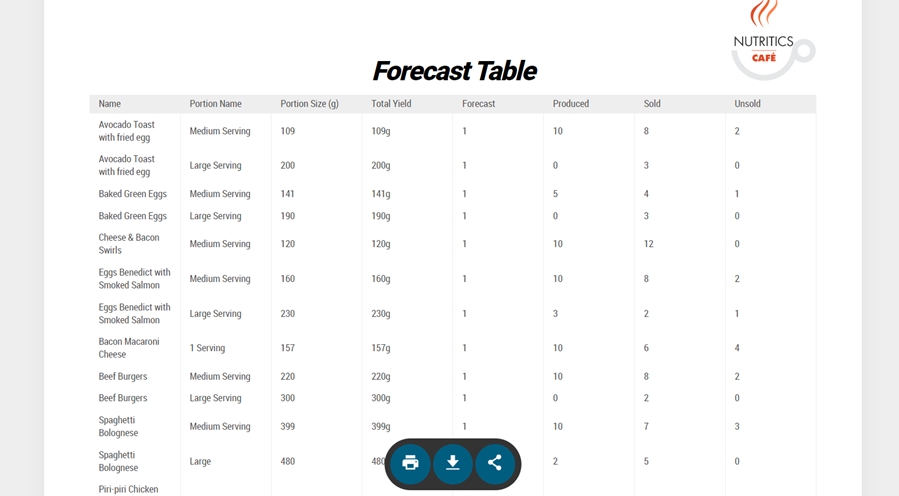
Click ‘Include Forecast Table’ to insert forecasted amounts at the beginning of the page. This will sync forecasted, produced, sold and unsold servings directly from your menu. Alternatively, open the desired menu with these input numbers and click ‘Export to > Shopping List or Production Sheet’ to sync figures. Where these columns were blank on a menu they will remain blank for the export, allowing you to populate later:
CREATING SHOPPING LISTS FOR MENUS
Shopping lists can be generated for menus in a couple of different ways.
FROM THE START MENU:
- Click on the menus tab to generate shopping lists for your menus (1)
- Use the filters along the top to open a menu cycle (2)
- Click on a menu name to expand a list of menu items (3) and tick any menu items to be included on the export. Individual portion sizes are listed separately
- Specify the number of portions to be included in the export (4)
- Select your grouping preferences and whether costs, production steps or a blank forecast table should be included in the report (5)
- Click ‘Go’ to generate the shopping list (6)

FROM THE MENU WORKSPACE:
You can use the popularity and forecasted monitors in menus to generate a shopping list for your menus.
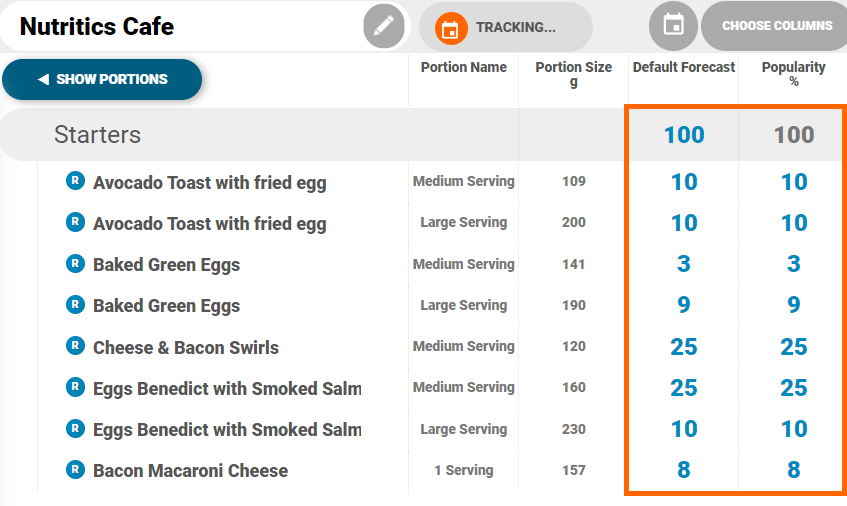
- Open a menu and click ‘Choose Columns‘
- Enable the ‘Popularity (%)‘ and ‘Default Forecast’ columns under Administration
- In the menu workspace, estimate the popularity of menu items by percentage. Note the popularity of each menu group must add up to 100
- Add the total number of forecasted servings required for the menu group e.g. 100 covers
- Nutritics will then calculate the number of servings for each menu item based on the popularity percentage input:
- Click ‘Export to’ in the top right corner of the screen and select ‘Shopping List’ to open the Shopping List tool
- Items in your menu will automatically be selected along with the forecasted servings. You can add additional menu items by clicking on them or change the number of servings if needed:

- Specify your export preferences in the bottom bar and click ‘Go’ to generate a shopping list.
FROM THE LIVE ORDERS DASHBOARD:
Generate a shopping list of orders placed via your digital menus. This is useful where customers order in advance.
- Open the live orders dashboard from the Nutritics Content Explorer
- Click on the ‘Export To‘ menu in the top right corner of the screen to open the Shopping List tool
- Items that were in the order dashboard will automatically be selected. You can add additional menu items by clicking on them or change the number of servings if needed.