If the food labeling maker tool is not available on your account, it is available as an add-on from Menu > Add Features.
This guide will show you:
- How to access the label maker
- How to create a label
- Adding elements to a label
- Using label templates
- Exporting and accessing labels after creation
Accessing the Label Maker
The label maker can be used to create food labels quickly and easily for your products and recipes. It can be accessed in a few ways.
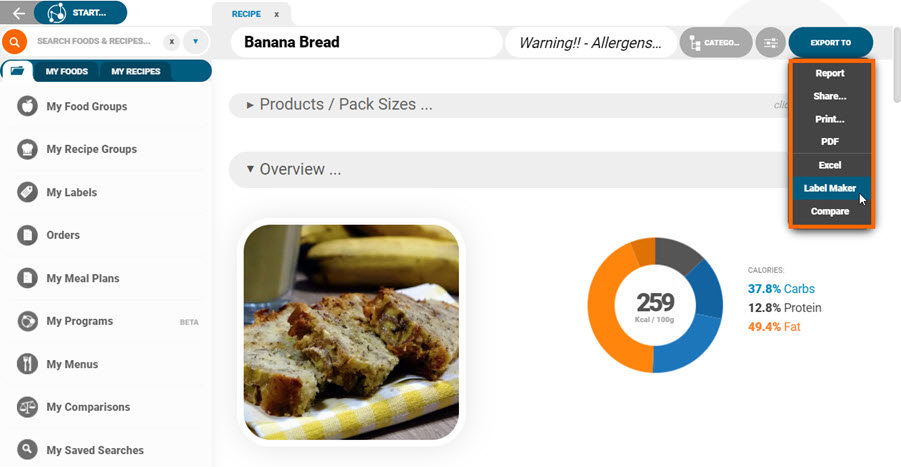
Option 1: Open a food or recipe and select Export To > Label Maker
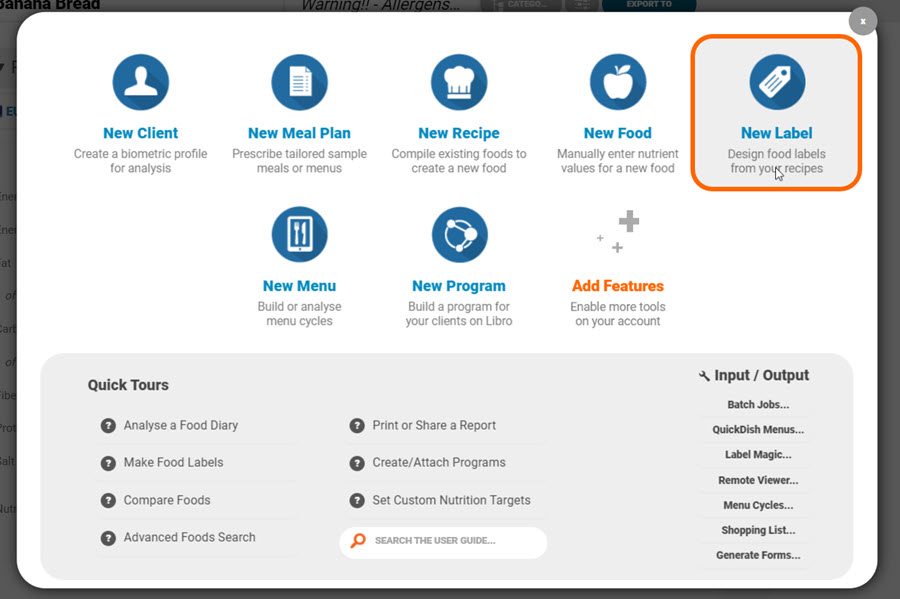
Option 2 (recipe only): Open a recipe and click on ‘+New Label’ in the food labelling section
Option 3: Click the Start button and select ‘New Label’ then choose the food or recipe you would like to make a label for
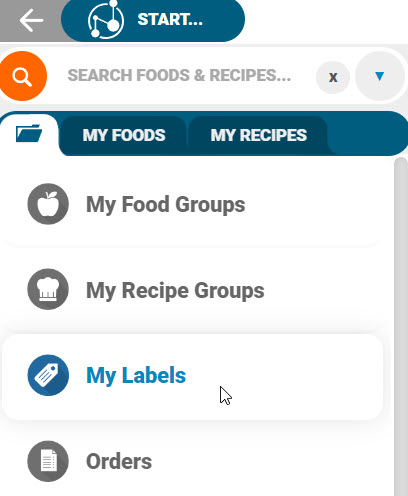
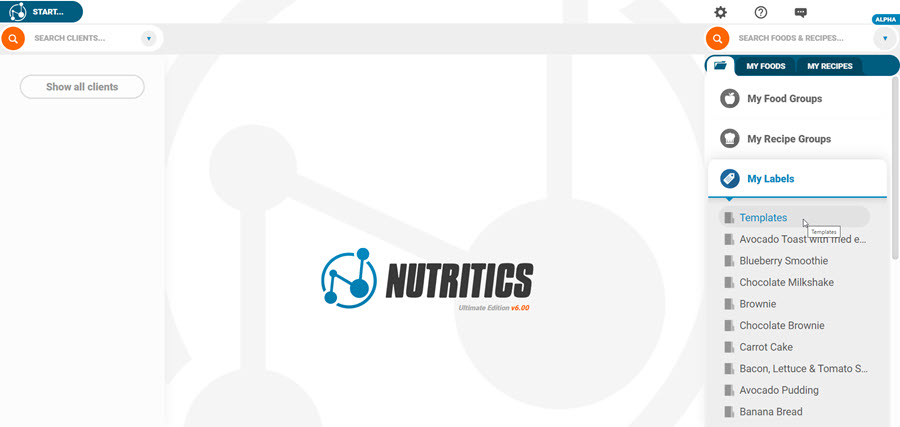
Option 4: In the Nutritics Explorer click on ‘My Labels’ and click ‘+New Label’
Creating a Label
In the Label Maker, select a pre-made label template and customise this as needed, or start from scratch.
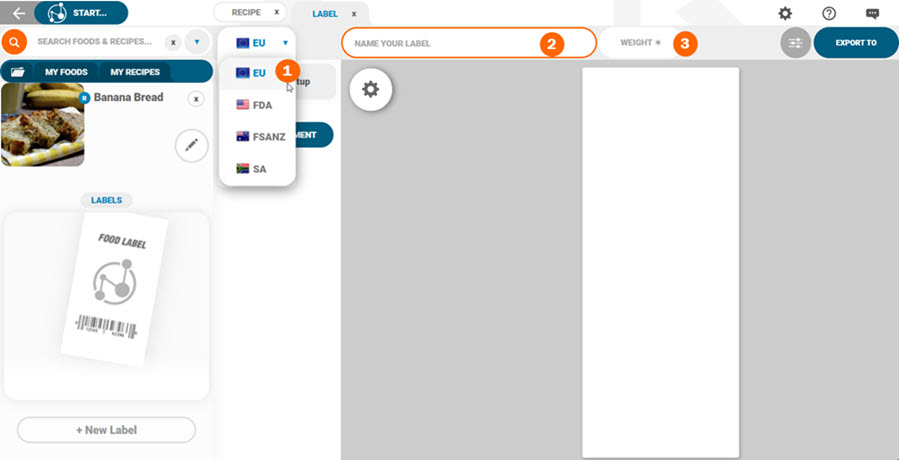
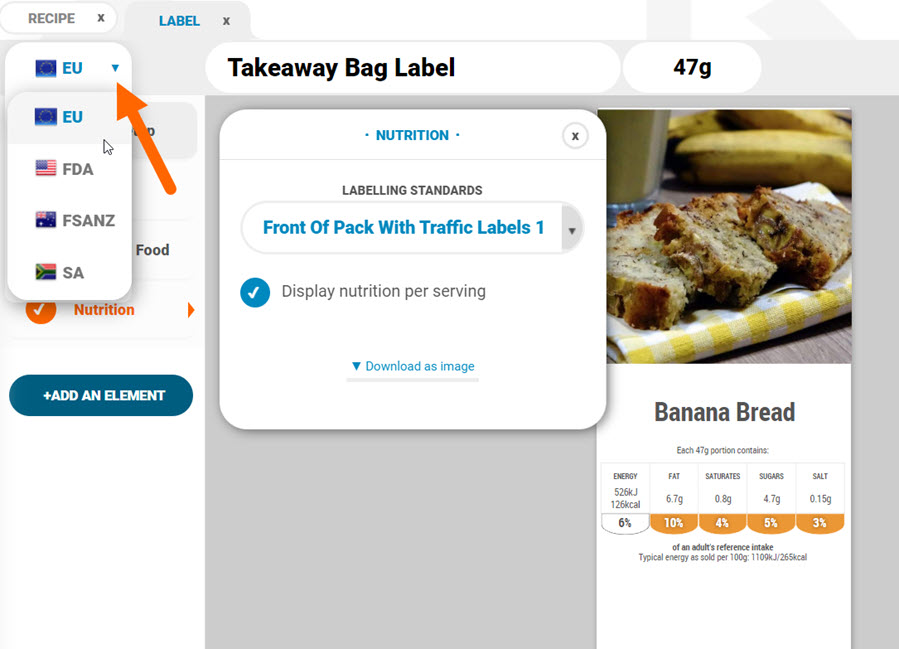
(1) Your region can be changed here. This will determine the labelling standards applied to the label.
(2) Give the label a name.
(3) Enter the weight of the product.
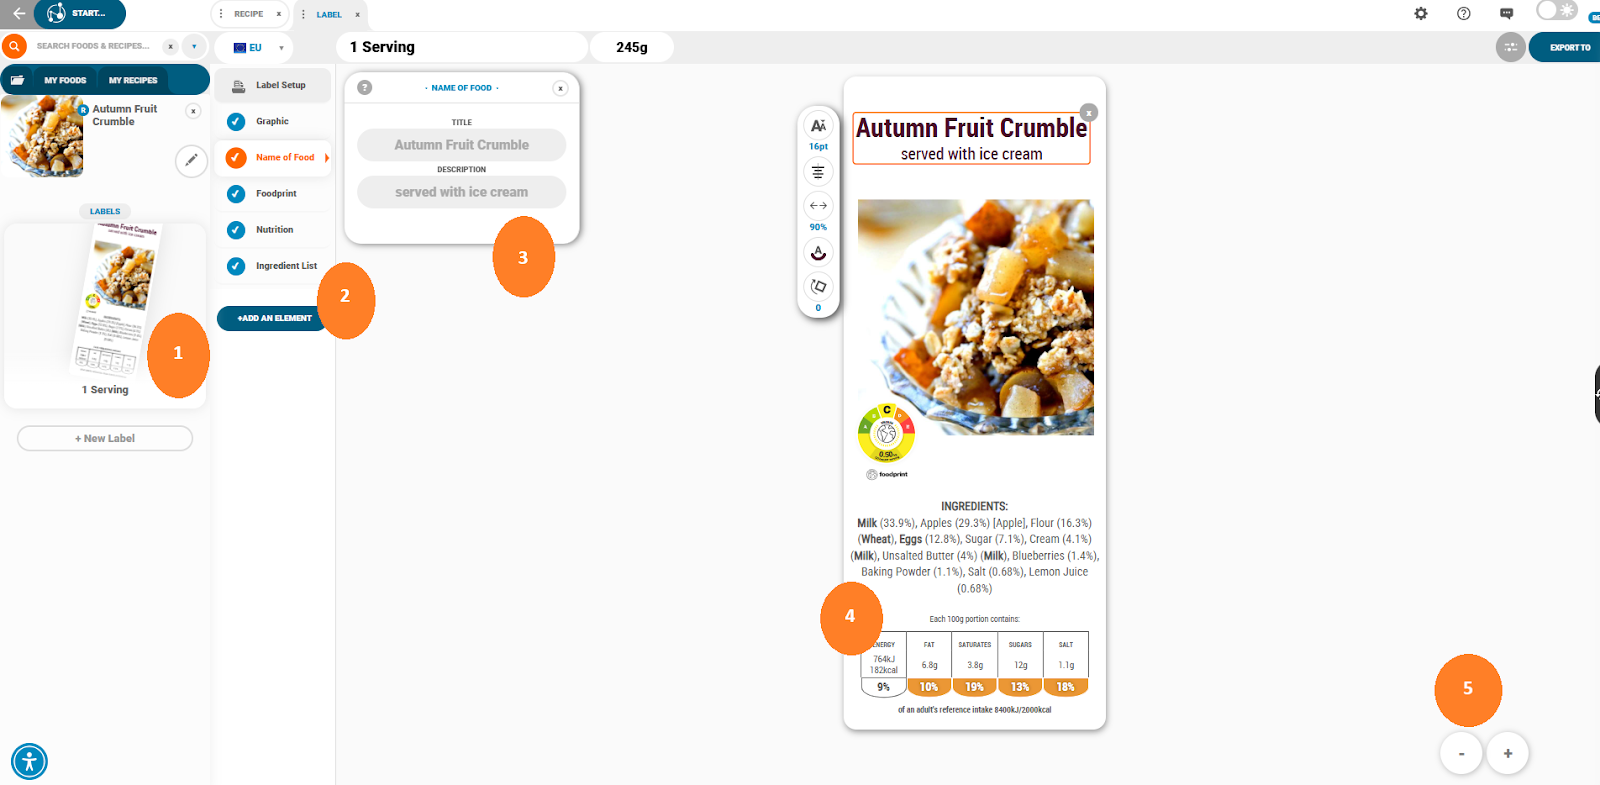
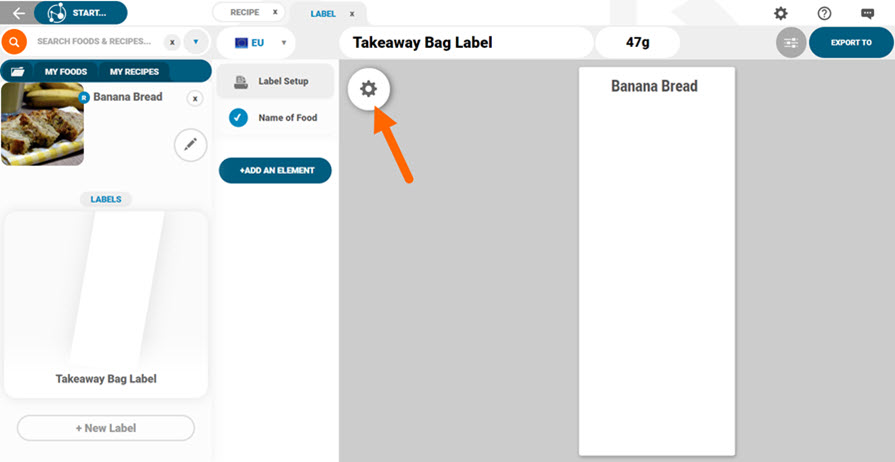
The label maker is set up in a series of side-by-side panels, similar to the main Nutritics interface.
Panel 1: This is a list of labels created for this recipe or food. Additional labels can be created for this recipe by clicking ‘+Add Label’.
Panel 2: Add elements to the label from this panel. Elements include graphics, text, nutrition facts panels etc.
Panel 3: Customise elements from the panel that expands when an element is selected from the list of elements. Click on the ‘x’ icon to close this panel. It can be reopened by clicking on the cog icon that appears.
Panel 4: Finally we have the label workspace. Elements can be resized and repositioned here and clicking on an element here will open a format bar where elements can be further customised.
Panel 5: Zoom in on the label using the + and – buttons in the bottom right corner.
Set the label dimensions in the ‘Label Setup’ panel by setting the width and height of the label:
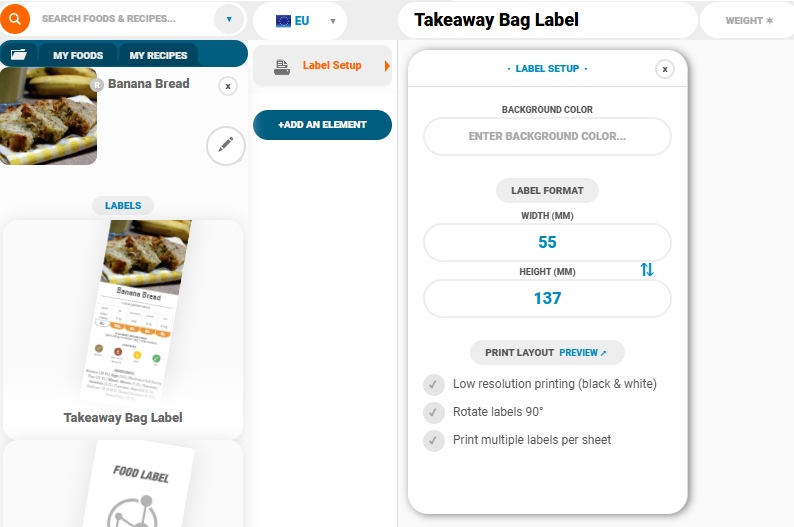
It’s important to make sure that the dimensions set up in the Nutritics label maker match label rolls the labels will be printed on and the dimensions in your printer settings. You can set the printer dimensions by opening your printer properties and going to the printing preferences. We have a separate guide on this here.
At this point, you can also set a background colour for the label if desired.
- Tick ‘Low-Resolution Printing’ to print in black & white
- Determine if you want your labels to be flipped 90 degrees for printing
- Print multiple labels per sheet e.g.on an A4 sheet you can set how many labels will be printed
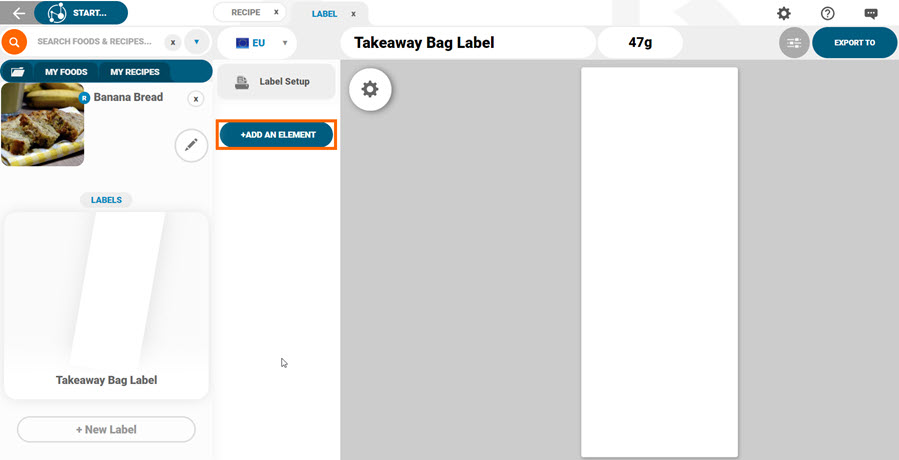
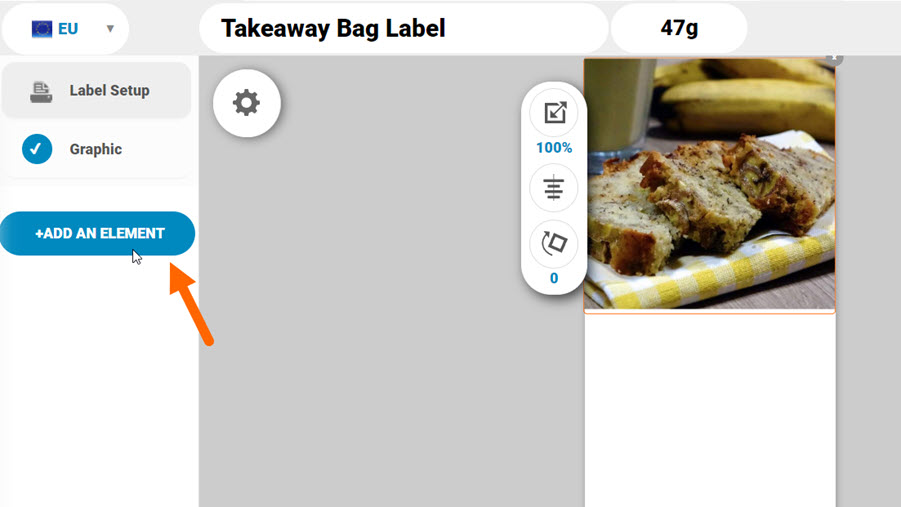
Adding Elements to a label
Click ‘+Add An Element’ to get started. Click on any element to add it to the label.
Elements can be customised in the panel that expands. Click on the ‘X’ icon to close the panel. Click on the cog icon to expand it again.
Elements can be arranged on the label by clicking on them on the label workspace and dragging them into position.
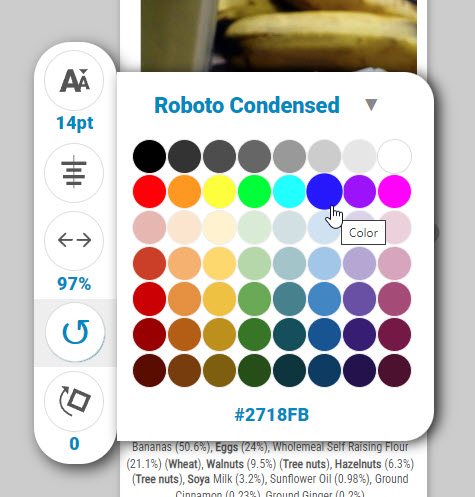
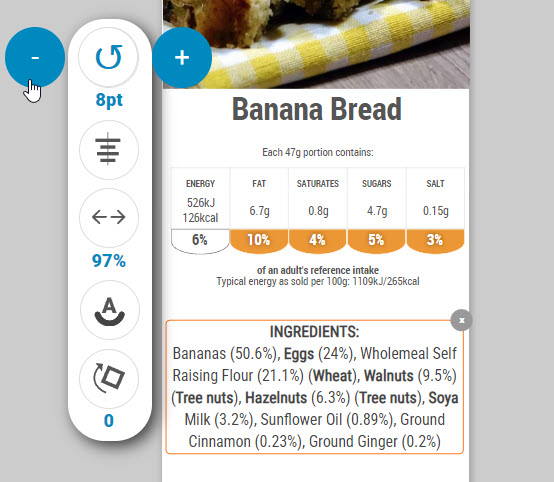
When an element is selected a formatting bar appears. From here, elements can be resized, aligned, rotated and for text elements, the width of the text box, font and font colours can be changed:

Click on the font icon in the format bar to edit the font style and colour:
Click on the ‘x’ icon to remove an element from the label:

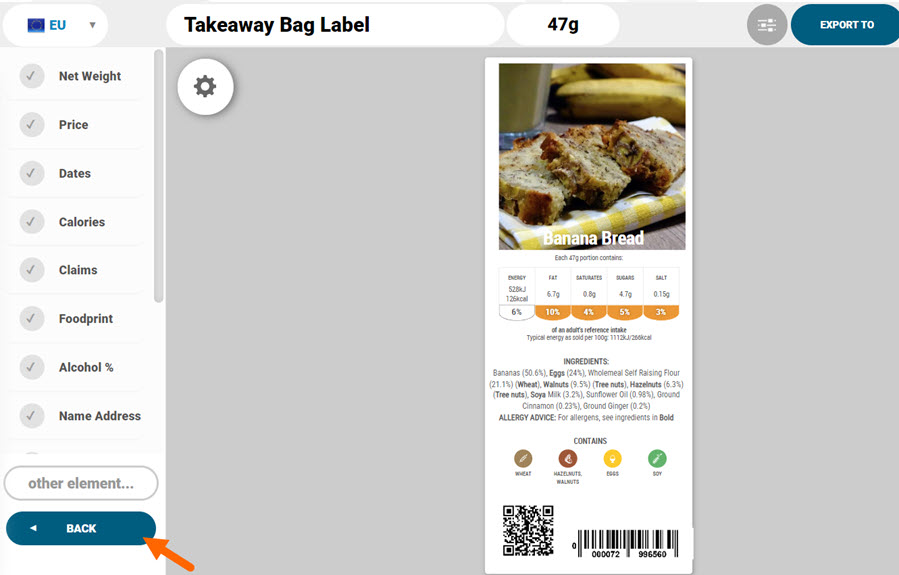
Once you are done adding elements to the label, click back to see all elements enabled on the label:
Graphics
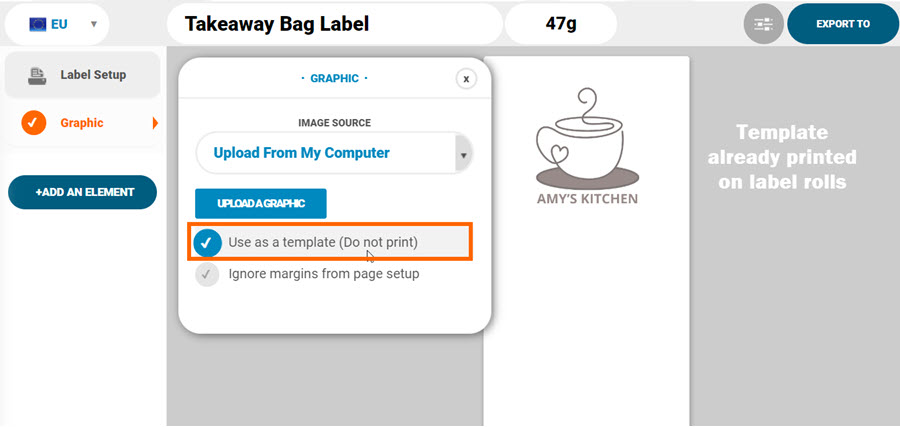
In the graphics element, you can add your logo or upload images and templates to your label.
Click Use as Template if you have pre-printed label rolls or sheets – this means the graphics won’t be printed but will be shown on the label workspace so other elements can be positioned around the image.
Background templates should be the exact same aspect ratio as the finished cut label. In cases where the cut label is an irregular shape, the template should contain the entire finished cut label exactly. The image resolution is not important as it will not be printed but we recommend at least 72 pixels per inch for reasonable quality in the editor.
Also please note that the label maker does not natively support bleed, or PDF or EPS files – they must be raster graphics – png/bmp/jpg/gif/tif.
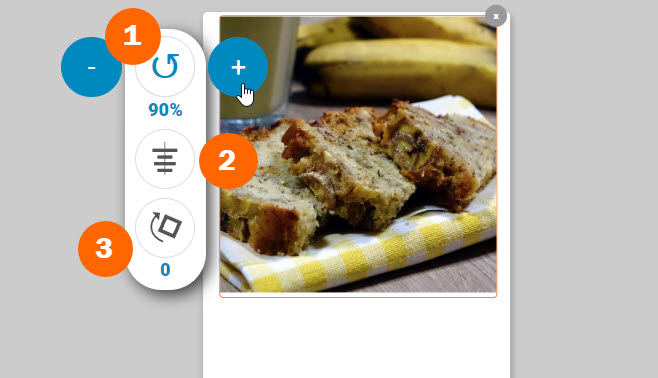
Click and drag the image on the label workspace to reposition it.
(1) Use the plus and minus buttons to resize the image, or type directly into the box to change the size.
(2) The image can be aligned by clicking on the alignment icon.
(3) The image can also be rotated by clicking on the plus and minus icons beside the rotate icon or by typing the number of degrees directly into the box.
To add more than one graphic to the label, click ‘+Add An Element’ and then select ‘Other Element’ and select the graphic option from the drop-down menu.
Name of Food
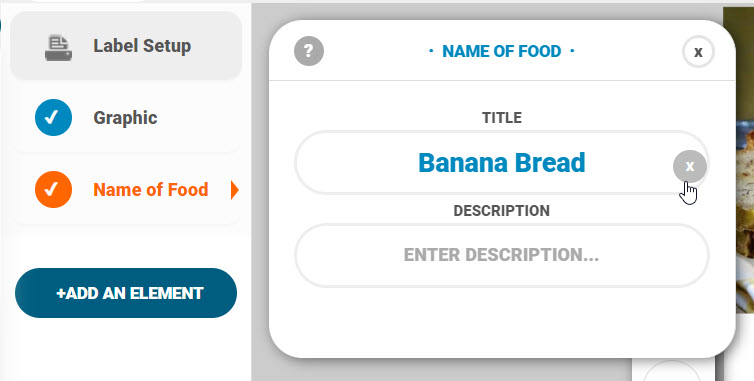
To add the name of your product tick the ‘Name of Food’ element. In the panel that expands, add in the product name and an optional description. By default, Nutritics will pull in the food/recipe name as the name of the food. Change the text here using the pencil icon. It will not change the recipe details. You can refresh to the original recipe name by clicking the ‘x’ button:
Reposition the name of the food by clicking on it in the label workspace and dragging it into place.
The font size and text box width can be changed in the formatting bar using the plus and minus buttons or by typing directly into the box.
Change the font colour by selecting a colour from the options provided or type in a colour code. The font can also be rotated and aligned.

Net weight
Specify the weight of the product on your label using the weight element. The net weight is the weight of the product excluding packaging. You can choose to include the drained weight and the estimated weight symbol also.
Price
Specify the sale price of the product in the price element. This will sync across from the food/recipe workspace if input. Click the pencil icon to edit this. It will not change any cost on the food or recipe.
Dates
Set the date format and preparation date.
(1) Click the small circular arrow under the ‘Preparation Date’ box to input today’s date
(2) Tick Automatically update on print to automatically update all dates enabled on the label to the date of printing
(3) You can then specify the number of days durability for ‘Sell By’, ‘Best Before’ and ‘Use By’ for your product. Toggle on the ‘Printed Date’ to automatically print the date when printing. A placeholder will be inserted on the label to save space.
(4) If you have our custom fields feature, you can input a ‘Shelf Life’ in the Modifiers & Properties tab in the recipe workspace. This will automatically inform the ‘Use By’ and ‘Best Before’ dates here. You can click to edit these using the pencil icon if needed.
(5) Input a time of preparation date to be printed on the label. Click the round arrow to refresh this to the current time. Toggle the ‘Use By’ on to allow this time to inform a ‘Use By’ time as well as date.

To add more than one date to the label, click ‘+Add An Element’ and then select ‘Other Element’ and select the Date / Timestamp option from the drop-down menu.
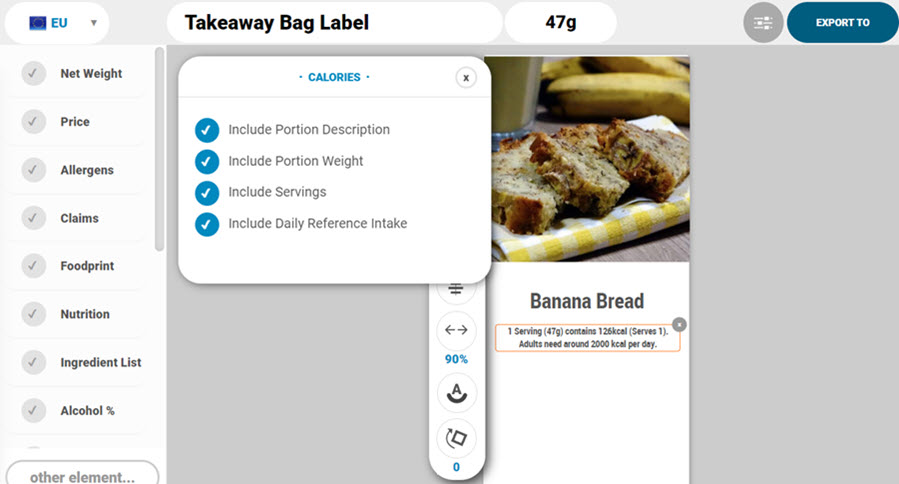
Calories
Toggle this element on to display calorie information on your label. Remember to choose a portion size option at the top of the screen.
Click to include the associated portion description from the recipe workspace, the portion’s weight or how many servings it contains. You can also include a daily reference intake to put this into perspective for your customers.
Allergens
Toggle on to display allergens as text or icons on your label. Allergen information is pulled from your recipe in real-time and cannot be edited in the Label Maker.
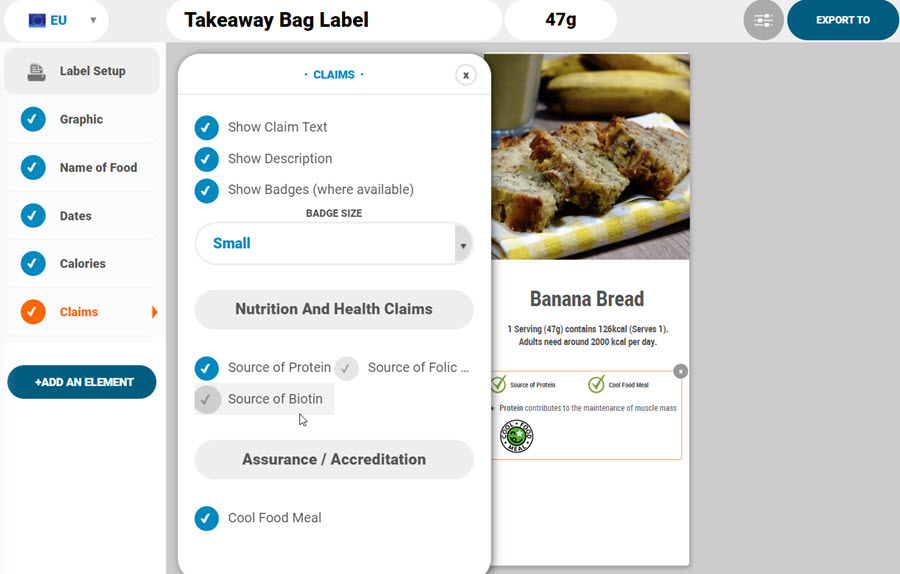
Claims
If Nutritics has indicated that nutrition and health claims can be made for the recipe, these can be added to the label by clicking on the claims element. Nutritics won’t indicate any claims that cannot be made for your recipe.
Decide whether to show the claim text, description of the claim (attached health benefit) or the badge where available. You can then choose the badge size.
Enable specific claims on the label using the tick boxes:
Foodprint
Add a Foodprint badge to your product label syncing information directly from the recipe workspace. Choose your badge type and details included.
Nutrition
The labelling standard applied can be changed from the region dropdown.
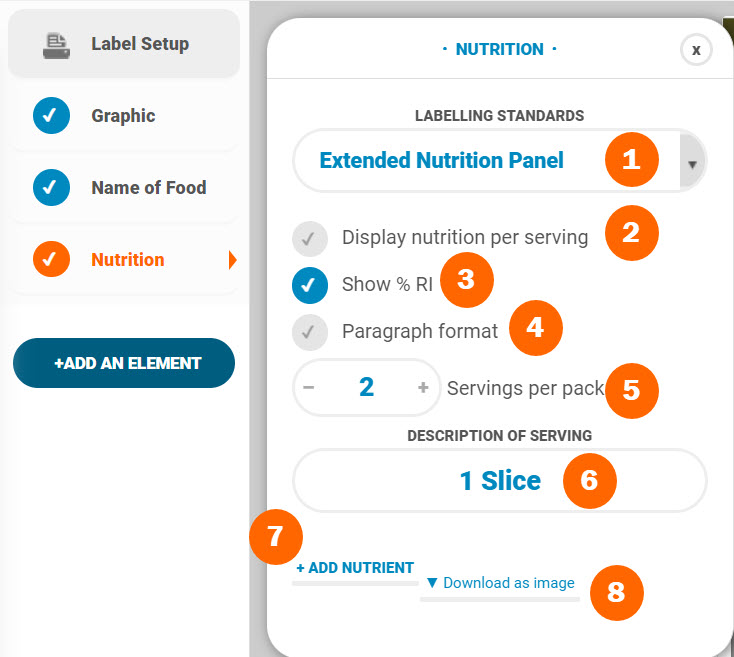
(1) In the nutrition element, choose the style of the nutrition panel e.g. front or back of pack
(2) Depending on the style set, tick to also display the nutrition per serving
(3) Tick to display the nutrition as a percentage of the reference intake of an average adult
(4) Tick Paragraph format to display your nutrition panel in text only
(5) Servings will sync from the food/recipe Edit this by clicking the pencil icon if needed.Use the plus/minus buttons or type a number directly into the box.
(6) Add a description of the serving e.g. 1 cup, 1 carton by clicking the pencil icon
(7) Click ‘+Add Nutrient’ to add additional nutrients to the nutrition panel. Note that only nutrients present in adequate amounts will show here.
(8) The nutrition panel can be downloaded as an image
Click and drag the nutrition panel in the label preview to move it. Resize, align and rotate the panel using the formatting bar.
Ingredient list
This is an editable text version of the food’s ingredient list and quantities / QUID. This list pulls directly from your food/recipe. Instead of editing the text here, we recommend that changes to the ingredient list are made on recipe ingredients (learn how to do this here). If necessary, click the pencil icon to edit the list and stop syncing from the food/recipe. You will be notified of this every time you open the label:

Edit the text using the format options.
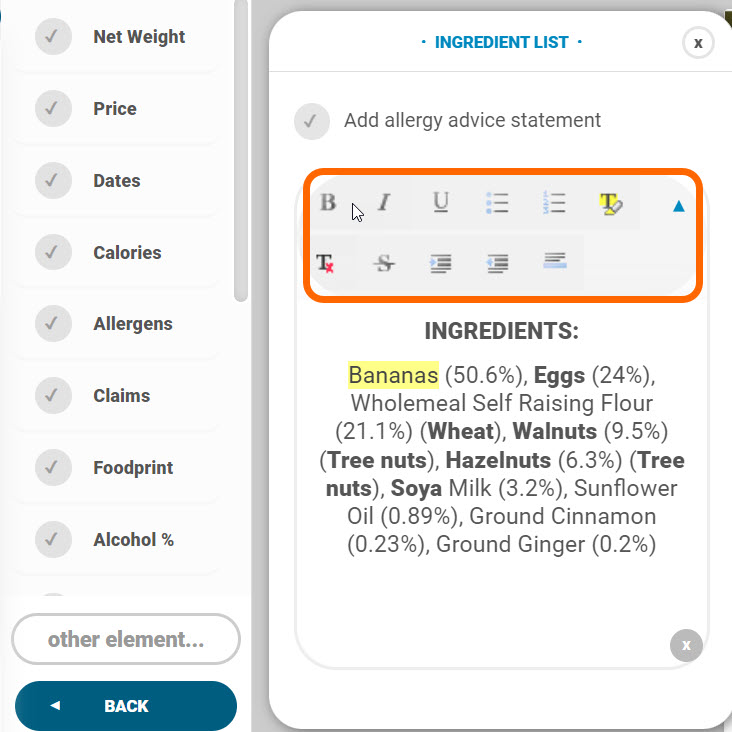
Adjusting the text here does not change the QUID on the food or recipe development workspace. To revert to the original ingredient list, the X button and the ingredient list will refresh. The text can also be formatted in the label workspace.
Choose to include the Allergy Advice Statement on your ingredient list also. This will notify people of any allergens that may be contained within the product.
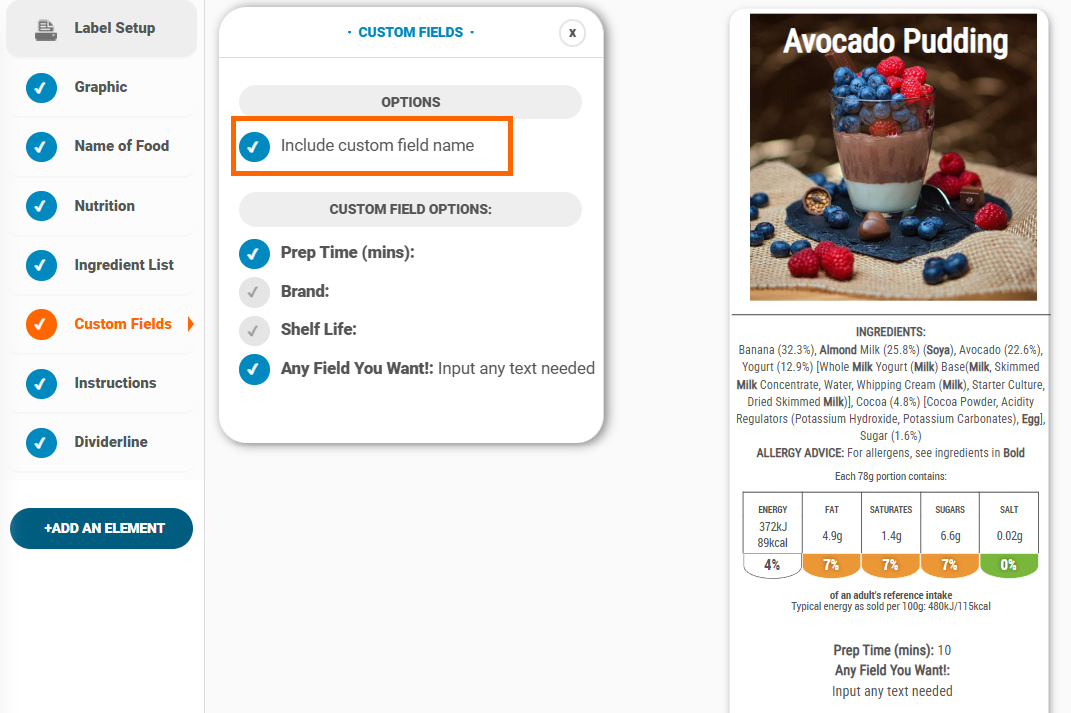
Custom Fields
To add custom fields, toggle the Custom Fields element on. Custom fields added to the food or recipe will be available here to select. Selecting multiple fields will add them to the label as one block:
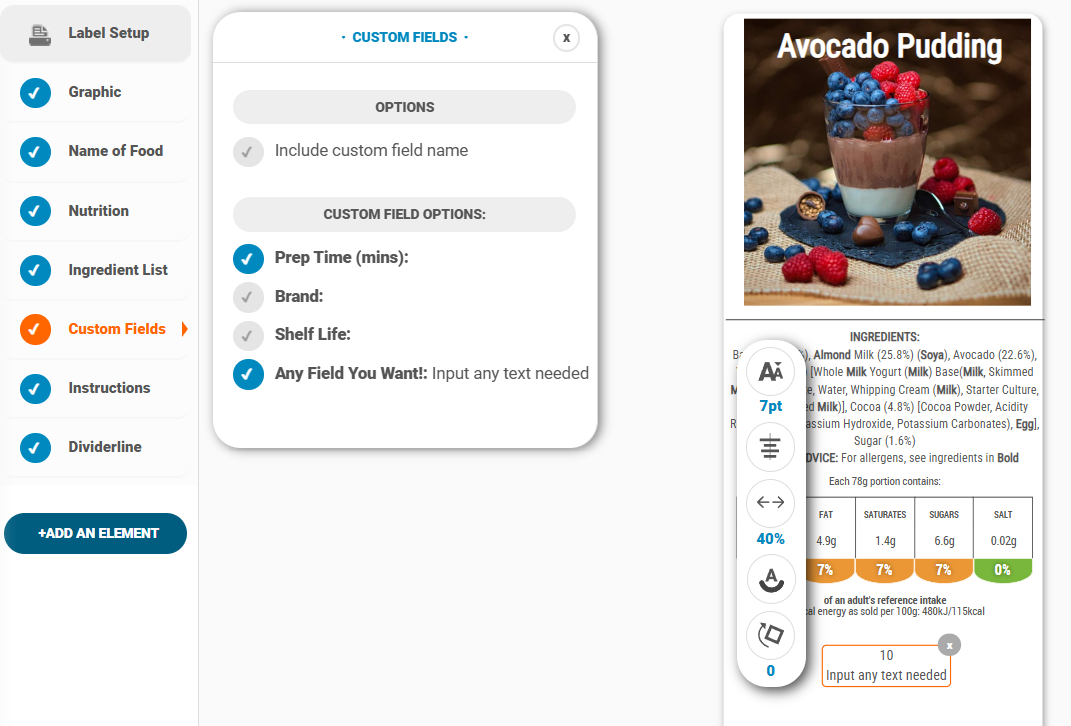
To include the custom field name, tick the ‘Include custom fields’ name option:
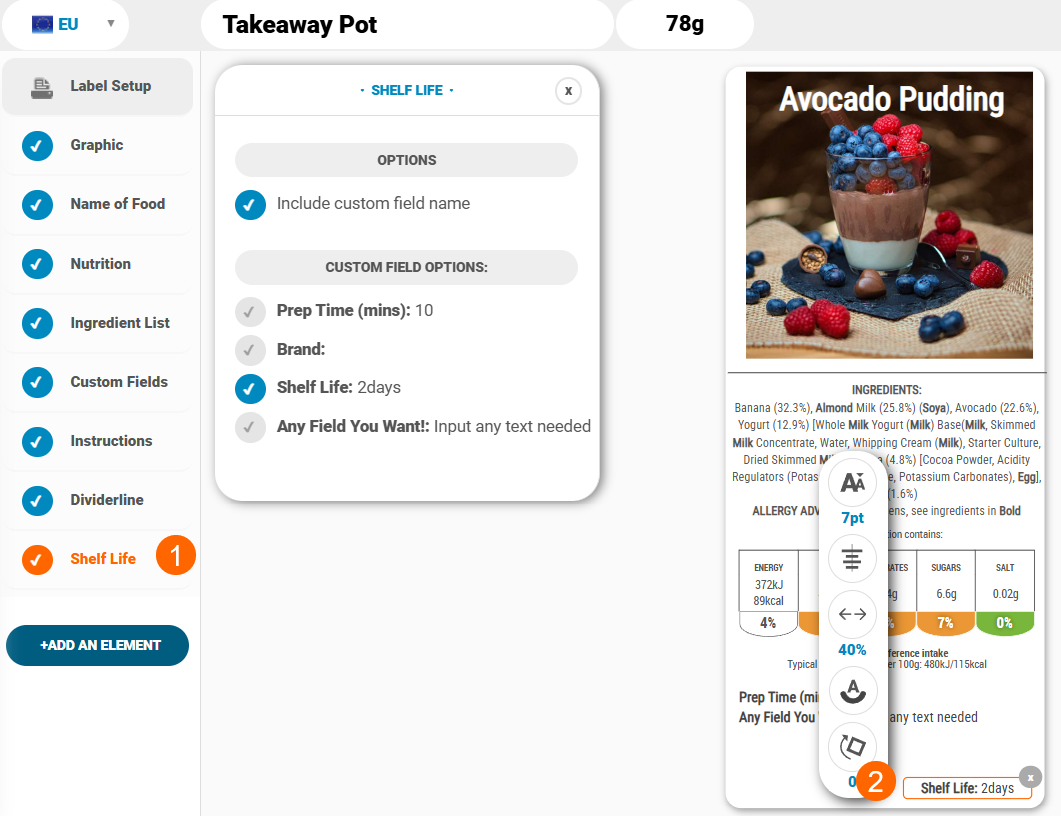
To add an additional custom field separate to the others on the label, click ‘+Add An Element’ and then select ‘Other Element.’ Select the custom fields option from the drop-down menu and name the custom field. Finally, select ‘Add Element’:

The additional element will be added to your list of label elements (1). This panel will repeat the list of custom field options that are on the recipe, allowing you to add an additional element anywhere else on the label (2):
Alcohol
Toggle this element on to indicate the alcohol by volume on your product label.
QR Code
Include the QR code element on the label to auto generate a customised QR code.
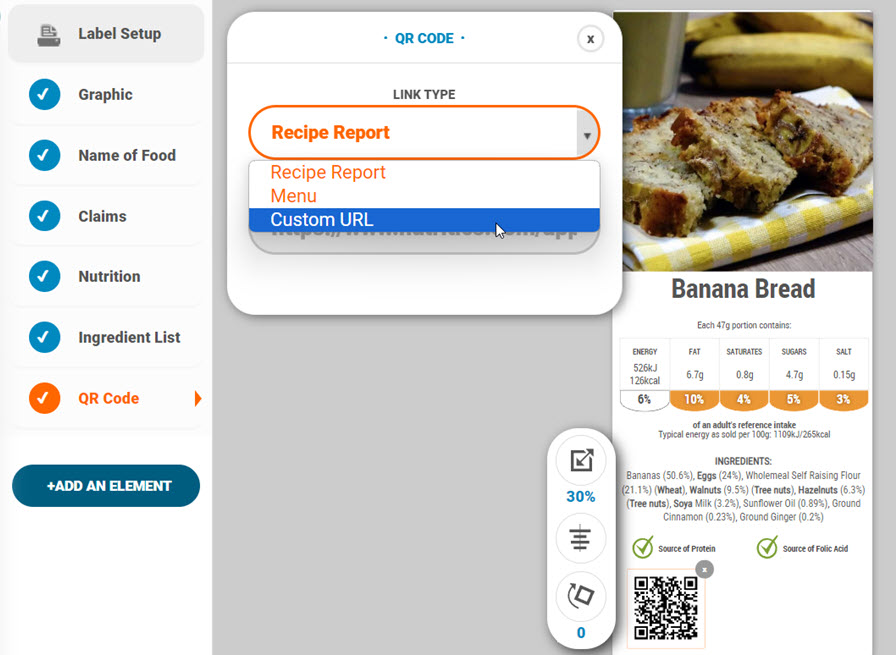
- Choose Recipe Report to direct customers to the product’s information including an ingredient list, nutritional information, recipe notes, portion sizes and allergens. This information will sync directly from the recipe workspace.
- Include a QR code for a menu and select the menu from the list. Customers will be directed to the digital menu after scanning. Please note a menu must be live to load.
- Choose ‘Custom URL’ and input a direct link to another website or address.
Name Address
Free text box to include your company name and address.
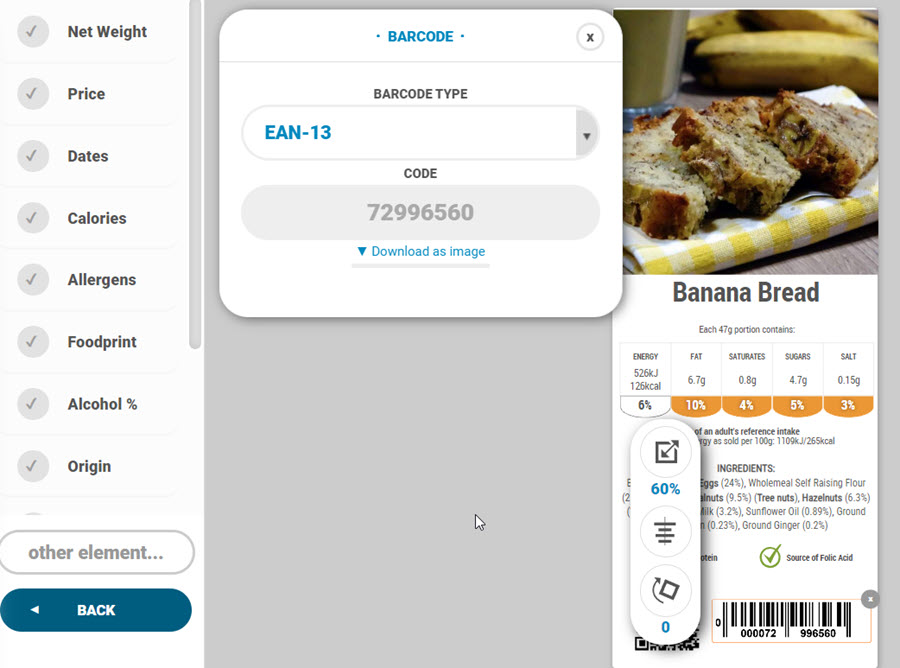
Barcode
Choose your barcode type and input the numeric values to generate a printable barcode for your product. This will sync from the food/recipe if a barcode is input for the portion selected. The barcode can also be downloaded as an image.
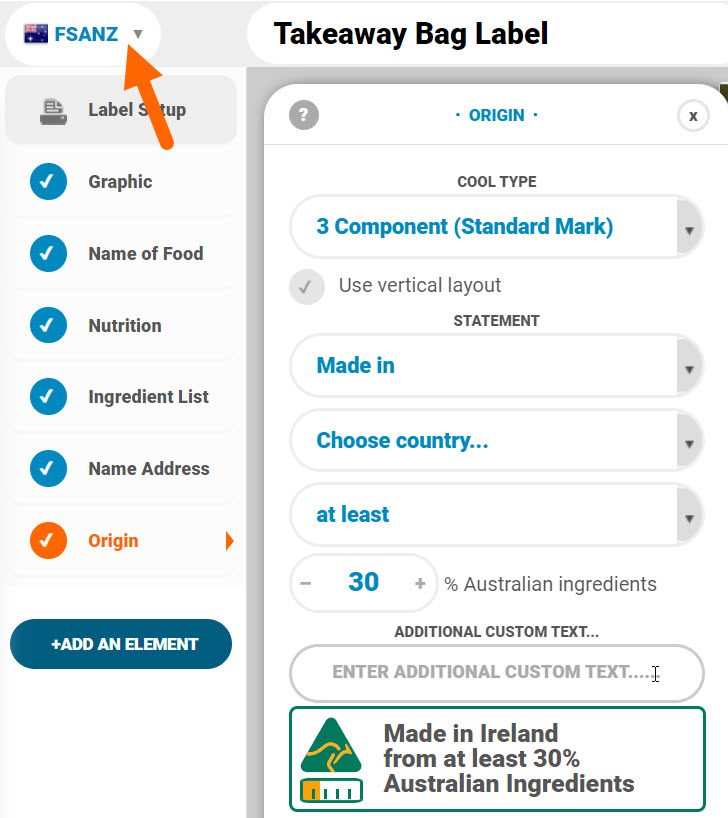
Origin
Specify the country of origin of your food in the origin element. This will add a badge to the label with the country code.
If the labelling standards are set to FSANZ, the origin element facilitates the Australian Standard Mark.
- Choose the Cool Type and the vertical layout if preferred
- Input the details for the statement and view it change at the bottom of the panel or on the label
- The percentage of Australian ingredients will sync from the food/recipe’s country of origin if input.
Instructions
This element is pre-populated with the instructions from your recipe workspace. This is not an element on foods at the moment. Editing the text here does not affect the instructions in the main recipe workspace. Use it to give the consumer additional information, such as cooking or storage instructions for the product.
Traceability
Include a batch code or Julian date to represent the date a product was manufactured or packaged. You can see a guide on this here.
Storage
Include storage instructions for the product e.g. Suitable for home freezing. This will pre-populate if the information is included in the recipe workspace.
Dividerline
Add a divider line to your label to break up the space. Control the thickness or height of the line using the +/- buttons. Choose between solid, dashed, dotted or double lines.
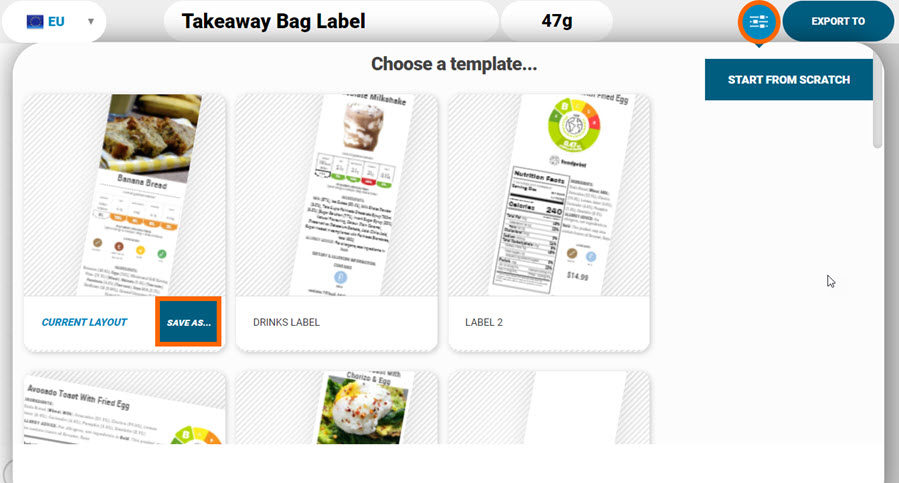
Label Templates
Once label creation is complete, it can be saved as a template and reused for different products by clicking on the grey slider icon and clicking ‘Save As’. The next time the label maker is opened, the template will be accessible from here.
You can also access label templates via the Nutritics Explorer menu. The templates folder show at the top of the ‘My Labels’ list:
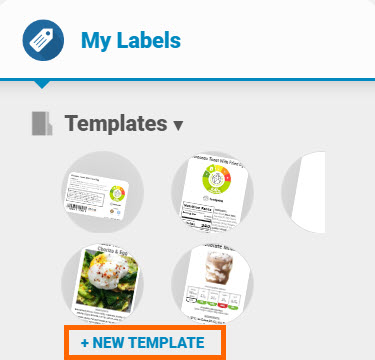
Open the folder and click ‘+New Template’ to create a new template from scratch.
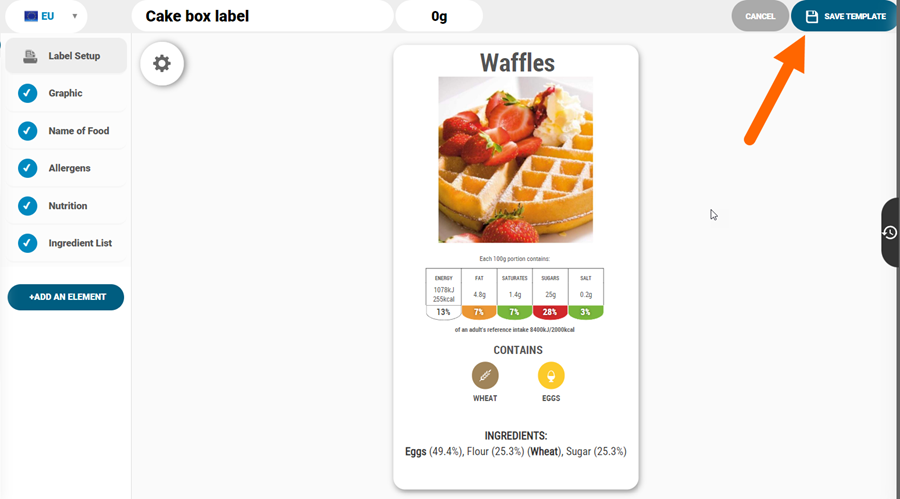
Design the new blank template using the desired elements and choose ‘Save Template‘ in the top left corner. This template can then be applied to any recipe or food within the Label Maker or Label Magic.
When a pre-existing template is opened from Nutritics Explorer, it will apply the recipe initially used to create the template, or the most recently opened recipe.
Exporting Labels
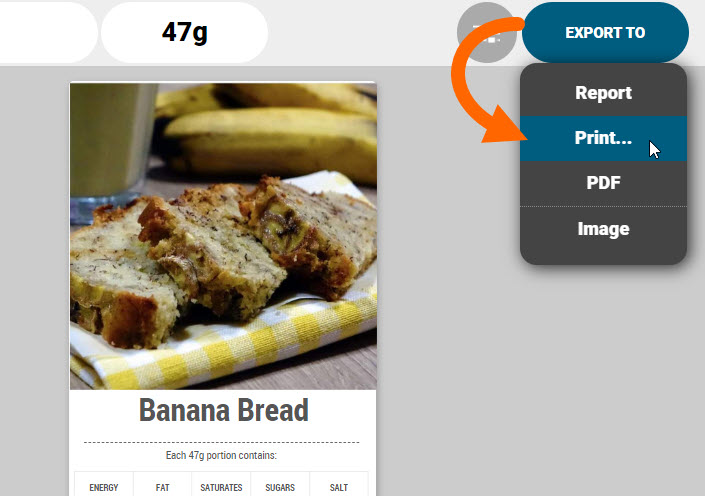
Print directly to a label printer or onto paper on any regular inkjet/thermal printer; or download your label as an image.
Export the label to a live report to preview how the final version will look.
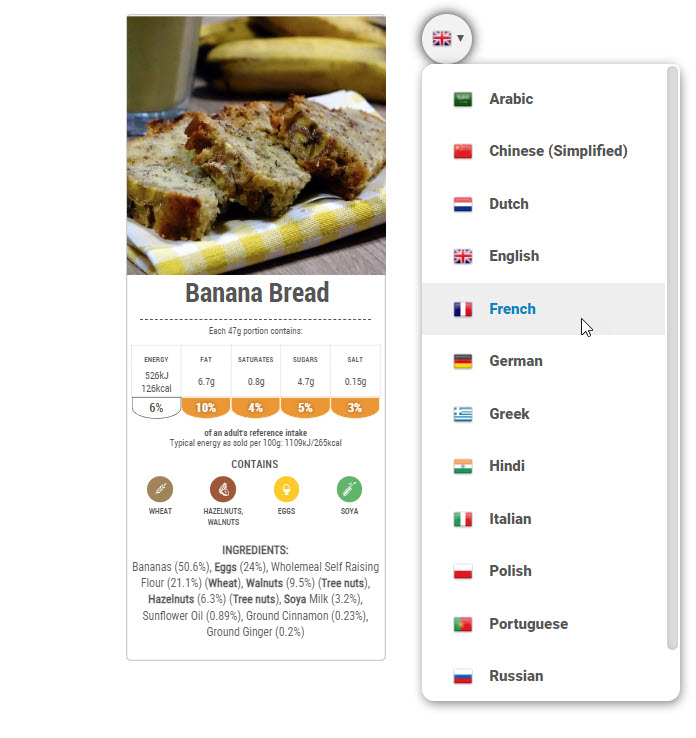
Label headings can be translated by clicking on the language drop down in the top right corner of the label report:
To print your labels in bulk, see our guide on Label Magic.
Accessing labels
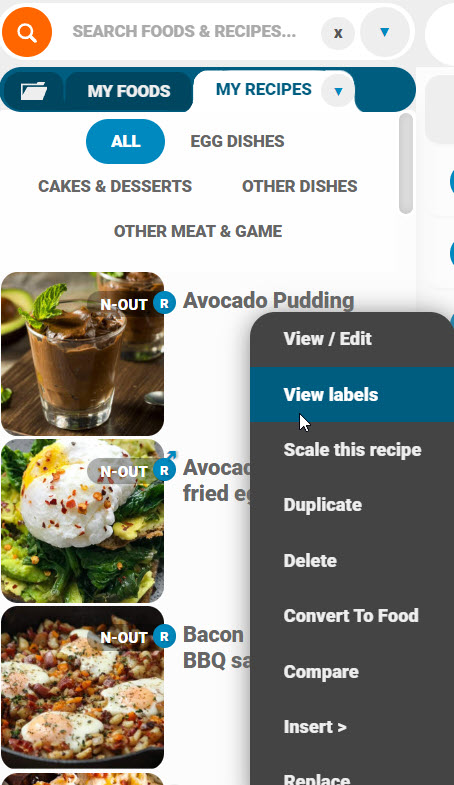
Once created, labels are accessed by right clicking on a recipe and selecting ‘View Label’:
Alternatively, click the ‘My Labels’ folder in the Nutritics Explorer: