If you are interested in adding meal ordering to your Nutritics account, please contact sales@nutritics.com
This guide will show you:
- How to set up your outlet in Nutritics
- How to set up your patients’ profiles for meal ordering
- How to publish your existing menus and enable ordering
- Limiting items that can be ordered on a menu
- How to manage your orders in the orders dashboard
- Filtering orders in your Dashboard
- Dietary Mismatch Warnings
- Printing dockets and receipts
If you have not already built up your menus in Nutritics, please see our guide on menu creation here.
If you have not already created a patient profile in Nutritics, please see our guide on this here.
If you are interested in adding meal ordering to your Nutritics account, please contact sales@nutritics.com
OUTLET SETUP
To enable ordering on your account you must first set up your outlet on Nutritics.
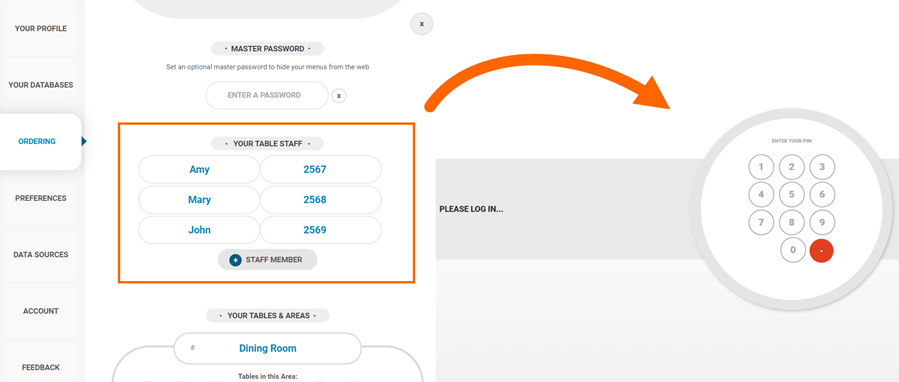
- From the cog icon in the top right corner of the screen, click Settings > Ordering
- Search in the search bar and select your outlet from the list
- Add in your outlet details
- Add your outlet’s social media accounts in order to be able to share your menus to social media platforms directly
- Set the width of your thermal paper rolls used for docket and receipt printing. Dockets and receipts can be printed from the orders dashboard
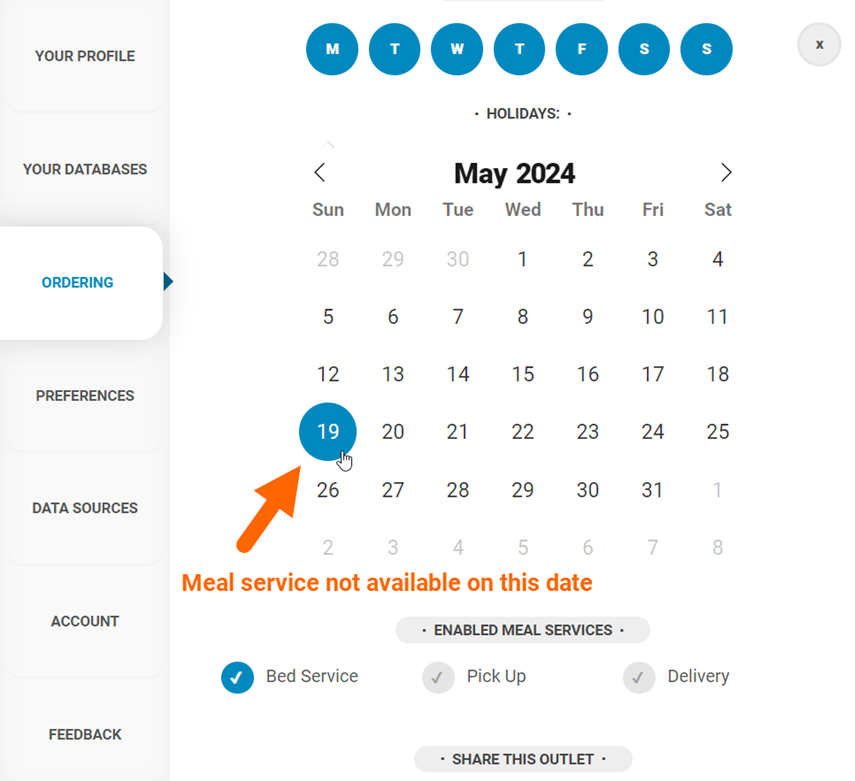
- Tick the days that your outlet is open to take orders. If ordering is enabled on your menus, patients will only be able to order on days the outlet is open. Use the calendar to mark any holidays on which the outlet is closed. Patients will not be able to place orders for those days:
- Under the meal services heading, specify how your patients can receive their orders e.g. bed service, pick up
- Choose how your outlet is set up i.e. beds and wards or rooms and floors.
- If desired, share your outlet with other Nutritics users. Type a Nutritics username or email address to enable sharing with the user. If your licences are part of an organisation or group, you will see all users of the organisation when you click ‘+Add User’. You can also choose to share with all account holders within the organisation. You will have the option to share the outlet with read only or read & write privileges after adding a collaborator
Payments
If required, allow patients to pay for their order directly from menus.
Payments will be collected by Nutritics payment partner Stripe. Follow the instructions on screen to connect Stripe with your Nutritics account and add details including where payout from orders should be deposited. By default, payouts will be made to your bank account daily:

Once your Stripe account is connected, it can be accessed from here (Settings>Ordering>Launch Stripe).
PATIENT AND ROOM SETUP
- Please see a guide here on how to set up patient profiles.
- Set up the staff and beds/wards or rooms/floors. If desired, staff members can be assigned pin codes that they will need to enter to gain access to menus. If staff members log into a menu and then a patient orders from that menu, you will be able to see the staff member associated with the order in the orders dashboard.
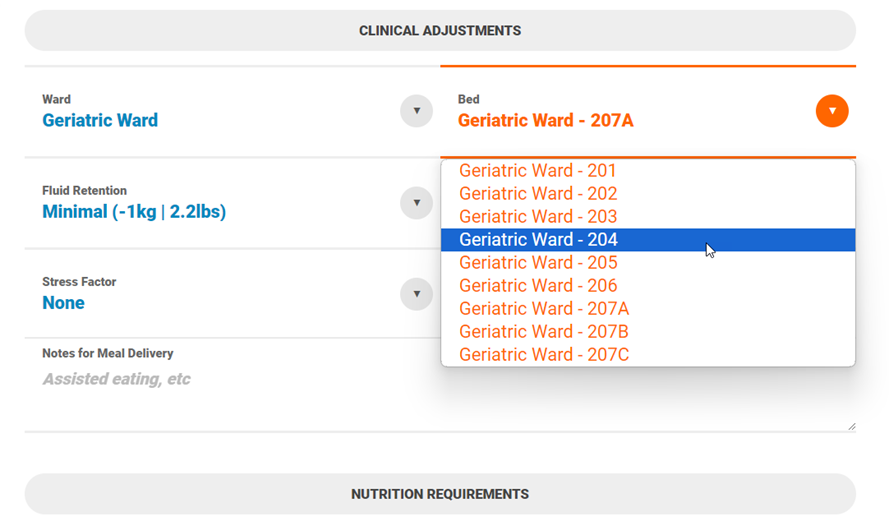
- Specify the beds/wards or rooms/floors:

Pro tip: A bed/room and ward/floor can be assigned to a patient in the patient profile.
- Over in the patient profile, the number of occupied beds is visible for each ward:

- If a bed is already occupied, it will appear greyed out (as shown below), and you won’t be able to assign a new patient to it.

- Once a patient has been assigned a bed, they can be either reassigned to a different bed or checked out as needed.

- When checking a patient out, you’ll have the option to adjust the check-out date and add a note to accompany the check-out, if needed.
- If a patient is moved, all meals associated with that patient will move with them.
- If a patient is checked out, all meal orders for that patient will be cancelled.

In QuickDish, you can change the patient’s bed when ordering a meal. Open the patient and click the bed icon in the top right:
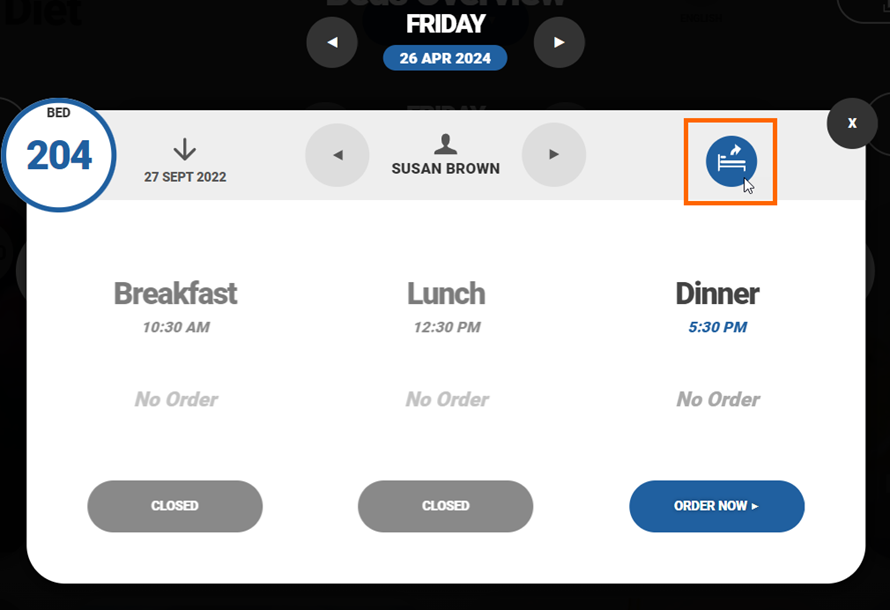
Choose a new bed or remove the patient from the bed by choosing ‘Checkout Patient’:

You can also see the patient’s check in date or when they were assigned to the bed in the top right corner.
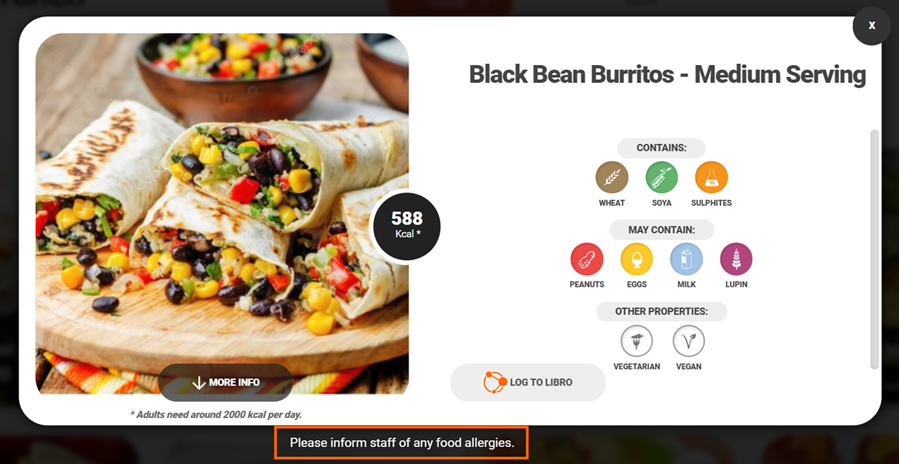
The menu can be filtered by bed/room number and the patient’s dietary requirements including allergies* and texture grade requirements** will be taken into account and any unsuitable meal options will be removed from the menu.
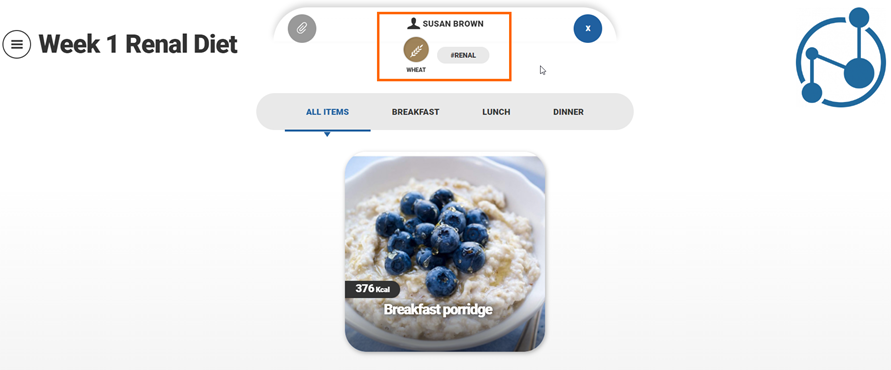
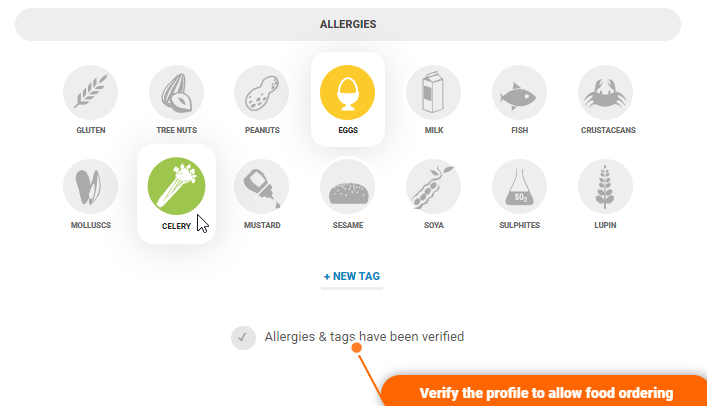
*Allergies and other dietary preferences are specified in the dietary preferences/allergies section of the patient profile:

**If a patient is suffering from dysphagia, their texture grade requirements can be specified under the grouping section of the patient profile:

Any changes made to a patient’s allergens, dietary properties or tags will require verification. Orders cannot be processed for the patient until this setting is ticked as verified:
Please note that if allergens, dietary properties or tags are edited after an order has been placed for a patient there may be a ‘Dietary Mismatch’. A warning will appear if the order contains items that do not comply with the new specified allergies or dietary preferences. An exclamation mark will clearly identify the specific items that pose a concern:

The order can be edited with this in mind using the pencil icon in the bottom of the order.
WARNING MESSAGES WHEN ORDERING
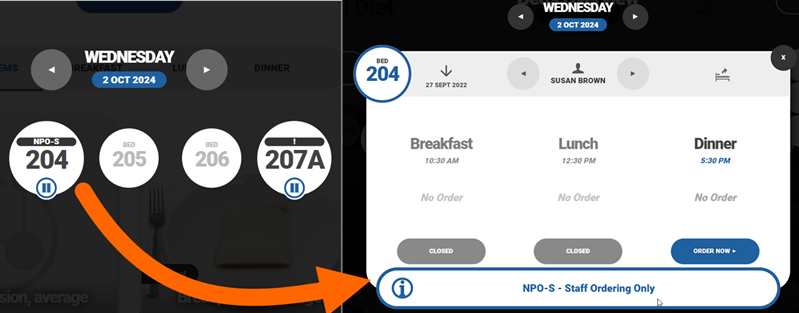
Where ‘Elevated Status Alert’ tags are attached to patients in the patient profile, the tags will carry across to menus to guide staff on processing orders for the patient:
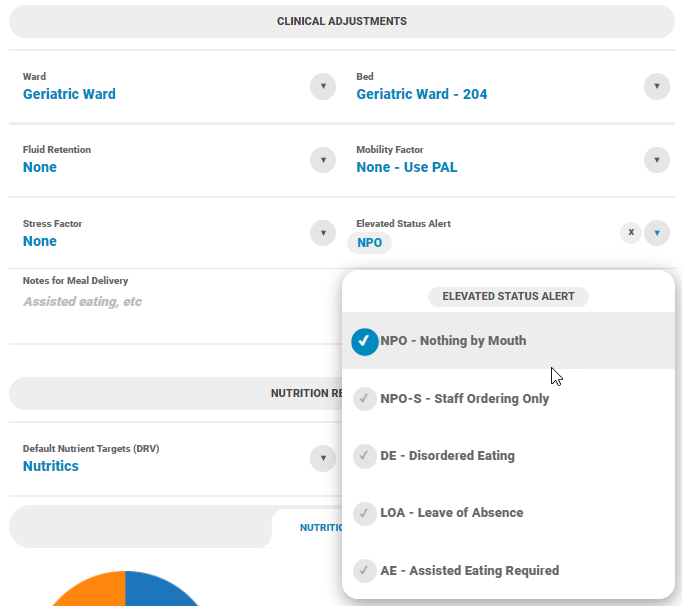
- NPO – Nothing by Mouth: Ordering will not be permitted for this patient.
- NPO-S – Staff Ordering Only: Ordering can only be processed on menus with staff ordering enabled.
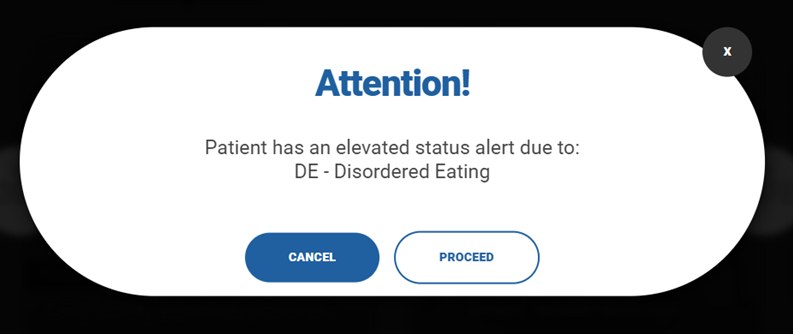
- DE – Disordered Eating: Use this tag if the patient has disordered eating. A warning will show before an order can be processed as a reminder.
- LOA – Leave of Absence: Use this tag where a patient will not require a meal or they are absent for meal time.
- AE – Assisted Eating Required: Use this tag if a patient requires assisted eating. A warning will show as a reminder before an order is processed for the patient.
The icons can be seen in the beds overview on a menu:
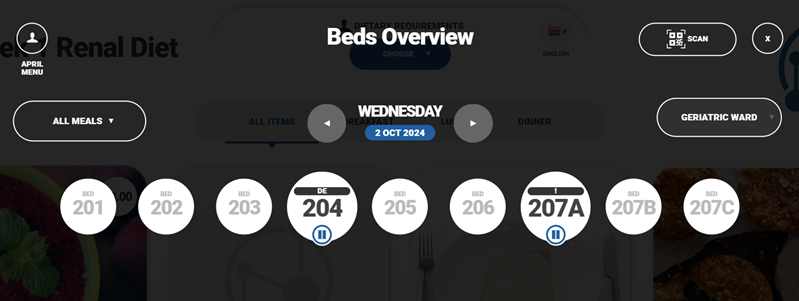
Depending on the tag used, ordering may be paused for this patient with the relevant warning shown:
Other tags, such as ‘DE – Disordered Eating’ will show relevant warnings for staff before processing an order for the patient:
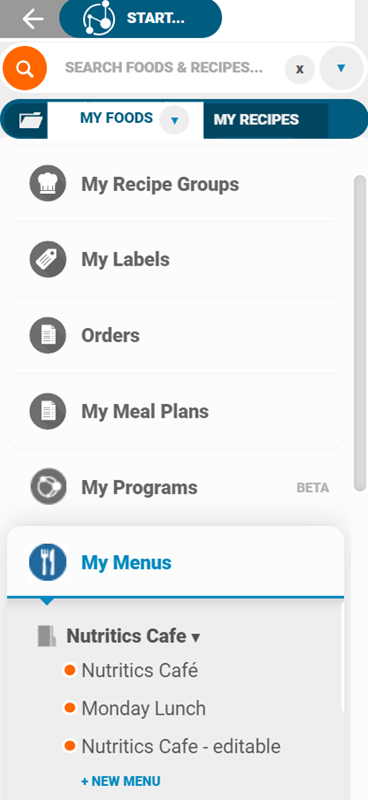
Once the menus and the outlet have been set up, open the menu you would like to publish from the Nutritics content explorer and review the menu settings. If you haven’t already created your menus in Nutritics, please see our guide on menu creation here.
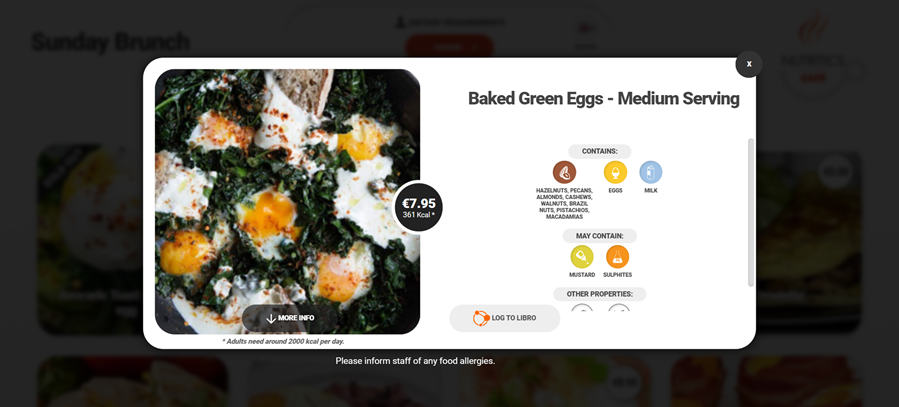
When ordering for your patient (or if they are ordering for themselves) you can see a running nutritional summary using our meal planning tool. Once you add an item to the basket, click the ‘i’ icon to view the meal’s nutritional content in comparison to the client’s individual targets:
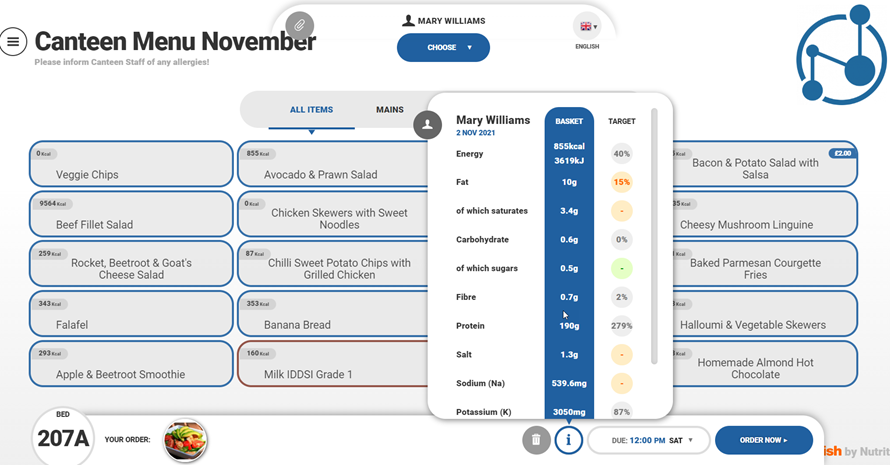
These figures will update automatically as items are added to or removed from the order.
MENU SETTINGS AND PUBLISHING
Once the menus and the outlet have been set up, open the menu you would like to publish from the Nutritics content explorer and review the menu settings. If you have not already created your menus in Nutritics, please see our guide on menu creation here.
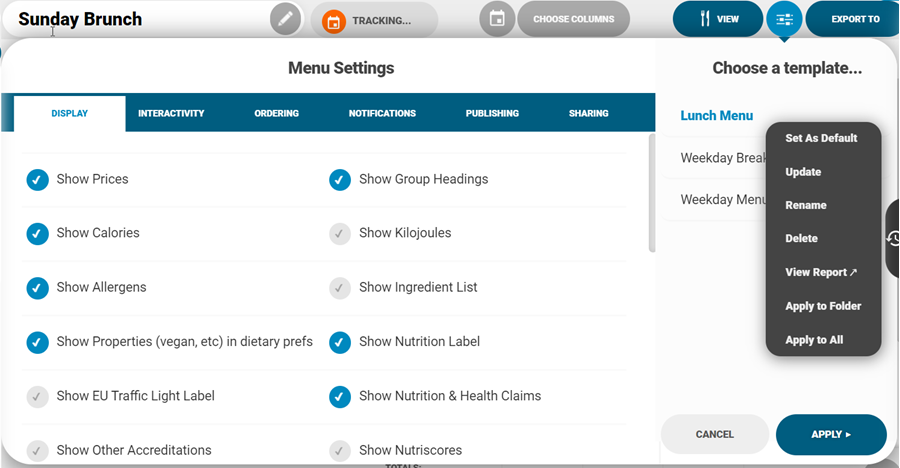
Menu settings are accessed by clicking the grey slider in the top right corner of the menu workspace:
Within the settings menu, there are several tabs that allow for the customisation of the menu:
DISPLAY TAB
Choose the information to be displayed on paper and digital menus.
- Choose the information to be displayed on digital menus. This includes showing prices, calories, allergens, ingredient lists, food claims, nutrition information etc.
- Select show the ‘all items’ group to allow the menu to default to all items as the main tab. Alternatively, toggle this off so the menu defaults to the first recipe group available when opened:
- Choose the look of the menu e.g. apply a light or dark theme and select how many menu items or ‘tiles’ are displayed in each line.
- Decide whether to ‘Show Therapeutic Meals as Standard’ on your menu. Therapeutic meals are items tagged with a group in Nutritics such as #renal, #diabetic etc. If this is switched off, special items will be hidden until a patient under this grouping is selected.
- Decide whether to display photos on the menu. This will allow for quicker browsing and ordering for staff members. When photos are not included a menu item with multiple portions will be collapsed until clicked on:
- Enter a disclaimer to be displayed on all menu items, or add a welcome message for your menu:
INTERACTIVITY TAB
Choose how patients can interact with the menu.
- Interactive mode allows patients to scroll through the menu and click on menu items for more information/ordering purposes. This is recommended where menus are being displayed on touchscreens. Untick this option if your menu will be displayed on a digital display or TV that is not a touchscreen.
- Decide when the menu resets by setting the inactivity limit. Please note that this is only relevant to tablet devices, and will not apply to those using a mobile.
- Tick Allow users to go back to the list of menus to allow customers to exit the current menu they are viewing and browse all published menus from your account. This is useful if you want to allow customers to exit the bar menu and look at the restaurant menu:
- Tick The screen resets to the list of menus and the menu will return to this list of published menus after a period of inactivity.
- Enable ‘featured items’ screensaver on reset and menu items will flash on screen when the menu is left idle:
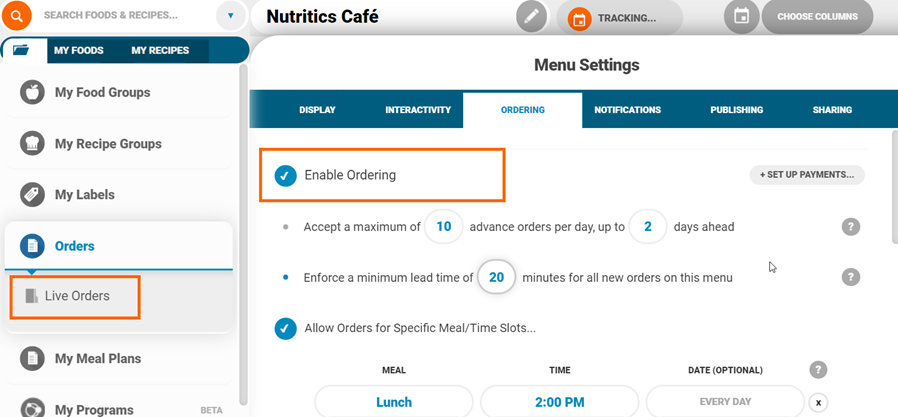
ORDERING TAB
Enable ordering to allow customers to place orders from the digital menu. Orders will appear in ‘Orders’ in the Nutritics Content Explorer:
- Enable card payments from this tab.
- Max advance orders per day: This allows orders to be booked for subsequent days. Define how many advance orders can be booked each day.
- Min lead time: Set the minimum amount of time and order can be placed before it’s due i.e. the minimum lead time it will take the kitchen to produce an order for this menu. For example, if the lead time is set to 15 minutes and a customer tries to place an order at 3pm, the earliest ‘due time’ slot will be 3:15pm.
The lead time for orders can be controlled in 2 places:
1) In the ordering tab of individual menu settings as described above.
2) The minimum lead time can also be controlled by the kitchen in the live orders dashboard:
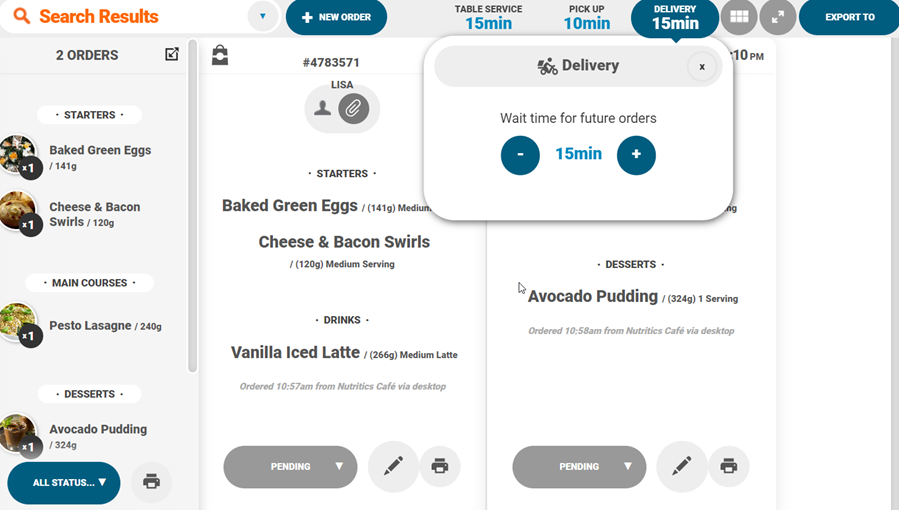
Click on the meal service type e.g. bed service and use the plus or minus icons to edit the due time.
Please note: The due time can only be increased here and cannot go below the due time set on an individual menu e.g if the lead time of a menu is set to 20 minutes but the kitchen is busy and needs more time to fulfil the orders, they could set the lead time from the dashboard to 30 minutes and this lead time will be applied. If the kitchen is quiet however and wants to decrease the lead time e.g. to 15 minutes, this would need to be changed in the individual menu settings.
- Allow orders for specific meal/time slots: This should be used where mealtimes are at a set times e.g. breakfast is served at 8am, lunch is at 12pm and dinner at 6pm.
- Allow orders at custom times: Allows patients to choose their order ‘due time’ from automatically calculated time slots. Define how many orders the kitchen can handle in a set amount of time.

This will determine the amount of due time slots that are visible to the customer when ordering from your menu.
Set the default order type (this will be the first option shown to patients when selecting how they wish to receive their order).
- Set the service operating hours for each order type (or leave this blank to accept orders at all times).
- Set an optional fee for orders. Note that card payments will need to be enabled for this to work (scroll to the top of the ordering tab to enable payments via ‘+Set Up Payments’).
- Select what information is required from the patient e.g. name, address, phone number (this must be ticked to enable SMS notification to patients that their order has been received).
NOTIFICATIONS
- Choose to be notified via email each time a new order is submitted.
- Choose to send patients an SMS message confirming their order. Note you will need to collect patient phone numbers (enabled from the ordering tab of your menu settings) for this to work.
- Send patients a confirmation email summarising their order.
- Add additional information for the email and receipts printed from the ordering dashboard.
PUBLISHING TAB
Publish your menus so staff and customers can view and interact with your menus on a digital display.
- Choose whether the menu requires staff login. Staff can be set up by clicking the ‘+Add Users’ button.
- Enable order summary for staff to prompt an order review before placing.
- Tick ‘Require Patient Verification for Self-Ordering’ to require a check before ordering. Patients will be required to input their date of birth to open the menu. This will ensure that all dietary requirements and allergens sync across and filter out unsuitable menu items when opening the menu. Please note patients must be assigned to a bed and access the menu using the QR code for their bed. These can be obtained via Start > Quickdish Menus > Get QR codes per bed.
- Choose if the menu is published immediately or schedule a date and time for the menus to go live.
- You can enable the menu to run on the Same Day or Next Day. Enabling Next Day allows your menus to run after midnight. The menu will start as usual on the days selected and continue into the next day until it is set to end:
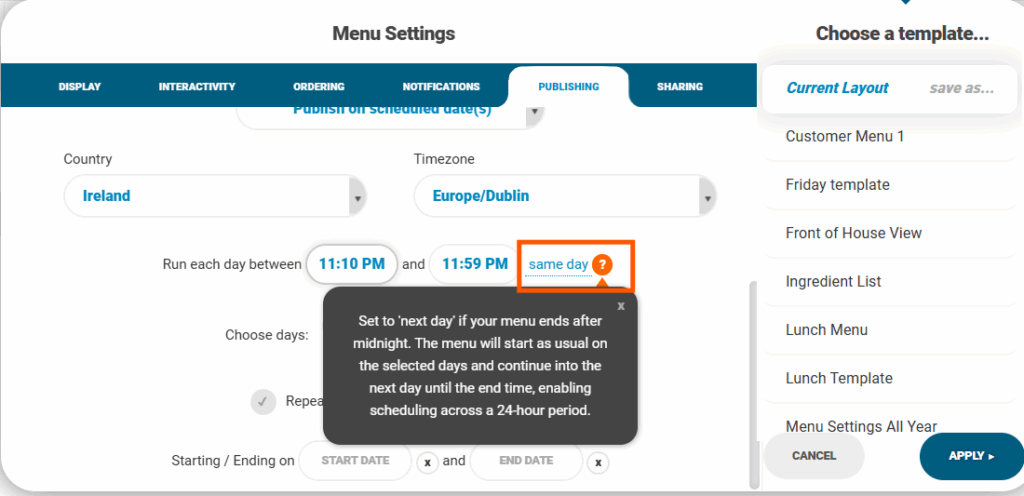
- Click here for more information on scheduling menus or Watch a video on this here.
- Live menus have an orange circle beside the menu title in the Nutritics Explorer:
SHARING TAB
Choose how to share your menu with customers.
- Click Copy to copy the menu’s live URL to display the menu on a website, on a tablet or other displays.
- Click QR to generate a QR code for the menu so others can scan.
- Click Embed to get the Embed link for another website.
- You can also share the menu with other Nutritics users. Please see our guide on this here.
To see your full menu list, click ‘Get Main Menu URL’. This will provide you with a link to a list of all active and inactive digital menus in your Nutritics account.
Pro tip: You can insert ‘#’ followed by a ward name at the end of your share link and bookmark. This will allow ward staff to open the menu directly showing their bed layout.
SAVE AS TEMPLATE
Menu settings can be saved as a template and applied to other menus.
- Click Save As…, name your template and the template will be saved for reuse:

- To apply a template to a menu, click the template name and select Apply in the bottom right corner.
- Right-click on the template name to set it as the default menu layout, to update the template with new settings, rename or delete the template.
- You can also click ‘View Report’ to generate a report for your menu using another template without applying the changes.
- Templates can quickly be applied to entire menu folders or all menus at once also:
LIMITING ITEMS THAT CAN BE ORDERED ON A MENU
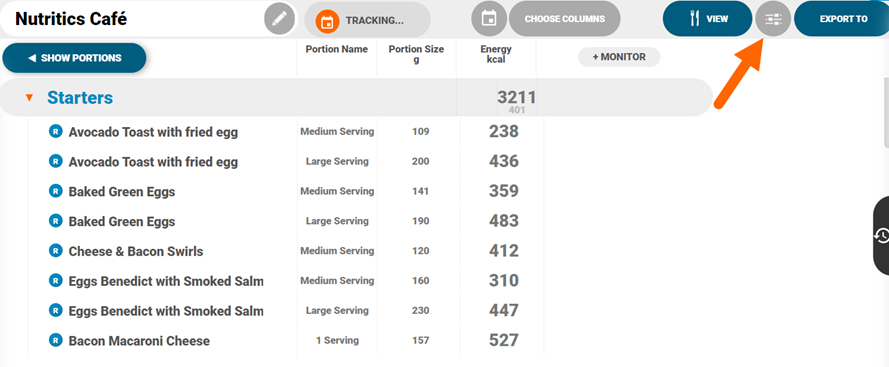
To limit the amount of items that can be ordered from a menu, click on the ‘Choose Columns’ button from your menu workspace. Order limits can then be set using the columns under the ‘Administration‘ heading:

- Sold Out: Enable this and tick any items that are no longer available. The item will still appear on your digital menu, but will bear a ‘Sold Out’ banner:

- Min and max order: Setting a min order means the patient must select at least this many menu items from this menu group e.g. create your own breakfast by selecting 2 meats.
- Setting a max order means the patient cannot select any more than the specified number of items from this menu group e.g. make your own sandwich, choose 1 bread, 1 meat and 3 salads. Any order limits will be displayed on the digital menu beside the menu group name.
PATIENT VIEW
If a menu is password protected, a staff member will be required to log in to see the menu.
Enter the name and pin assigned to the staff member in your outlet settings:
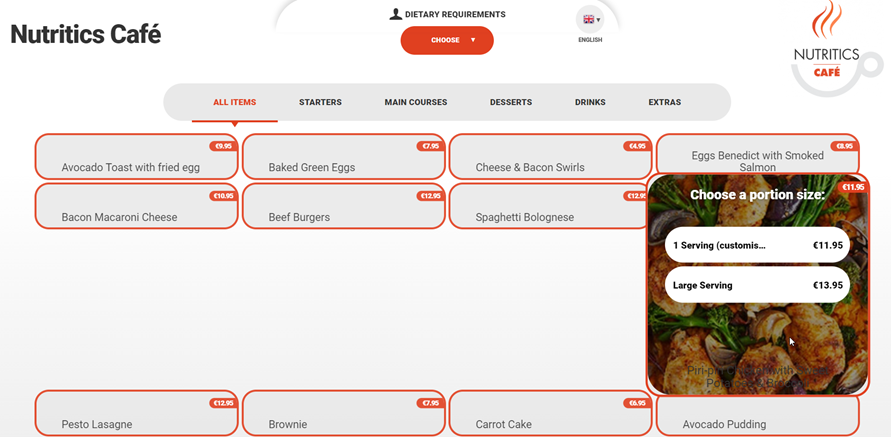
- Menu items are shown in a tile format.
- Patients can click on the language dropdown at the top of the screen to translate the menu into their preferred language.
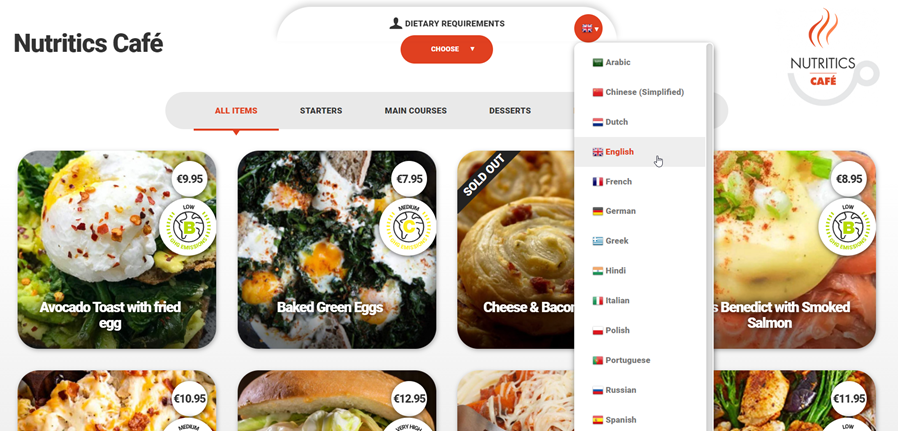
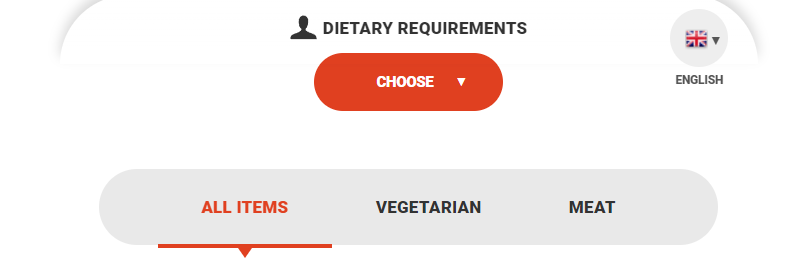
- Patients can scroll through and filter the menu by clicking on the tabs along the top.
- If patients are assigned to a bed, their allergens and dietary properties will automatically filter the menu here. Patients or staff will not be able to edit the filters as they are locked from the patient profile. Any changes needed to allergens and dietary properties will instead need to be made directly from the patient profile. To bypass this and allow patients and staff to filter freely you can disable this setting in Settings > Ordering > Use client profile as source of truth for menu filtering.
- If this setting is disabled, patients can then filter by their dietary preferences and allergies by clicking on the drop-down menu at the top of the screen. Clicking on the ‘Choose’ button allows for the selection of a specific ward/floor and bed/room:
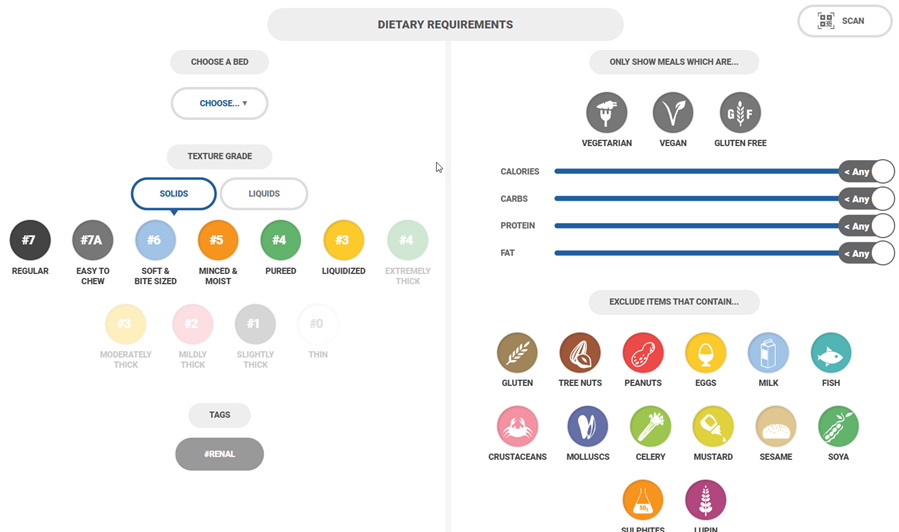
- The patient’s dietary requirements including allergies and texture grade requirements will be taken into account and any unsuitable meal options will be removed from the menu.

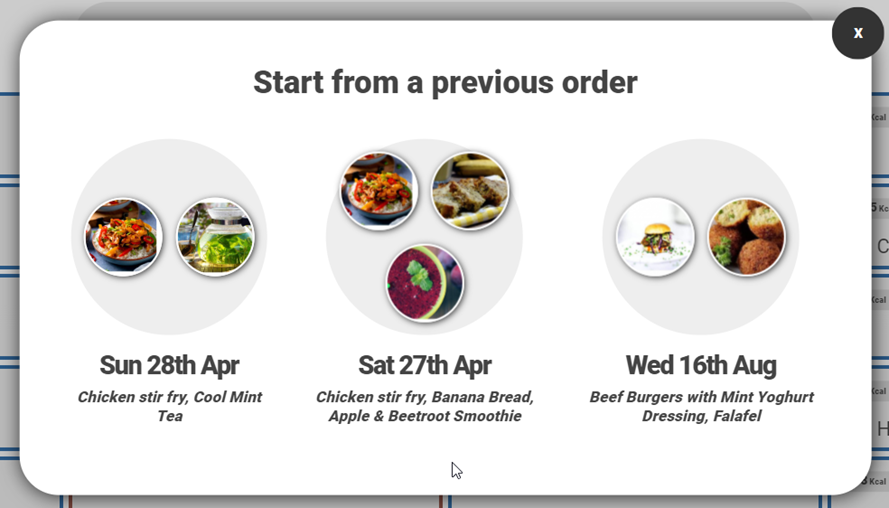
- Open a patient’s order history by clicking the clock icon in the ordering bar:

- Choose a previous order to quickly populate the basket and reorder:
- Alternatively, start from scratch: clicking on a menu item will open it (the information on display e.g. calories, pricing etc. can be controlled from the menu settings).
- Specify the desired number of servings and any notes for the kitchen:
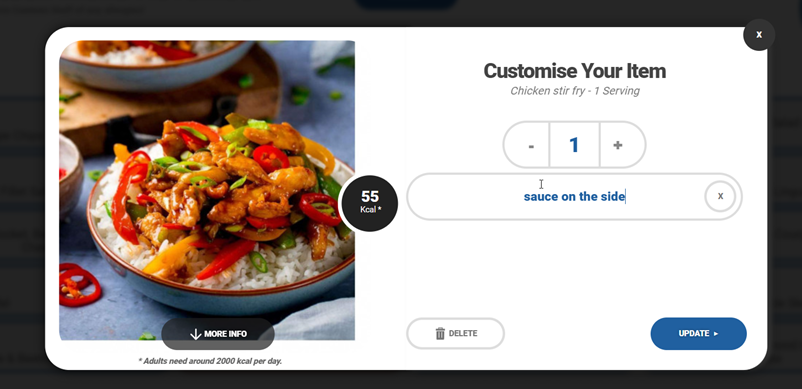
- If you have added notes to an item before while using Quickdish, you will see customisation notes for quick selection:
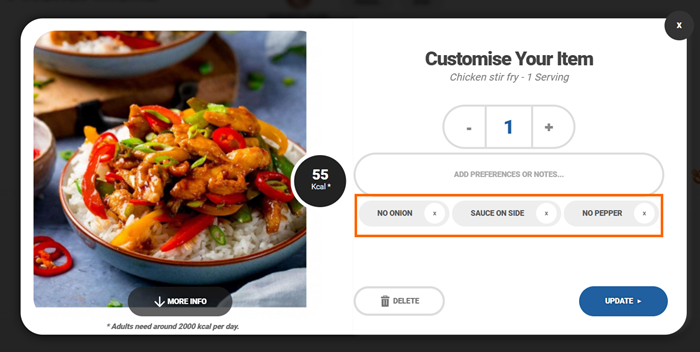
Please note: Custom meal notes are stored locally in your browser’s storage. Therefore, they are only visible on the specific device, browser, and account (including incognito mode) where they were added. These notes will appear for staff when ordering, but not for patients ordering themselves. They will be visible across all items and menus once added.
- Items are added to a basket at the bottom of the screen (1). Depending on the menu set up, patients can choose bed service, pick up or delivery by following the prompts on screen (2):
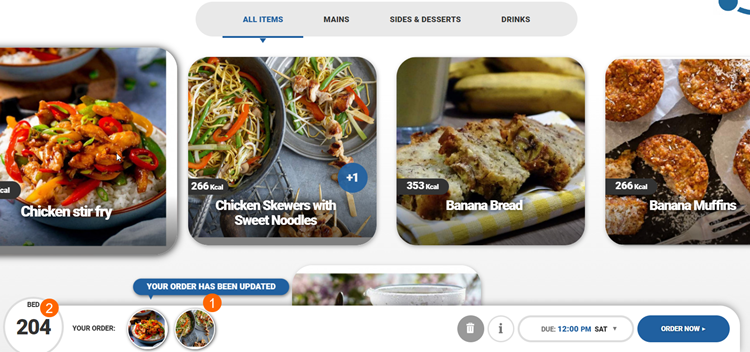
- If payments are enabled, patients will be prompted to enter their card details to complete their order.
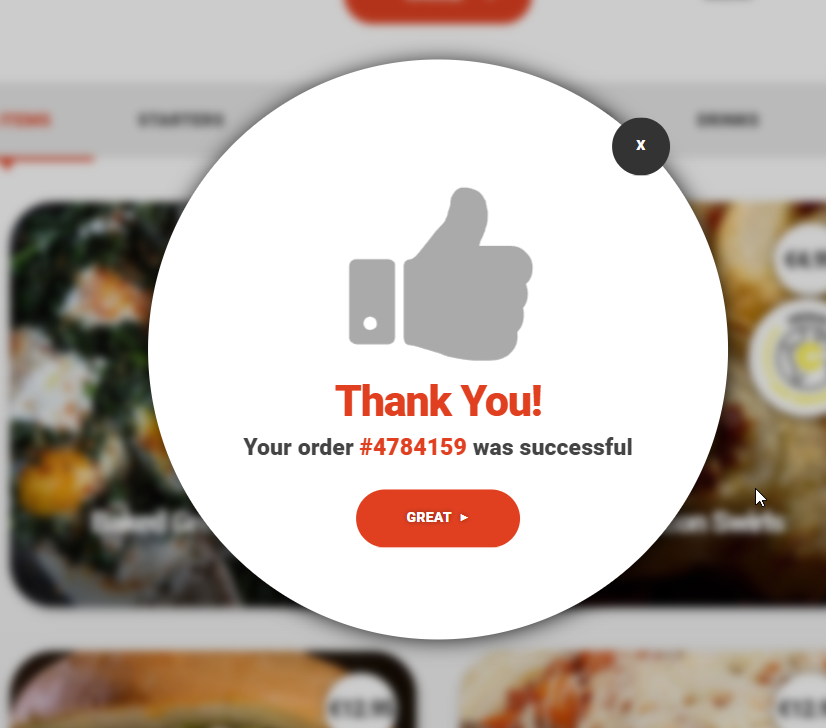
- Patients will receive on-screen confirmation of their order:
Ordering via a patient’s QR code
To get a patient/bed’s QR code click ‘Start‘ in the top left corner. Choose Digital QuickDish Menus>Get QR code per bed:

A zip file will download containing all QR codes per bed. These can be printed and distributed to beds for scanning at meal times.
The codes can be scanned within the staff area to order for the patient directly once the menu is opened. Choose the bed manually, or scan the unique QR code to load information:

Alternatively, click the menu icon in the top left to access the staff area.

ORDER DASHBOARD
The order dashboard is accessed via the Nutritics Content Explorer. Click ‘Orders’ then ‘Live Orders’:

- A summary of all orders is shown in the first panel. Items are organised into the food and recipe groups set up in the Nutritics account, or by menu groups.
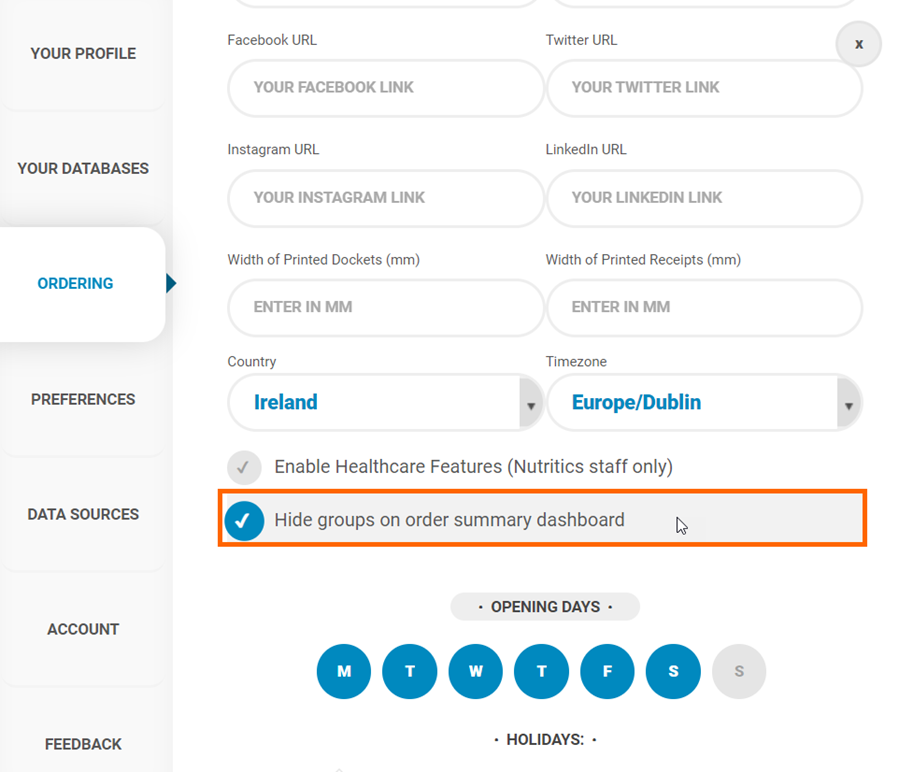
- You can hide this group name by going to Settings>Ordering and clicking ‘Hide groups on order summary dashboard’:
- The number of times an item has been ordered is shown beside the item name. You can click the item to expand this and view any modifications also:

- Individual orders are shown to the right of the summary panel.
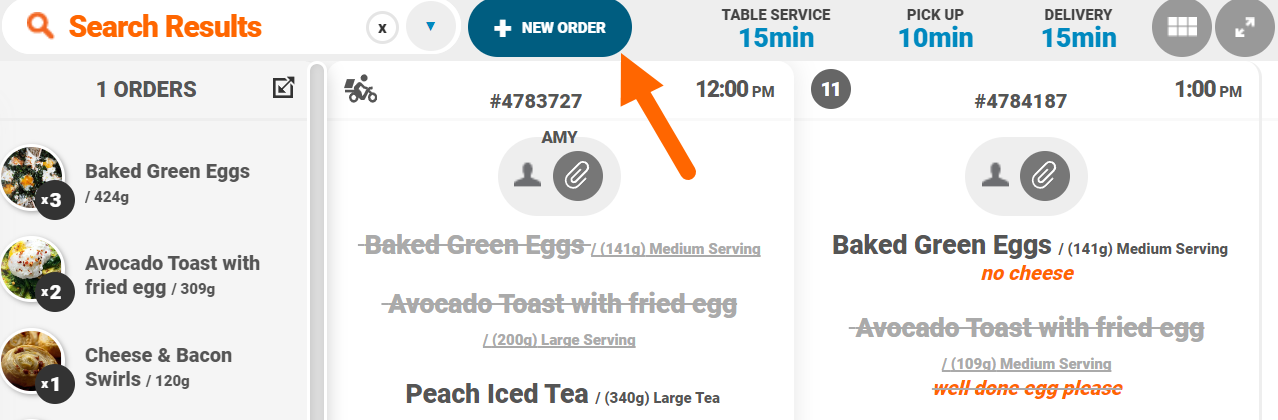
- Order information includes an icon displaying if the order is for bed service, pick up or delivery; the order number; the time the order is due; patient details including allergies, bed number; and the order items organised into groups.
- Click on the paperclip icon beside a patient name to see more information on the patient:

- Toggle a condensed view of the orders or enable fullscreen mode using the icons in the top right corner of the screen:

- We’ll condense the order for easy viewing but you can click on an order to isolate it and view it alone:

- Select the button beside the total order count in the dashboard to open all orders in a new panel. This panel allows you to view all orders and modifications associated at once:

- Control the minimum lead time for orders directly from the orders dashboard. Click on the due time and use the plus/minus icons to increase/decrease the lead time. This is useful for ensuring the kitchen is not overloaded with orders:

- Click on an item in the order summary panel to view all orders containing that item. In the panel that expands, you will see if any orders require a modified version of that item, for example if the patient has added any notes to their order:

- Where items are on multiple orders, you can click the three dots to the right of the item to tick these off in bulk.
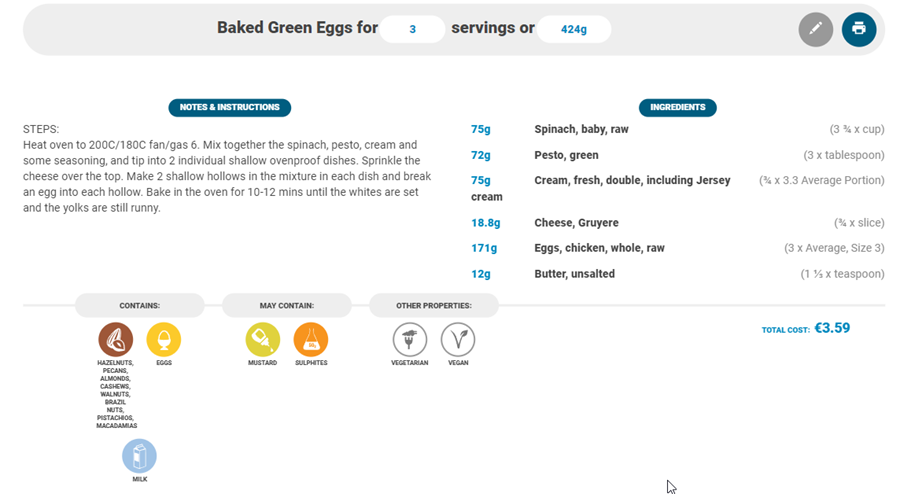
- Right-click on an item > Make Recipe to view the cooking instructions, ingredient list, allergens and properties. You can adjust the number of servings required and the ingredient list will update automatically:
- Keep track of order progress by clicking on order items to tick them off:

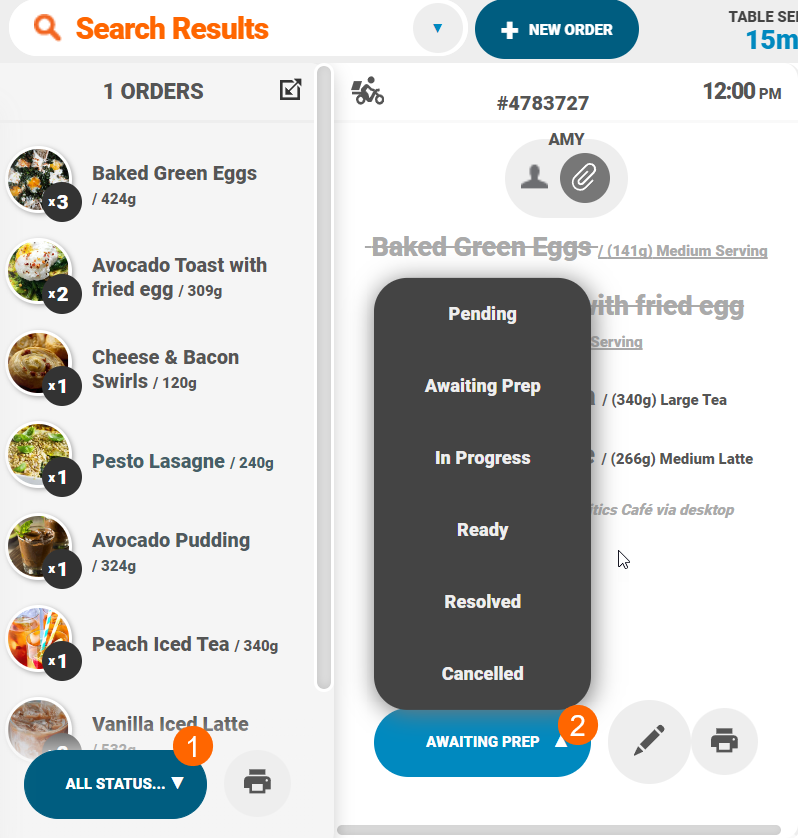
- Change the status of an order using the drop-up menu on individual orders (1), or set order status in bulk from the order summary panel (2):
DIETARY MISMATCH WARNING
You may see a ‘Dietary Mismatch’ warning on orders in the ordering dashboard. This will appear for the following reasons:
- When an order is edited for a patient and items that do not comply with their specified allergies or dietary preferences.
- When allergens, dietary properties or tags are edited in the patient profile after an order has been placed and the items in the order are no longer suitable for the patient.
An exclamation mark will clearly identify the specific items that pose a concern:
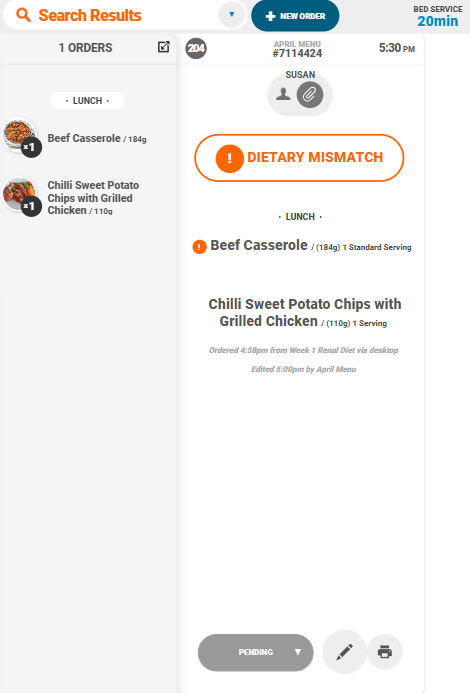
The order can be edited with this in mind using the pencil icon in the bottom of the order.
PRINTING ORDERS AND DOCKETS
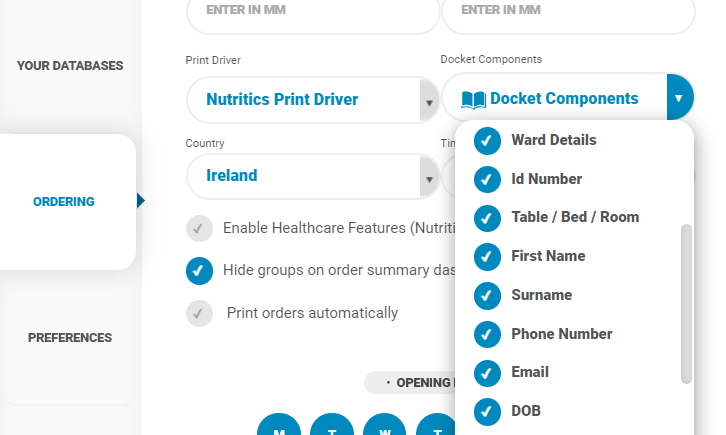
Print a receipt or docket for an order by clicking on the printer icon on individual orders. You can customise the information included on the docket such as MRN, order number, patient names, ward details and more. This feature can be accessed by selecting Settings > Ordering > Docket Components:
Note that the width of the thermal rolls used for printing must be specified in your outlet settings accessed by going to the menu in Settings>Ordering.
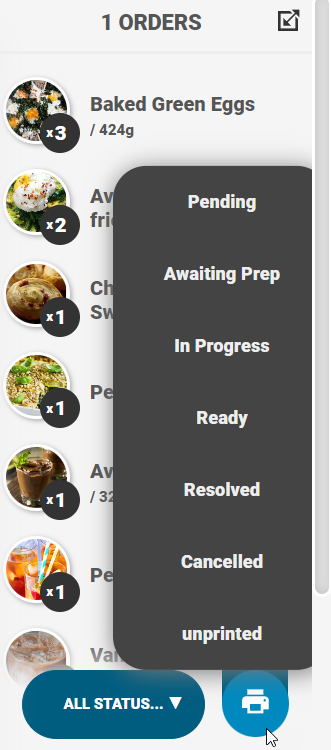
Print dockets in bulk based on their status by clicking on the printer icon in the order summary panel:
Print labels per item ordered by right clicking over the meal:

Alternatively, print an individual label for a modification by clicking the three dots to the right of the request:

EXPORTING ORDERS
You can export order data to excel or an inventory list.
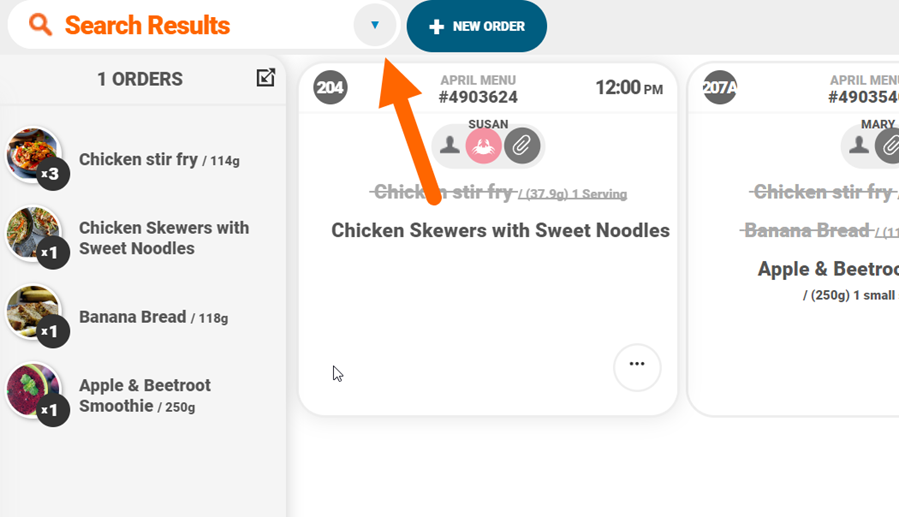
Set any parameters for your export via the filtering function. Click the arrow in the search results bar to set these:
Click ‘Export to’ in the top right corner to export the order list.
These can be exported via Excel as an order summary sheet. This sheet will show the items ordered per menu, menu group, areas, areas and groups or wards and beds and if any modifications were requested. Data includes totals by menus, totals by areas, totals by groups and information on the order number, bed, ward, resident name, staff name/ID, resident fluid grade etc.
FILTERING ORDERS
Filter your orders using the search tool at the top of the dashboard:
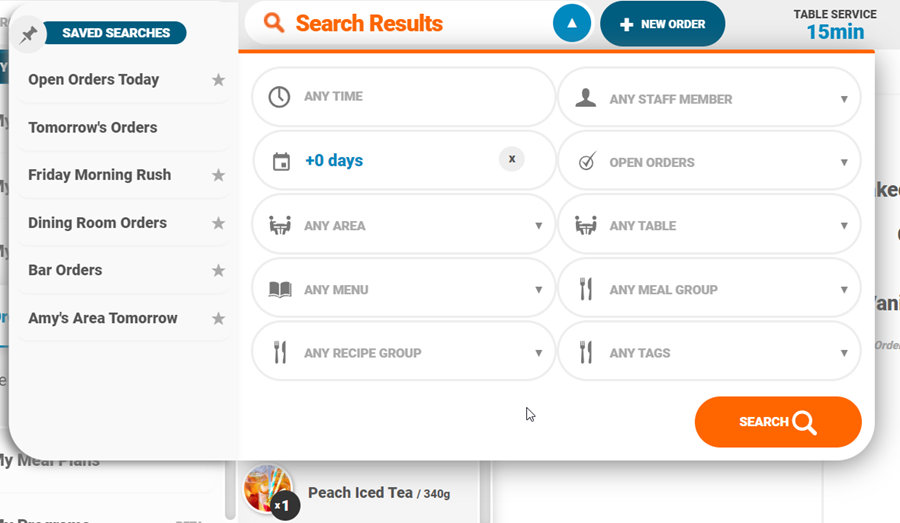
Orders can be filtered by:
- Due time
- Date the order was placed or days offset e.g. days in advance, setting this to 0 will show today’s orders, setting this to 1 will show orders for tomorrow, setting it to 2 will show orders for 2 days time and so on
- Ward/floor and room/bed number
- The menu the customer ordered from e.g. bar menu, main restaurant menu
- Fluid and solid texture grades
- Menu Staff member (if staff login is enabled on menus)
- Order status e.g. pending, ready for collection
- Meal groups e.g. breakfast, soups, salads
Save commonly used searches by setting your search criteria and clicking ‘Save’ and give the search a title.
Saved searches can be pinned to the dashboard for immediate selection:

You can also right click the saved search to ‘set as default’. This will automatically load the search when you open the dashboard. You can further decide if the search should be saved for your account or your device. This is useful for saving different searches on one account but different devices.
New orders can be placed directly from the order dashboard by clicking on ‘+New Order’. This will open a list of menus. Select the relevant menu and order as normal: