In this article, you can see answers to our top Libro support questions.
Do I need a Nutritics account to use it?
If you are a nutrition professional looking to use Libro with your clients, then you will need a Nutritics account to invite your clients to log their diet on Libro.
How do I log in, I don’t have a password?
Your username and password are created when you first log in to Libro. Once you have downloaded Libro, open the app. You will be prompted to enter a username and password. Whatever you type into these fields will be your log in details going forward.
Does it automatically sense activity?
No, you must log your physical activity. This is covered in our guide here.
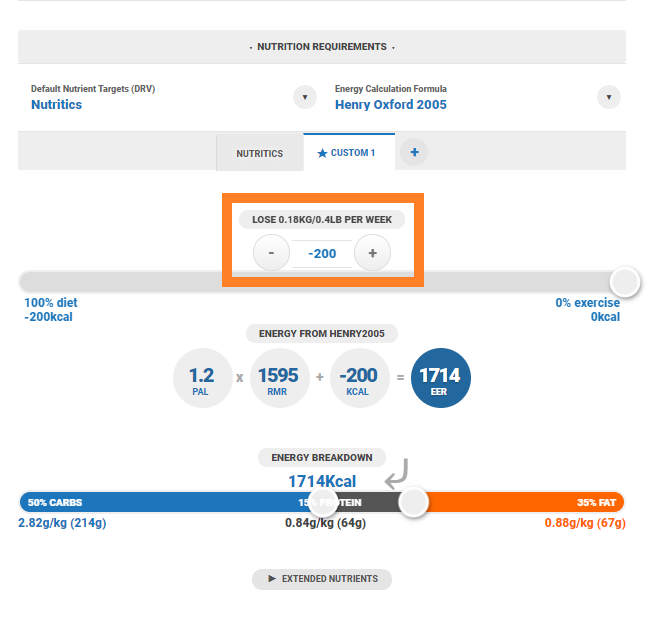
Are targets age restricted?
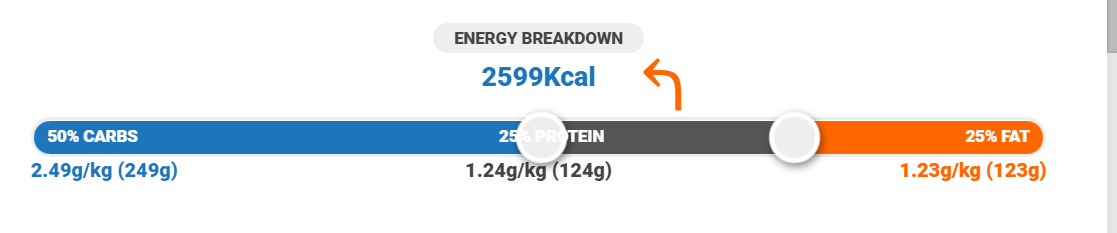
Targets are based on your biometric data (e.g. weight and height) and the DRV source selected by your nutritionist.
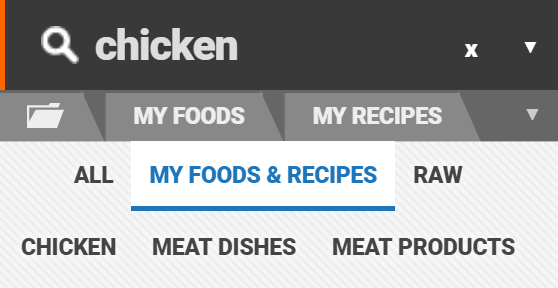
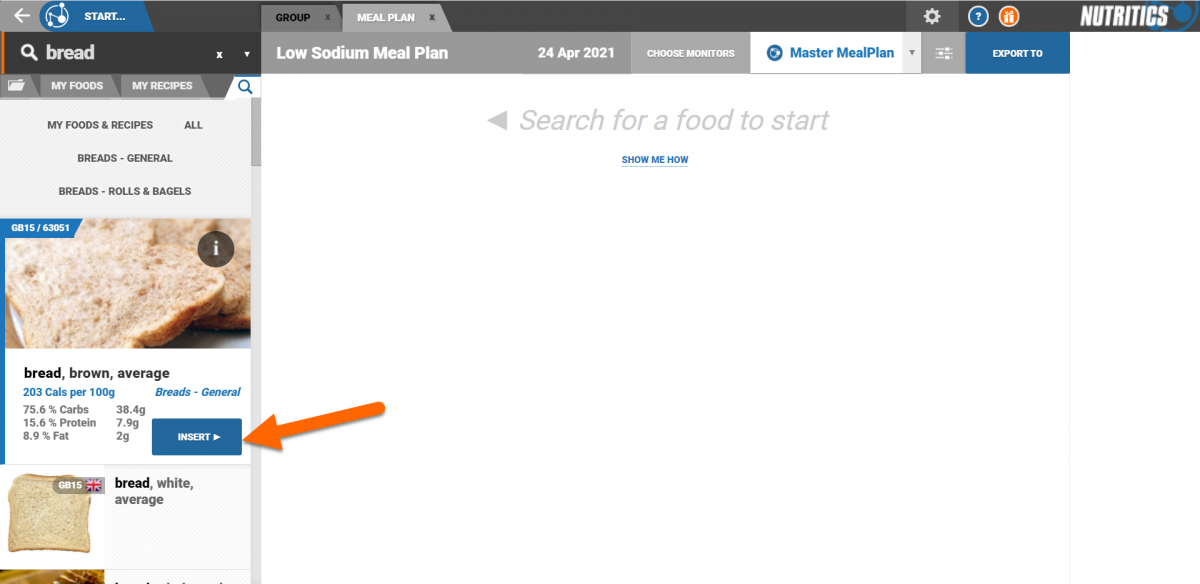
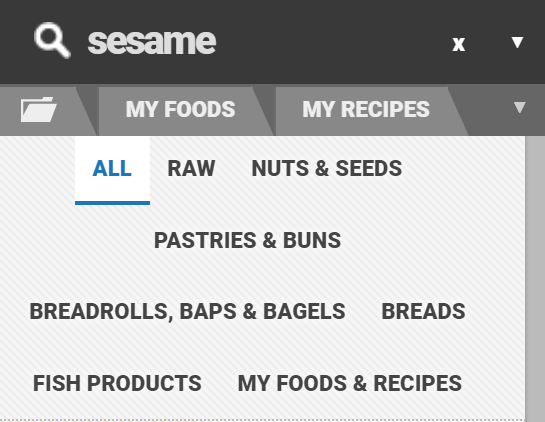
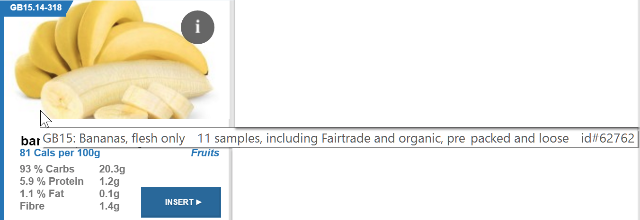
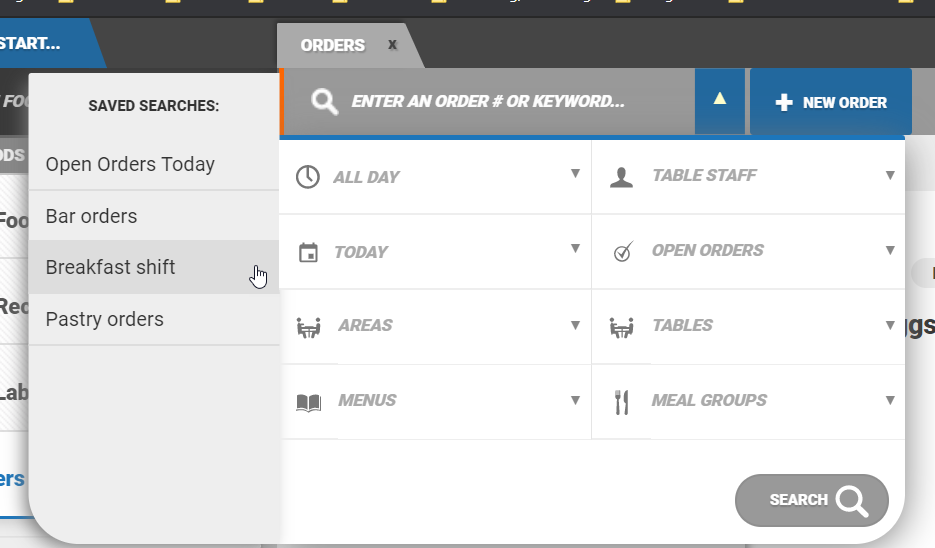
How do I search for products?
Select ‘Go to log’ located in the bottom left hand corner of your home screen.
Click one of the orange plus buttons to search for and add foods to that meal.
Enter a keyword in search box
Alternatively, click on the Libro symbol in the bottom right corner of the screen and enter a keyword.
I'd like to report a problem or a mistake.
Open the menu, click on the settings button and navigate to the about tab. Fill in the contact form and someone will be in touch as soon as possible.
I searched for a product but Libro doesn't have it. What do I do?
See our tutorial here on adding a new food.
Where do you get your product information?
The database of foods available in Libro is comprised of official national databases and branded data from manufacturers.
How do I mute Libro?
Make sure the media volume on your phone is on silent.
How to log a food log?
See our tutorial here on how to add foods to your log in Libro.
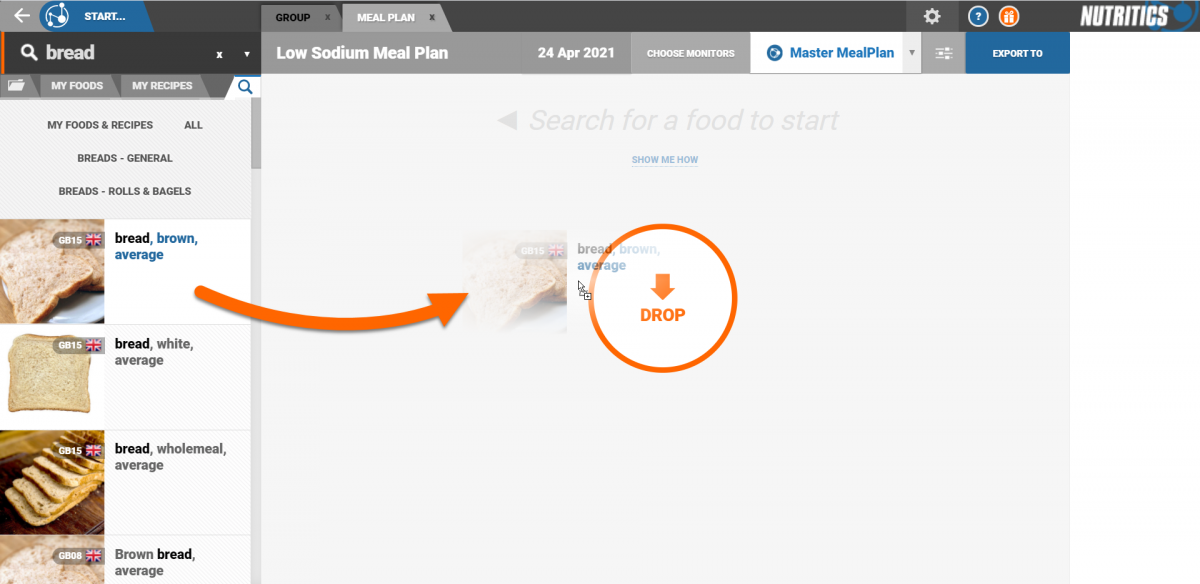
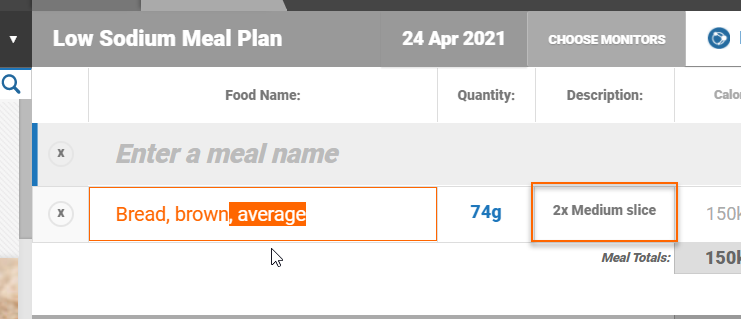
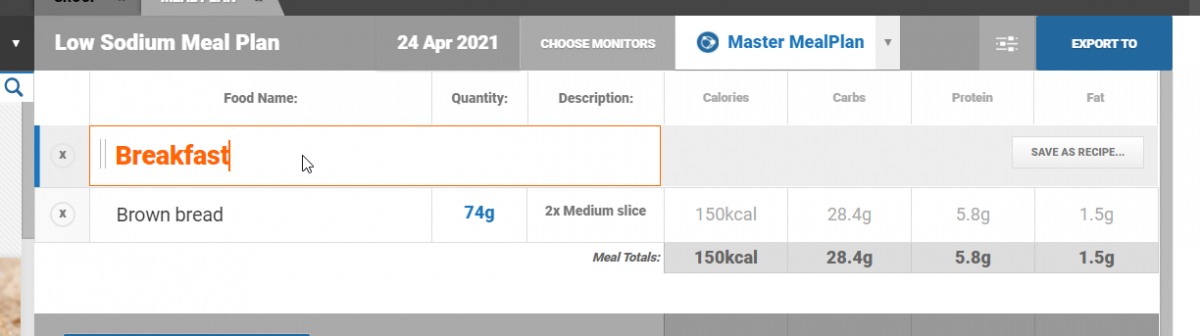
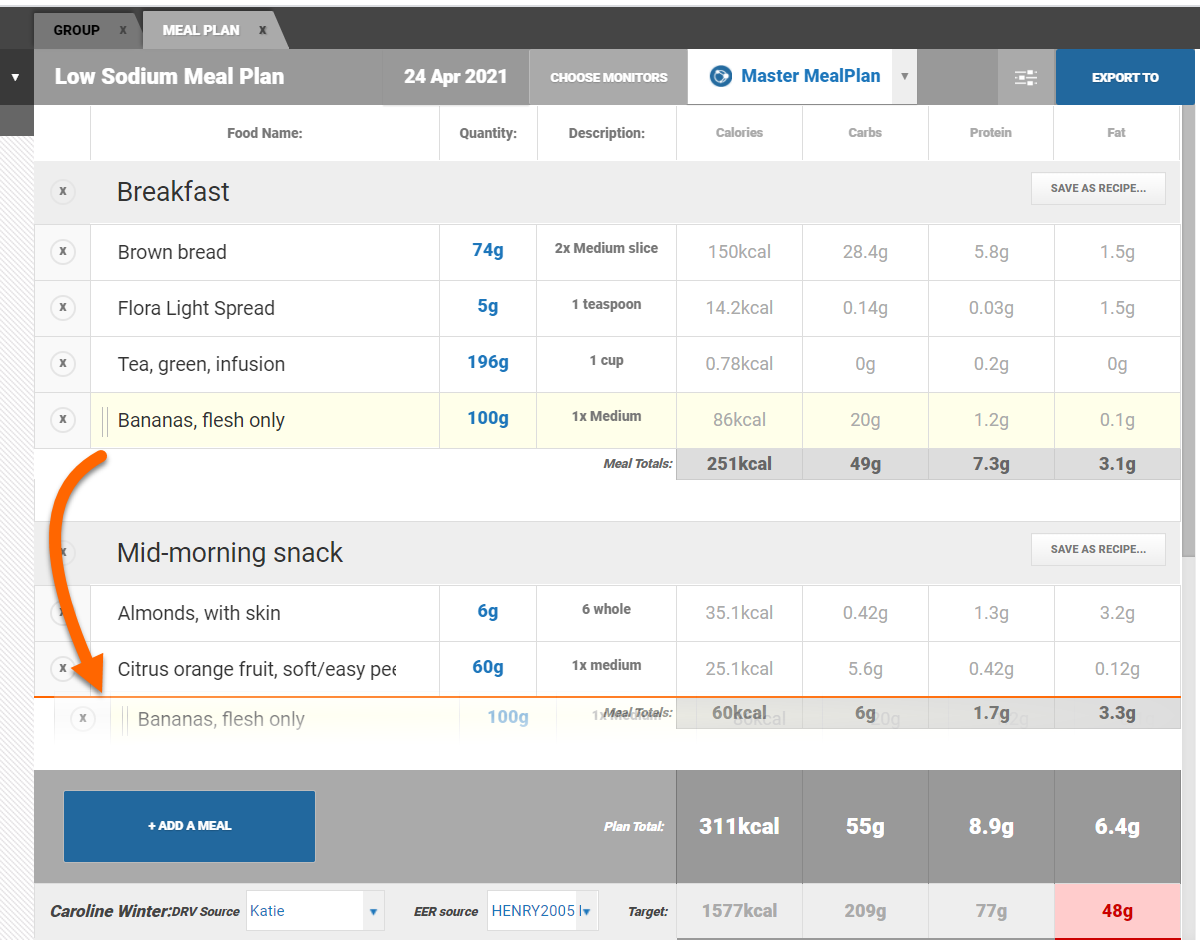
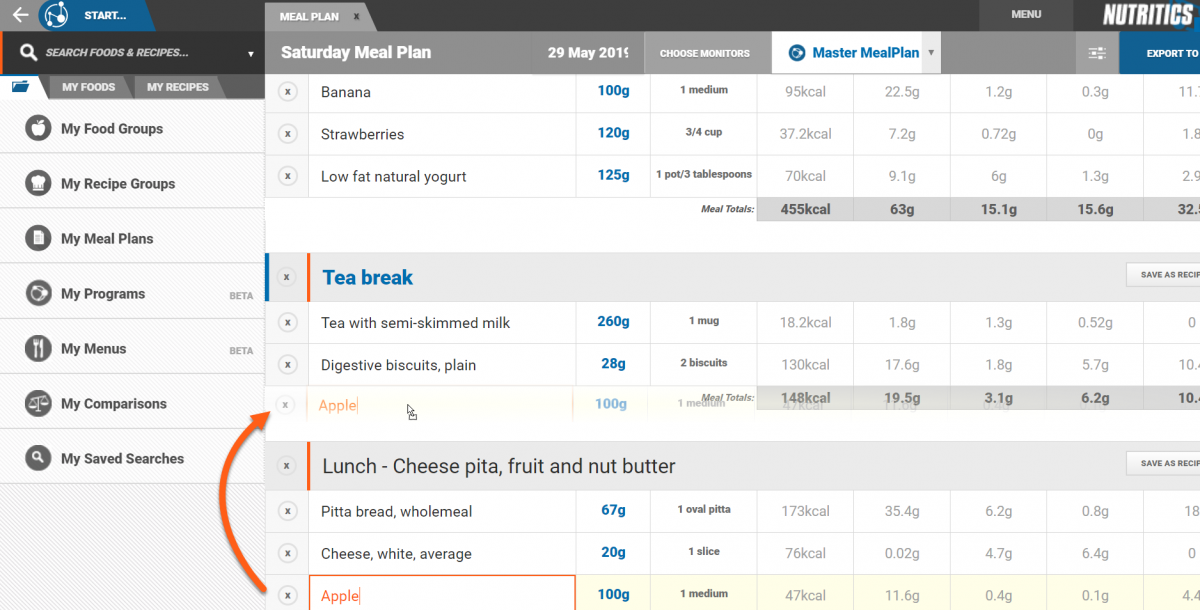
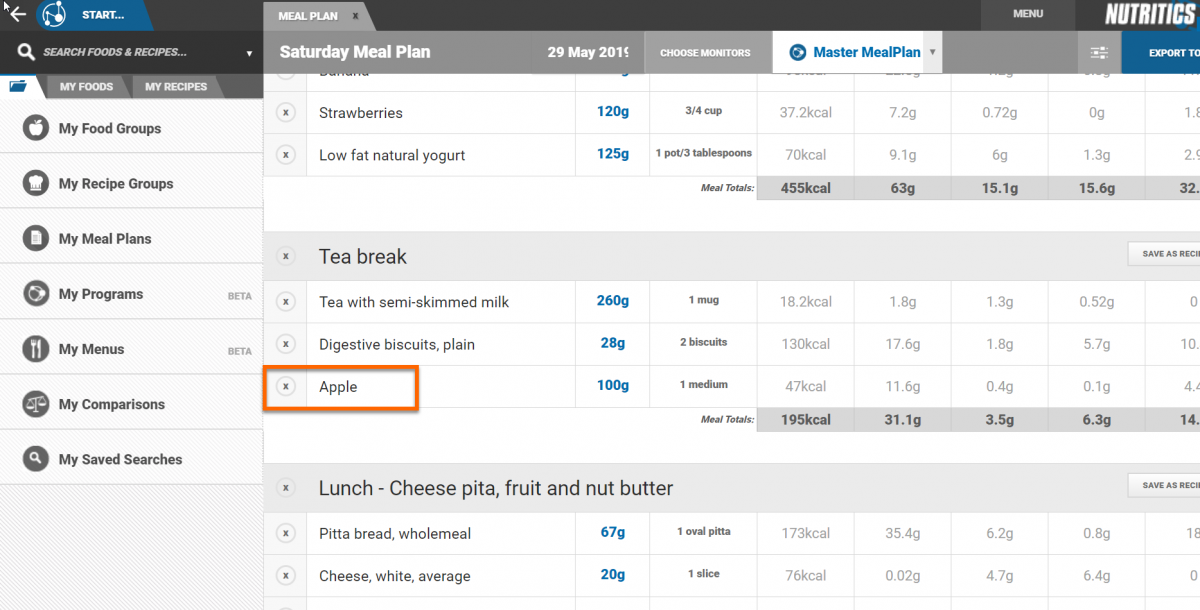
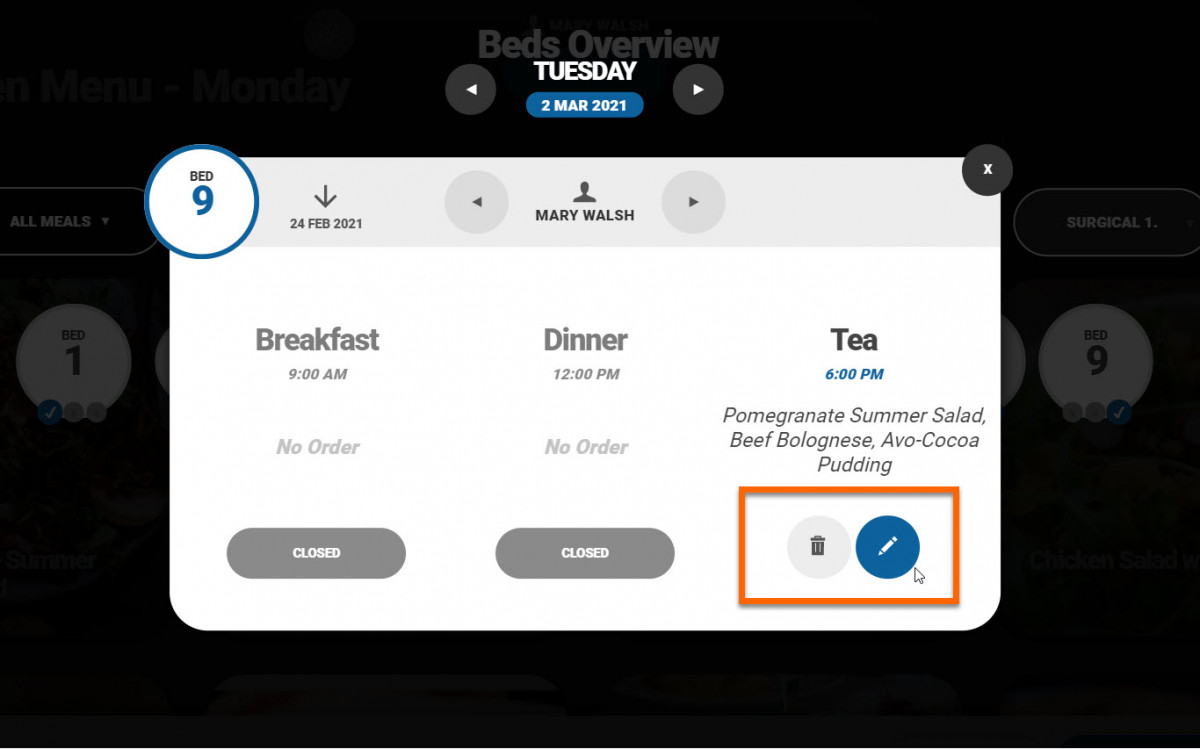
How do I move a food to a different meal name?
See option to change meal selection before saving the foods in your basket:
How do you access logs from your Nutritics account?
See our tutorial on importing logs from Nutritics.
How do I assign a program to my clients on Libro?
You can do this by opening the program you would like to share and navigating to the drop down menu at the top of the screen. Click 'add a client' to assign that program to a client. You can toggle between the master program, and the client-specific program using the drop down menu. See our guide on using Libro Programs here.
Any More Questions?
Our user guide includes video tutorials and in-depth instructions on key tasks.
See our sales FAQs
Email us at support@nutritics.com and we will get back to you shortly.
In the short video below you will learn how to:
- Navigate through the app
- Add nutrient trackers to your home screen
- Add foods and exercise to your diet log
- Interact with a program assigned to you by your nutrition professional
For more detailed tutorials, please check out the rest of the Libro section of our support center. WATCH THE VIDEO:
https://www.youtube.com/embed/DtdRh3Z9FVM
Libro is a voice assisted smartphone application for Android and Iphone that allows your clients or research participants to input their own food diaries directly, to save you input time and improve accuracy. Libro includes visual aids, prompts and reminders, and the user can log by voice, ask nutrition related questions to our AI, and create recipes for inclusion in their log or fine tuning by you as their nutrition professional. The client’s diet log is then available for you to import into Nutritics in one click for analysis and feedback, and the analysis report and feedback can be sent directly from your Nutritics Professional account to the client’s smartphone
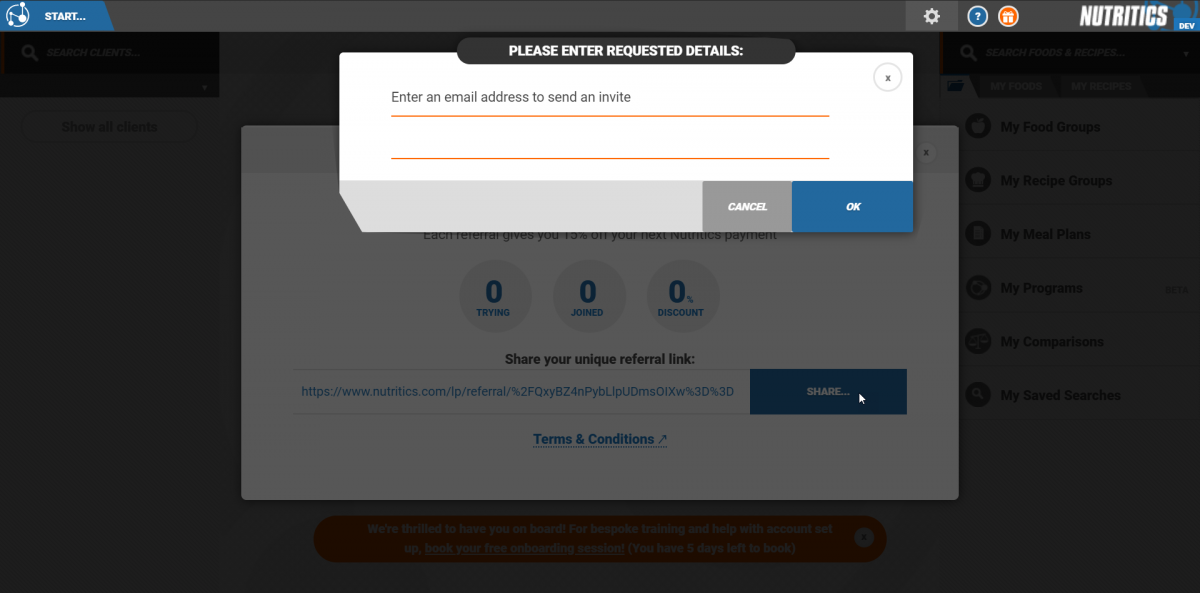
For nutrition professionals
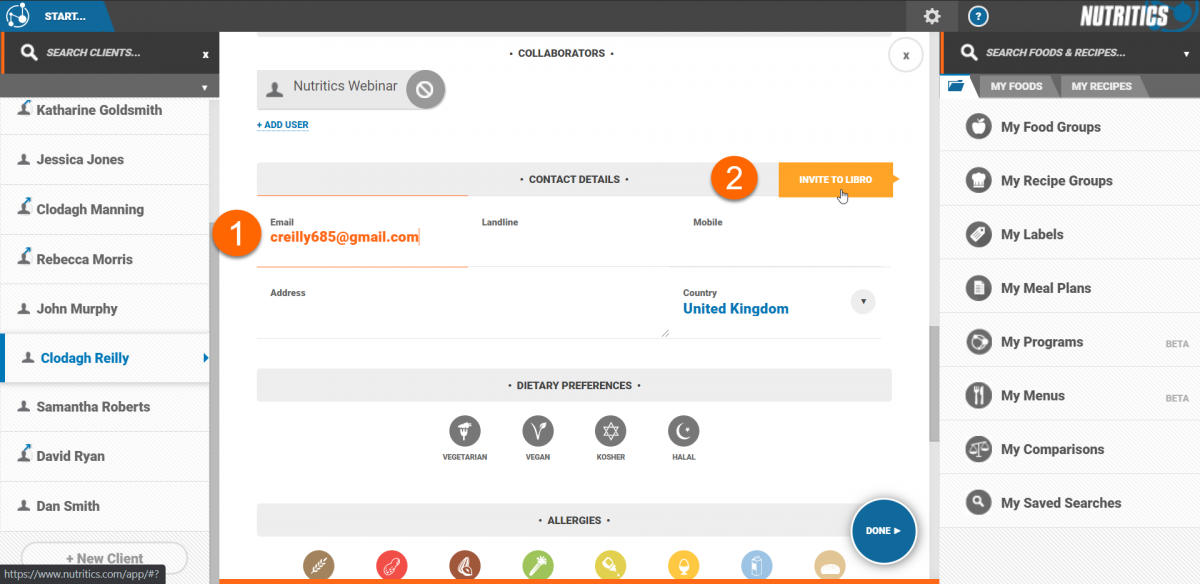
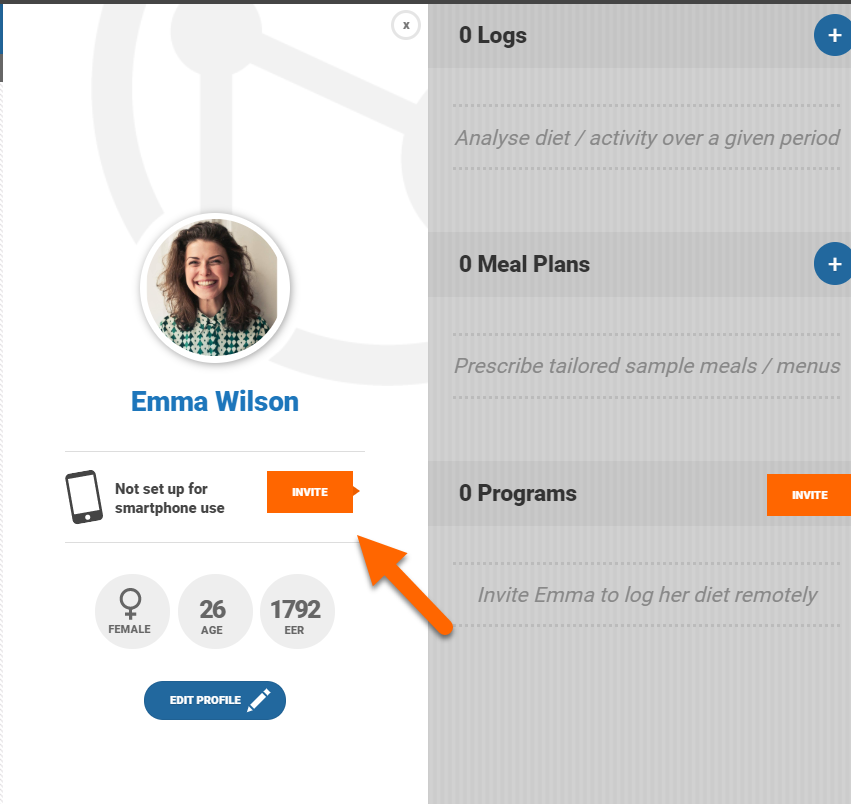
To invite a client to use Libro, or to try it out yourself, simply open a client profile in Nutritics and enter the client's email address under the 'contact details' section. Click ‘invite to Libro’ and an email will be sent to the client inviting them to download Libro from the app store.
Alternatively, you can invite a client to download Libro from the minimised client panel view (visible when you click ‘done’ after creating a new client or by clicking on an existing client in your list of clients).
Once a client has accessed Libro, their login activity is visible in the minimised client panel.
For clients
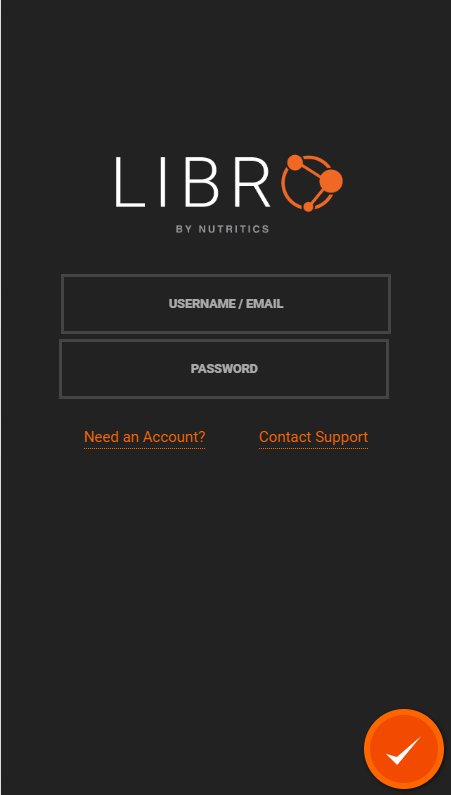
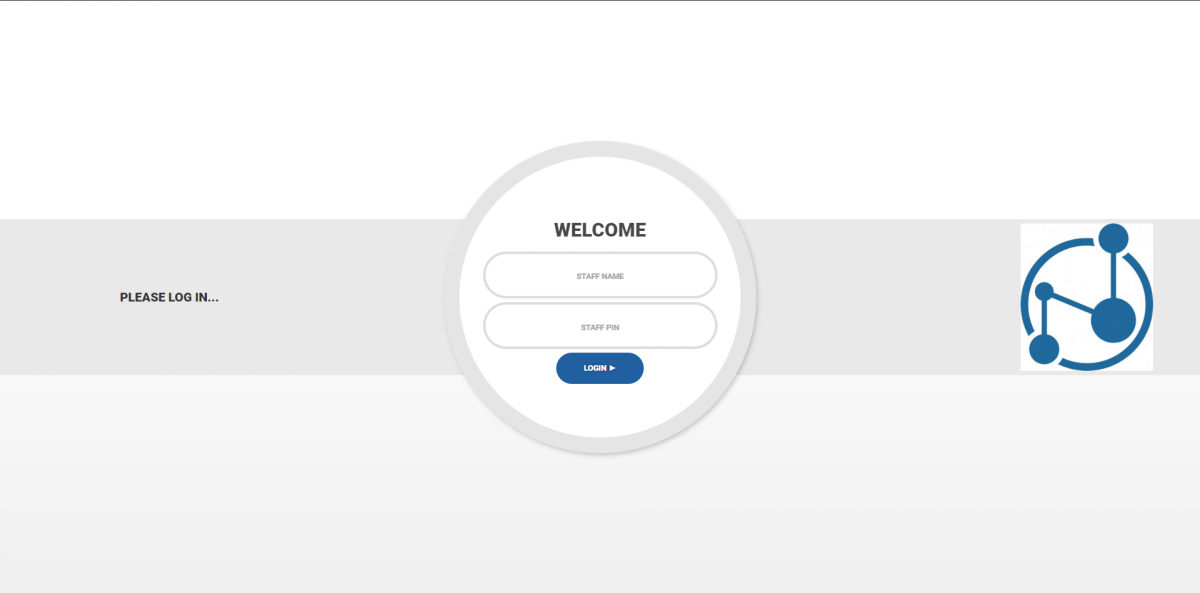
To access Libro, you will need to receive and invitation from your nutrition professional. You will be sent an email containing a link to download Libro from the Android or Apple app stores.
When you open Libro for the first time you will be presented with the screen below.
You will need to enter a username and password to log in. The username and password you choose will be your credentials any time you log in.
Once you have entered the username and password of your choice, click the tick in the bottom of the screen to log in.
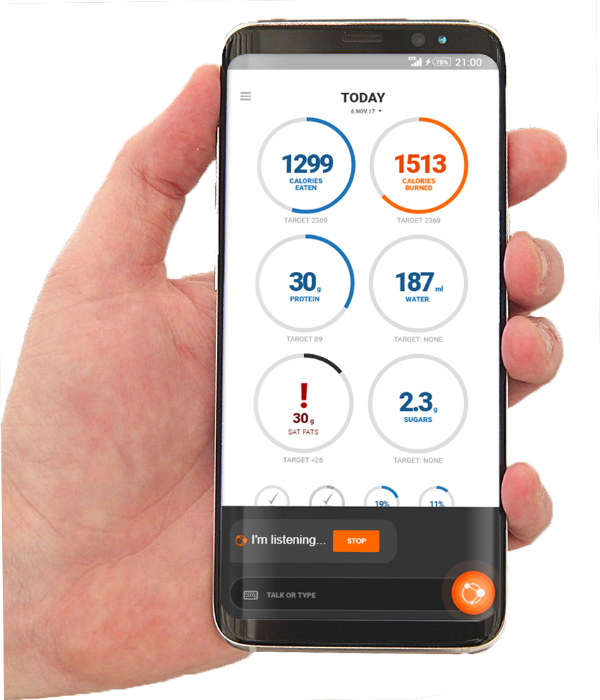
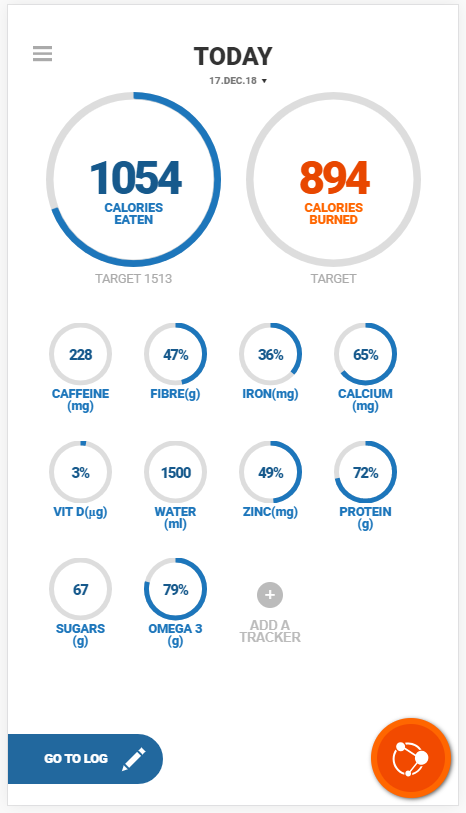
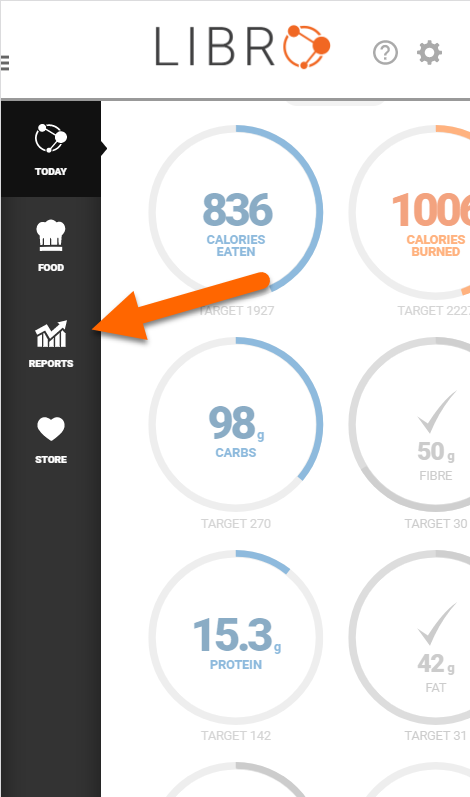
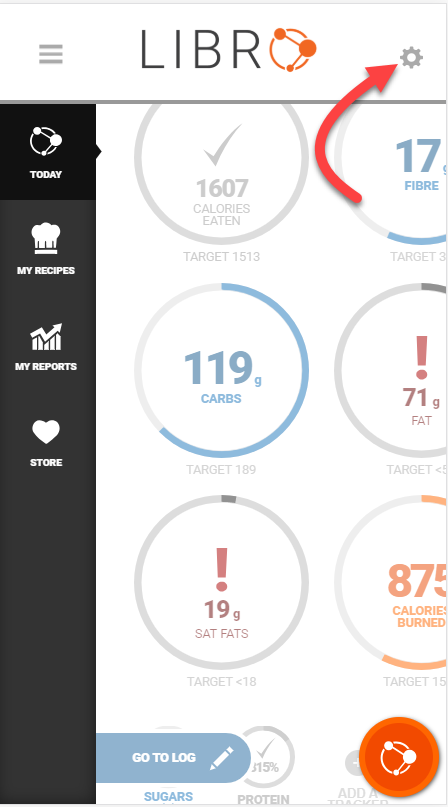
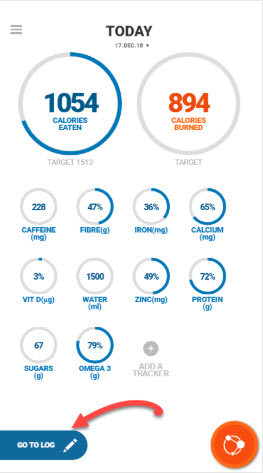
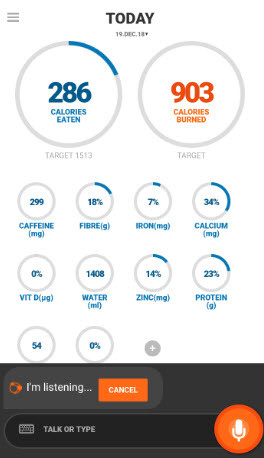
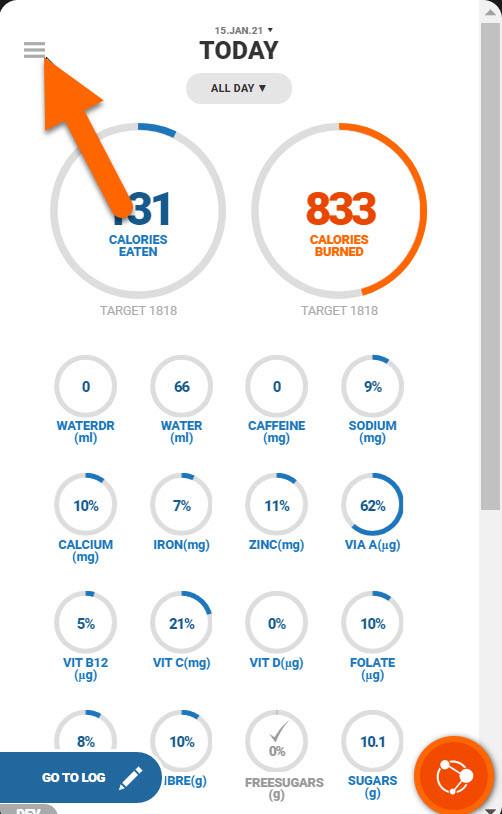
Libro has been designed to be as user friendly as possible, with a main home screen with which can be personalised with nutrition and health trackers and various displays relevant to you and your lifestyle goals. A tracker is an element of your diet or lifestyle that you wish to monitor for example, your vitamin D intake.
Your home screen is tailored to what you and your nutrition professional want you to see.
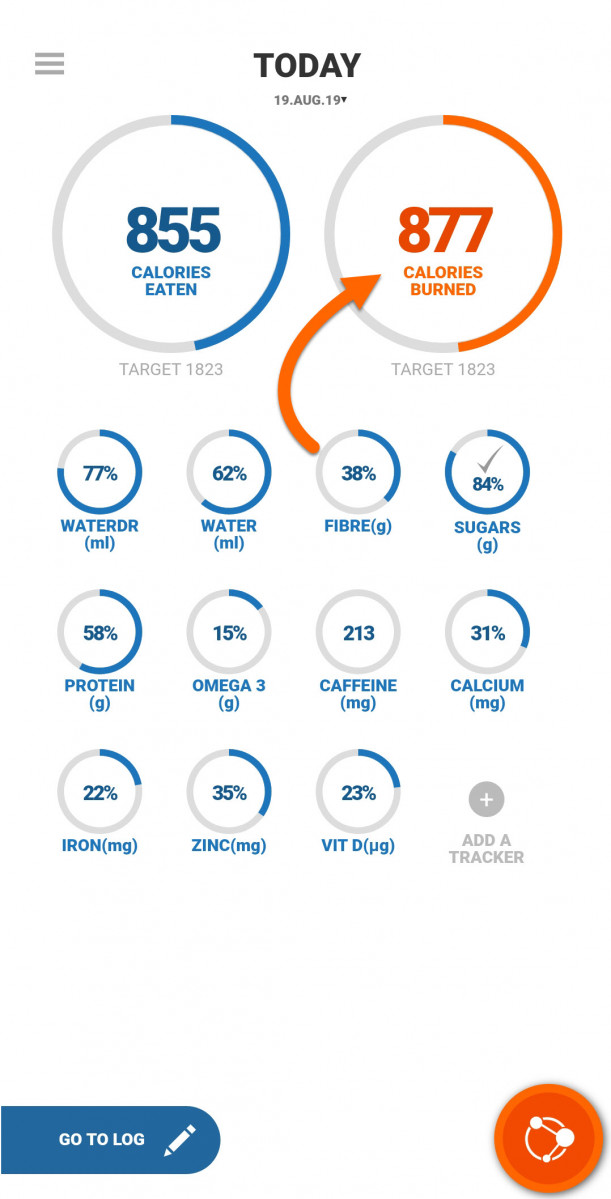
This home screen can be personalised to include trackers of choice if allowed by your nutritional professional. Your display will also show your calories eaten and calories burned for the day.
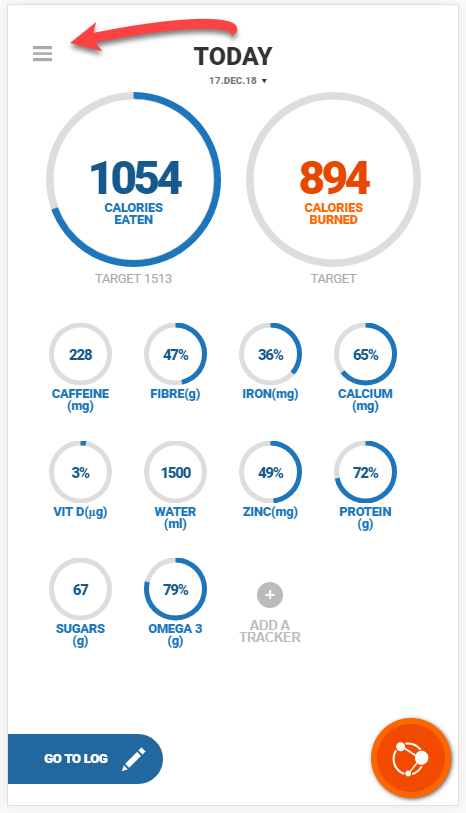
If you click on ‘Today’ you will access a calendar where you can search previous days.
Dates with a circle around them indicate that you have logged on that day.
Days can also be changed by swiping left and right on the home screen.
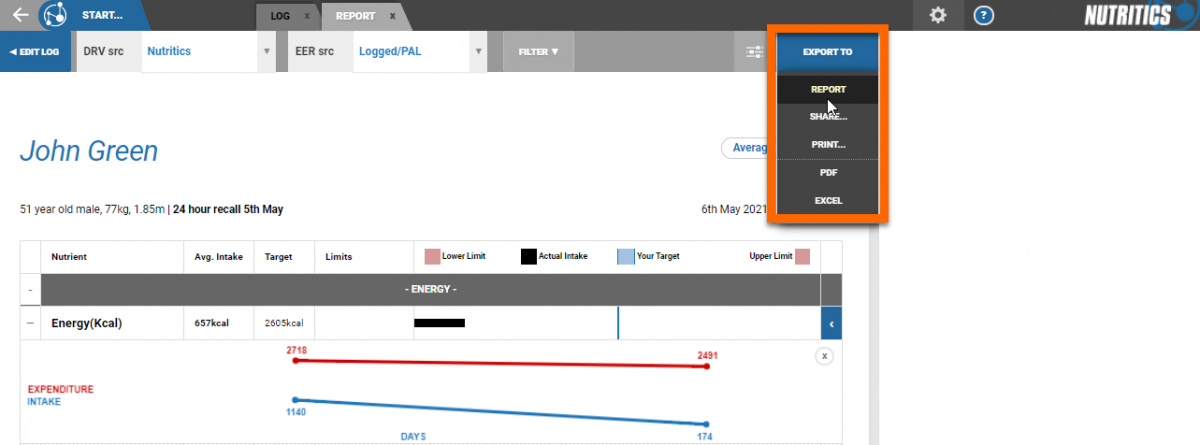
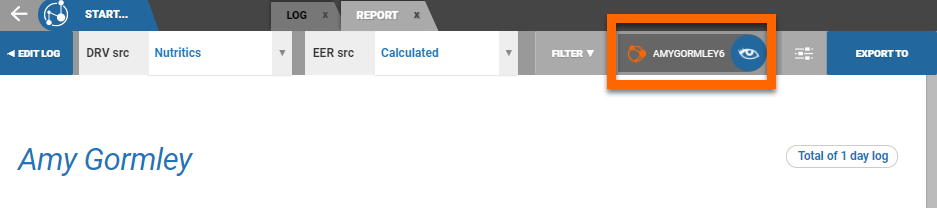
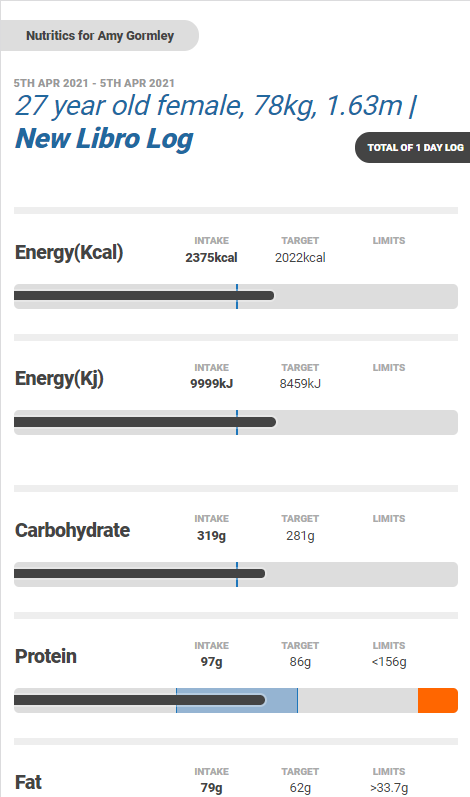
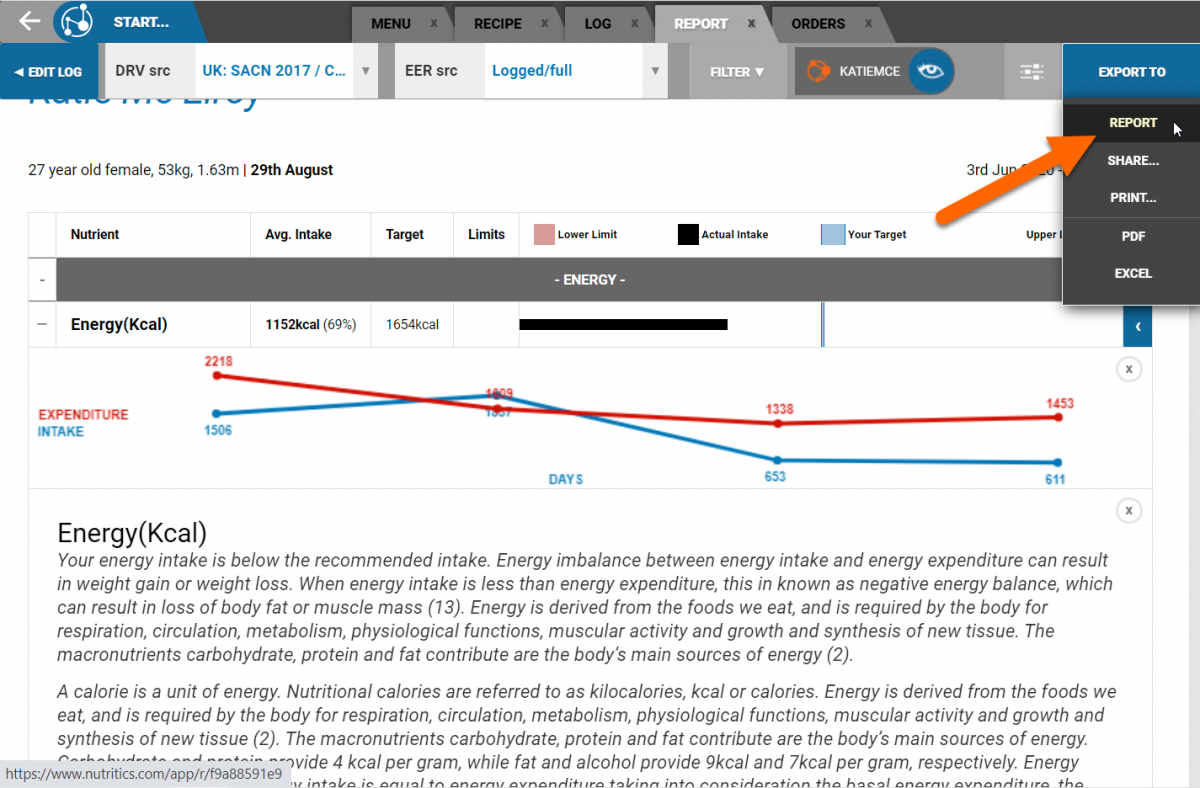
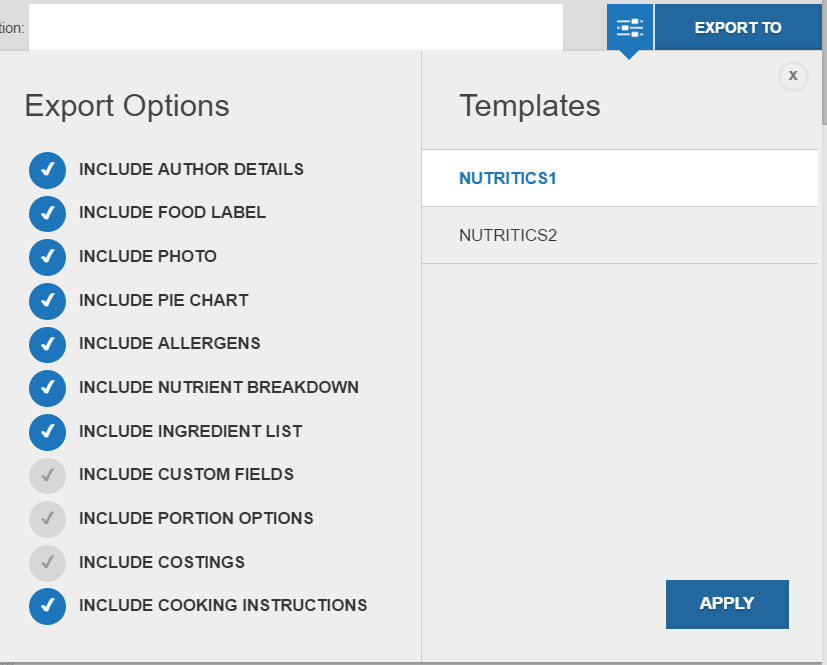
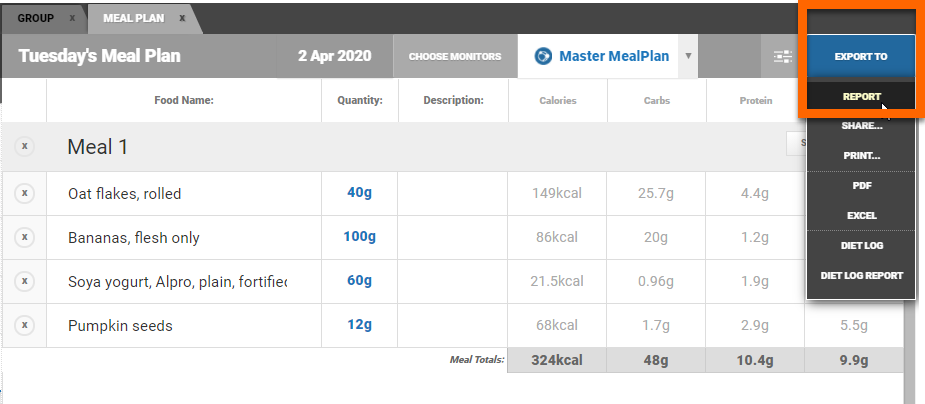
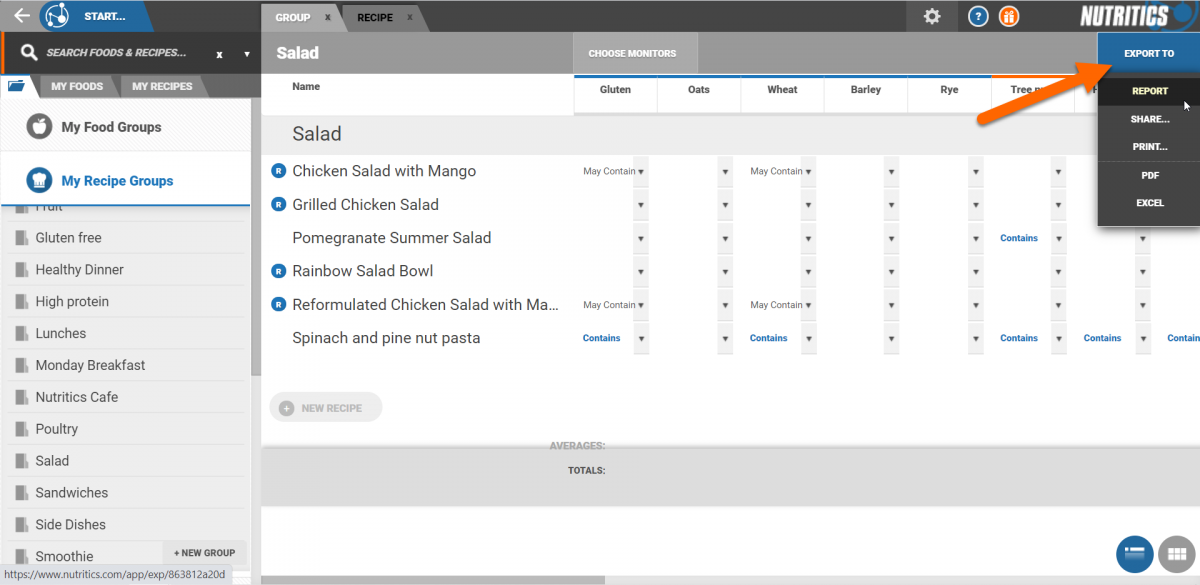
Diet log reports can be printed or shared from the 'export to' button at the top right of the screen. Note that the share link is live, and any changes you make on the report will be reflected in real time, without the need to reshare or send an email again.
Sharing a Diet Log Report to Libro
If your client is set up on Libro, reports can be shared directly to their Libro app by clicking their name at the top right of the report screen.
The eye icon here means that the report is now shared in read only format.
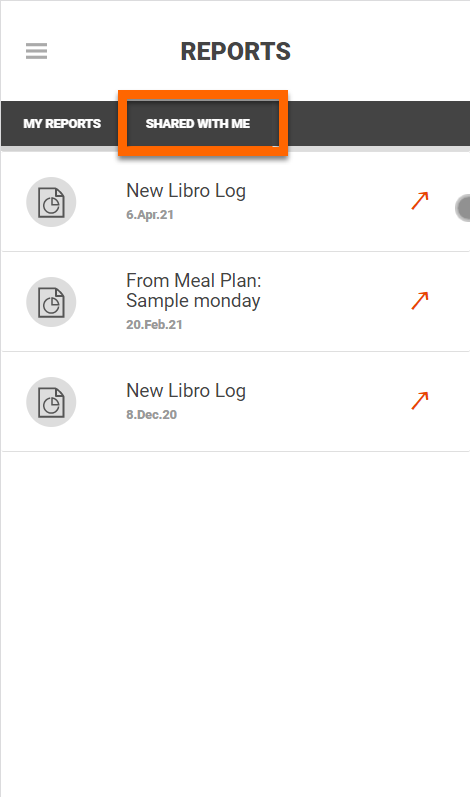
Your client can see this in their 'Shared Reports' section in Libro by clicking on the menu icon and navigating to the 'Reports' section.
All diet logs that have been shared can be found in the 'Shared with Me' tab.
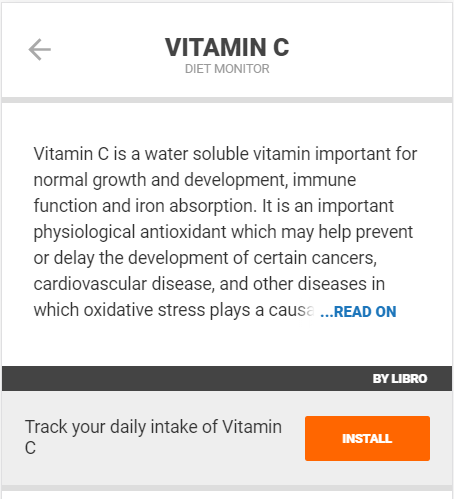
A tracker is an element of your diet or lifestyle that is being monitored.
From the homescreen, click on one of your nutrient trackers to view more information on it.
- Your intake for that nutrient and your progress in relation to your daily target for that nutrient are shown in a bar chart. Beside this, your intake over the previous days are shown in a bar graph. Click on a date to jump to your nutrient intake on that day. You can also edit your food log from this workspace.
- Your top food sources that contributed to your nutrient intake will be listed underneath the graphs. The food name, portion size logged and the contribution of each food to your intake of that nutrient are shown.
- Underneath the list of foods, you will find some background information on the nutrient.
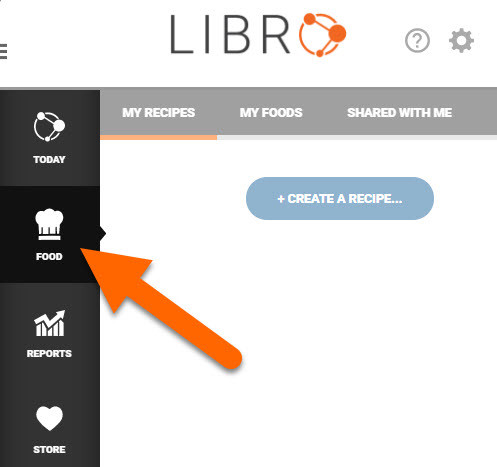
The Libro Menu is available in the top right corner of the homescreen.
The menu provides various support tools and account specific features such as adding and creating new foods and recipes, viewing reports and feedback shared with you, and the adding of trackers to your account.
Today
This returns you to your home screen
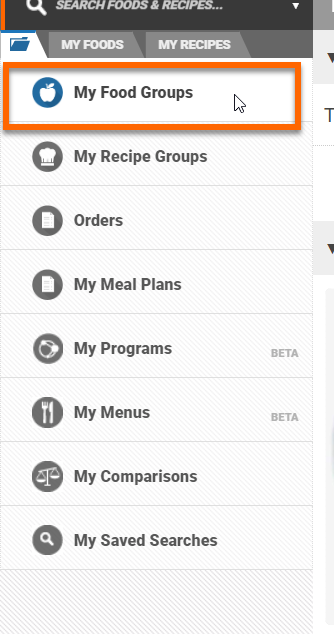
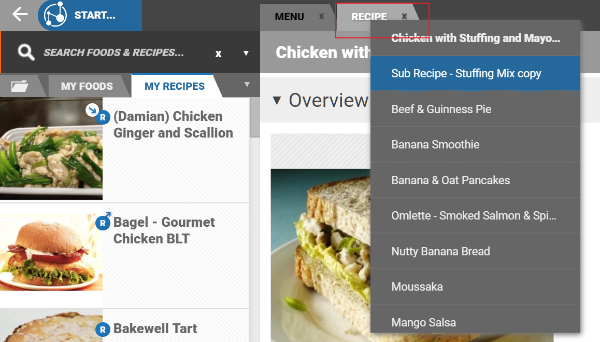
My Food
My Food is divided into three sections - My Recipes, My Foods and Shared With Me.
My Recipes
Any recipes created by you in Libro are stored under ‘My Recipes’. The recipe can be viewed by selecting the ‘i’ icon. The recipe can be added to a diet log by clicking on the plus icon.
My Foods
Any foods created by the client in Libro are stored here. The food can be added to a diet log by selecting the tick icon. The food can be viewed by selecting the ‘i’ icon.
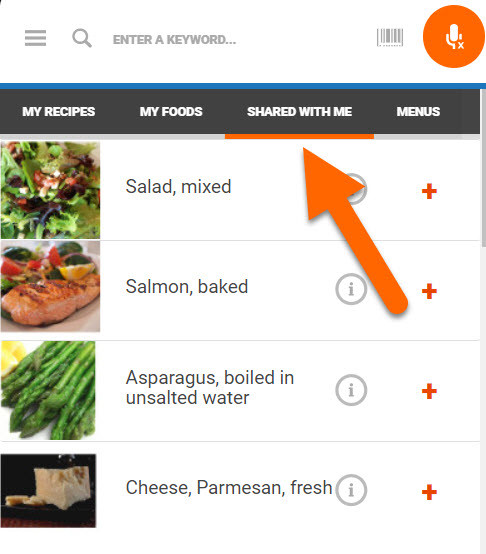
Shared With Me
Any foods or recipes shared with you from your nutrition professional are stored here. The food/recipe can be added to a diet log by selecting the tick icon. The food/recipe can be viewed by selecting the ‘i’ icon .
My Reports
My Reports is divided into two sections - My Reports and Shared With Me.
My Reports
Any reports created on Libro can be viewed here.
Shared With Me
Any reports shared with you from your nutrition professional can be viewed here. To view the report, click on the report title.
Store
Add trackers to your home screen via the Libro Store.
This tracker will monitor your daily targets or intakes for each respective goal.
Settings
From the home screen you can access your settings by clicking on the menu and then the settings icon.
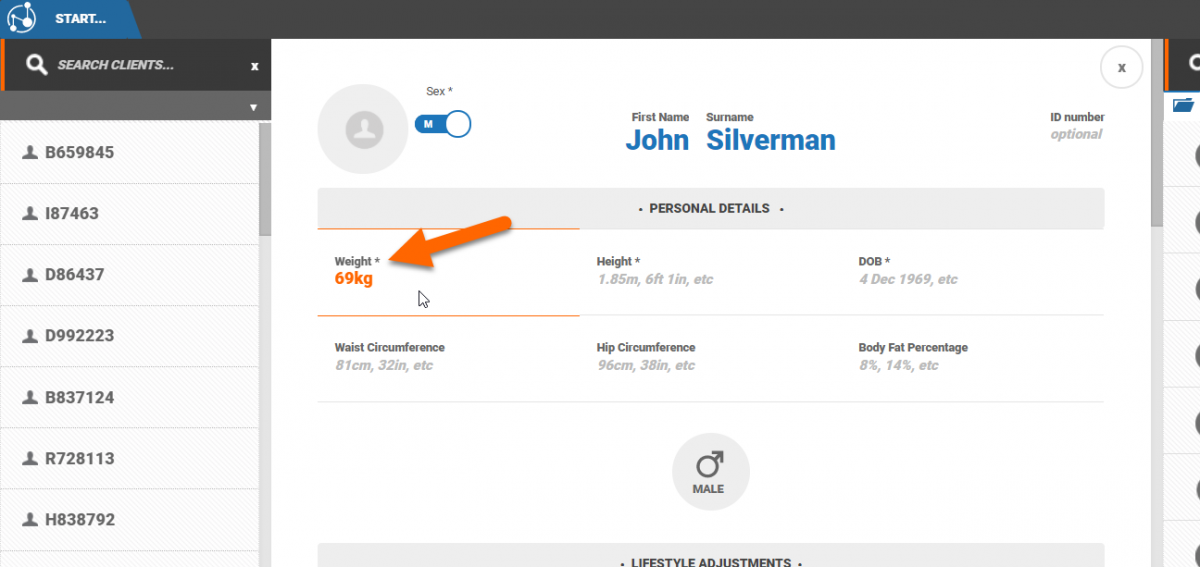
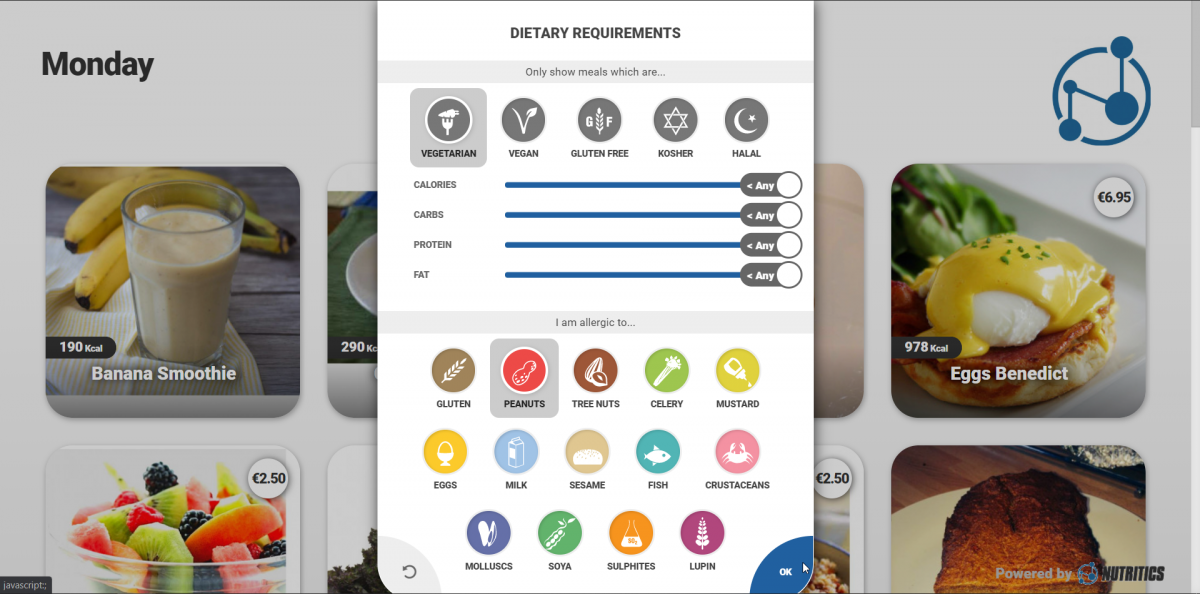
In the ‘profile’ tab, you can change your personal details, specify your dietary requirements.
In the ‘voice’ tab you will see examples of questions you can ask Libro.
In the ‘general’ tab you can log out of Libro and change your Libro build.
We recommend you stay in the live build of Nutritics unless advised otherwise.
In the ‘about’ tab you can see the version of Libro you are running and log any issues you might have.
A tracker is an element of your diet or lifestyle that you wish to monitor.
Adding trackers from the store:
1. From the home screen, open the menu in the top left corner of the screen.
2. Click on ‘Store’.
3. Choose from diet and activity.
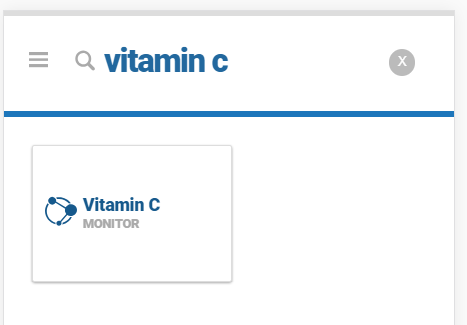
4. Search for a tracker in the search bar.
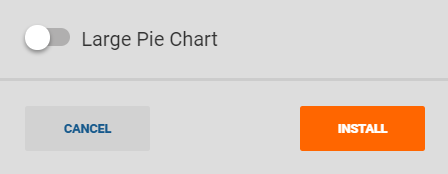
5. Click on the tracker for more information. If satisfied, click the install button.
6. Specify if you would like the tracker to appear as a large or small chart on your homescreen and click install.
Adding trackers from the home screen
On the homescreen, click the ‘+ add trackers’ button.
This will bring you to the store where you can browse and search for diet or lifestyle trackers.
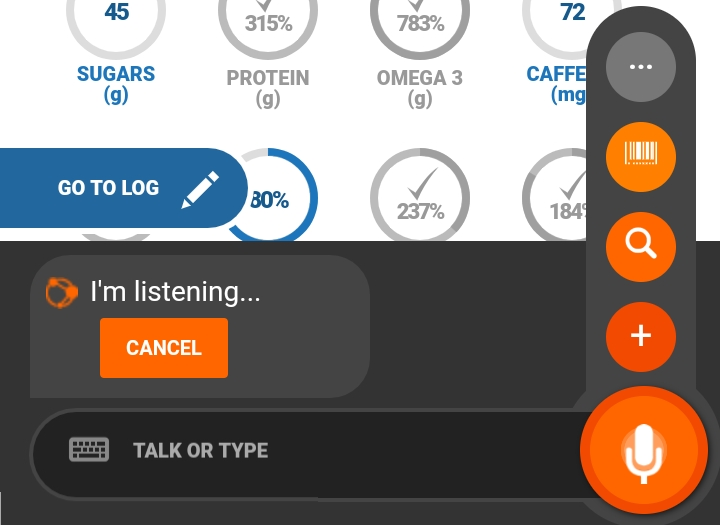
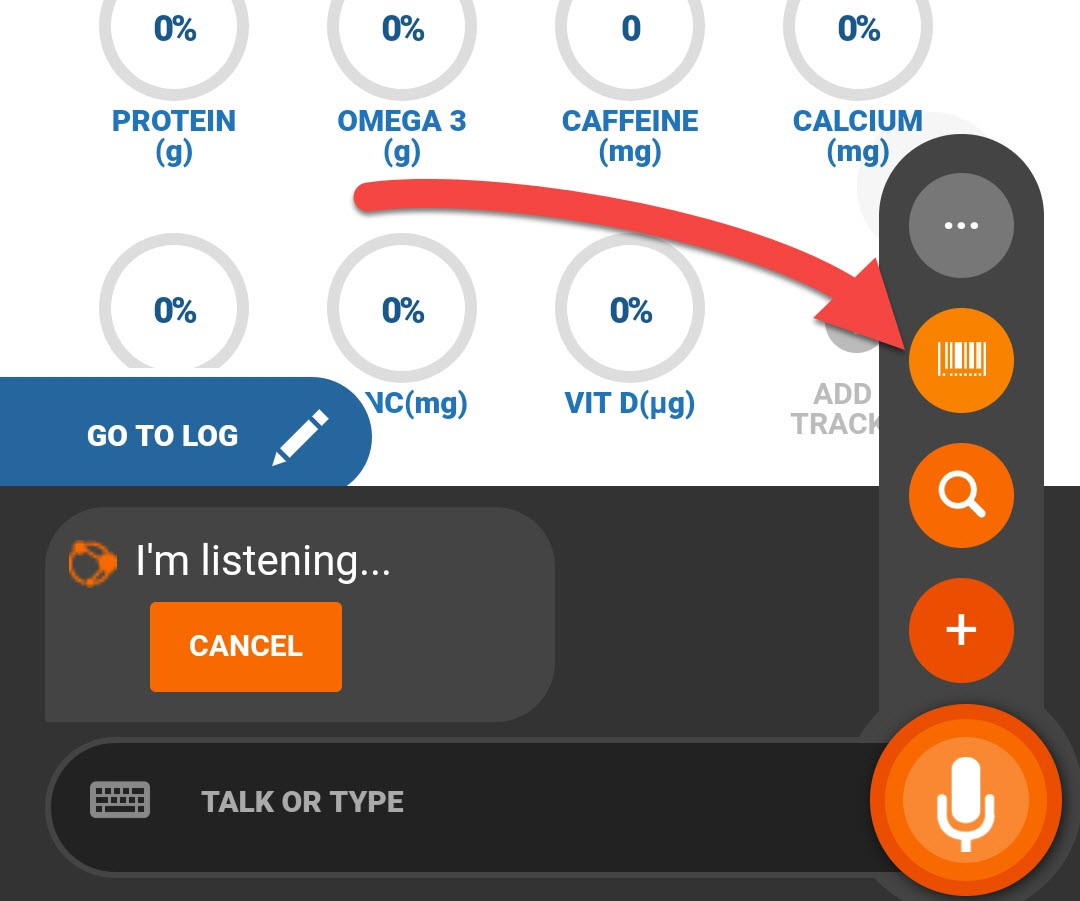
You can access the Libro quick menu by clicking on the Libro icon  in the bottom right corner of the screen.
This will open up the quick menu where you can easily start off a number of actions such as running a food search or creating a recipe.
Talk or type a question for Libro e.g. ‘How much vitamin C is in an orange?’
Click on the plus icon to log a food
Click the magnifying glass to run a search
Click the barcode icon to scan a product barcode and quickly add this to your log
Click the 3 dots to open up an extended menu
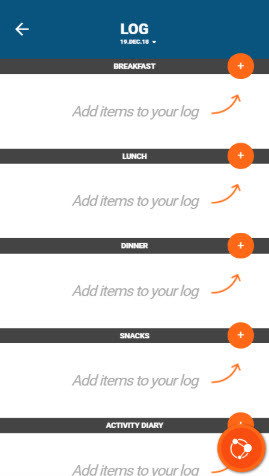
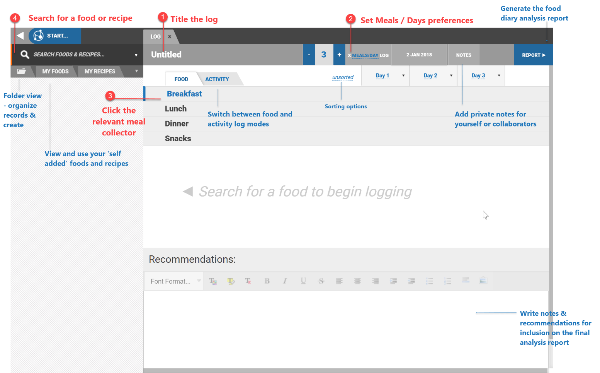
LOGGING MANUALLY
1. From the homescreen, click ‘Go to log’.
2. To add items to a section of the log, click on one of the orange plus buttons.
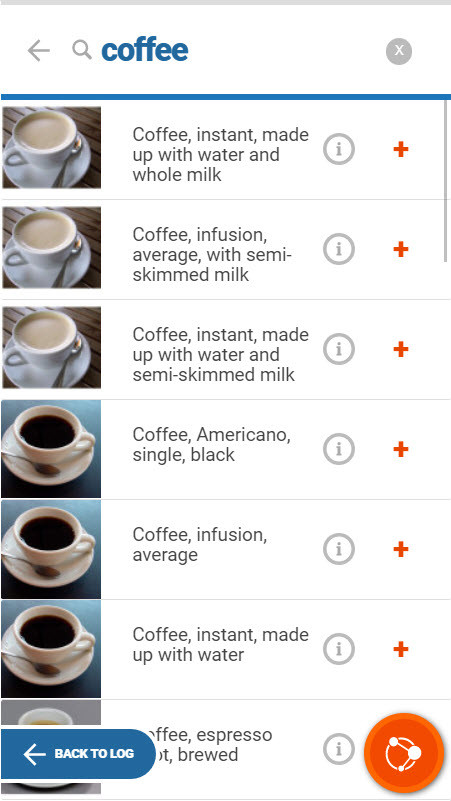
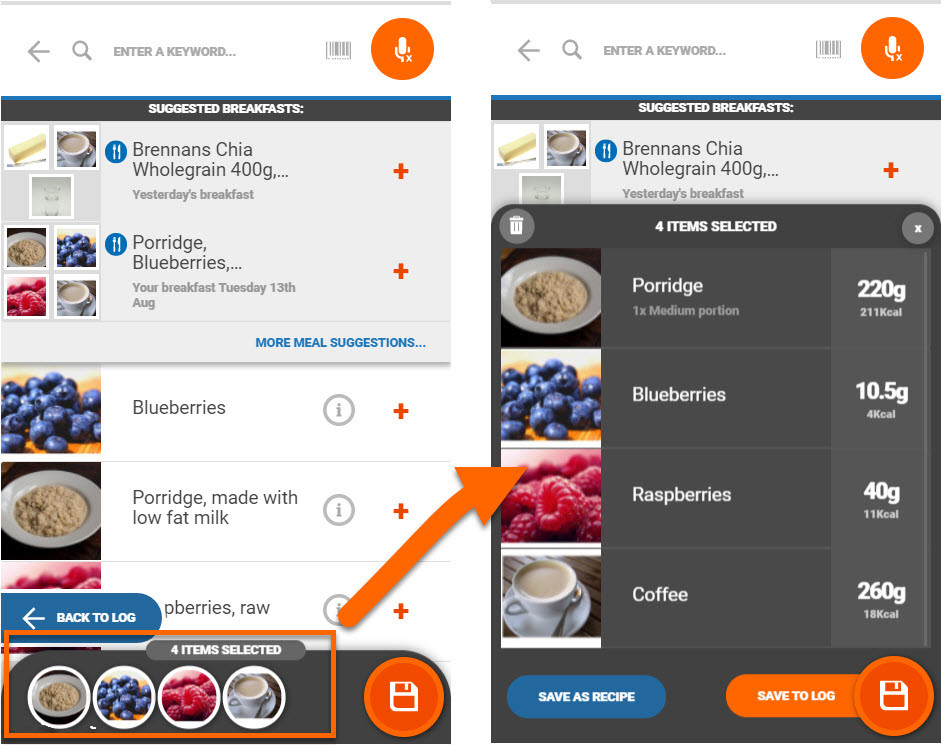
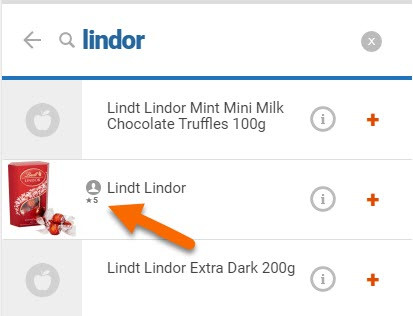
3. Enter a keyword into the search box, or add from suggested foods. Suggested foods are foods that you log frequently. For example, if you have log porridge for breakfast for a number of days, Libro will remember that you frequently have this food and suggest it the next time you log your breakfast, saving you time. Searchable keywords include foods, recipes and exercise.
4. Click on the ‘i’ symbol to view more information about a food.
5.If you wish to add the food to your log, click on the ‘plus’ symbol.
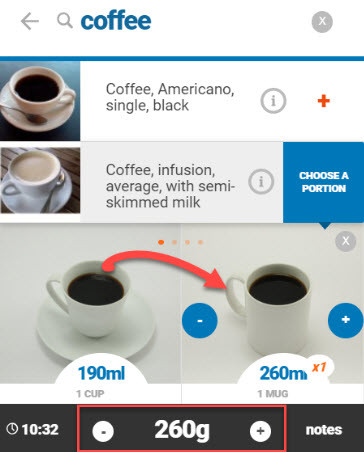
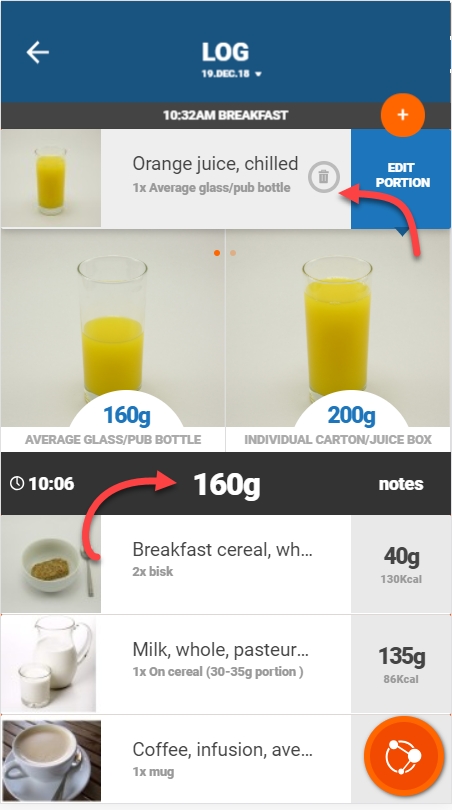
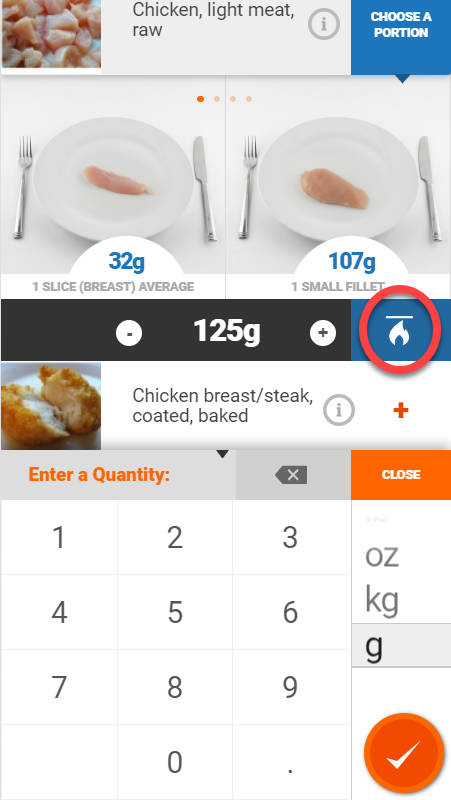
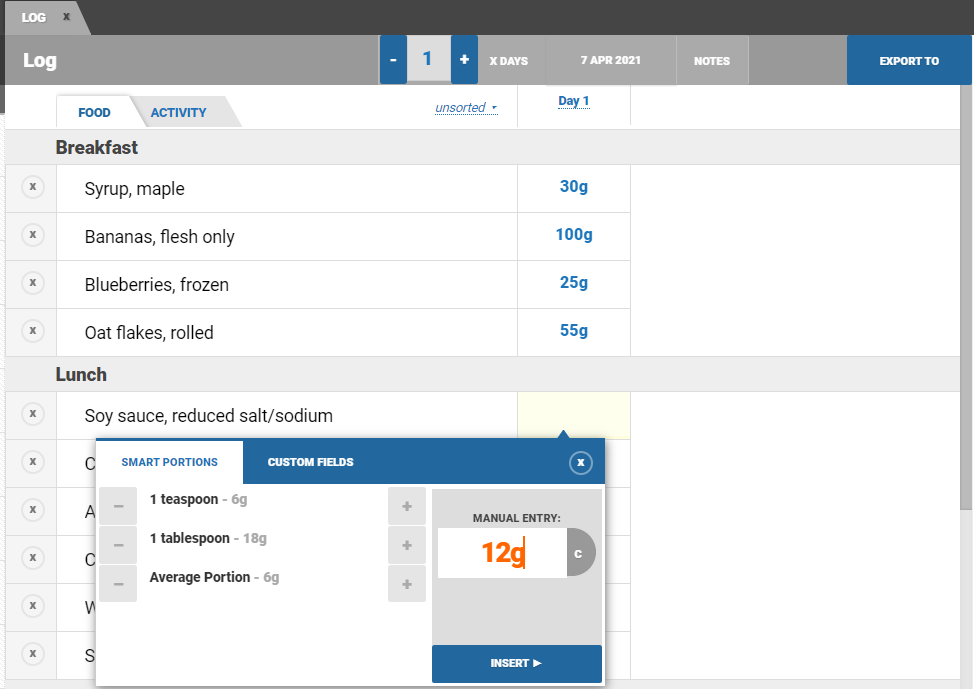
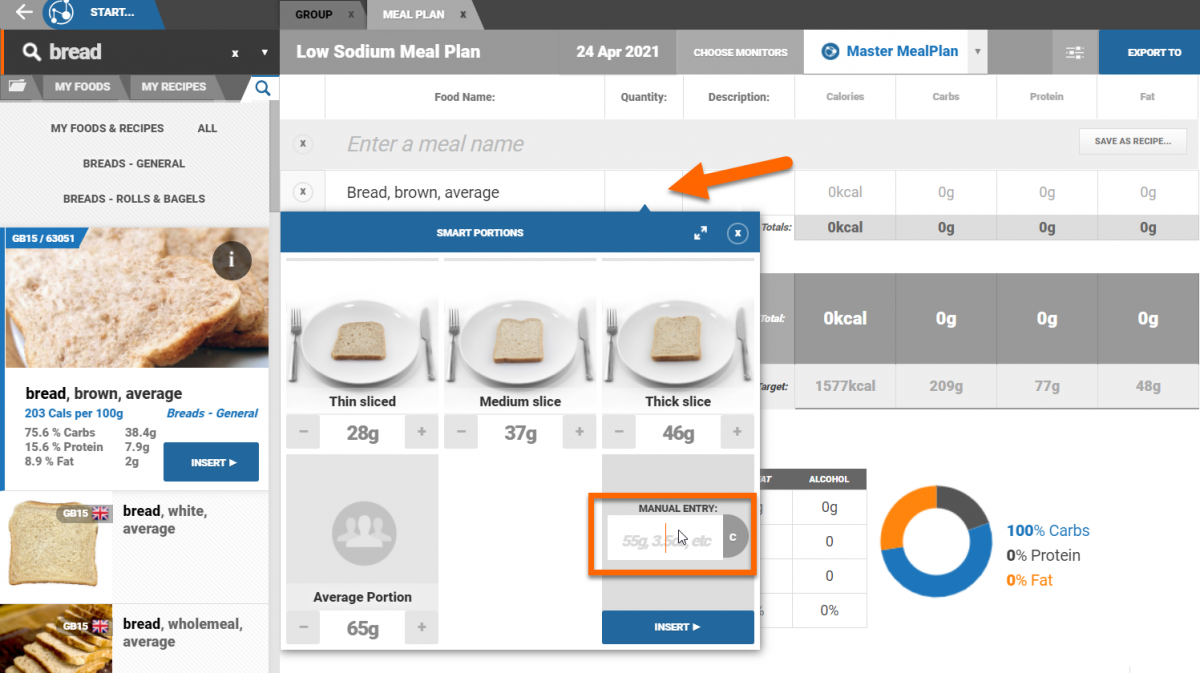
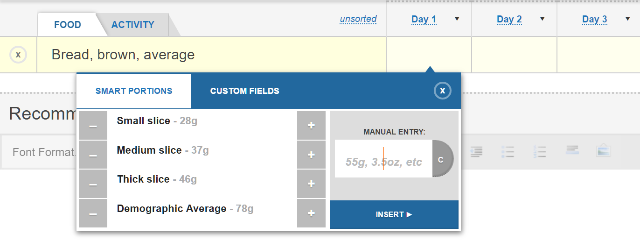
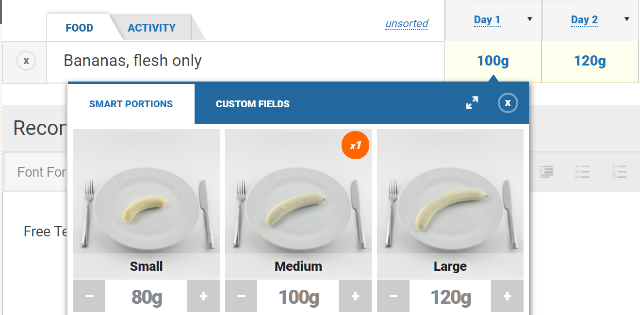
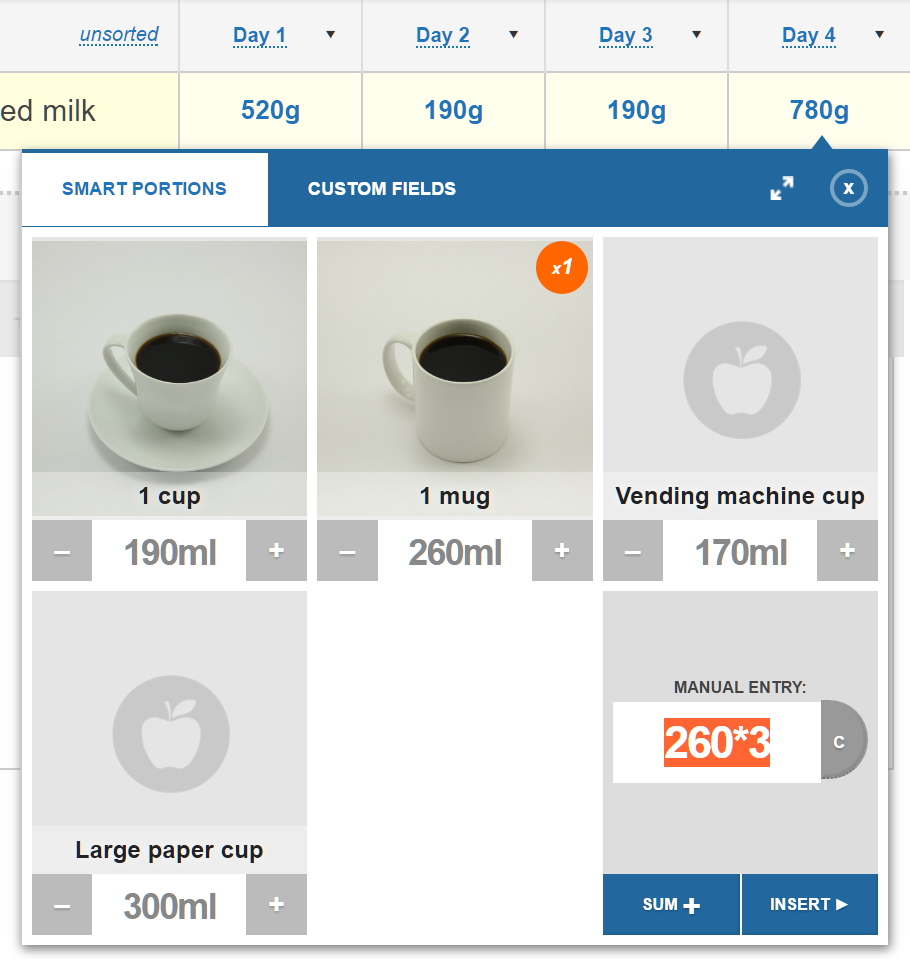
6. Select from predetermined portion size by clicking on the portion. Click on the plus button on the portion photo to increase the quantity by one portion. Click the minus button to decrease the quantity by half a portion. Alternatively, you can manually type a quantity in the box below the suggested portions or use Bluetooth scales to measure the exact portion weight. We have a guide on using Bluetooth scales
here.
7. If you wish to increase or decrease the portion slightly, click on the plus and minus buttons either side of the portion quantity box to adjust the portion size by ± 10% of a portion.
8. Click on the time to change the time of consumption, or add notes by clicking on the notes button.
9. Click on the orange tick button  to add the food to your basket. You can continue searching for and adding foods by following the steps above. Click on the basket to expand it.
Click on an item to edit the portion size or swipe right to delete the item from your basket. Once you are done adding foods to your basket, you can save the items as a recipe or click on the save button

and the items will be added to your log.
10. Once you are finished adding foods to your log, you will be taken to your log. To see your updated nutrient trackers, click the back button again to return to the homescreen.
LOGGING BY VOICE
You can add foods to your log by voice. Click on the Libro icon in the bottom right corner of the screen.
You can uses phrases such as "I ate an apple as a snack at 2:30pm" or "I had cornflakes with semi-skimmed milk for breakfast" and Libro will automatically add those foods to your log for you.
You will be brought to your log where you can adjust the portion size if needed.
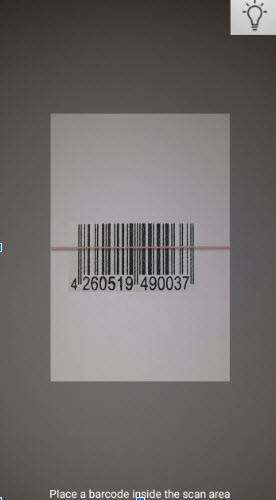
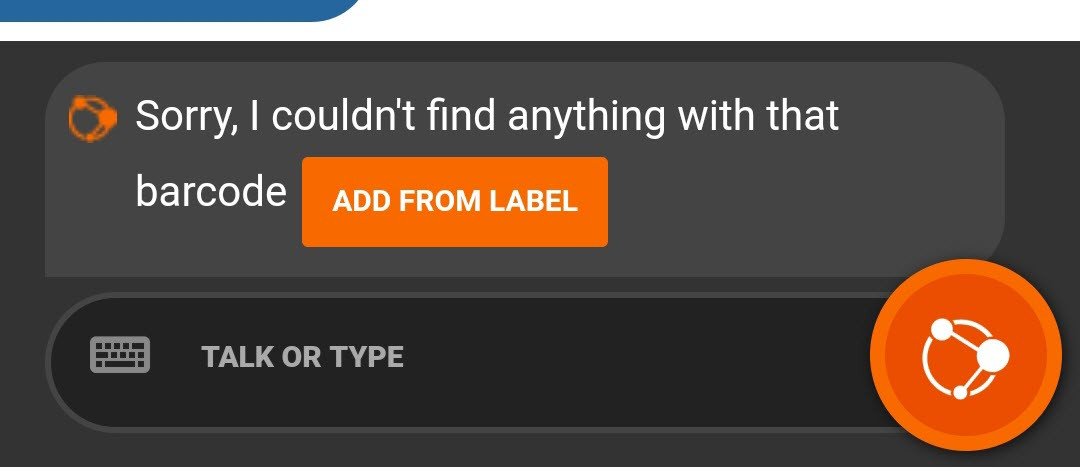
LOGGING USING A BARCODE
On the home screen, click on the Libro symbol in the bottom right corner of the screen and then click on the barcode symbol. Follow the prompts on screen to add the food to your log.
Alternatively:
1. On the home screen, click on ‘Go to Log’.
2. Click on the orange plus button beside the name of the meal you would like to log.
3. Click on the barcode symbol to the right of the keyword search bar.
4. Scan the barcode on the food label.
5. After a food is adding from a barcode, your log will open automatically and you can review the portion size entered.
Connecting to Bluetooth scales
Use Bluetooth weighing scales to accurately weigh your foods and recipes.
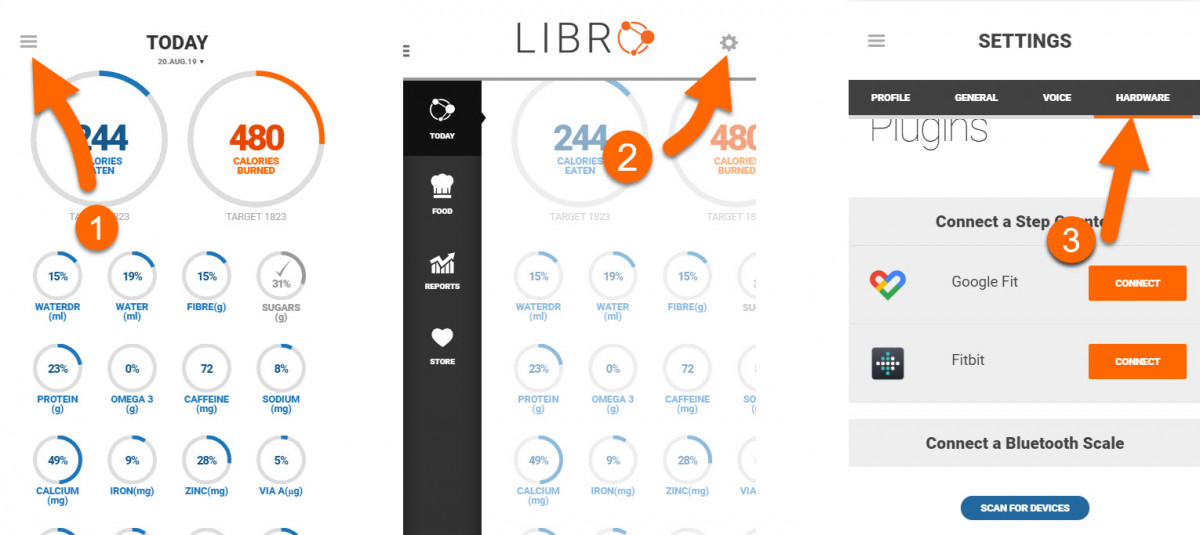
Connect Bluetooth scales to your Libro account by navigating to the menu, going to settings and clicking on the 'hardware' tab.
Make sure your scales are turned on and that Bluetooth is enabled on your phone. Click ‘scan for devices’ and select your device from the results.
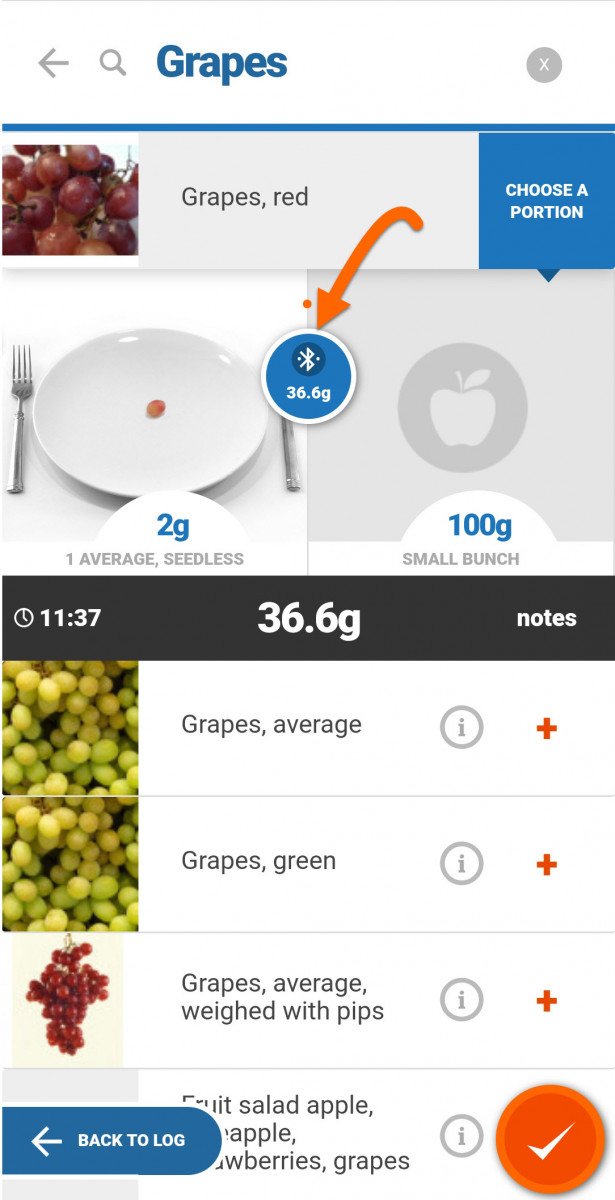
Using the scales in logs and recipes
Click on the menu and then 'today' to return to the home screen. From the home screen you can use the scales to log foods and recipes to your diet log or to add a recipe to Libro.
- Create a
new recipe or click 'go to log'.
- Search for the food or recipe that you want to weigh.
- Select an item from the search results - you will be prompted to select a portion size as normal, but now you will notice a Bluetooth symbol as shown below.
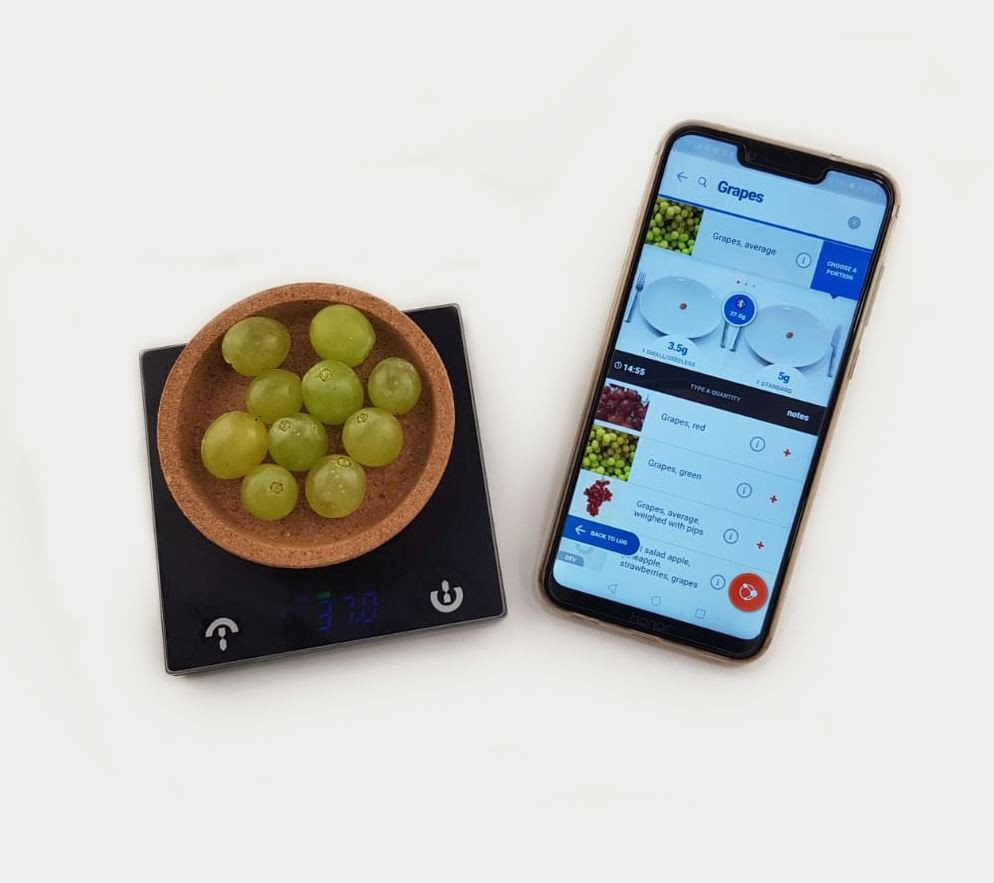
- Place the food item on the scales and the weight will update in Libro automatically.
- Click on the tick button to add the food to your basket. Repeat this process for any other foods you wish to add.
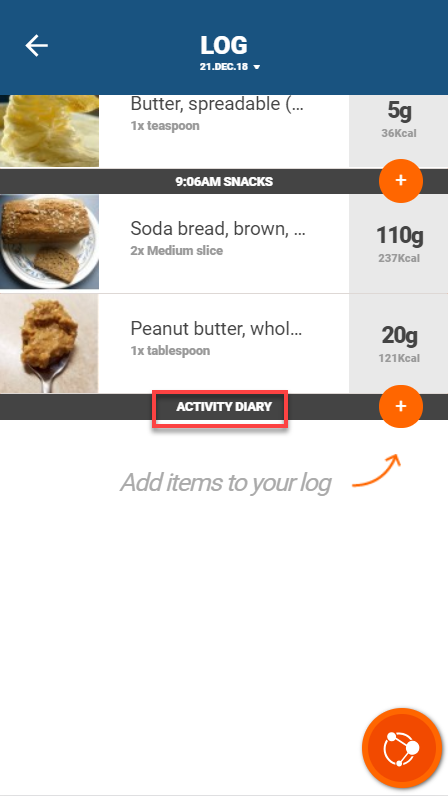
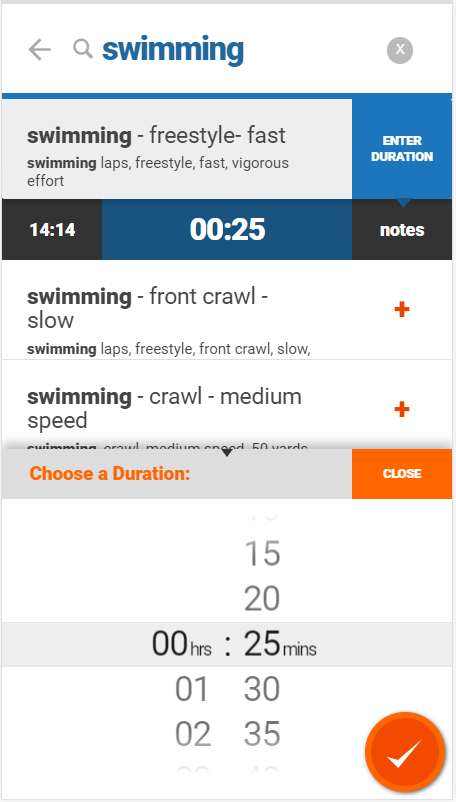
1. From the home screen click ‘go to log’.
2. Scroll to the ‘activity diary’ section at the bottom of log.
3. Select the orange plus button to add an activity

.
4. Enter a keyword to search for activity or choose from recent activities.
5. Add activity by clicking the orange plus button
.
6. Click on ‘Select duration’ and scroll through the hours and minutes to set the activity duration.
7. Add the time the activity was performed and any additional notes.
8. Save your activity by selecting the orange tick
.
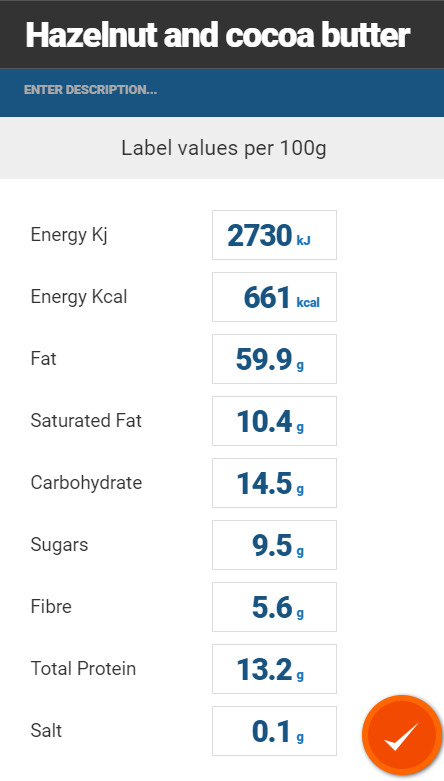
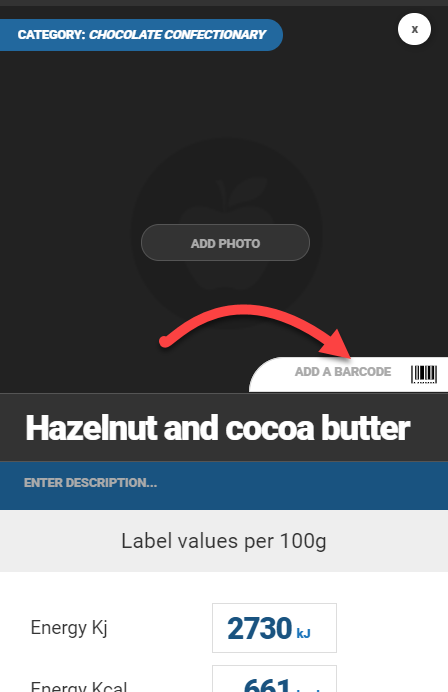
1. On the homescreen, click on the menu

2. Click on ‘Food’
3. Select the ‘My foods’ tab
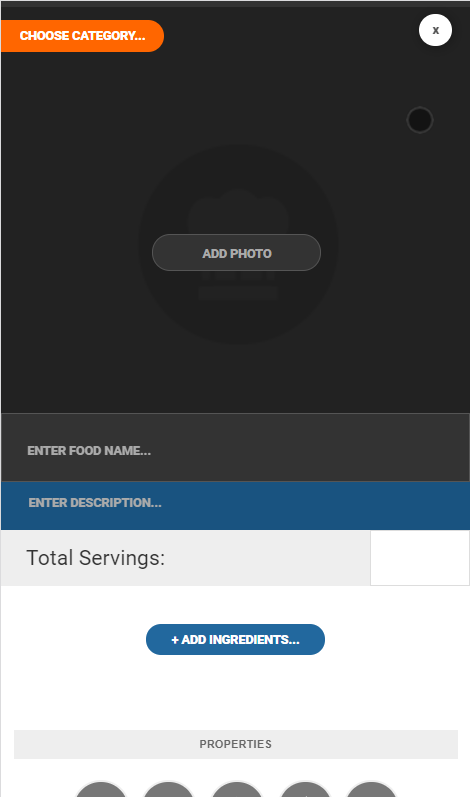
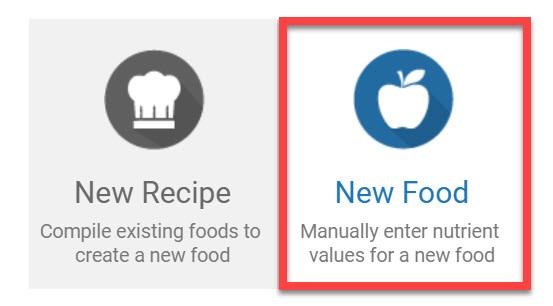
4. Click the ‘+New food from label’ button
5. Give the food a name and provide a description with any additional information (for example, manufacturer, data source, flavour, searchable keywords or any other background information).
6. Add a photo from a folder or from the camera.
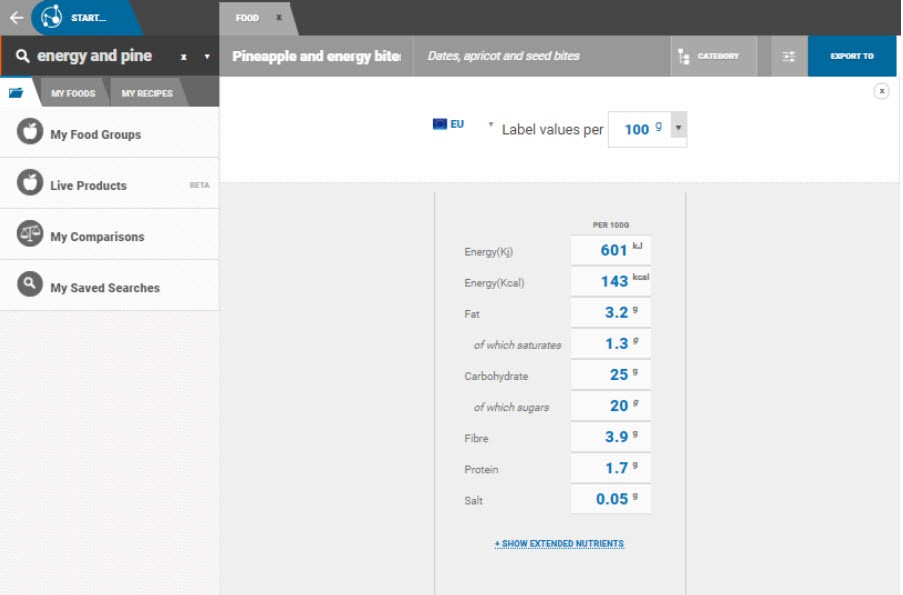
Fill in the label data exactly as presented on the label (per 100g).
7. Choose a category for the food. This is important if the ingredient will be used to create recipes later on.
8. Add any allergy information detailed on the product packaging or ingredients using the allergen indicator buttons.
9. Add a barcode if item is in packaging or is commercially produced.
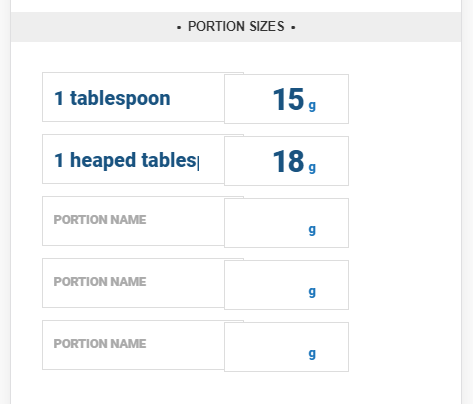
10. Add up to 5 portion sizes.
11. Select the tick icon
to save your new food
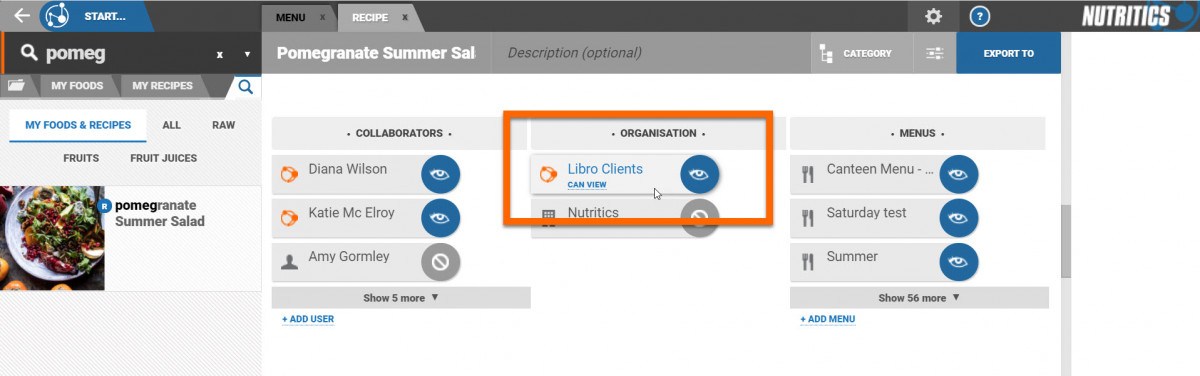
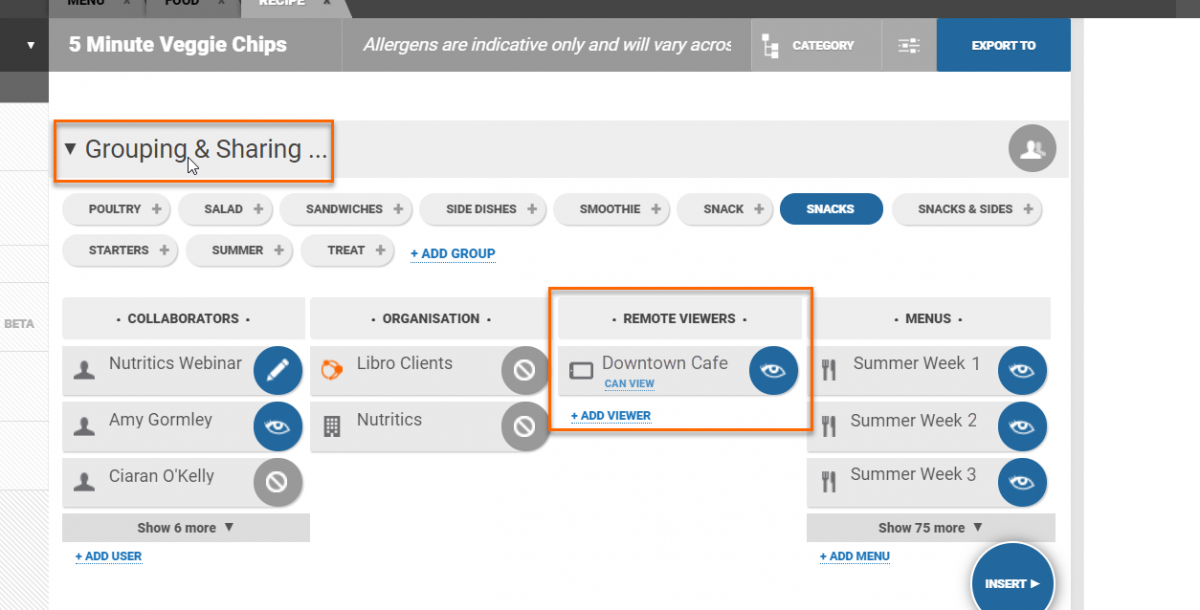
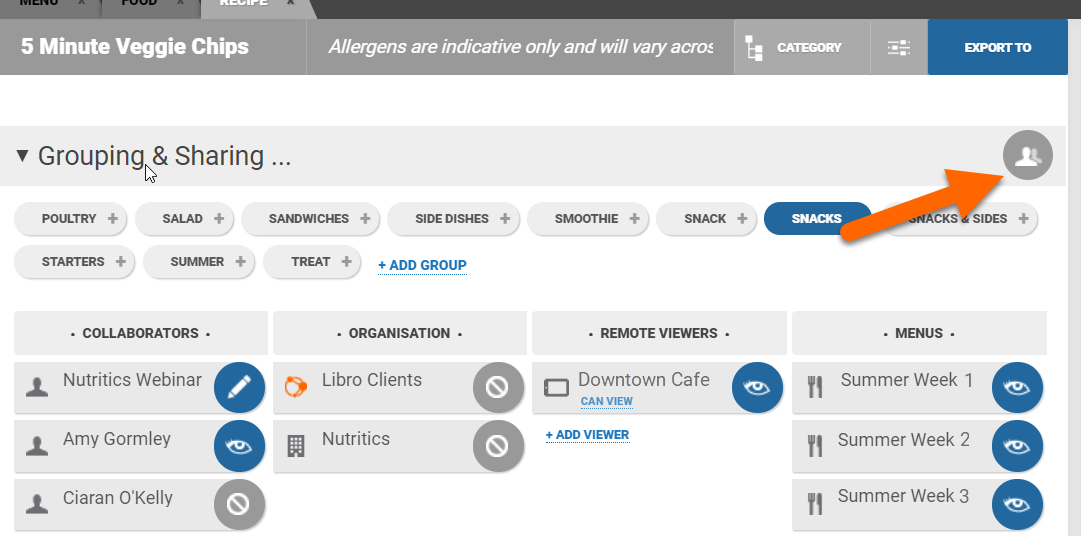
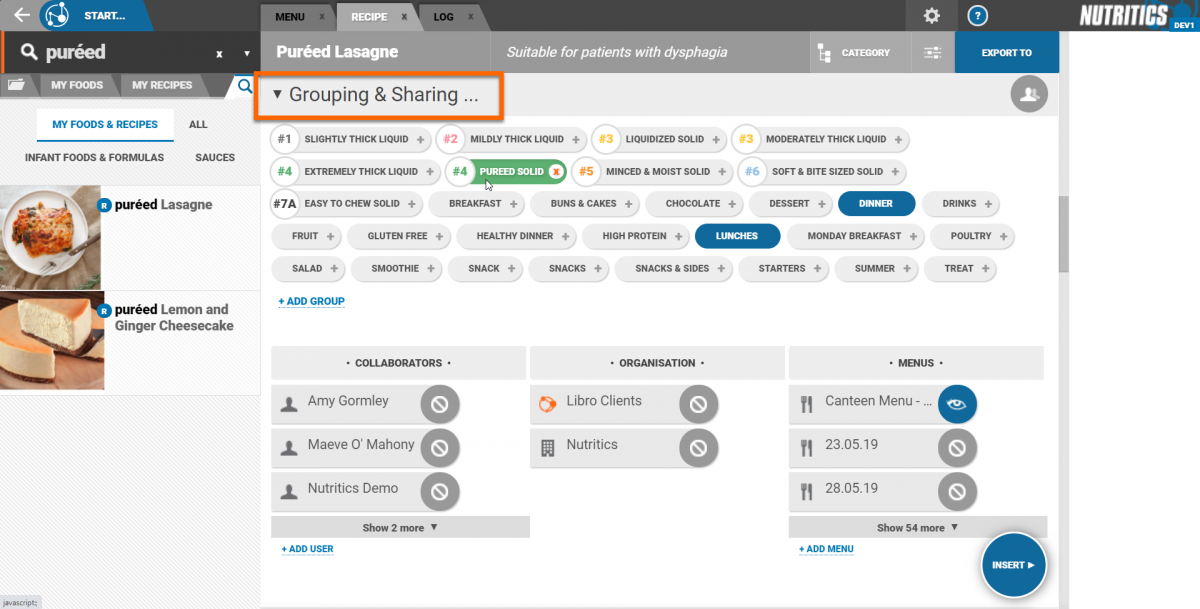
To share your foods/recipes with your clients on Libro, open a food/recipe in Nutritics and scroll down to the grouping and sharing section.
Under the 'organisation' heading, click on Libro clients. The blue eye icon indicates that any clients on Libro can see this recipe in their Libro account.
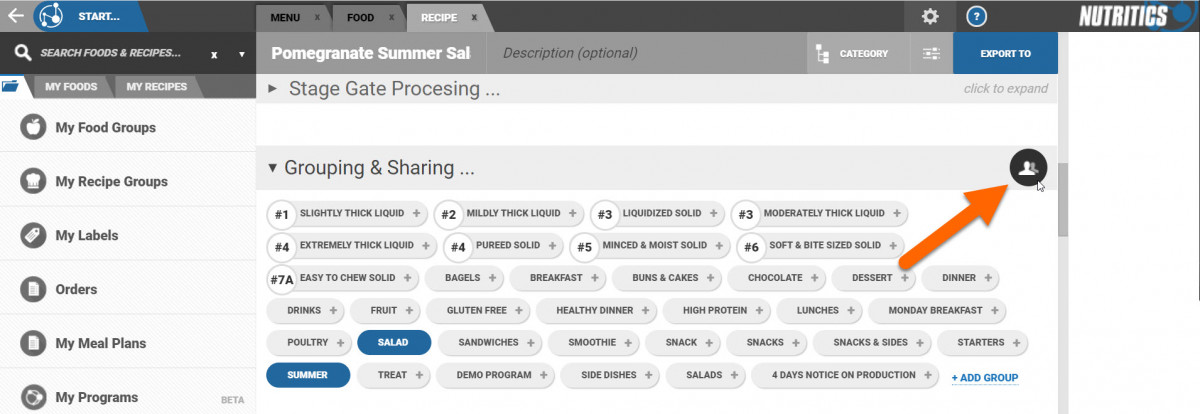
To share recipes in bulk:
- Open a recipe
- Click on the person icon beside the grouping and sharing heading
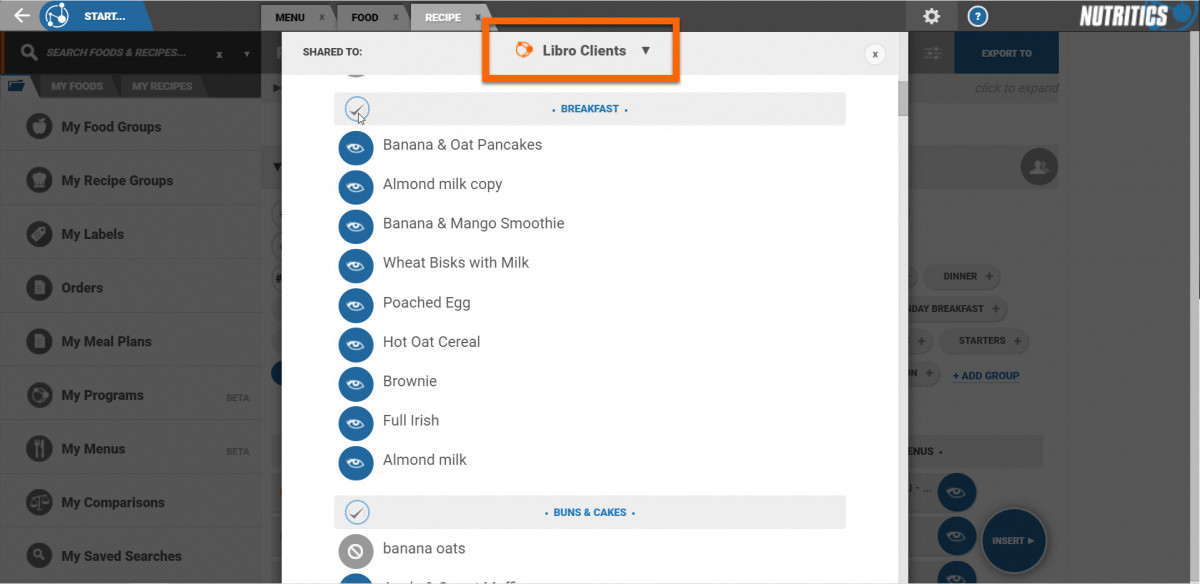
- From the dropdown menu, select 'Libro clients'
- Tick any recipes to be shared with your Libro clients
To see a shared recipe in Libro:
- Click on the main menu icon
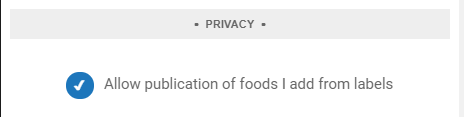
Help us grow our database by submitting your foods for publication in the Libro community database. To ensure our users are getting accurate information, all foods undergo a rigorous quality check before they are added to the database for general use.
You can opt out of contributing to the database at any time from the menu < settings < profile < privacy.
1. To add a food, click on the Libro logo and then on the barcode icon.
2. Scan the barcode on the product label. If the food is not already in the database, you will be prompted to ‘add from label’.
3. Give your food a name, picture, category, nutrition and allergen information and at least one portion size. If you need any more information, we have a detailed guide on adding a food to Libro here. Once you are finished adding all relevant details, click on the orange tick to submit your food.
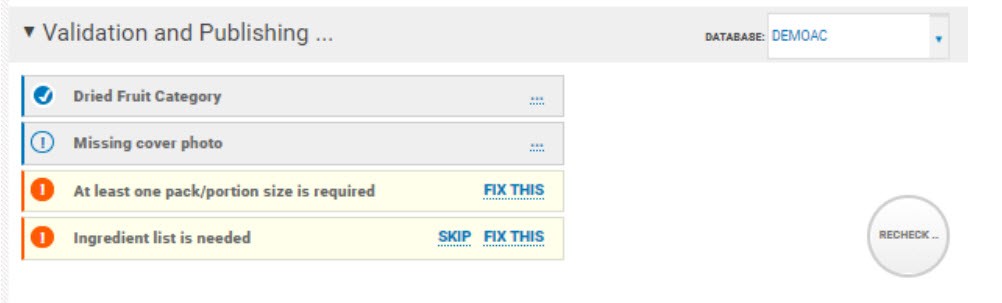
Your food will be immediately available for you to use, but will have to be reviewed by our team before it is published for general use. The food will undergo a series of checks by the system to ensure the information provided is accurate.
Once a food has passed these system checks, it is passed on to our team for review. The food photo is checked to make sure it does not have any information in it that would identify the user. The food name is checked for accuracy and brand information where relevant. Once this is complete, the food is published to the database and is ready to be used by Libro users around the world!
As a thank you for helping us grow the database, you are awarded 1 star for every 10 of your foods that are accepted and published by our team. Your star rating will appear on foods you have contributed to the public database.
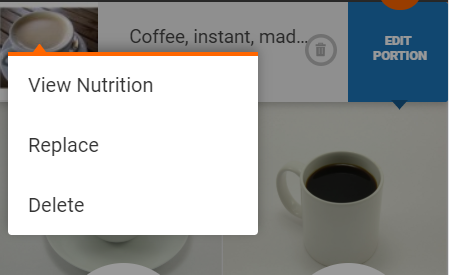
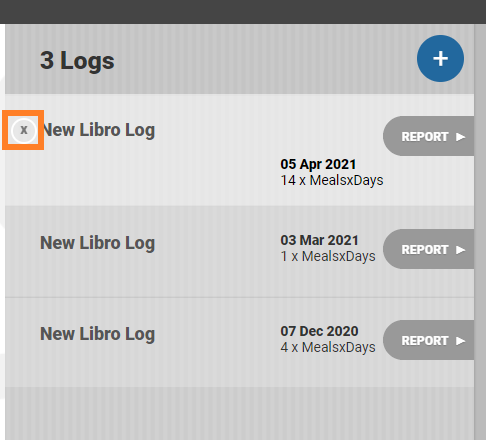
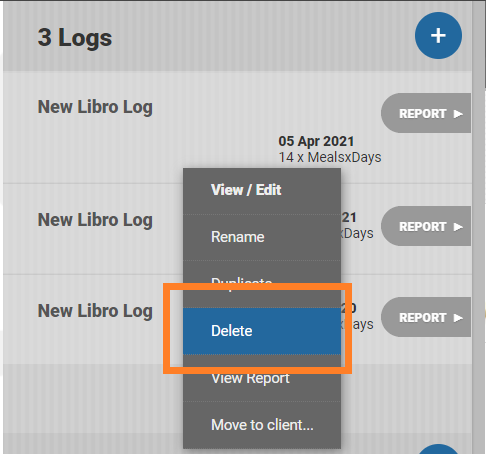
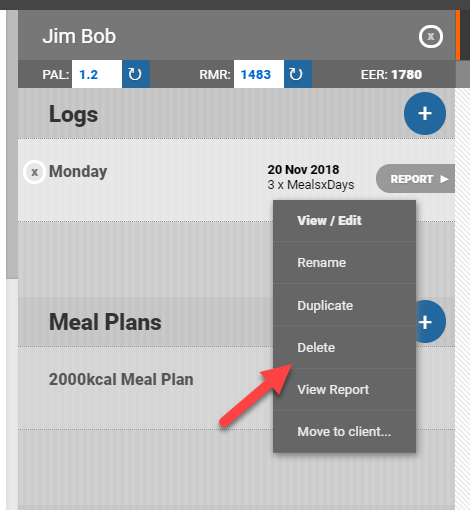
Deleting items
From the homescreen, click on ‘Go to log’.
Click on the item you want to edit/delete. Click on the ‘bin’ icon to delete the item from your log.
Alternatively, long press the item name and click on ‘delete’ or swipe right over the item name to delete it.
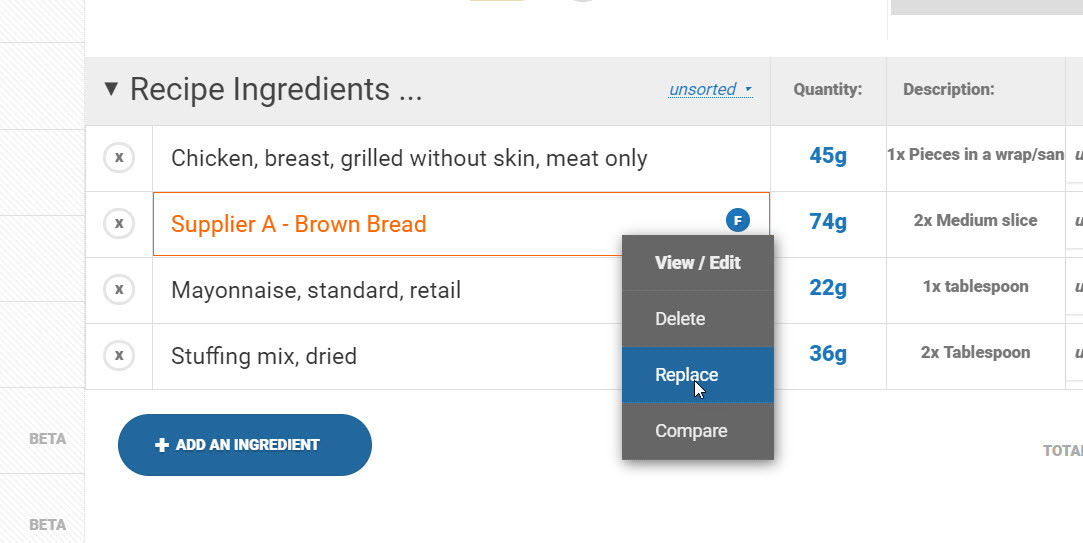
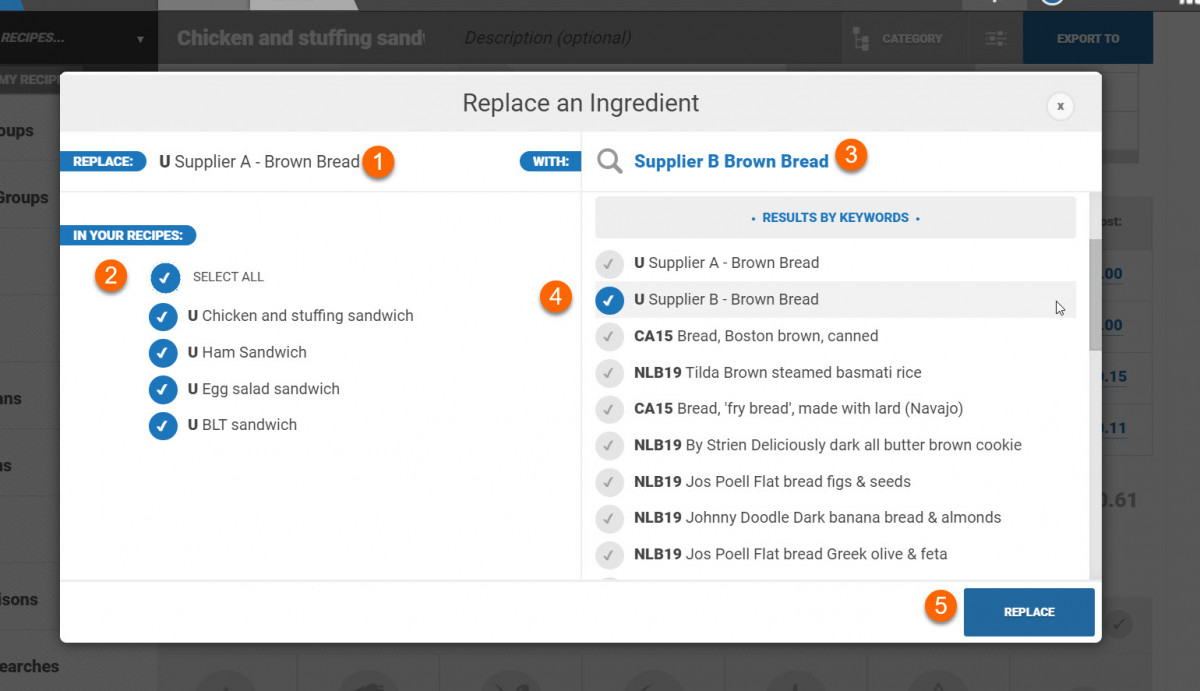
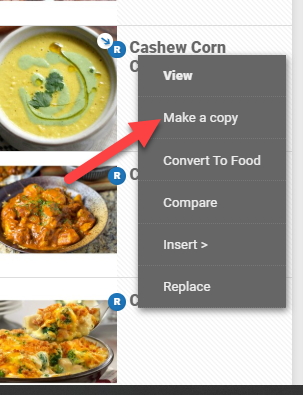
Replacing items
Long press on an item and click on ‘replace’ to swap it out for another item.
Editing portion sizes
To edit the portion size for an item in your log, open your log, click on the food/recipe you want to edit and then click on a portion size photo to select that portion, or manually edit the portion size by clicking on the portion quantity.
1. On the homescreen, click on the menu.
2. Click on ‘My Food.’
3. Select the ‘My Recipes’ tab.
4. Click the ‘+ Create a recipe’ button.
5. Enter the recipe name and description with any additional information (e.g. recipe source, web link, searchable keywords etc.)
6. Add a photo from a folder or from the camera.
7. Choose a category for your recipe by clicking the ‘category’ button above the recipe photo.
8. Click on ‘+ Add Ingredients’ to search and add ingredients.
9. Search for a food by entering a keyword into the search bar.
10. Select the orange plus button to select that ingredient and specify the quantity of the ingredient used in your recipe.
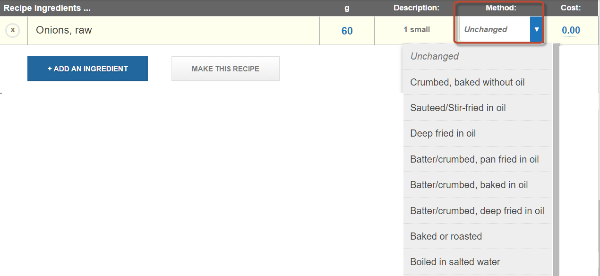
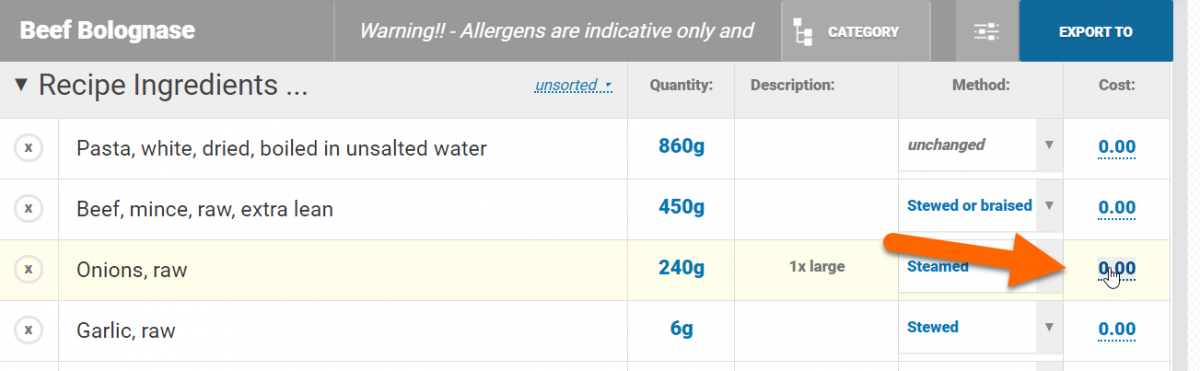
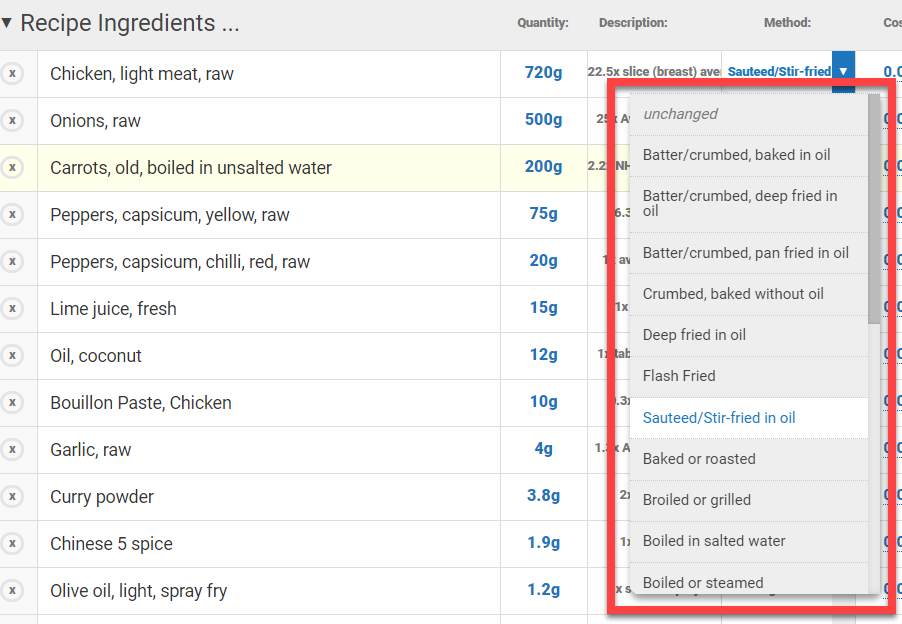
11. Click on the flame icon to the right of the ingredient quantity to set the cooking method for that ingredient.
Cooking methods should be applied to all recipe ingredients to account for nutrient changes during the cooking process. This should only be applied if your ingredients are entered as raw (or applied to cooked ingredient where they have a second cooking method or process.
12. Click the tick icon once you have selected your ingredient quantity and cooking method.
13. Repeat steps 9-12 for each ingredient and click ‘back to recipe’ once you have added all ingredients.
14. Enter the number of portions this recipe serves.
15. You can select properties for your recipe, for example, if it’s vegetarian or gluten free.
16. Add any cooking instructions and notes for your recipe in the free text box.
17. Review the allergen information to ensure it is correct.
18. Add properties to your recipe as appropriate e.g. vegetarian or gluten free by clicking on the properties icon.
19. Select on the orange tick to save your recipe
.
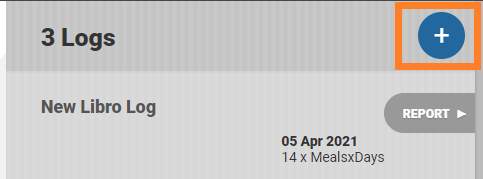
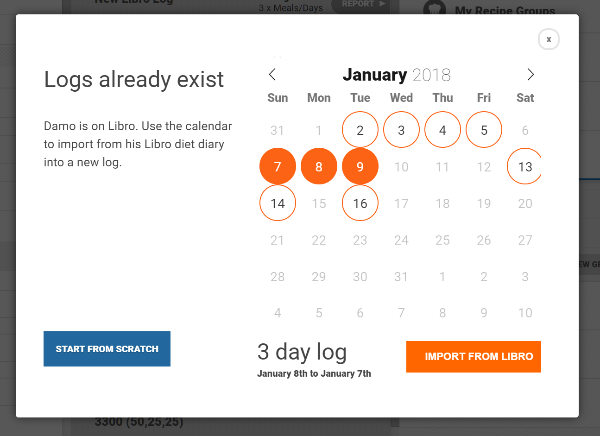
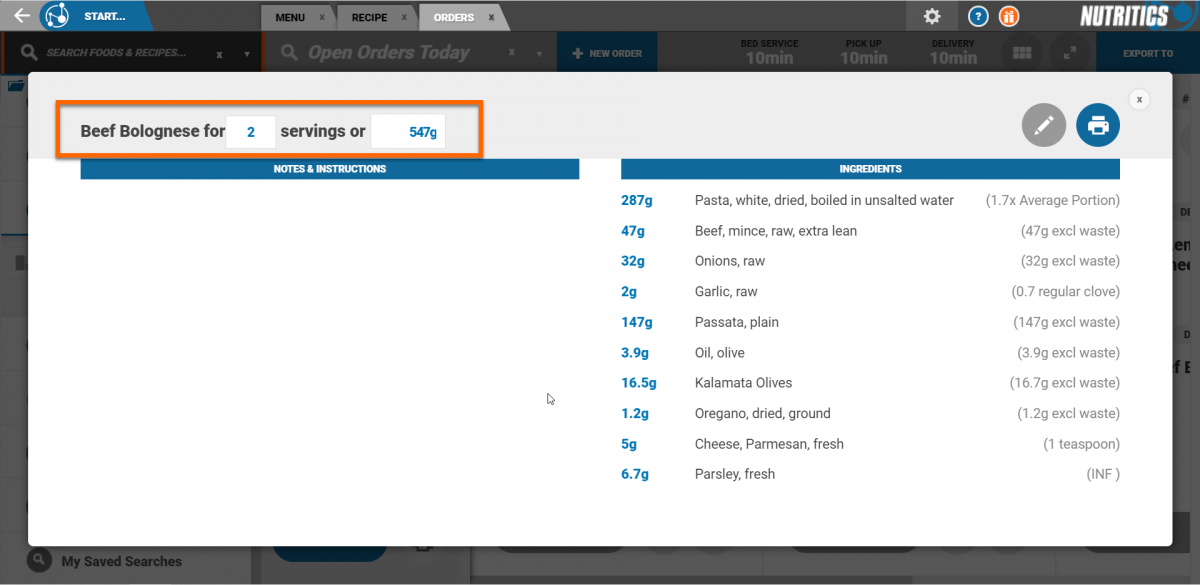
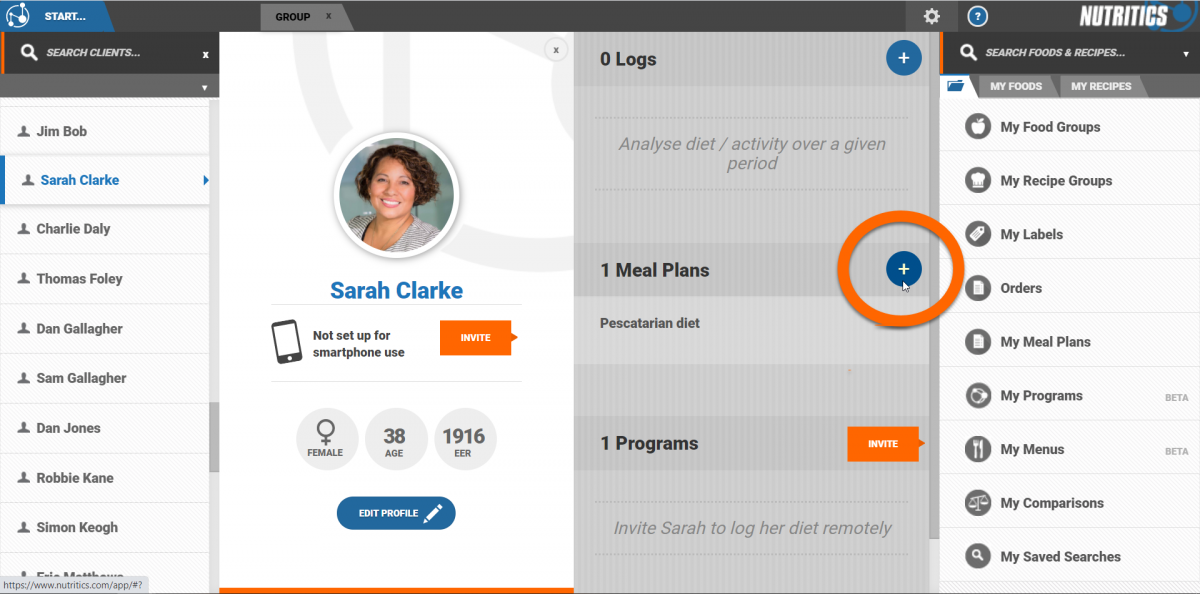
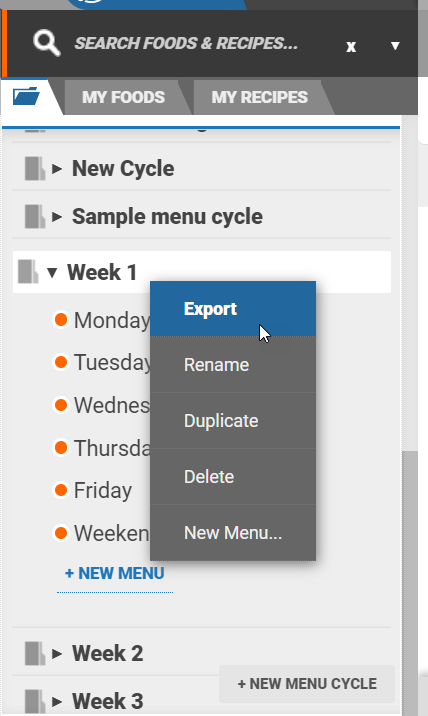
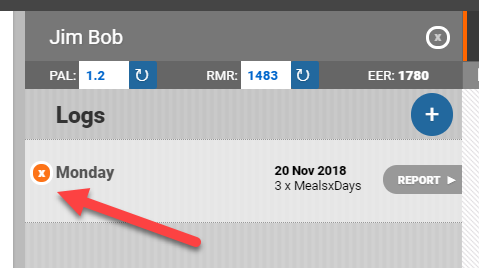
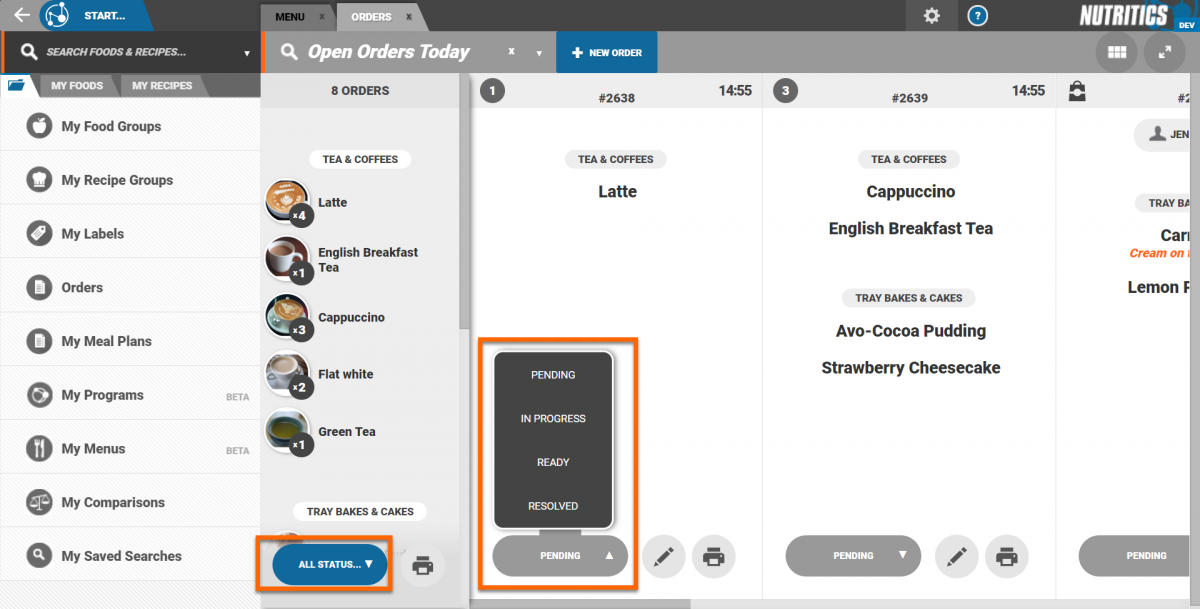
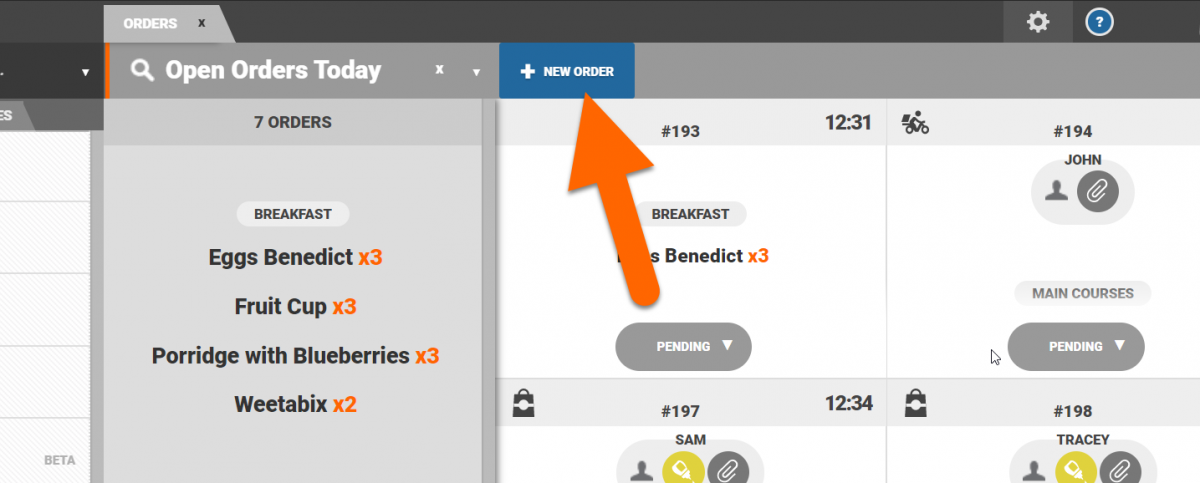
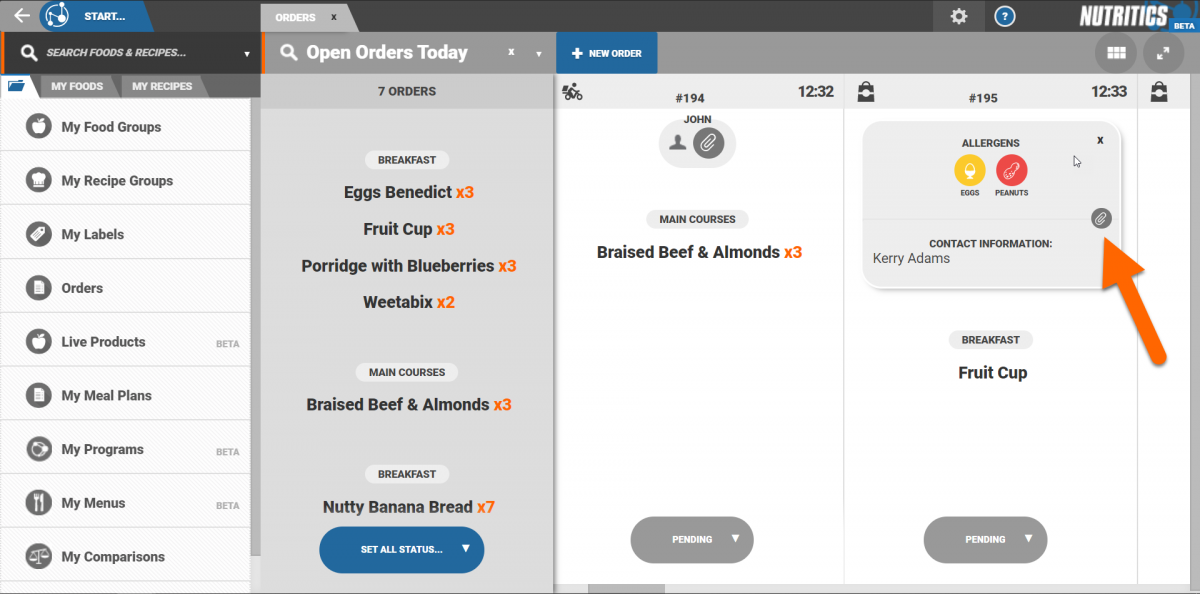
Nutritics allows direct import of food and activity information from your clients Libro app. To import a food diary, select a client from your client list, then click the + button in the logs section (the same way you would create a log manually from scratch).
If Libro logs are detected, you will be presented with the screen below. The orange circles indicates days that have been logged by your client in Libro. Simply click on them to select them for import, then click the orange button 'Import from Libro'.
This will bring you to the diet log workspace with all the diet log information filled in, as entered by your client. Once imported, you can make edits and tweaks to the diet log data, note that this does not change the clients smartphone log.
If the client has created any recipes and used them in their log, these will also be imported. This can also be useful to provide your client with feedback by making simple tweaks to their existing recipes as part of the feedback process.
Nutritics programs enable you to plan and schedule content for delivery to your clients via their own smartphones. Programs are built from a series of items delivered across multiple days or even months. These will appear as a checklist in Libro for your clients to complete each day.
WATCH THE VIDEO:
https://www.youtube.com/embed/5ylDHSztvtk
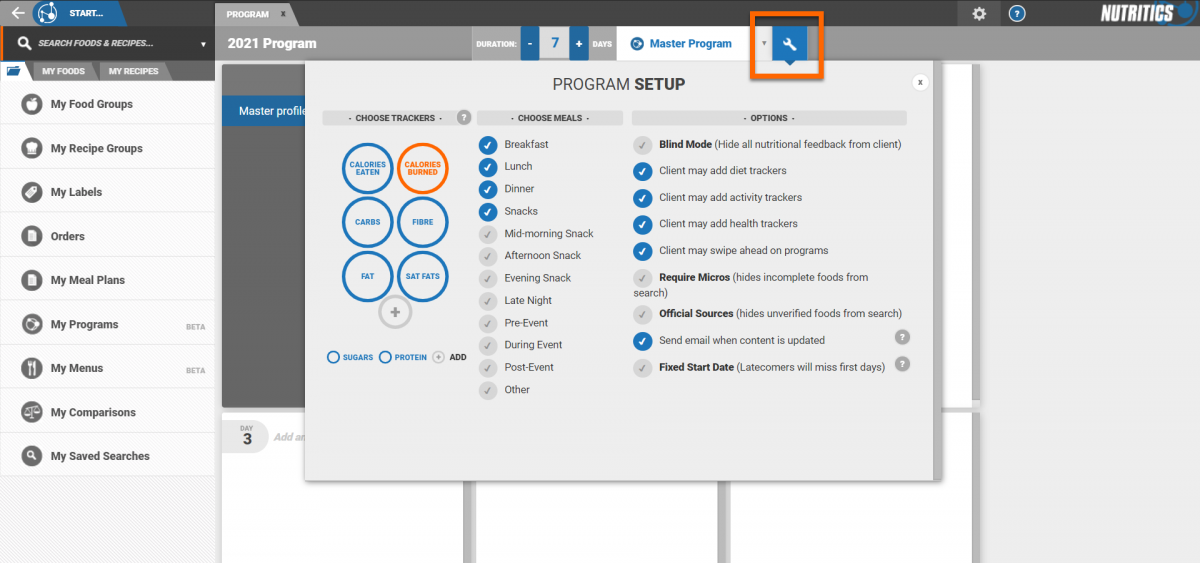
Program Setup:
- Click Start > New Program. Programs are also accessible from the Nutritics Explorer (the folder icon beside ‘My Foods’)
- Name the program, and set the number of days it will run for using the +/- ticker, or by typing the days. Additional days can be added later, even after the program has commenced.
- You can define a Master Profile in the popup box. The Master Profile should be as broad as possible, but still be specific to the target audience for your program.
- Click the wrench icon to define the trackers and permissions for the program:
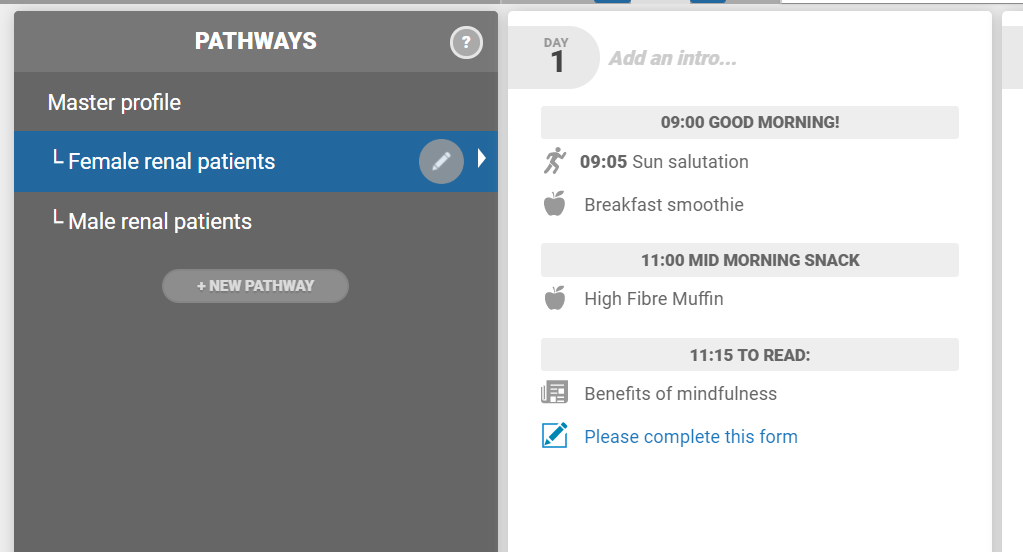
- Additional sub-profiles can be setup under the Master later to enable alternate programming pathways for different groups or individuals (e.g. Males / females, age groups, or based on client categorisation). Click 'New Pathway' under the master profile to set these up.
Trackers:
Specify which nutrients, exercises and other tracking monitors should be active by default on this program
Meal collector slots:
Specify which meals are available on the clients phone, specific to the program
Fixed Start Date:
If your program is bound to calendar dates and events (eg. when managing sports teams or research project groups), this option should be selected, and a start date input. All clients on the program will then receive the same content on the same days. Any client added late to the program will join in with the group (and miss the previous days of the program)
If the program is not bound to a specific start date (as per the default setting), then clients that are added to the program will always receive day 1, and progress sequentially through the program without missing any days.
Other Options:
Blind Mode – Nutritional information and reports are hidden from the client
Client Diet Trackers – Specify if the user may add nutrition-type trackers that are not part of the program
Client activity Trackers – Specify if the user may add activity-type trackers that are not part of the program
Client Health Trackers - Specify if the user may add other health related trackers such as sleep, blood pressure, that are not part of the program
Client may swipe ahead on programs - Allow your clients to swipe ahead in their program to log future days
Require Micros – Disable sources of data that are known to be missing vitamins and minerals (typically branded food items which have label nutrients only)
Official Sources - You can hide foods in your client's Libro that are not verified, or from our published database
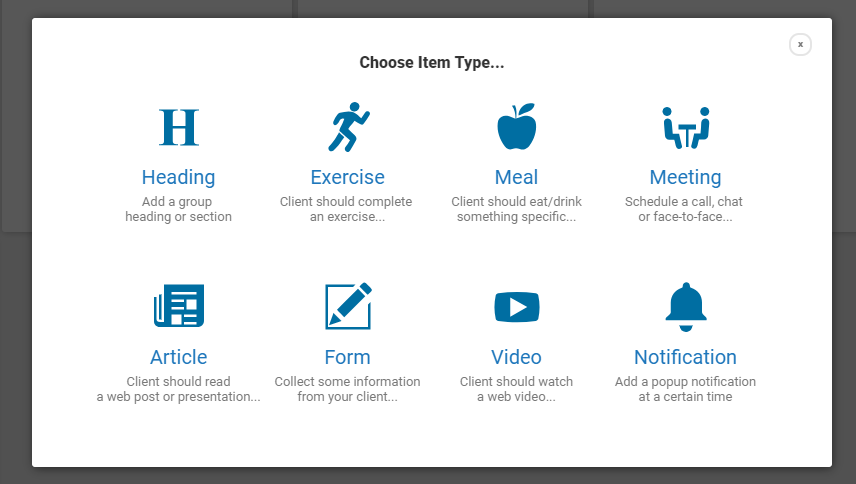
Adding content to a program:
After setting up the program parameters click ‘New Item’ at the bottom of any day tile.
This will present various item types which can be added to the program:
Headings – provide structure to the program by grouping similar items together (e.g. a series of foods for a meal, or series of exercises within a gym program)
Exercise – specify an exercise with steps or video instruction
Meals – select a food or recipe from your Nutritics account for the program
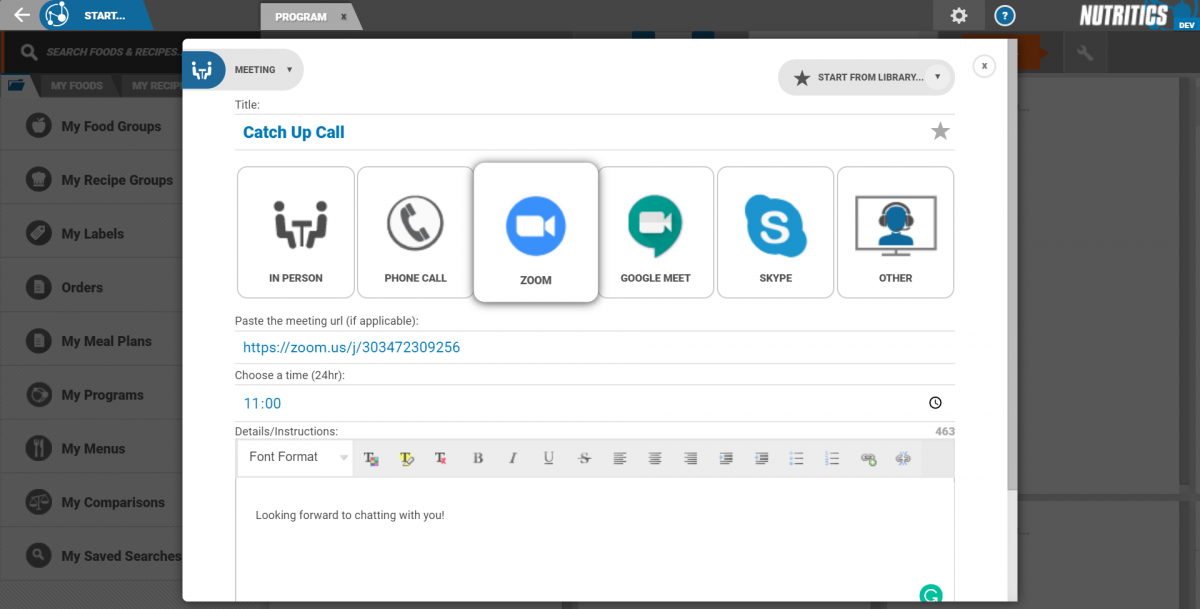
Meeting – schedule an appointment with your client, in person or call / video call.
Give your call a title, select the meeting type. If the meeting is a video call, add in the meeting URL so your client can join the call from Libro.
Article – provide an article or presentation for your client to read
Form – request that your client completes an online form
Video – provide a video for your client to watch
Notification – trigger a popup on your clients phone as a reminder
Pro tip: Using online URLs rather than uploading static files is great because you can freely change the form at any time in the future, and you don’t need to update the URL or make any changes to your program.
Adding pathways / clients:
Pathways allow you to create a different journey for different groups of people.
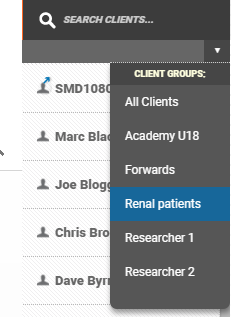
Click on 'new pathway' in the pathway box to create a new pathway. For example, you might have a master profile for renal patients, and then 2 different pathways depending on if they are male or female.
You can switch between the master profile and the new pathways by clicking on them in the pathways box. Any program items created in the master profile will be visible in the new pathways, shown in grey (these can be hidden if needed by clicking on the item). Items added within a pathway will only be visible in that pathway (not the master pathway) and are shown in blue.
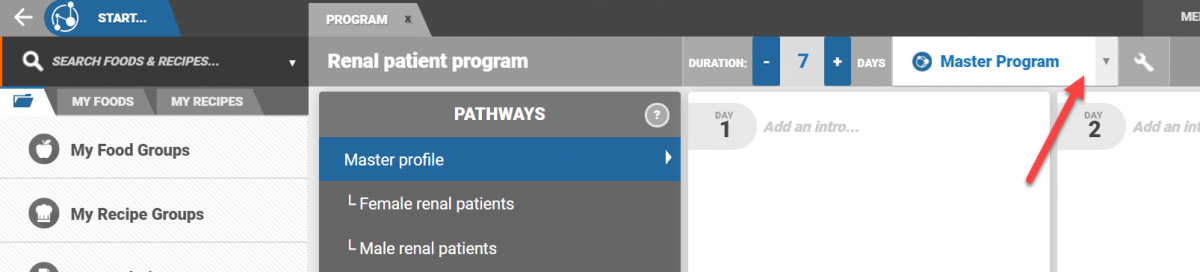
Once you have created all your pathways, you can assign programs to clients. You can do this by opening the program you would like to share and navigating to the drop down menu at the top of the screen.
Click 'add a client' to assign that program to a client.
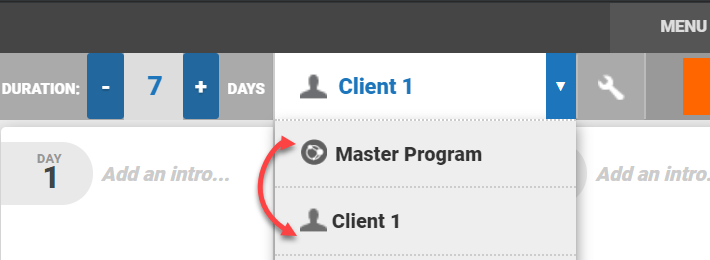
You can toggle between the master program, and the client-specific program using the drop down menu.
To start a client's program, open the program (making sure the client's name is shown in the drop down) and click 'start'.
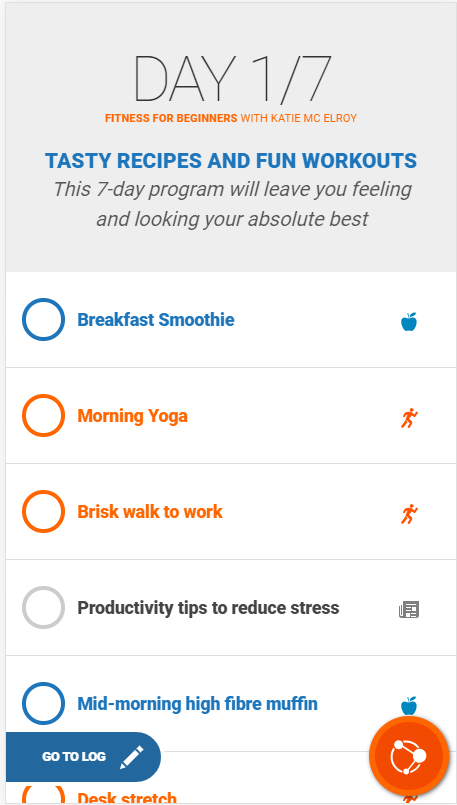
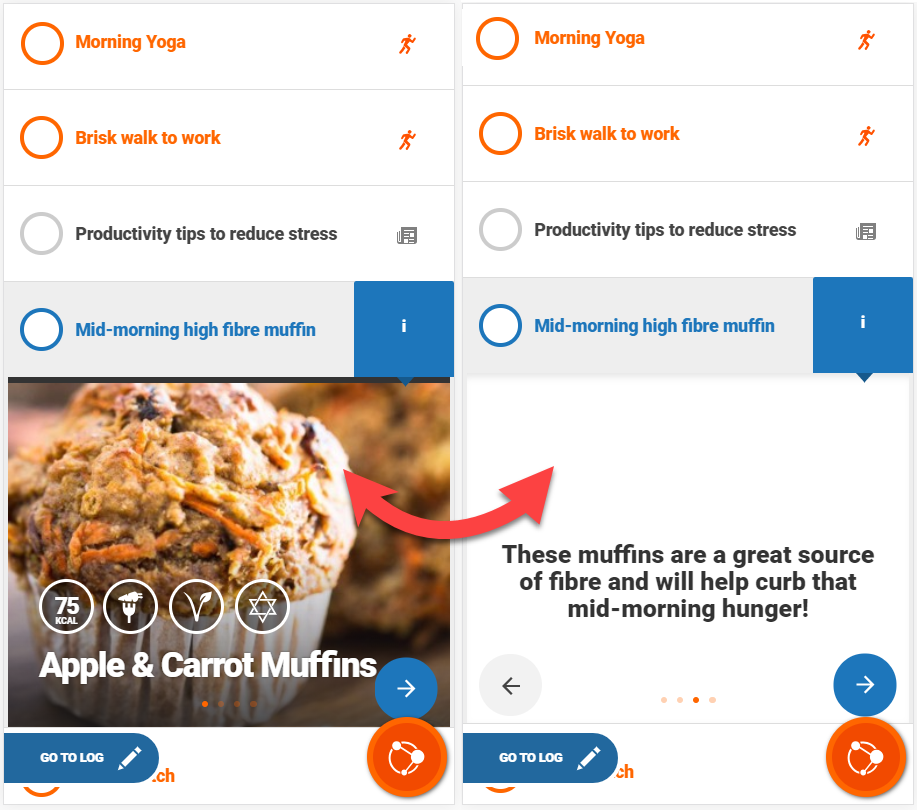
Libro programs are built for you by your nutrition professional and shared directly to your Libro account. Programs are a combination of events, articles, videos, meal plans, recipes and more designed to help you with your diet and lifestyle goals.
If your nutrition professional assigns a program to you, the next time you log in to Libro, your program will be visible on your home screen above your trackers.
On the home screen you will be able to see what day of your program you are on, and the program items will be listed underneath. Item types include exercise, meals, meetings, articles, forms, videos and notifications.
Click on an item to see more information on it.
Swipe left and right or click on the arrows to navigate between different panels of information.
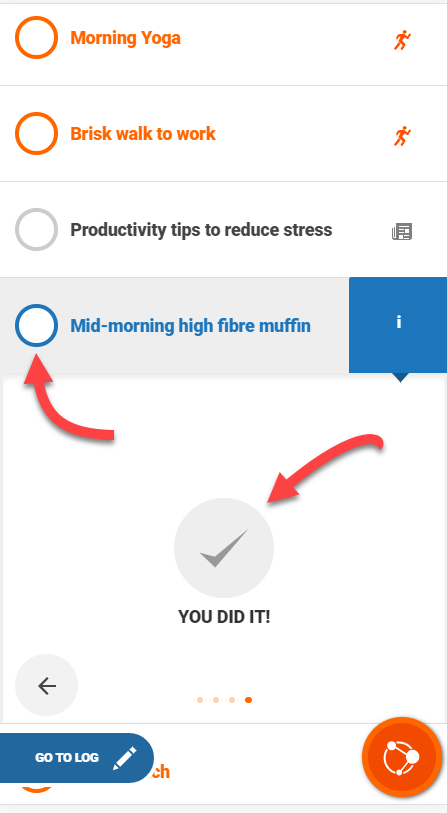
When you have completed and item, click on the circle icon to the left of the item name to mark it as complete.
Alternatively, click on the item to open up the panels, and swipe to the last panel to mark it off.
Completed items will have a line through them.
You can click on a completed item to set it back to incomplete.
Libro is an app designed to track diet, exercise and lifestyle goals. Libro users log their diet and exercise on the app and receive analysis reports and feedback from their nutrition professional directly to their phone.
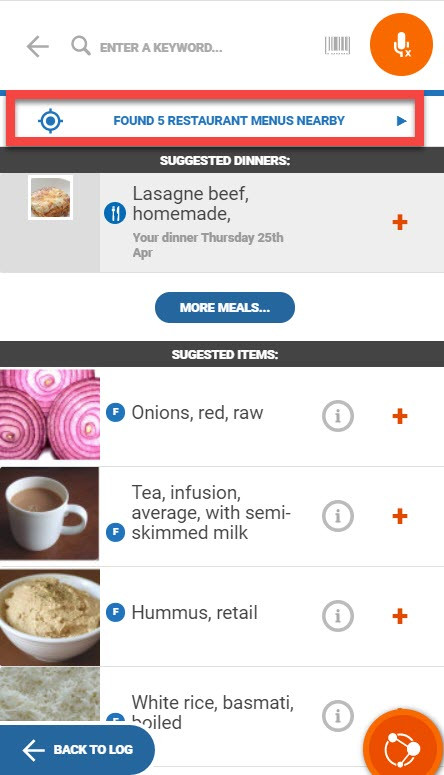
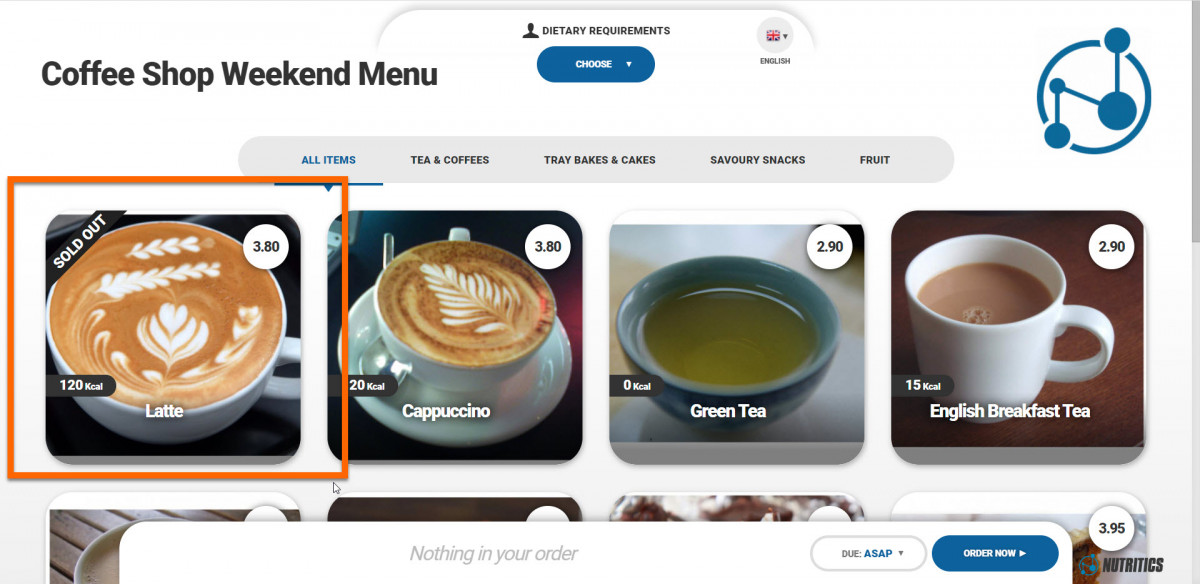
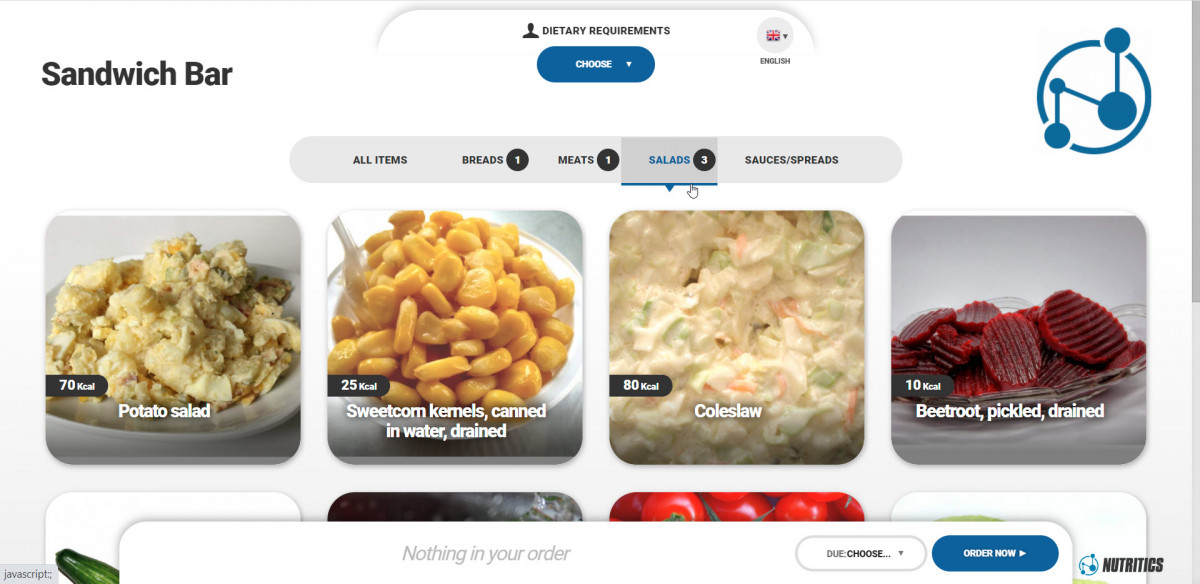
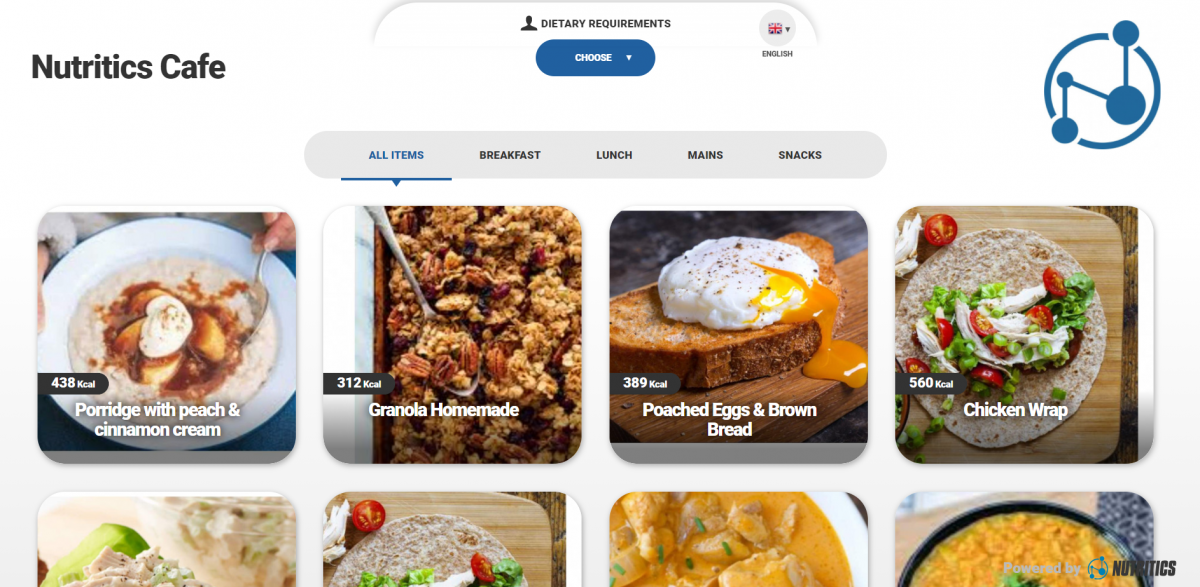
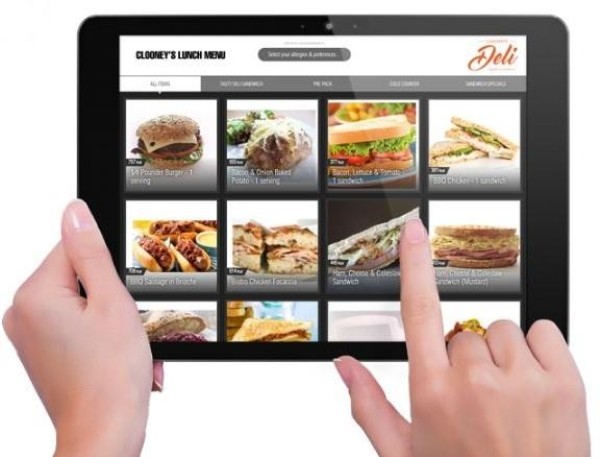
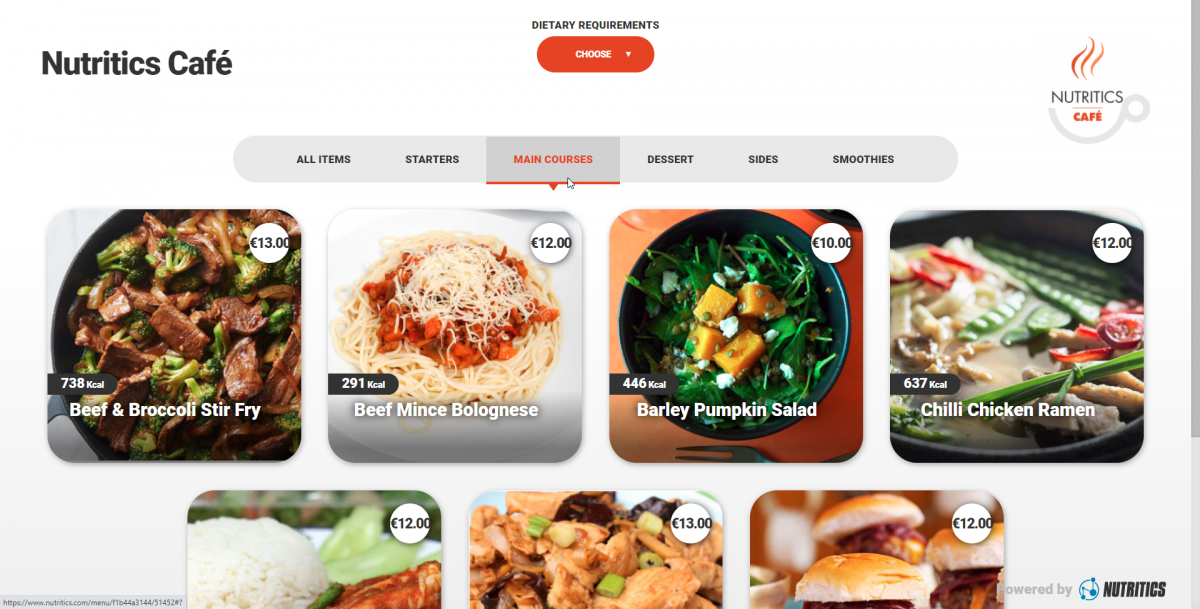
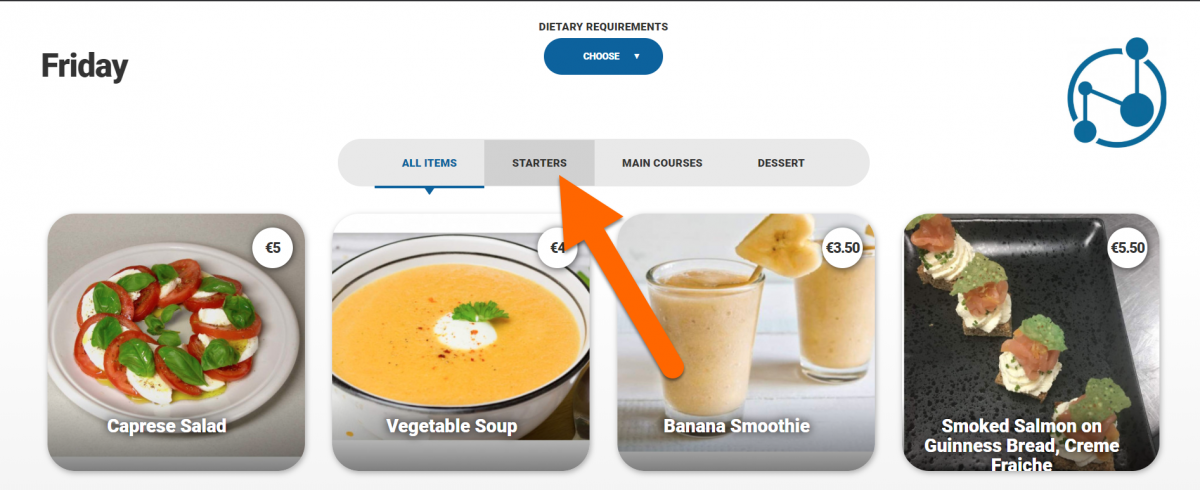
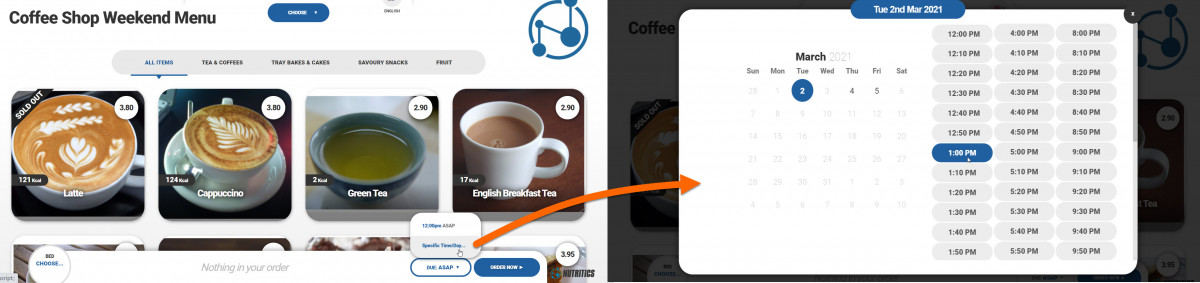
Libro users log what they eat by choosing items from our extensive database of foods and recipes. Users can also choose to browse and log menu items from restaurants in their area.
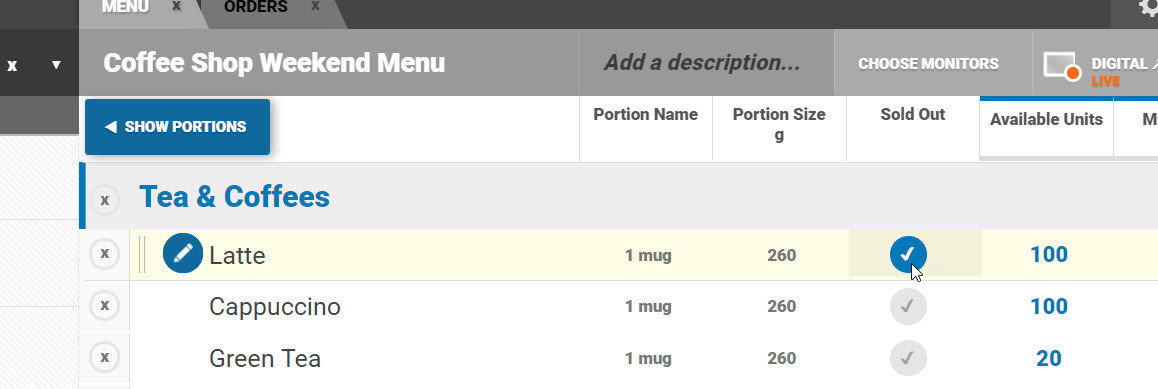
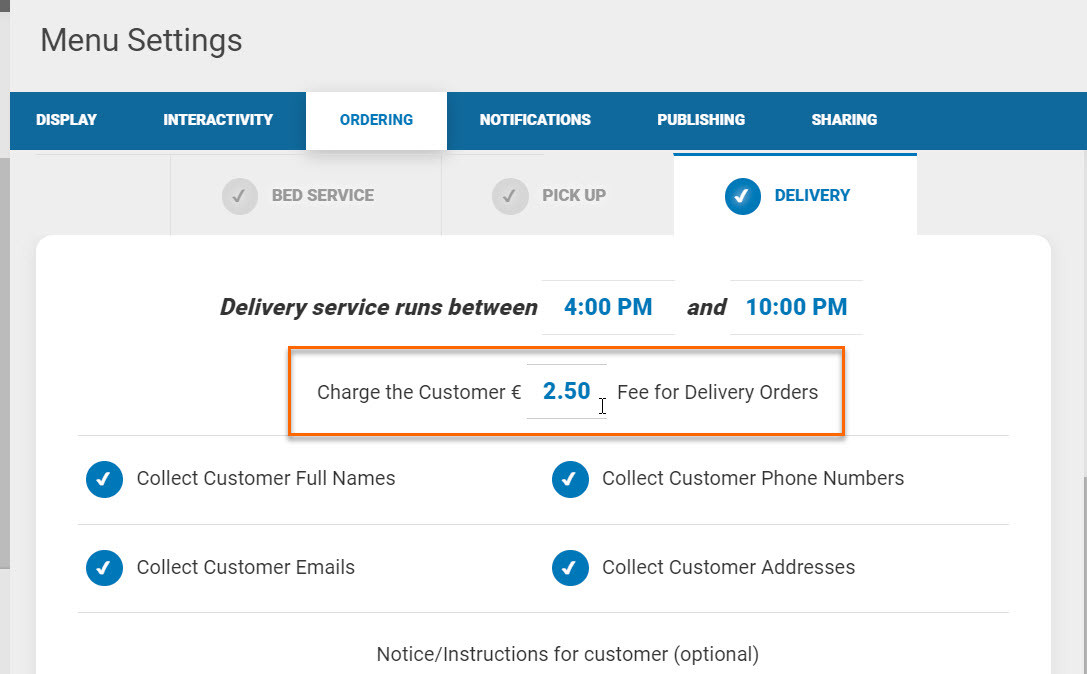
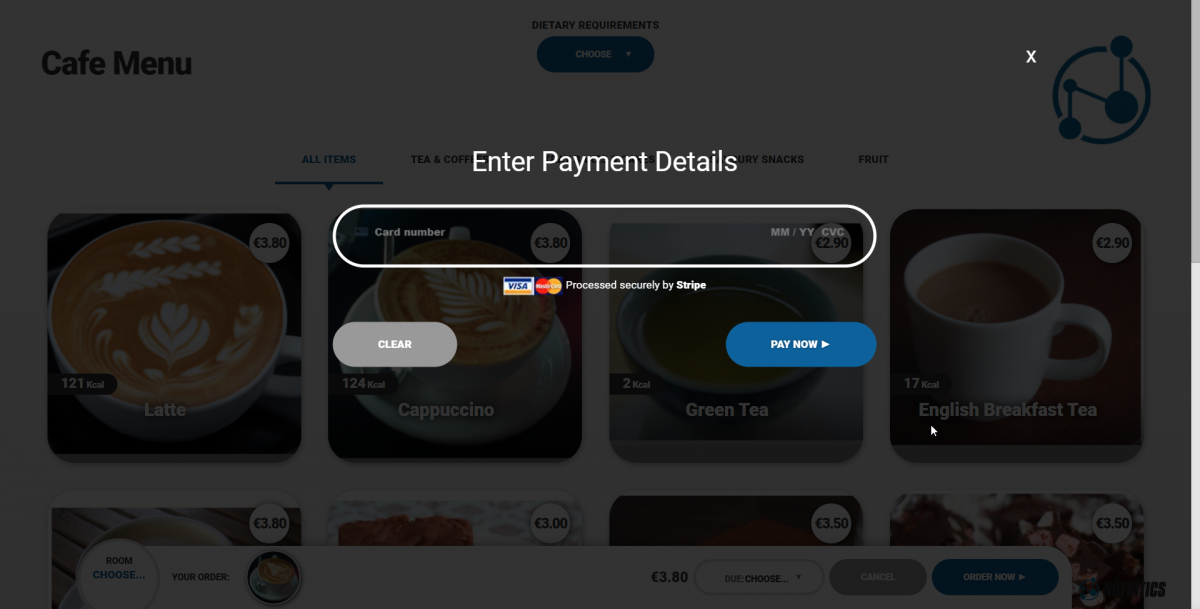
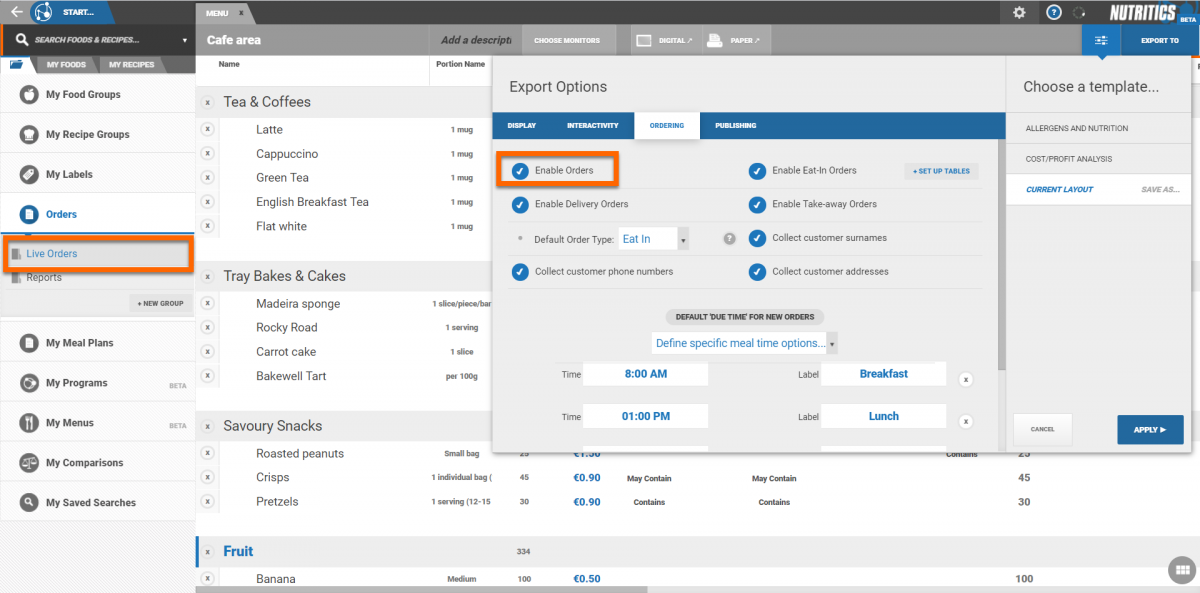
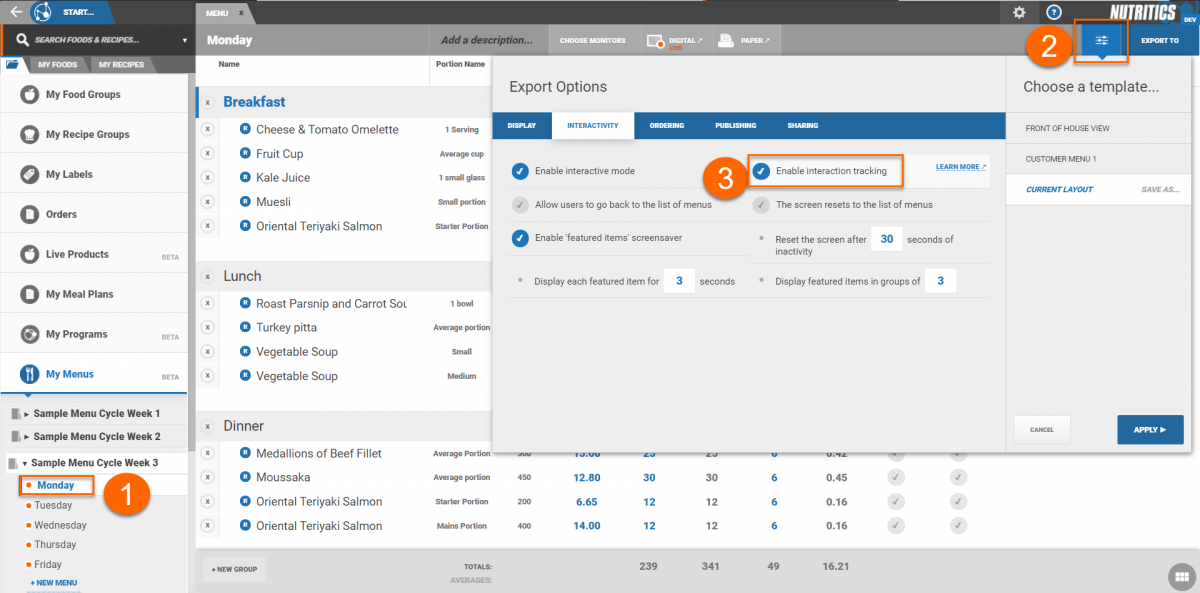
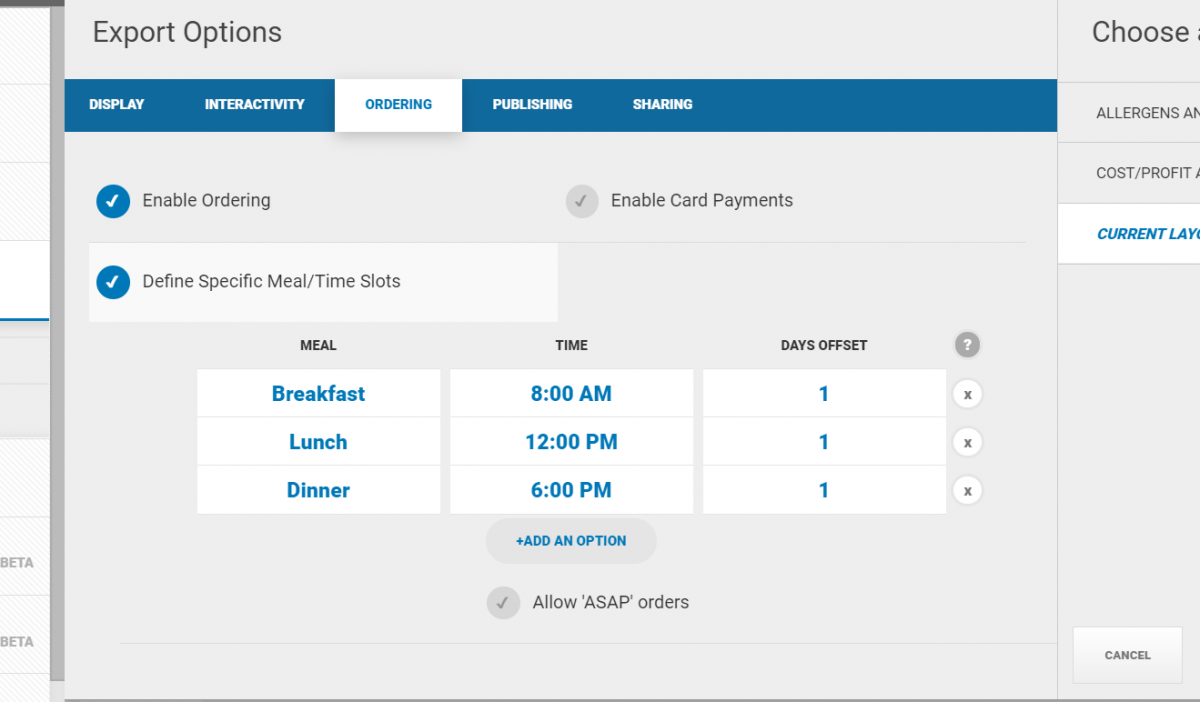
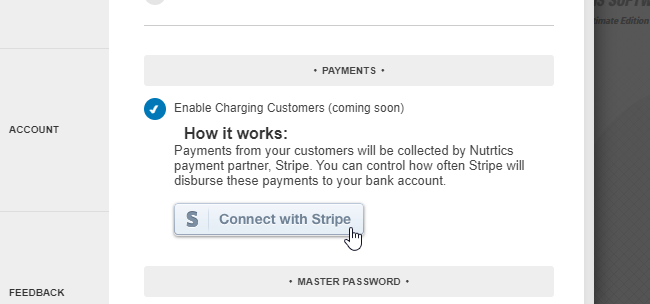
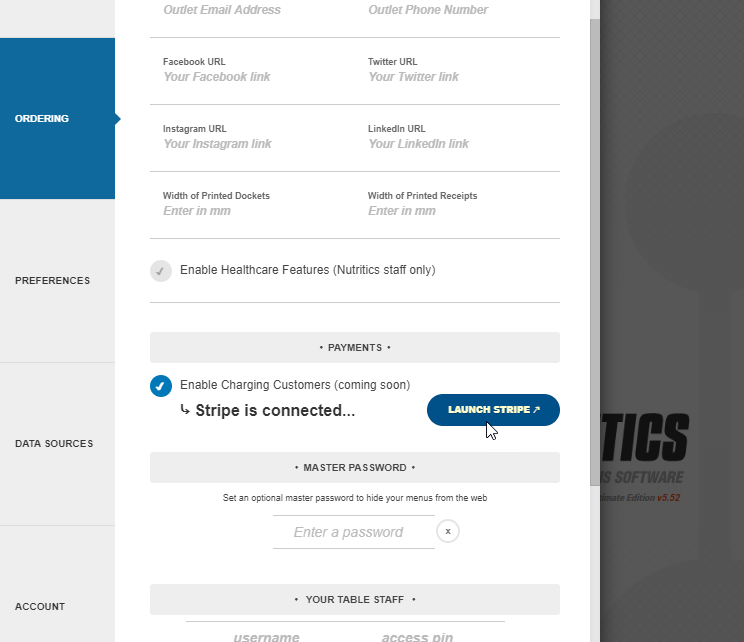
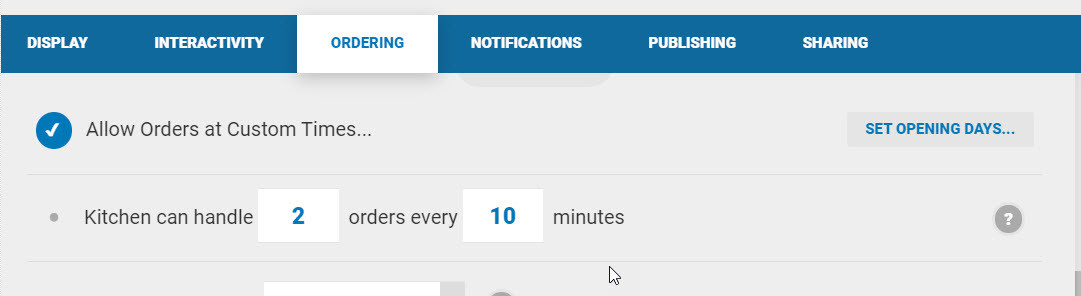
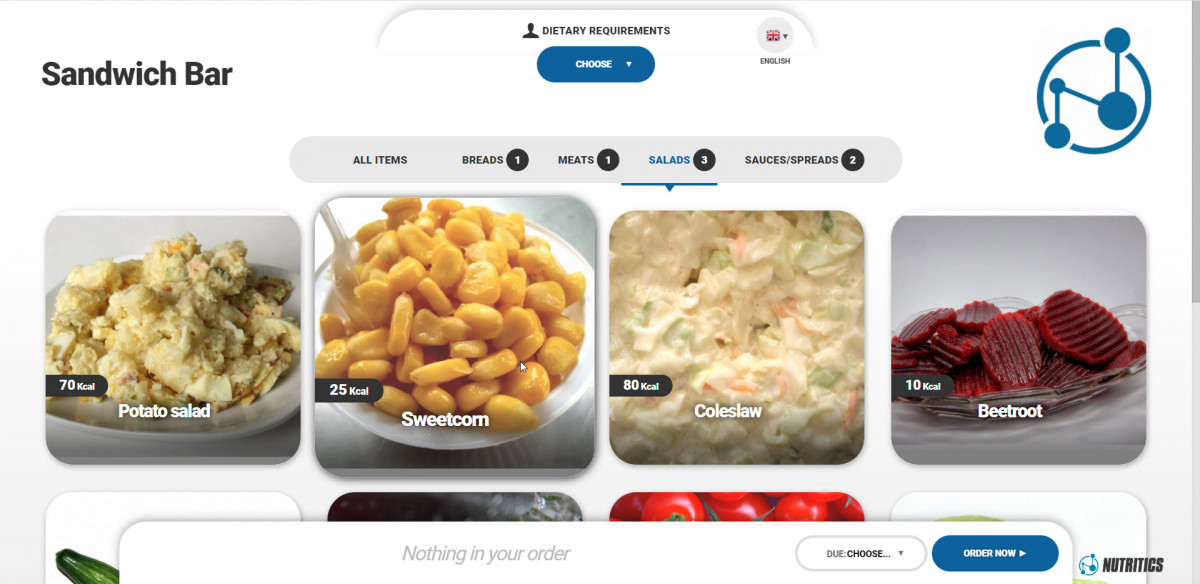
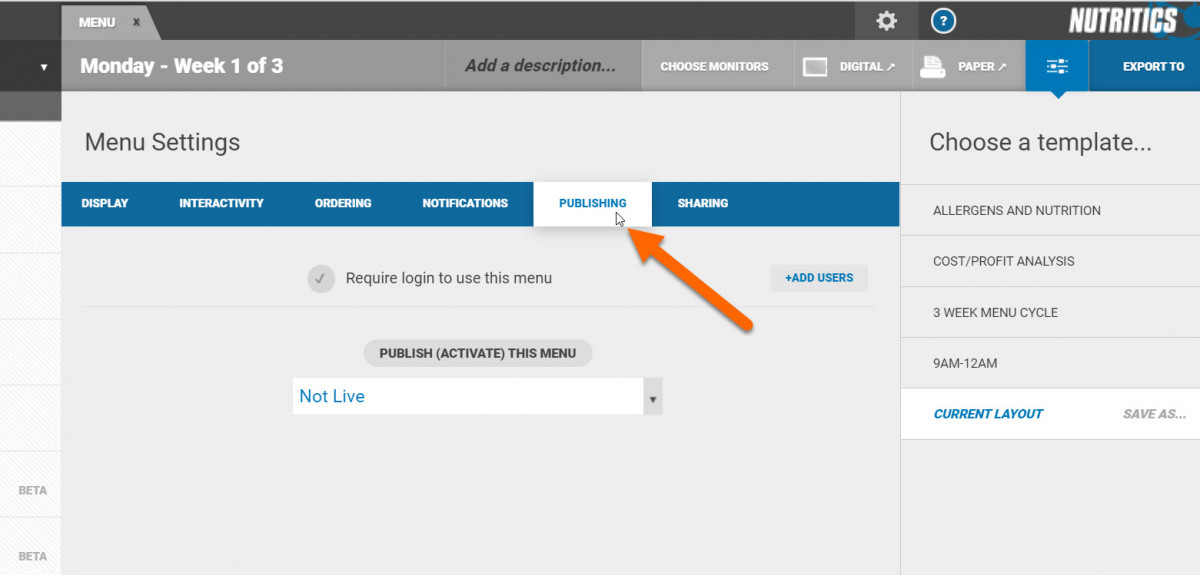
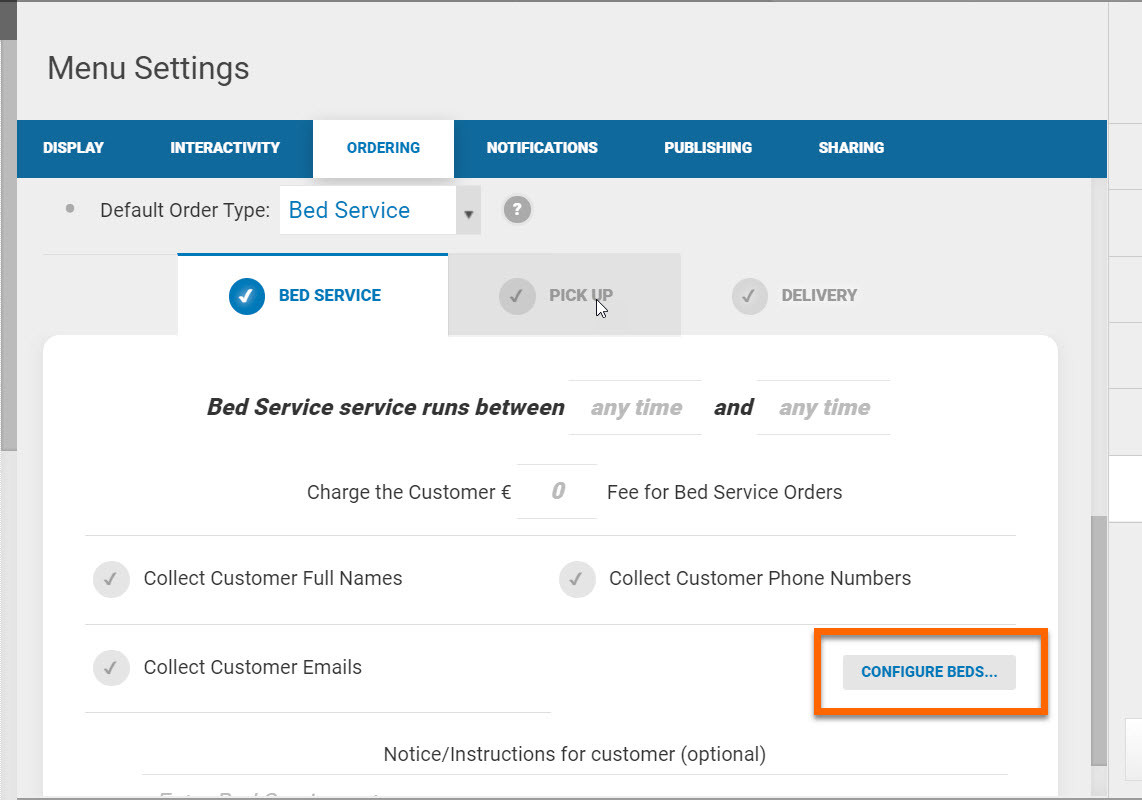
If you have the foodservice edition of Nutritics and would like to publish your menu so it is available to Libro users, follow the steps below:
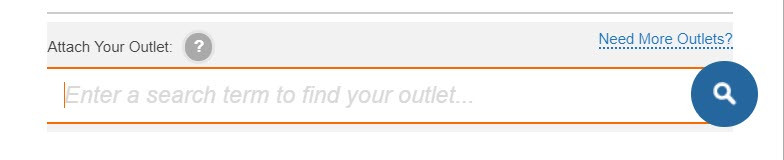
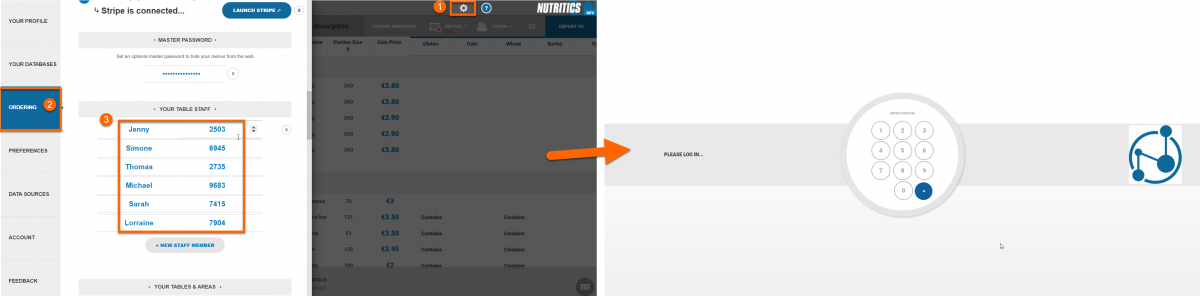
In your Nutritics account, navigate to the menu in the top right corner of the screen and click on ‘settings’.
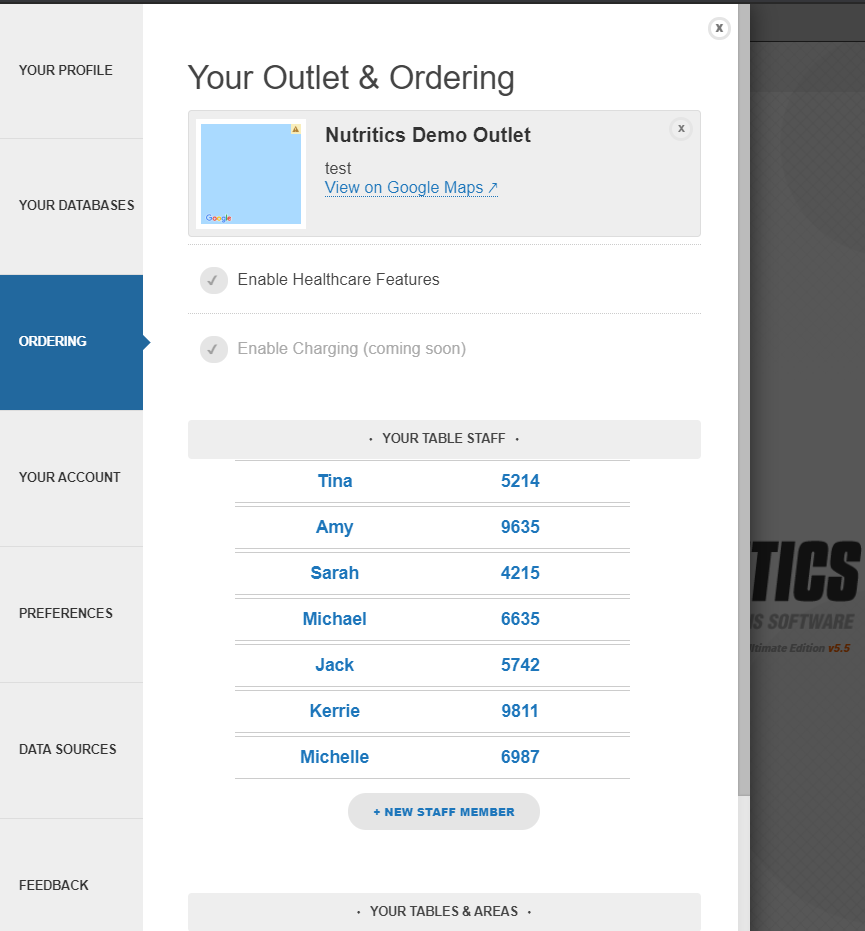
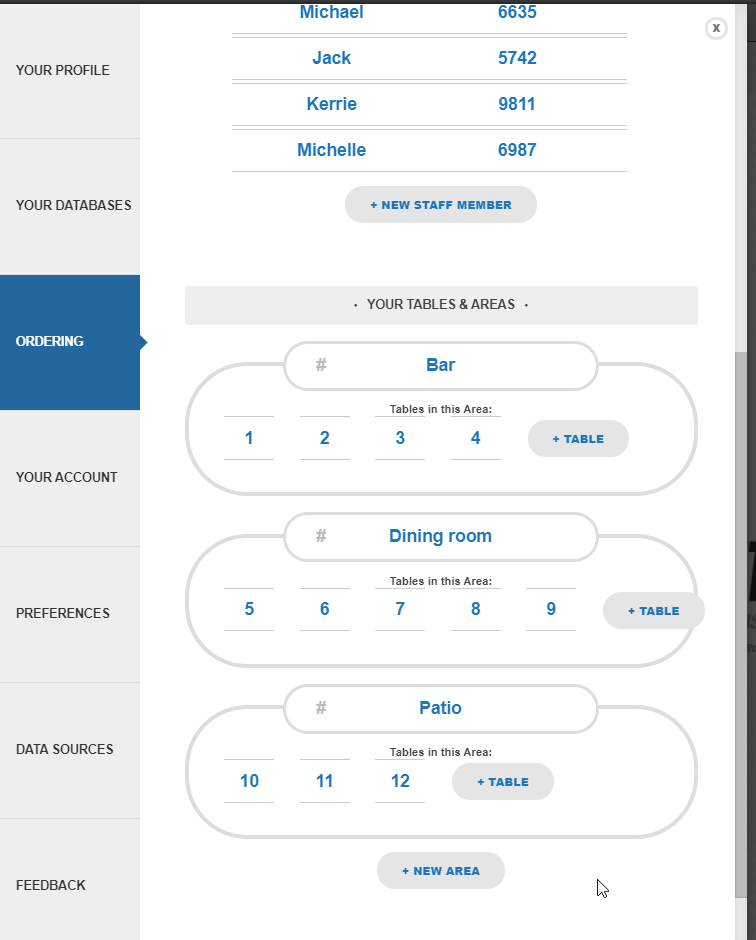
In the ‘ordering’ tab, search in the search bar and select your outlet from the list. Please note only one outlet can be attached to each Nutritics account. If you have multiple locations and would like more than one to appear in Libro, you will need a Nutritics account for each location that you would like to appear in the app. If you need more outlets or are interested in our meal ordering system, contact our sales team.
Upload your company logo in the 'Your Profile' tab of the settings heading as this will appear in Libro.
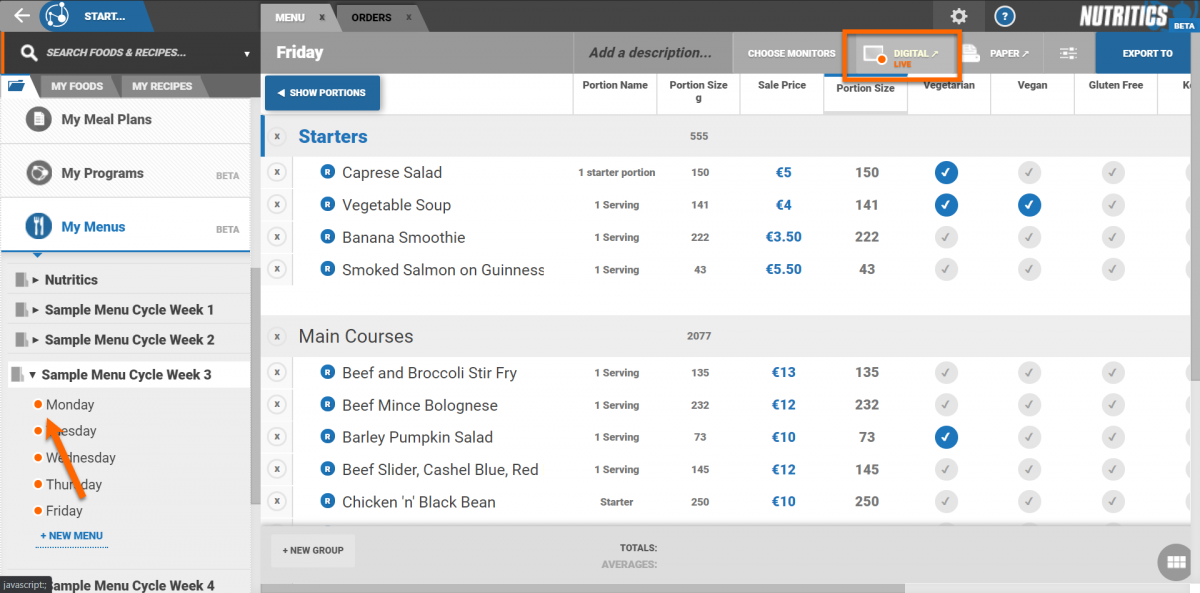
Create a menu and make it live. We have separate guides on creating menus here and on digital menus here.
Pro tips:
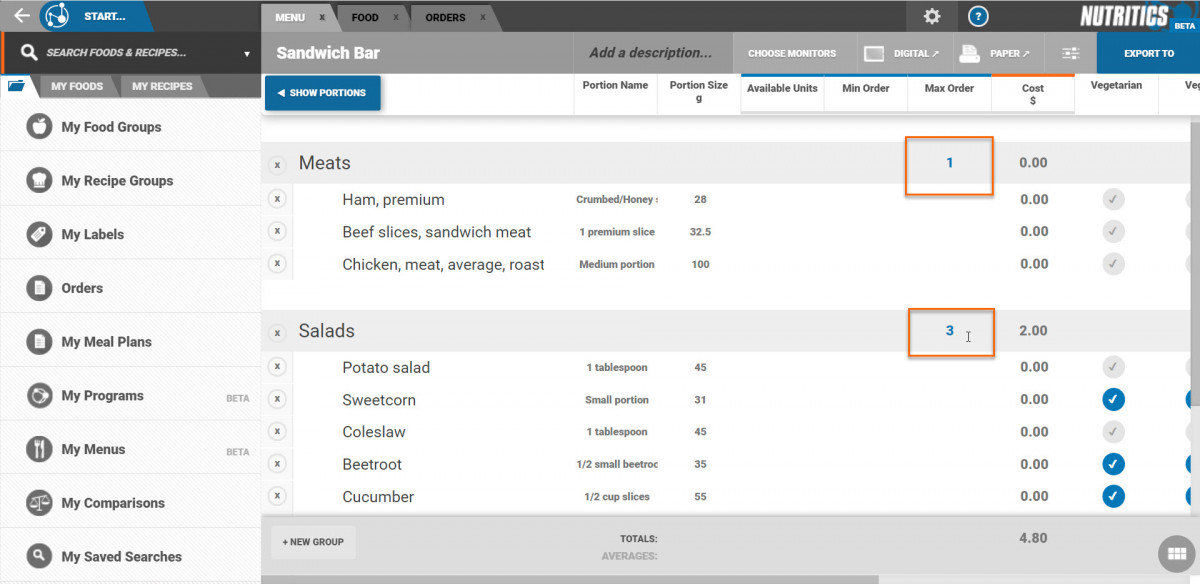
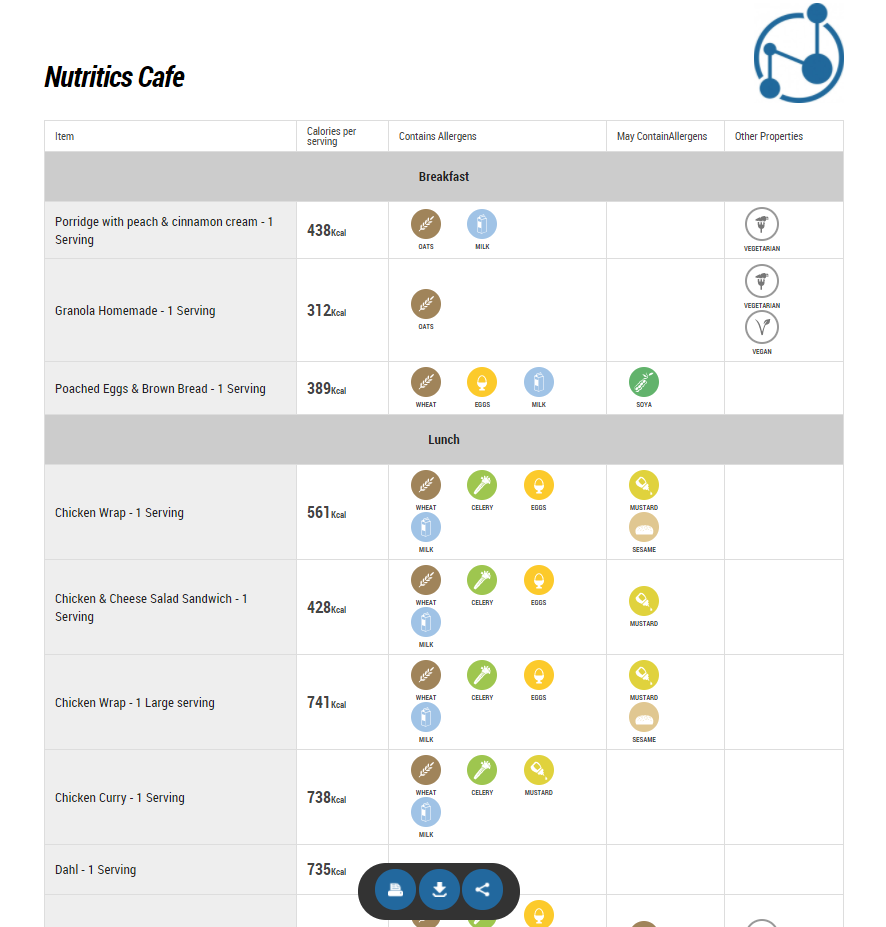
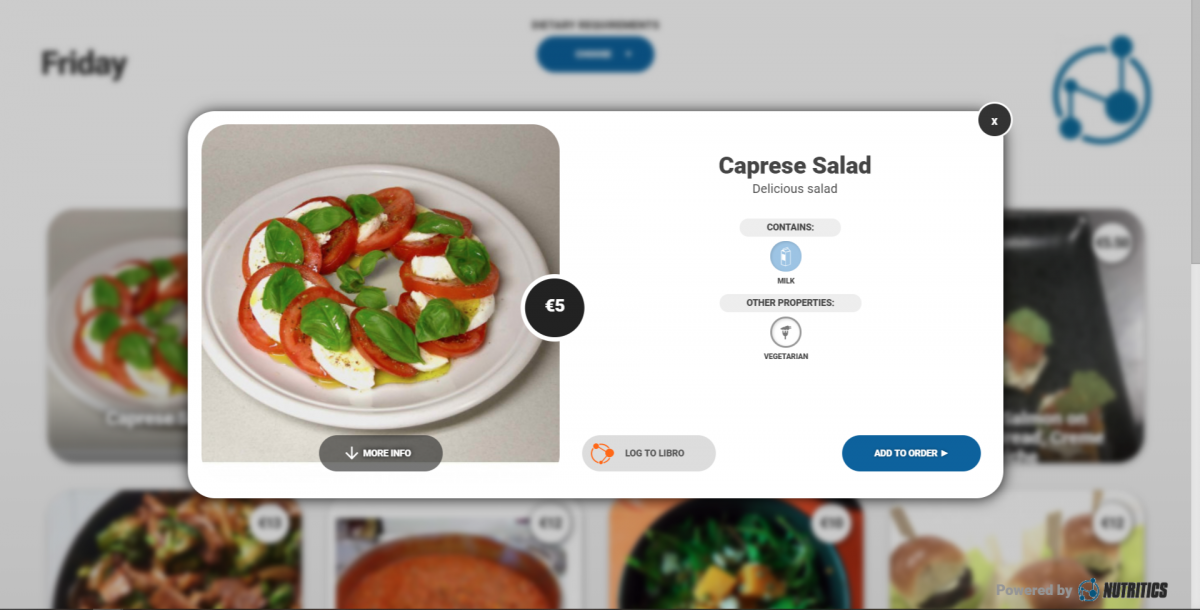
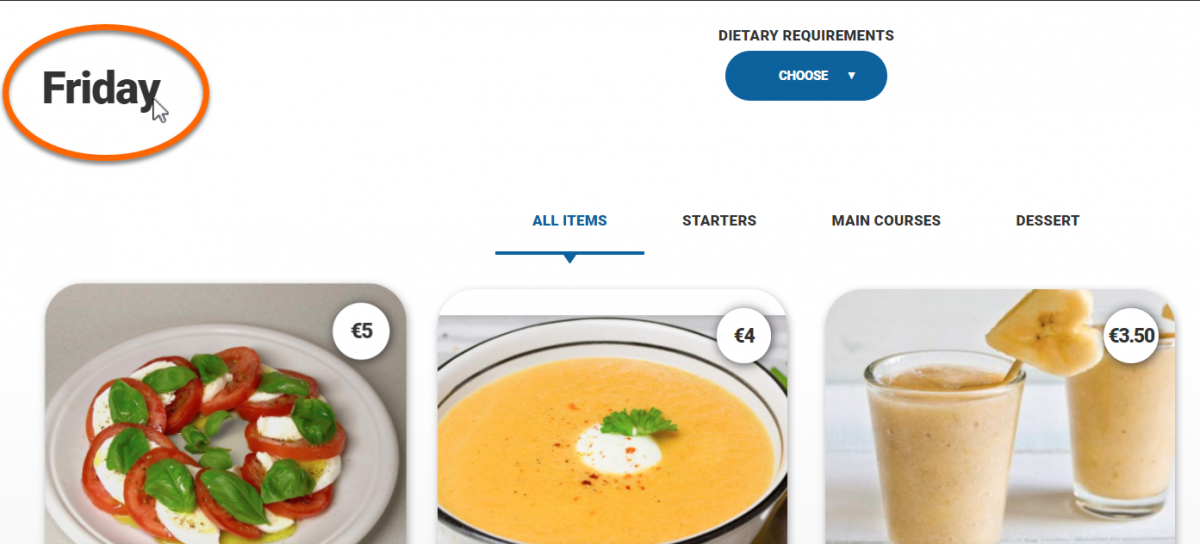
You should ensure that you have prices and pictures for all menu items.
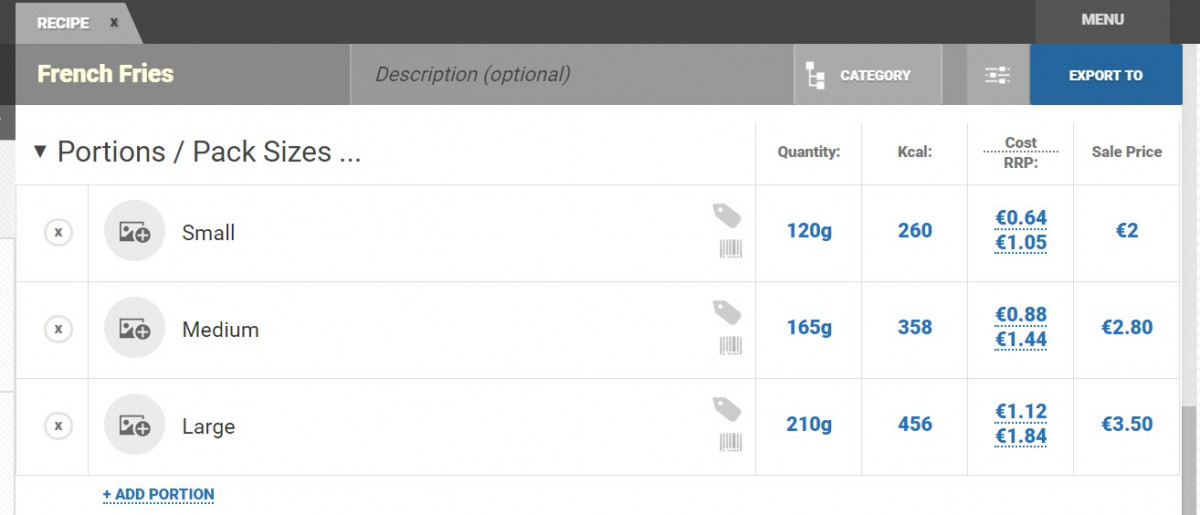
Try and add various portion sizes under one recipe for the best experience for your customers. For example, small/medium/large fries should be portions in under one food/recipe instead of having different recipe for each portion size.
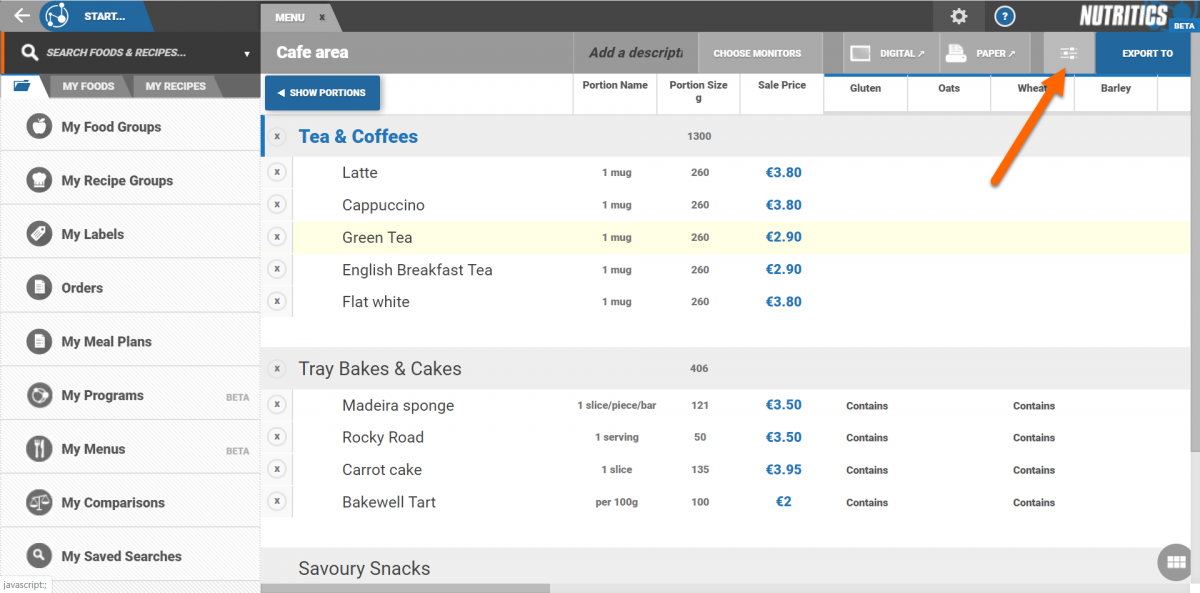
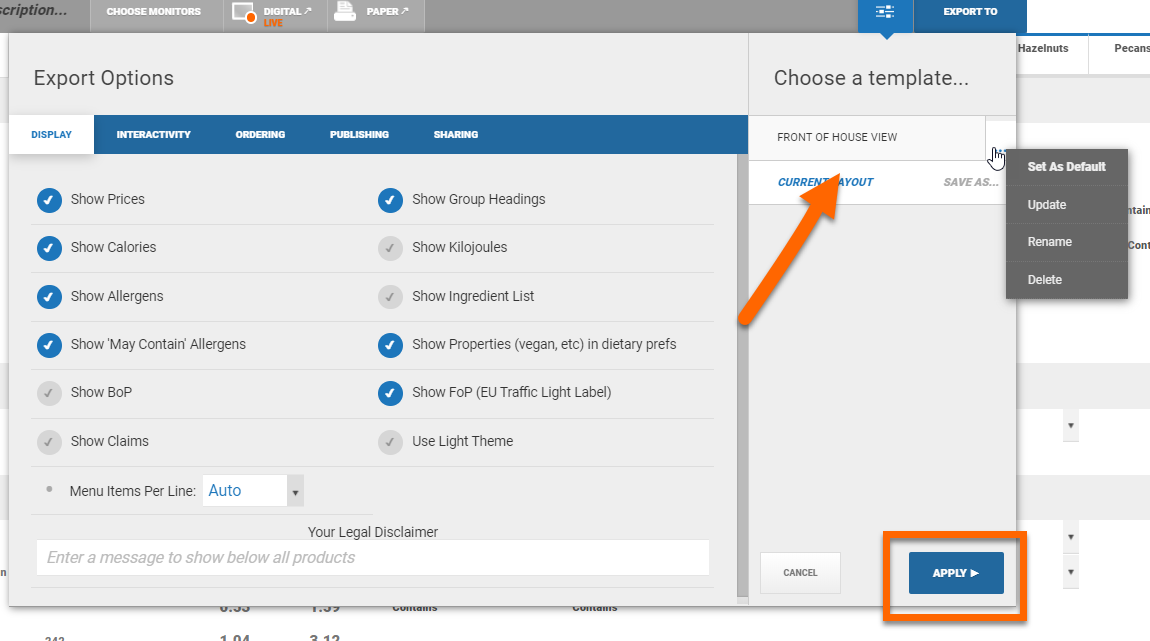
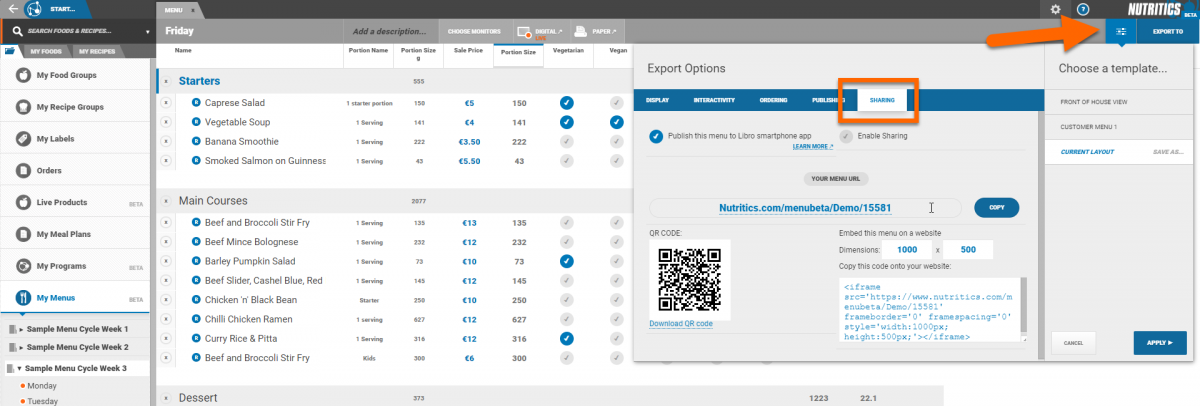
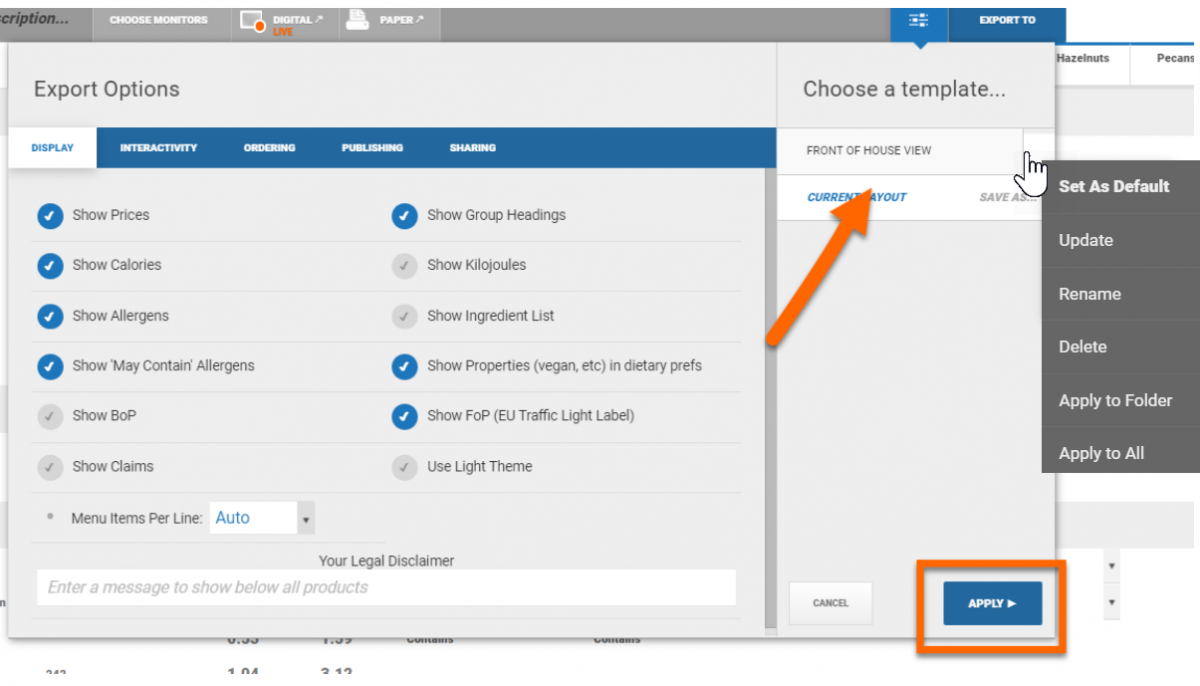
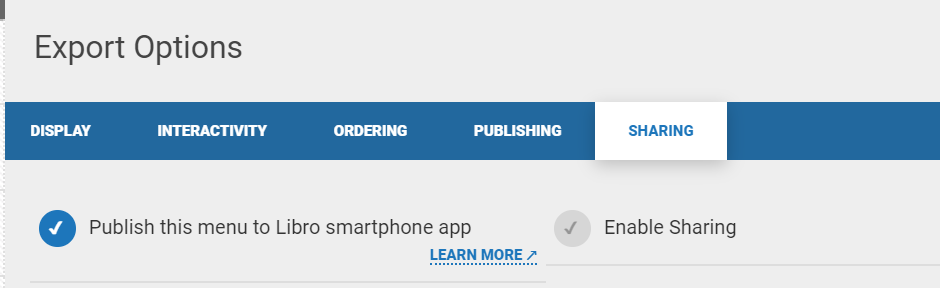
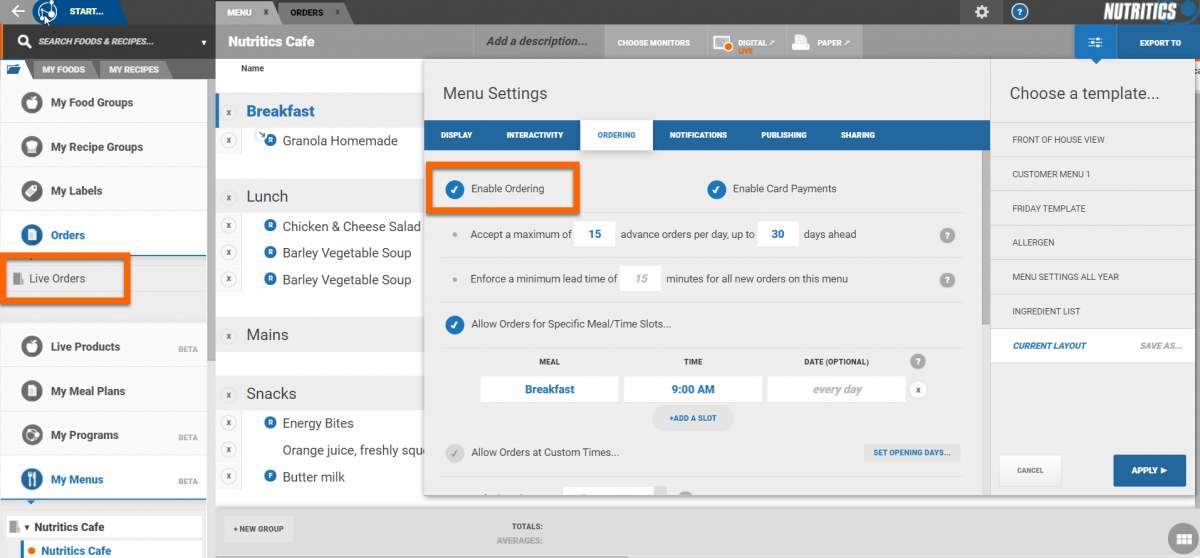
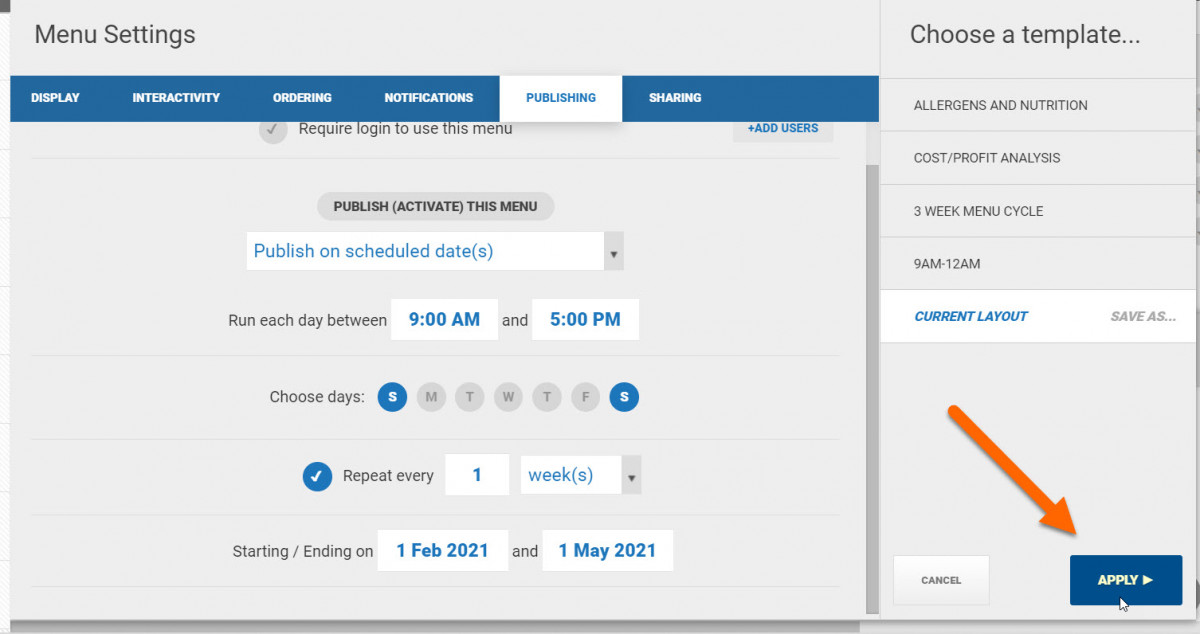
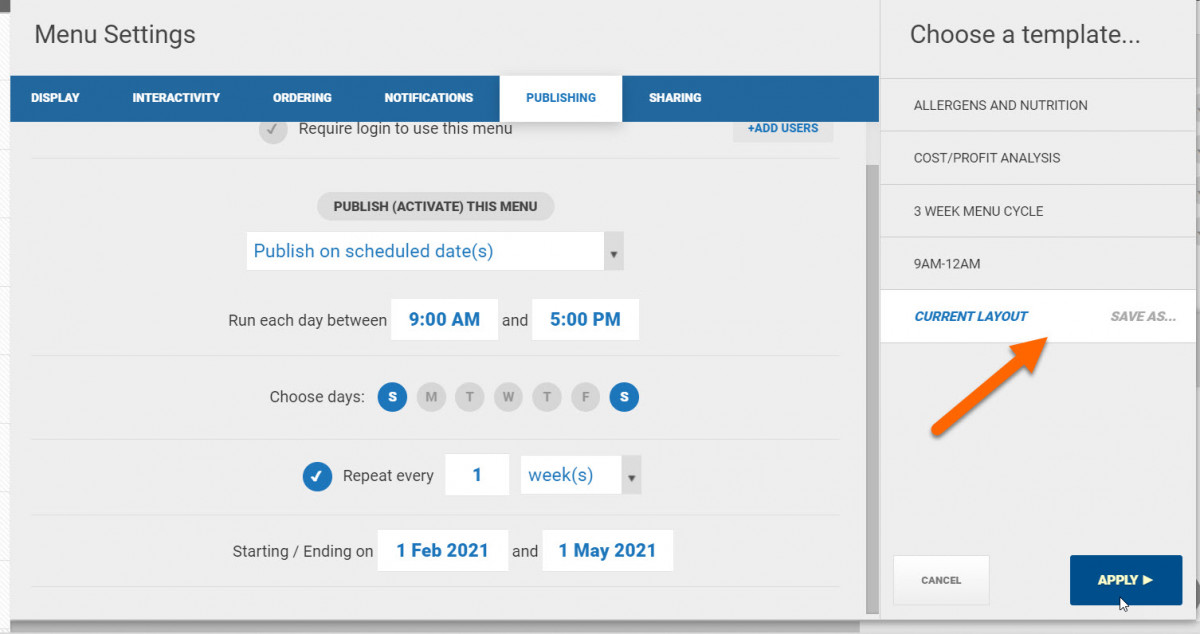
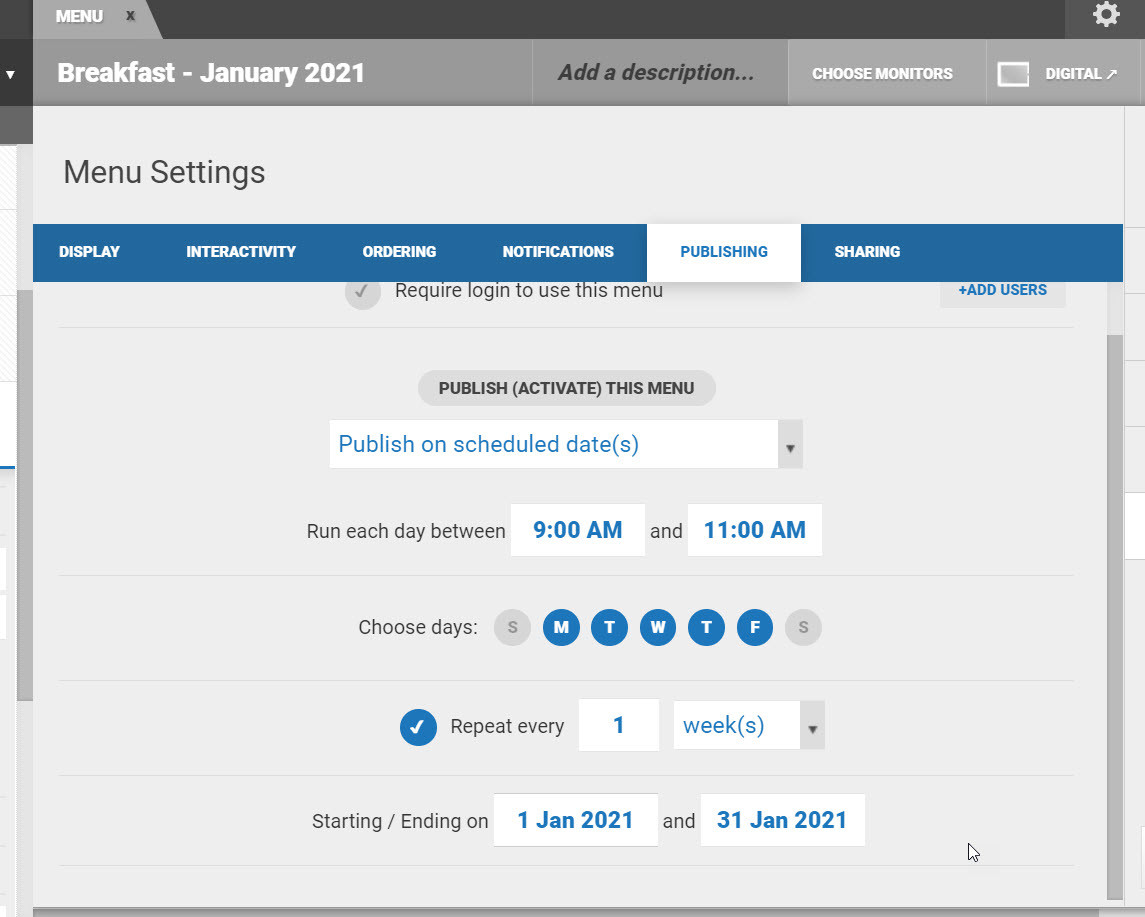
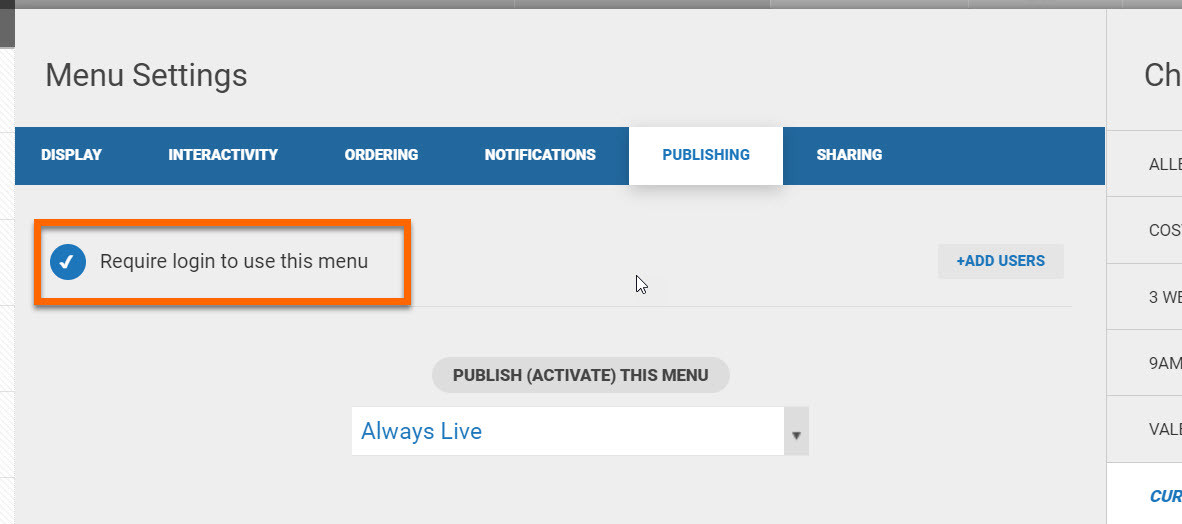
Open a menu and navigate to the menu settings (open a menu and click on the grey slider icon in the top right corner of the screen)
Click on the sharing tab and tick 'publish this menu to Libro smartphone app'
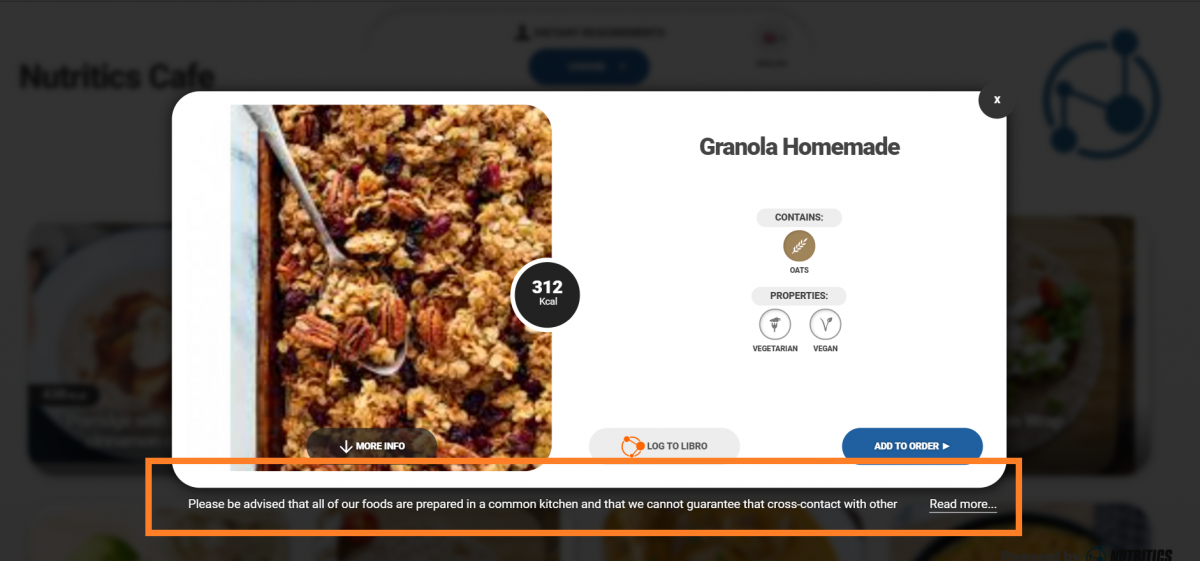
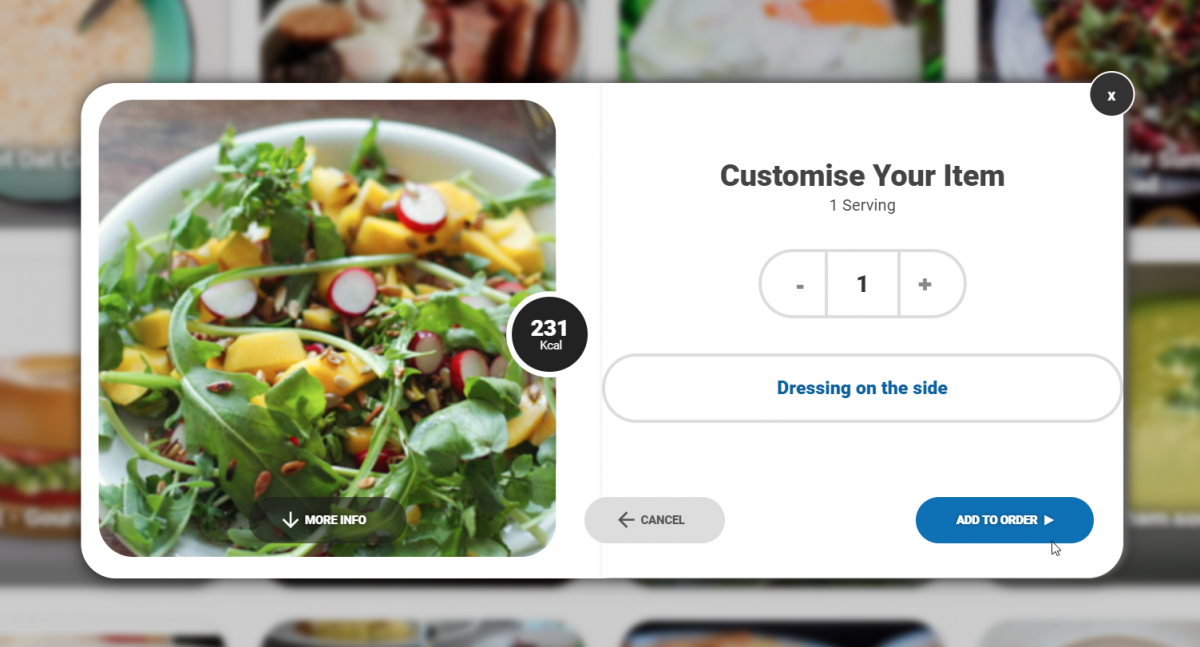
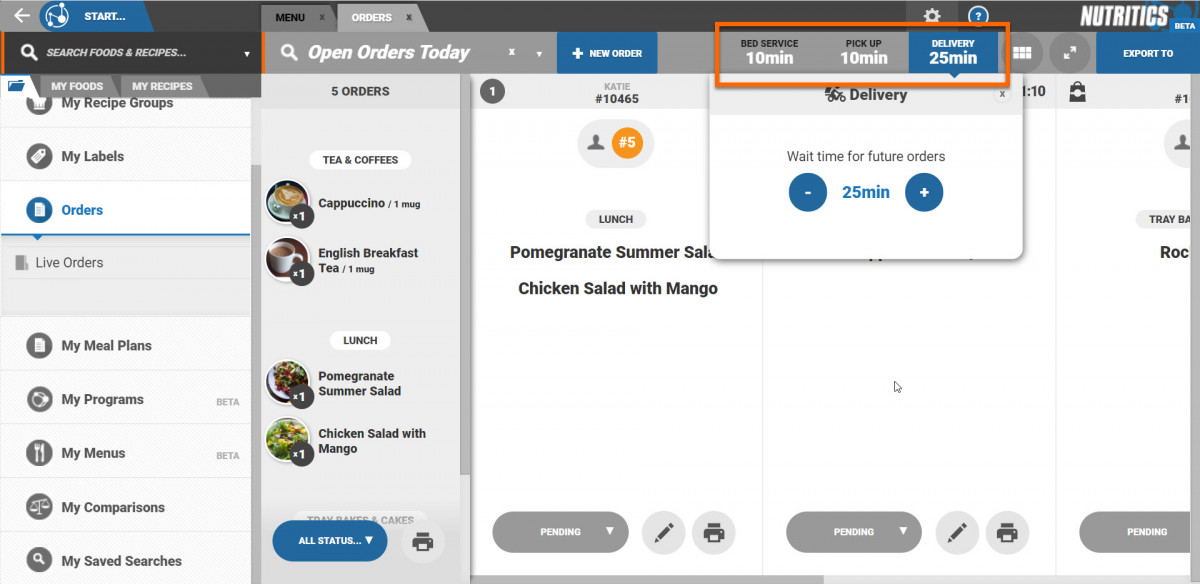
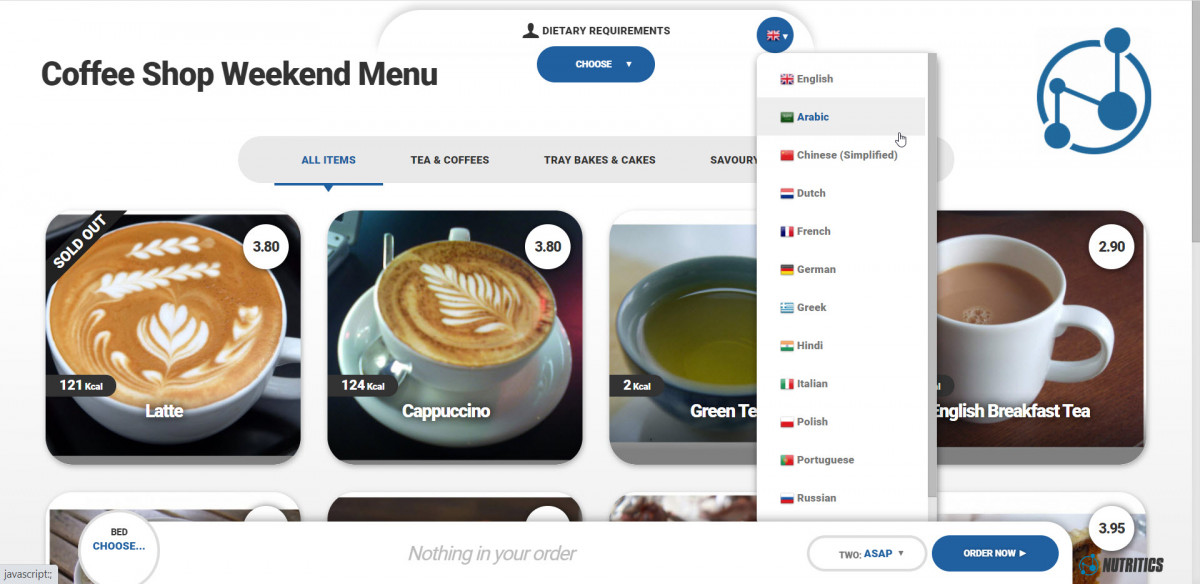
When Libro users log in near your outlet, they will be able to browse through your menu and add items to their food diary.
When Libro users log in near your outlet, they will be able to browse through your menu and add items to their food diary.
In the ‘hardware’ tab of the settings menu you can connect Libro with different hardware and plugins. Connect with activity tracker apps such as Fitbit, Garmin and Google Fit to import your energy expenditure data (calories burned) into Libro.
Connect Libro with your Google Fit, Garmin or Fitbit profiles by clicking ‘connect’ and following the instructions on screen.
Your ‘calories burned’ tracker on the Libro homescreen will update with data from these apps. Click on the ‘calories burned’ tracker to sync data from your activity tracker or to disconnect the tracker.
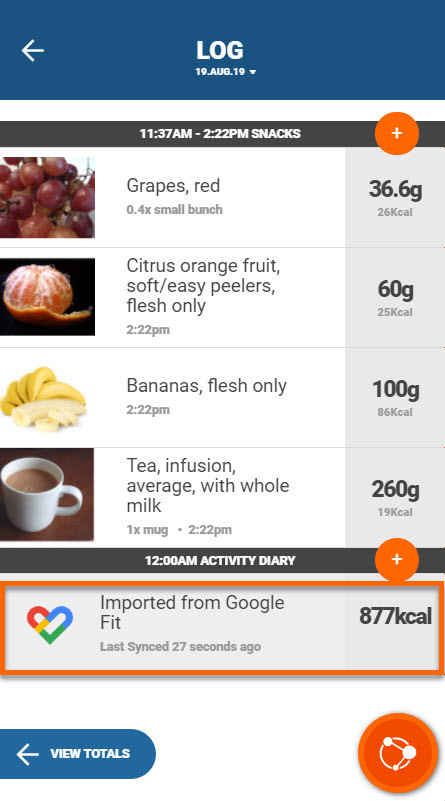
Data from your activity tracker will automatically be added to your daily log. From the homescreen, click ‘go to log’ and scroll down to your activity diary to see the total calories burned and when your data was last synced.
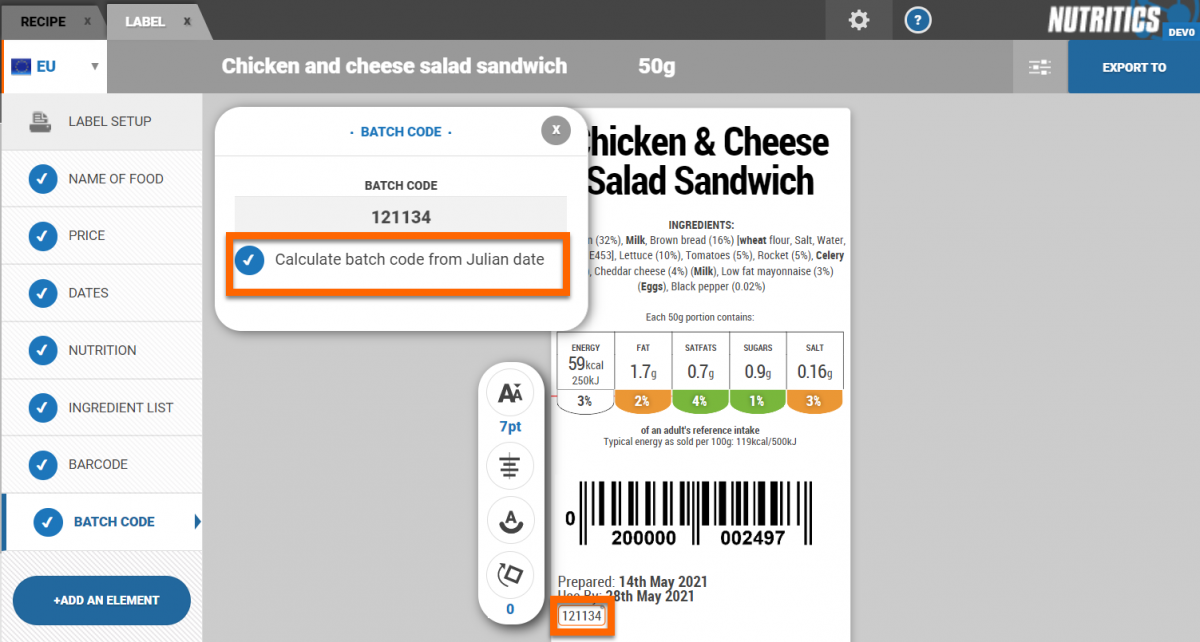
The ‘Julian Date’ is a code that represents the date a product was manufactured or packaged.
The Julian date format is CYYDDD, where: C is the century subtracted from 19, i.e. 1998's century number is 19 = 19 -19 = 0, 2000 = 20 - 19 = 1. YY is the year within the century, DDD is the day in the year, so for example, May 14th 2021 has a Julian date of 121134.
This coding system is used to track production dates for product recalls or any other issues that may arise. Julian Dates can be used to create batch codes for products in Nutritics.
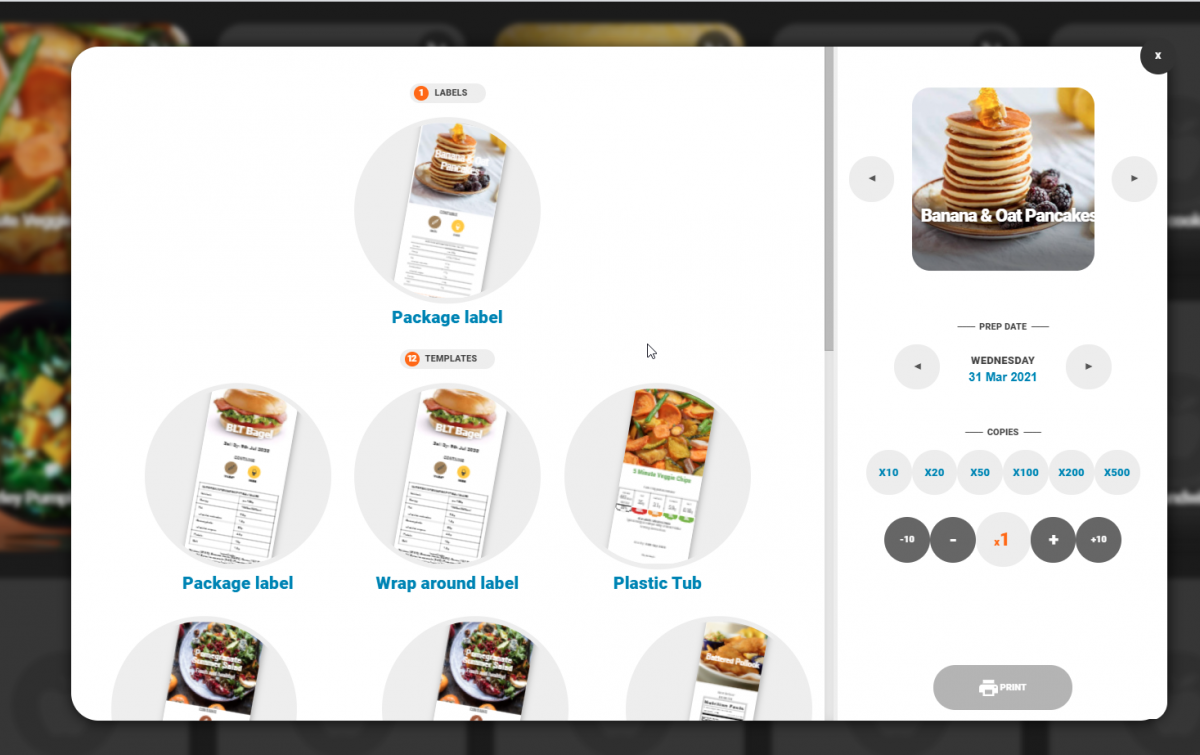
To add a batch code to a product label:
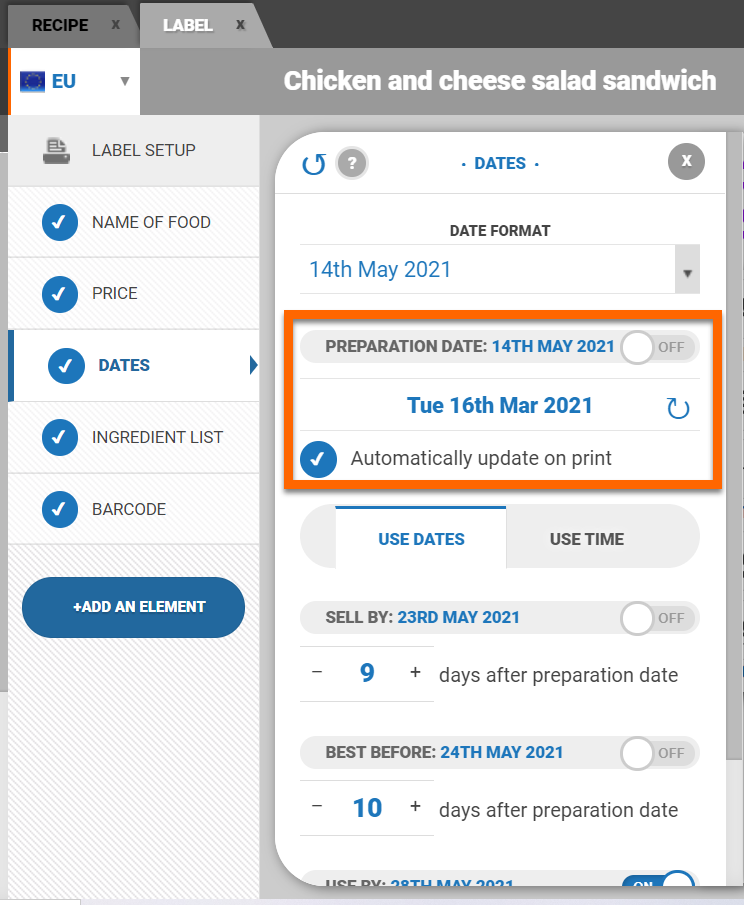
1. Create/open a label and enable the ‘Dates’ element to set the date the product is produced.
Pro tip: Tick ‘Automatically update on print' and the Julian date will update automatically when labels are printed.
2. Enable the ‘Batch Code’ element and tick ‘Calculate batch code from Julian date’ and a batch code will be added to the label workspace.
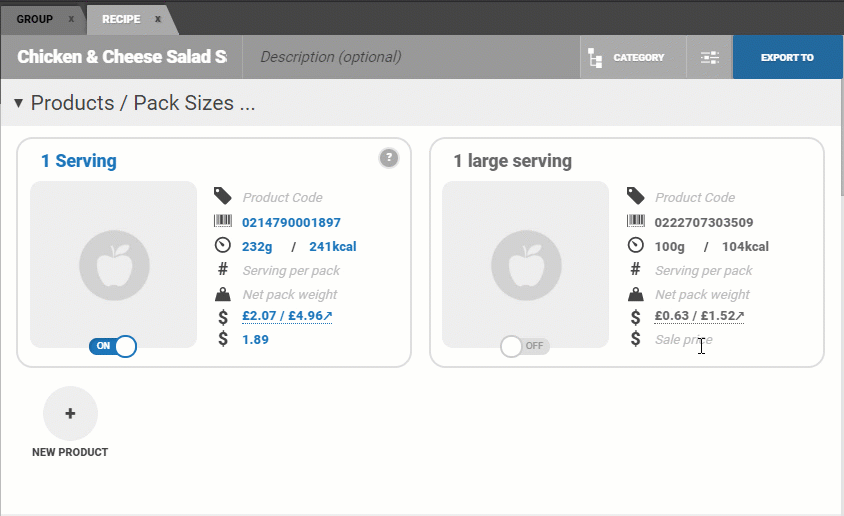
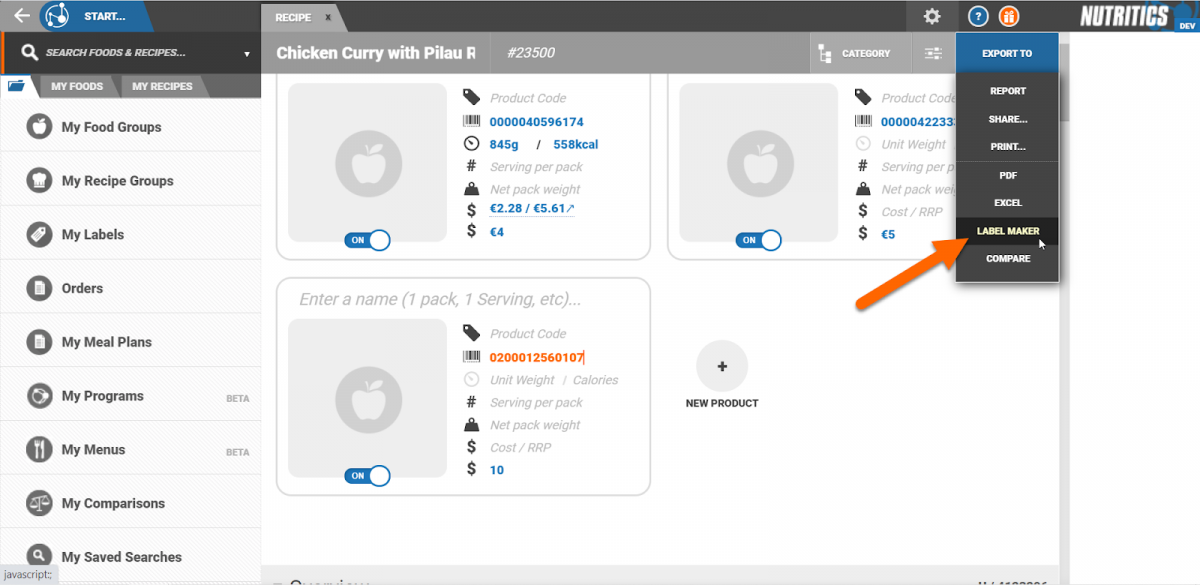
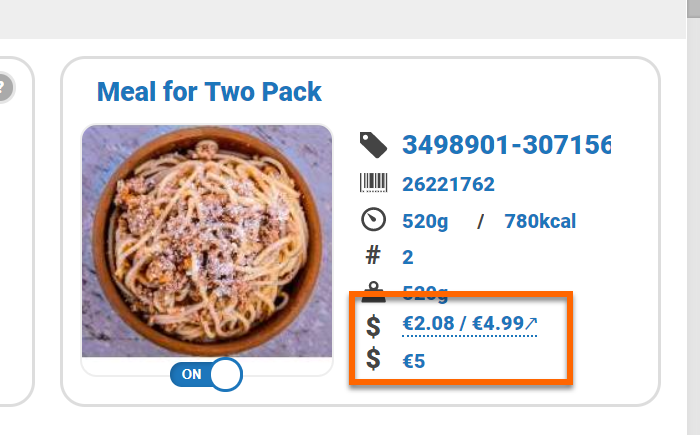
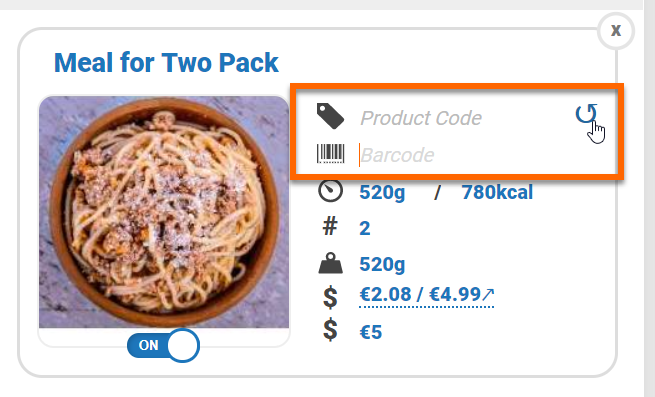
Create price embedded barcodes in Nutritics to inform point of sales systems of product prices.
Open a recipe and scroll to the ‘Products/Pack sizes’ section. Add a sale price to a food portion:
In the barcode field, enter the product barcode (beginning with ‘02’). Nutritics will automatically populate the barcode’s last four digits with the sale price followed by the barcode’s check digit (e.g. 2991 is $2.99).
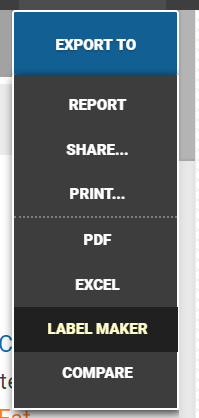
To add this barcode to a product label, open the label maker by navigating to the ‘export to’ menu in the top right corner of the recipe workspace and clicking ‘label maker’
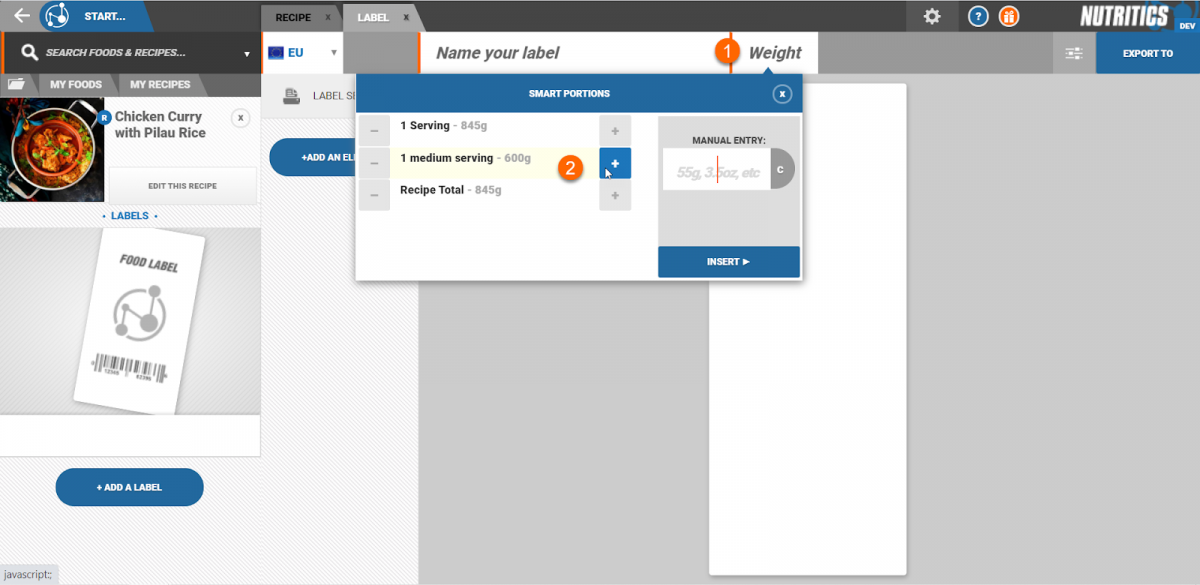
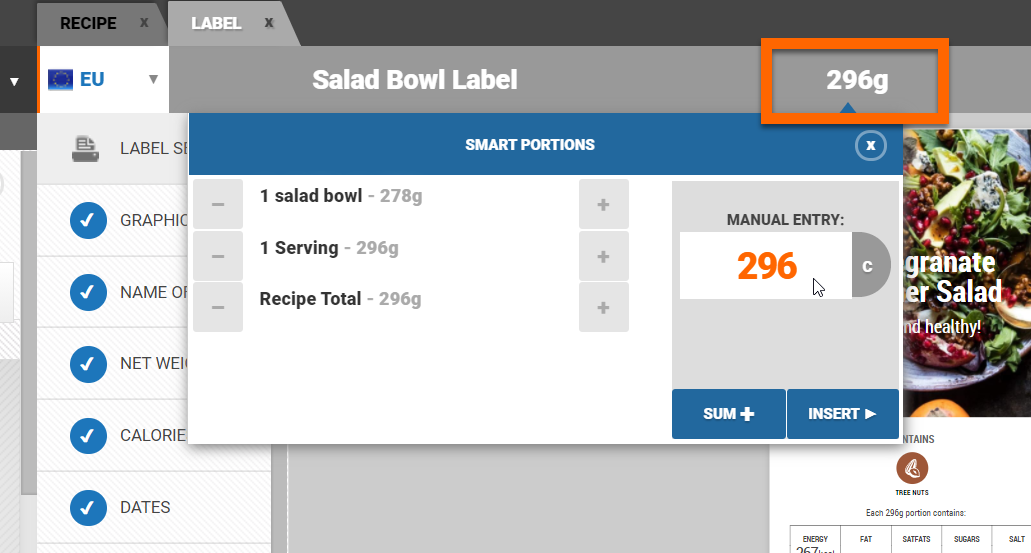
In the label maker, click on the ‘weight’ field (1) and select the relevant portion size (2):
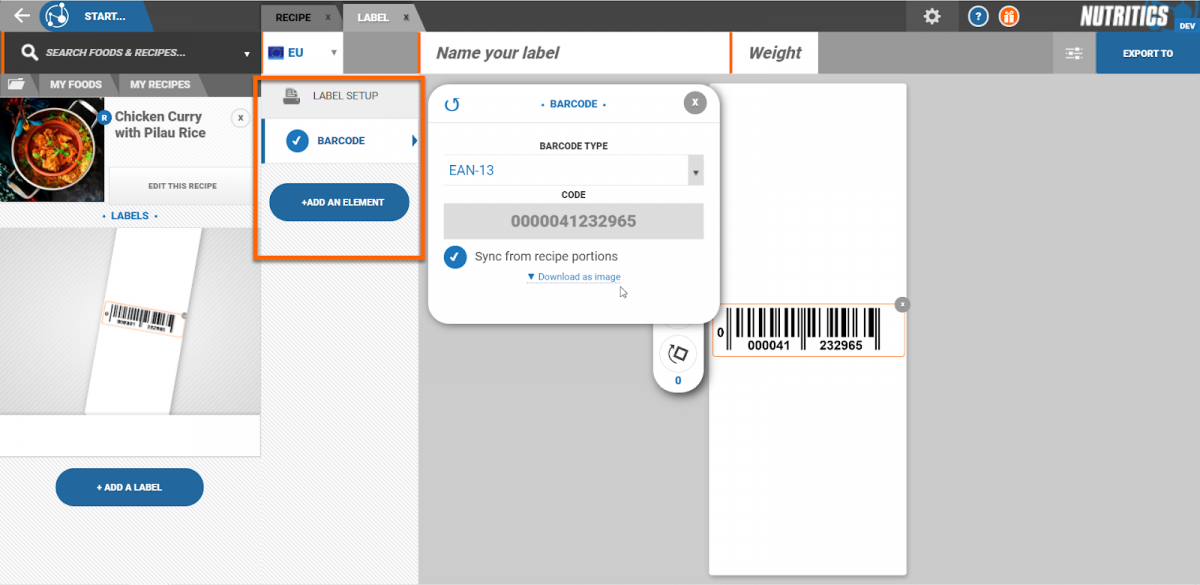
Add a barcode element to the label from the elements panel. Notice that the barcode is syncing from the recipe portion.
WATCH THE VIDEO:
https://www.youtube.com/embed/PReqYf8Am8Y
If the label maker tool is not available on your account, it is available as an add-on from Menu > Add Features.
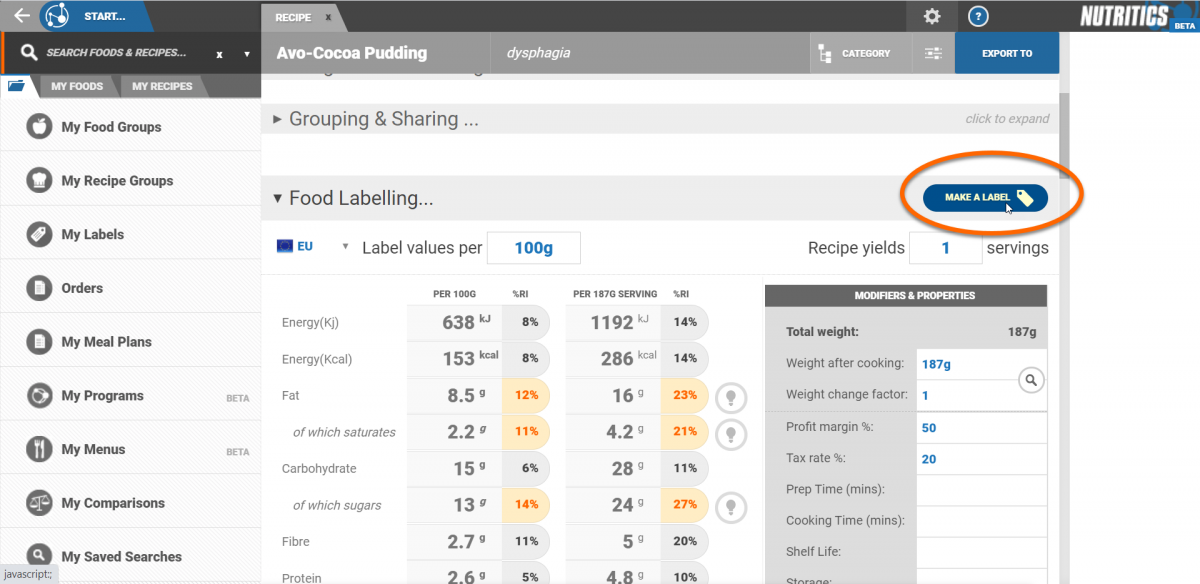
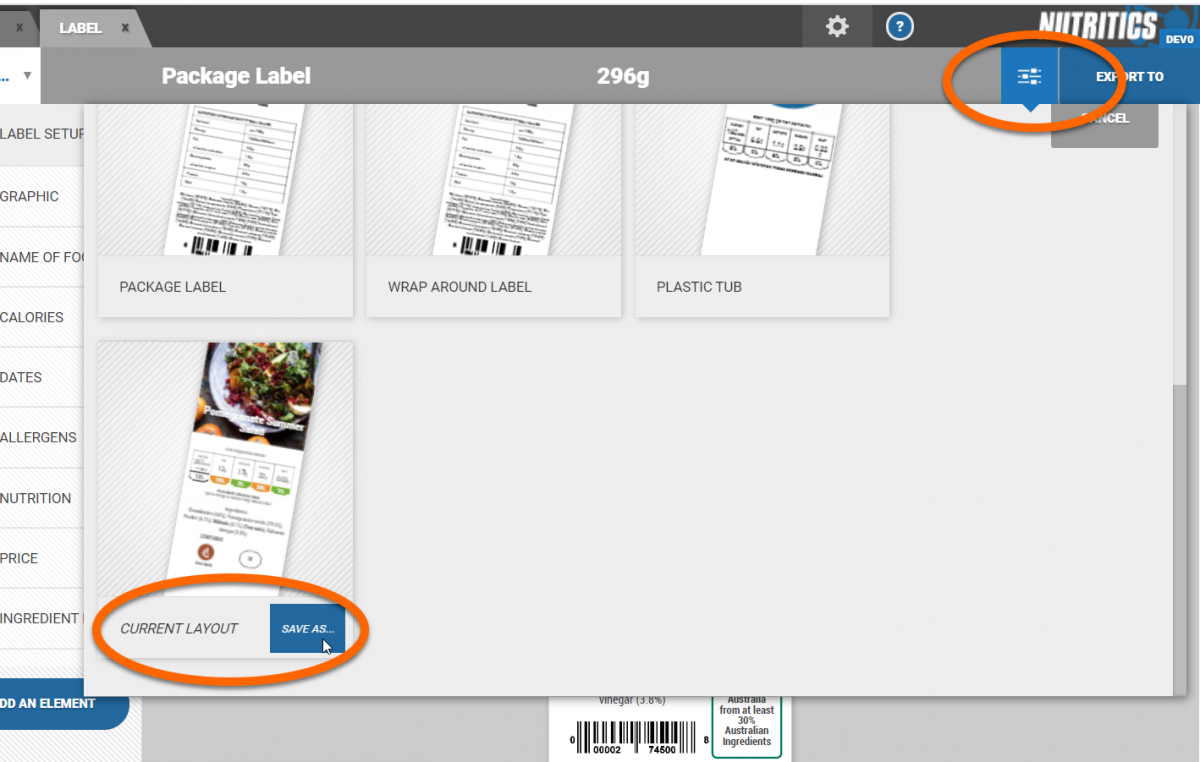
The label maker can be used to create food labels quickly and easily for your products and recipes. It can be accessed in a couple of different ways.
Option 1: Open a food or recipe and select export to > label maker
Option 2: Open a food or recipe and click on ‘make a label’ in the food labelling section
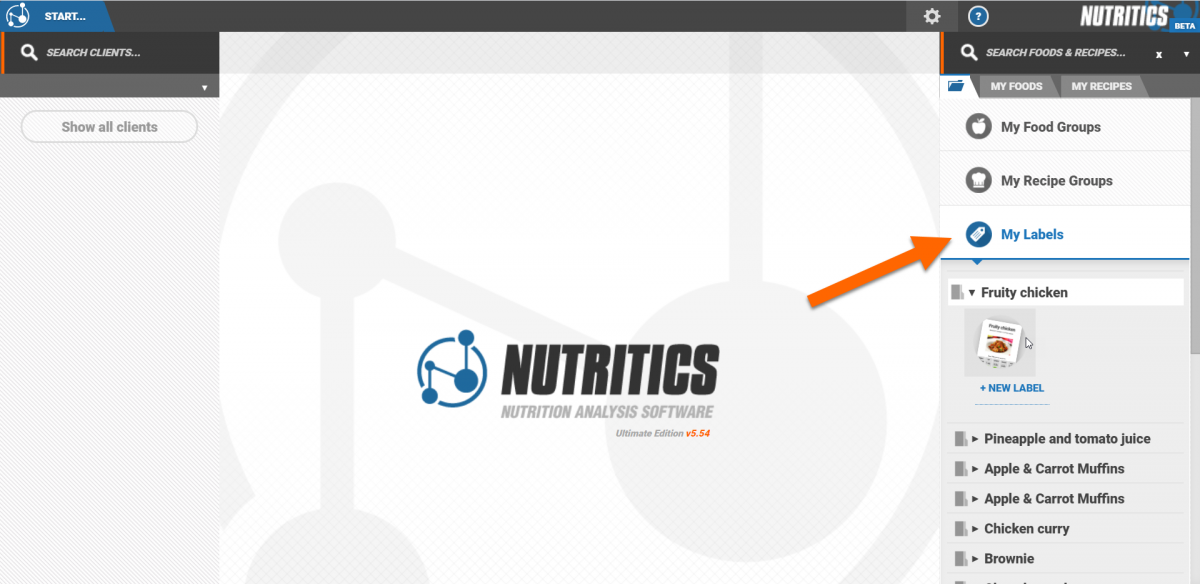
Option 3: Click on the start menu and select ‘new label’ then choose the food or recipe you would like to make a label for
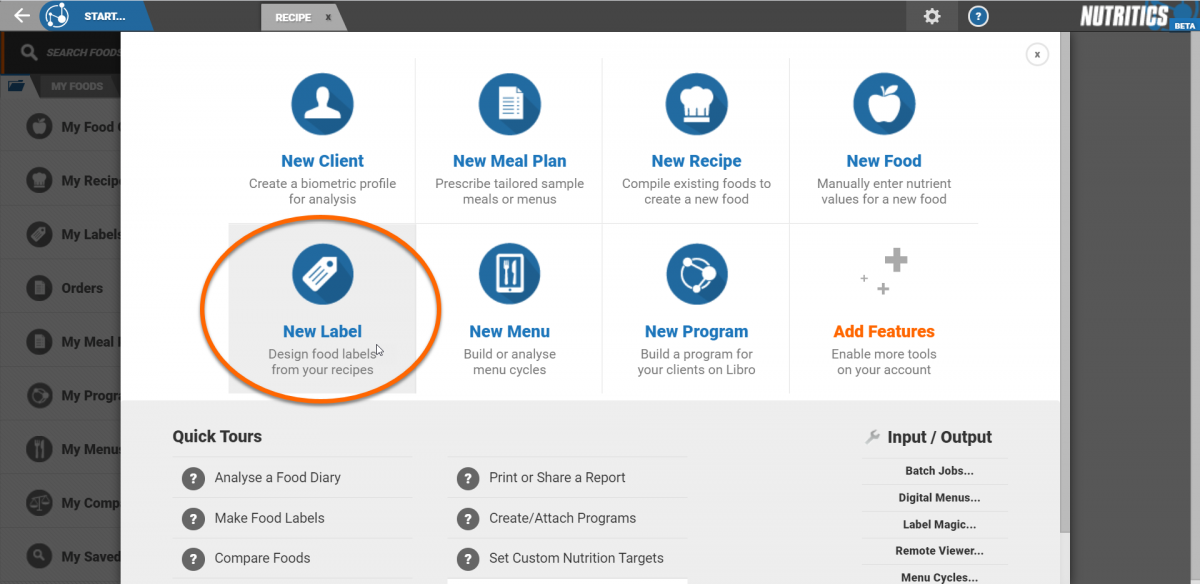
Option 4: In the Nutritics Explorer click on ‘My labels’. Expand the food or recipe that you would like to make a label for and click on ‘+new label’
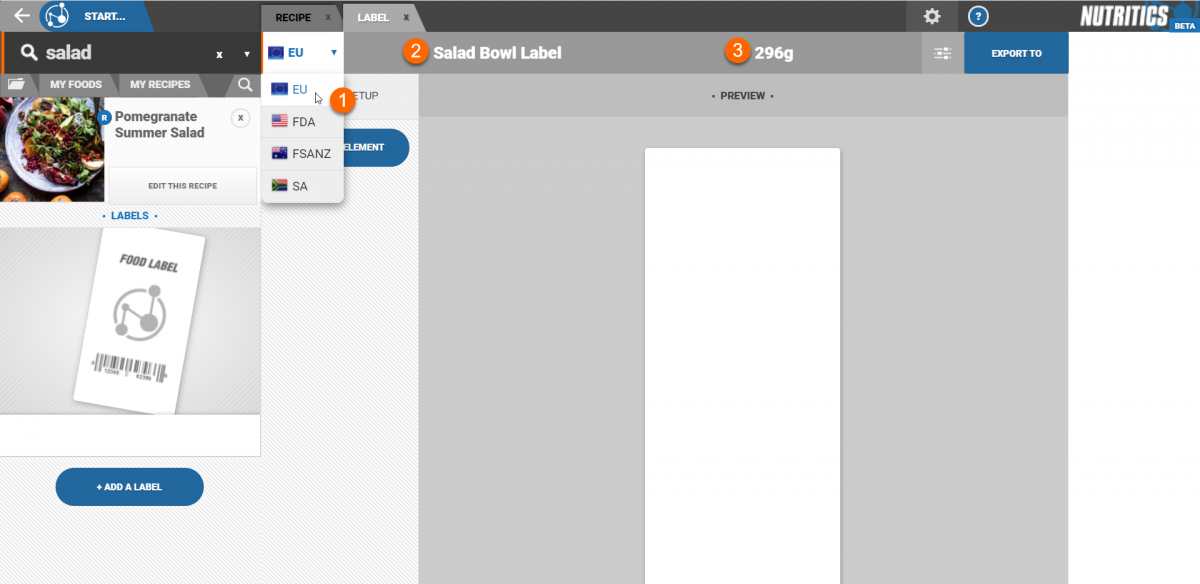
In the label maker, select a pre-made label template and customise this as needed, or start from scratch.
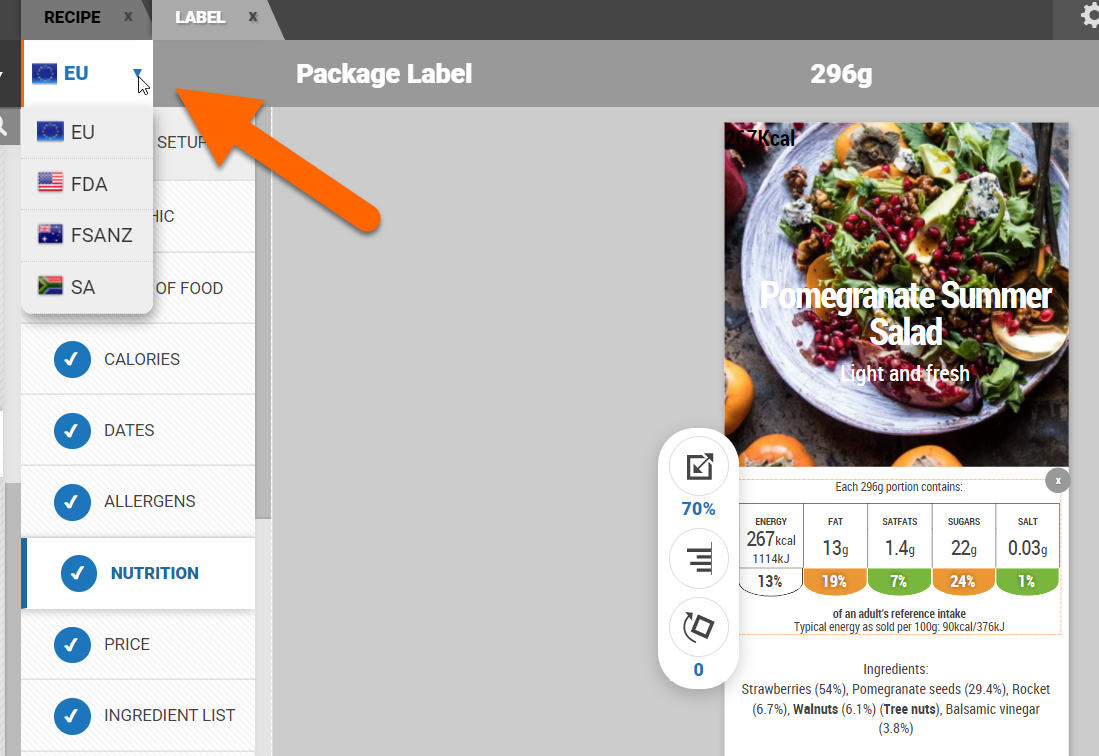
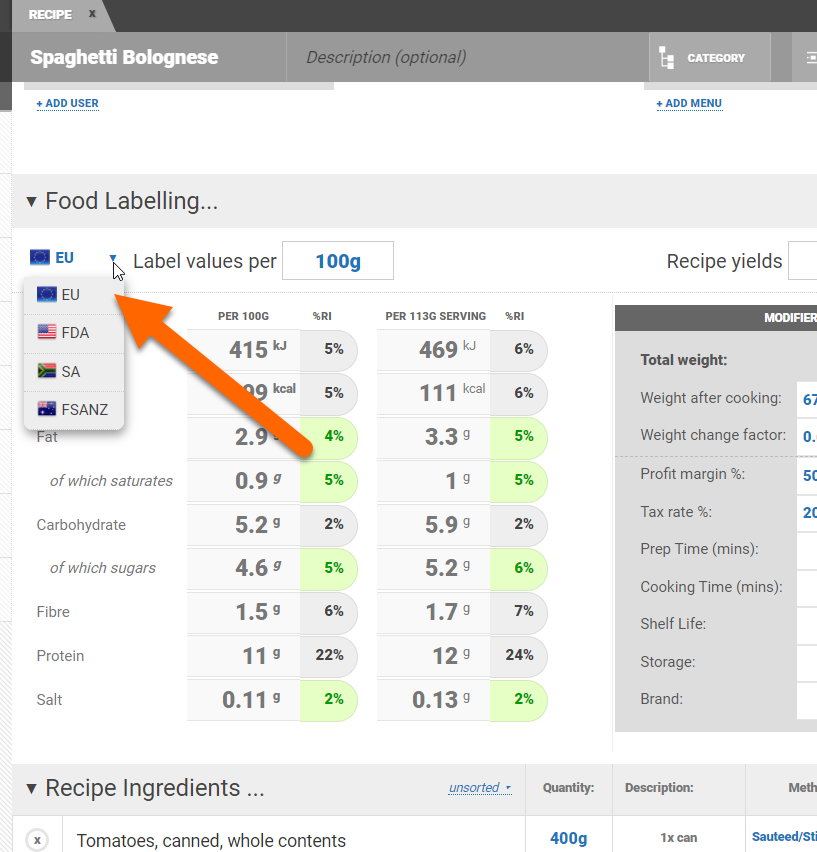
(1) Your region can be changed here - this will determine the labelling standards applied to the label.
(2) Give the label a name.
(3) Enter the weight of the product.
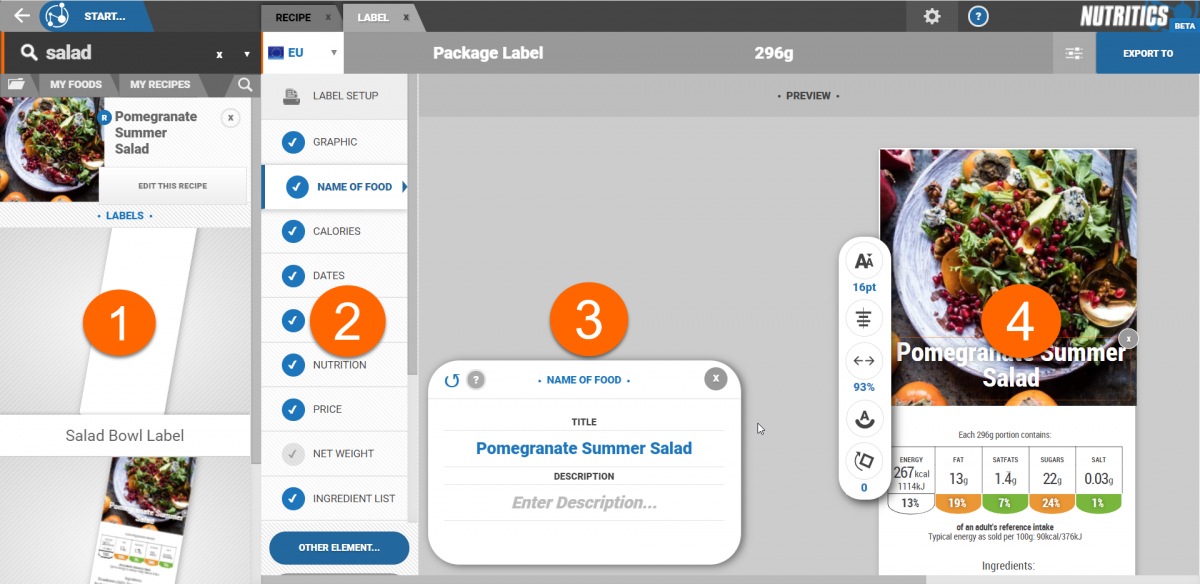
The label maker is set up in a series of side-by-side panels, similar to the main Nutritics interface.
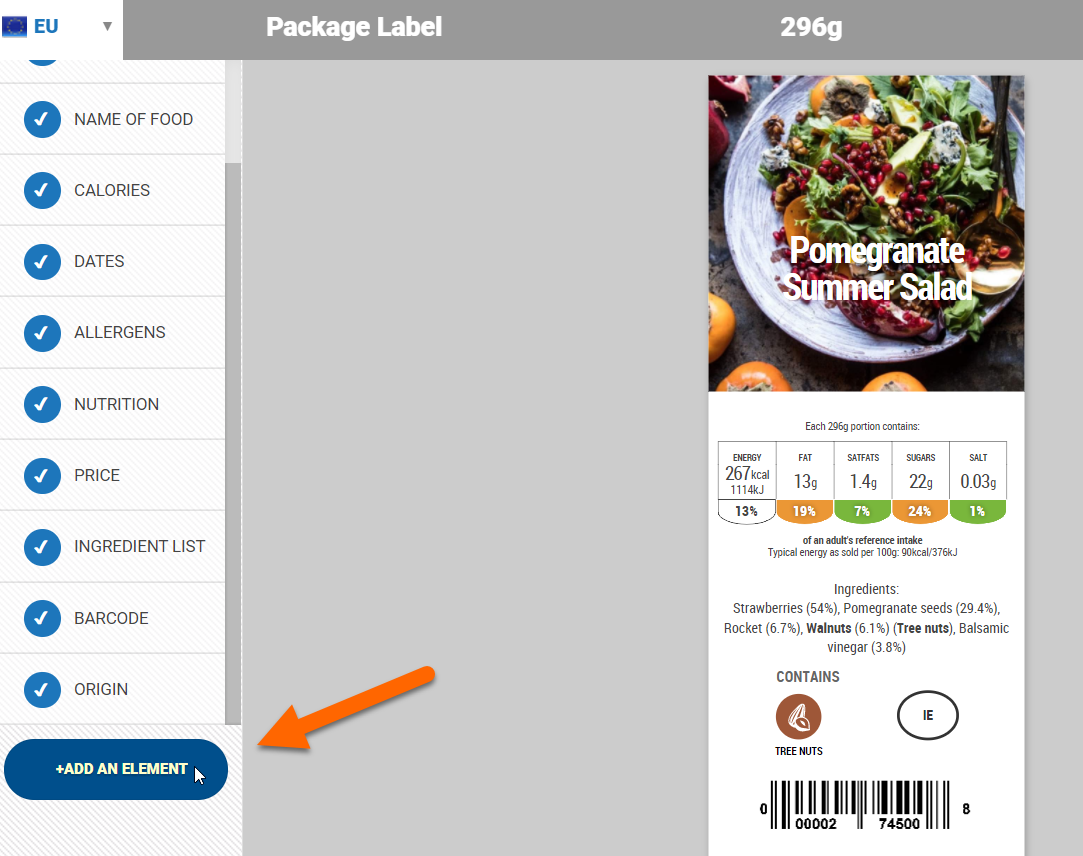
Panel 1: This is a list of labels created for this recipe or food. Additional labels can be created for this recipe by clicking ‘+add label’.
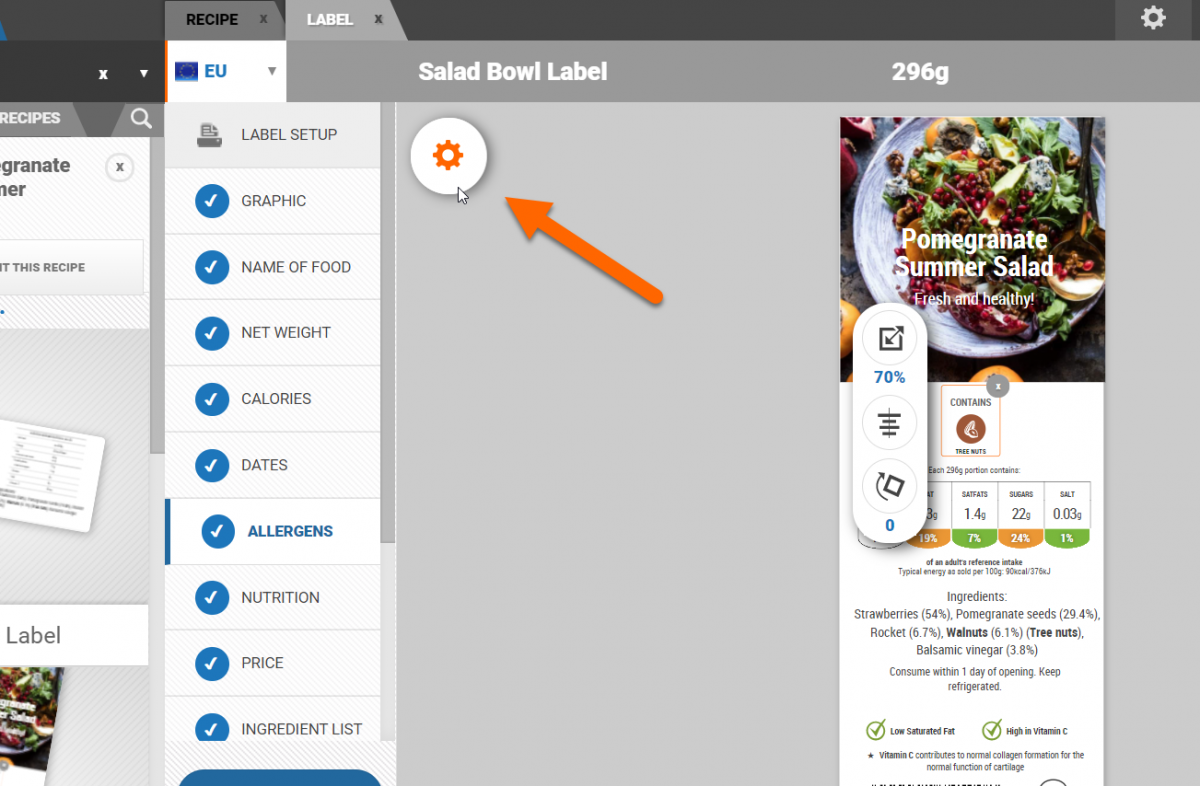
Panel 2: Add elements to the label from this panel. Elements include graphics, text, nutrition facts panels etc.
Panel 3: Customise elements from the panel that expands when an element is selected from the list of elements. Click on the 'x' icon to close this panel. It can be reopened by clicking on the cog icon that appears.
Panel 4: Finally we have the label workspace. Elements can be resized and repositioned here and clicking on an element here will open a format bar where elements can be further customised.
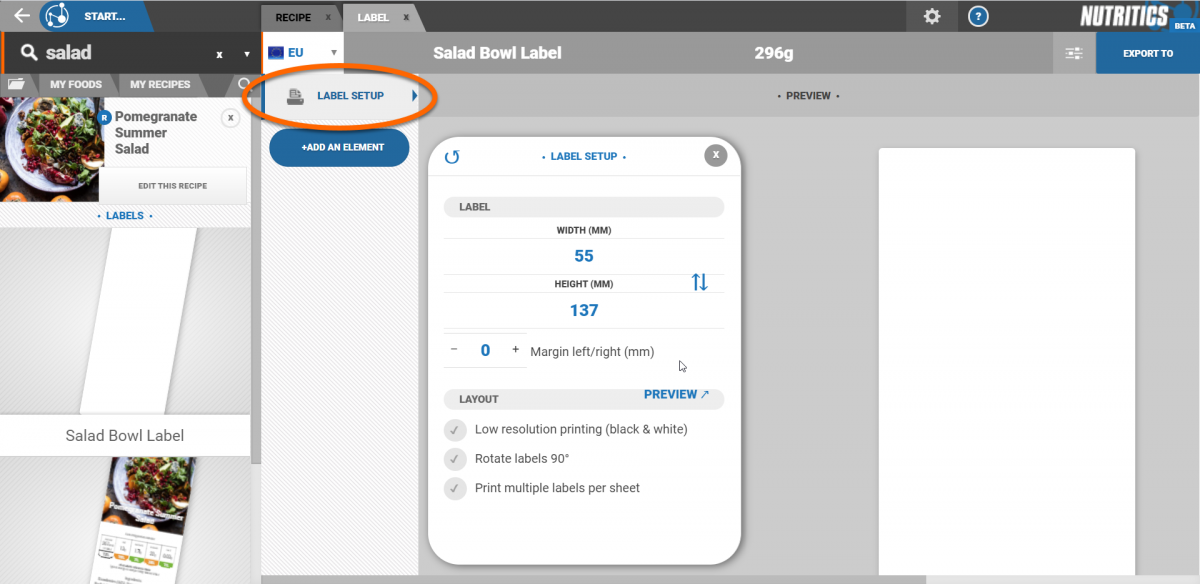
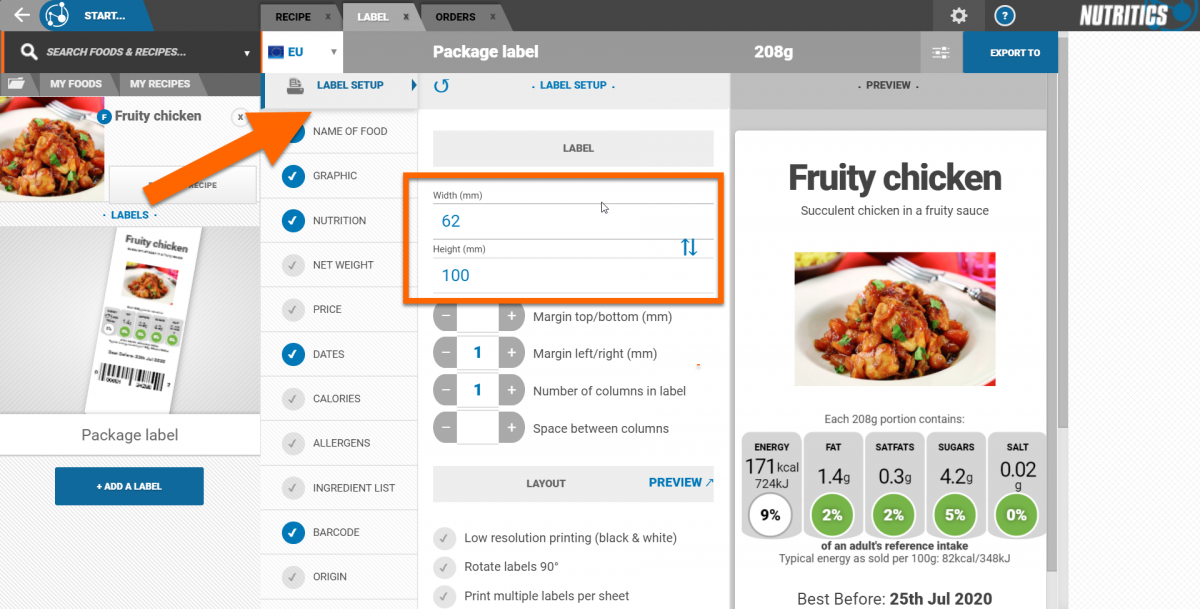
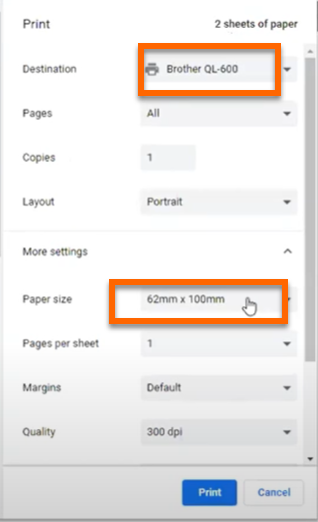
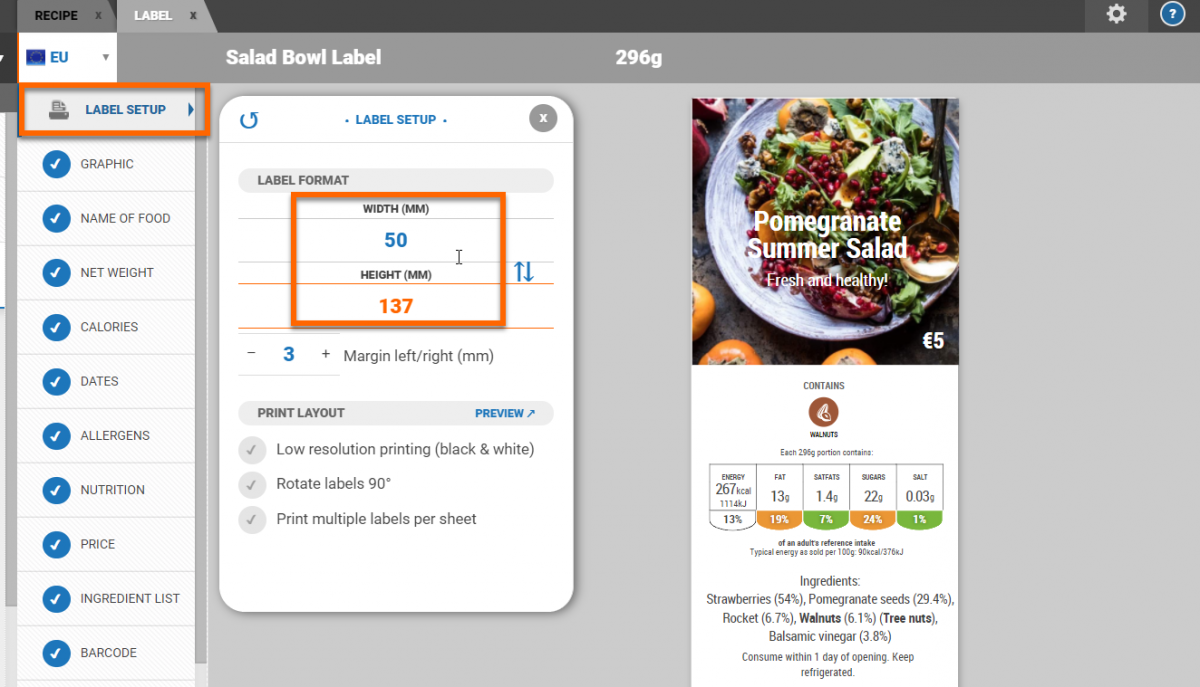
Set the label dimensions in the ‘label setup’ panel. Set the width and height of the label and the margins to the left and right.
It’s important to make sure that the dimensions set up in the Nutritics label maker match label rolls the labels will be printed on and the dimensions in your printer settings. You can set the printer dimensions by opening your printer properties and going to the printing preferences. We have a separate guide on this here.
Tick ‘low-resolution printing’ to print in black & white; determine if you want your labels to be flipped 90 degrees for printing or, if printing e.g. on an A4 sheet, you can set how many labels will be printed on a sheet.
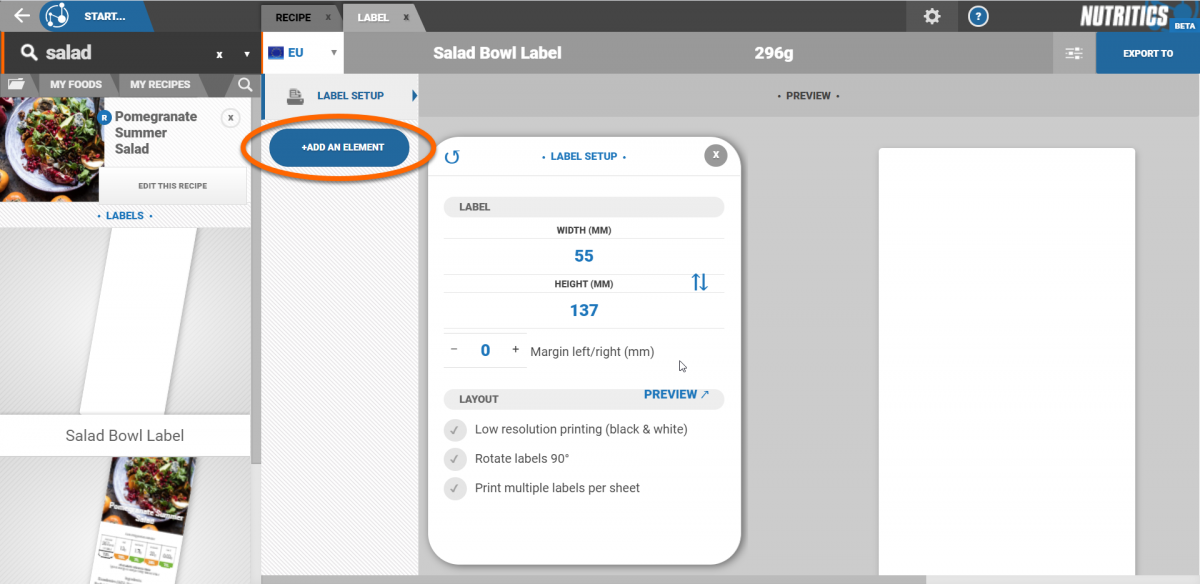
Adding elements to your label
Click ‘+add an element’ to get started. Click on any element to add it to the label.
Elements can be customized in the panel that expands. Click on the ‘X’ icon to close the panel. Click on the cog icon to expand it again.
Elements can be arranged on the label by clicking on them on the label workspace and dragging them into position.
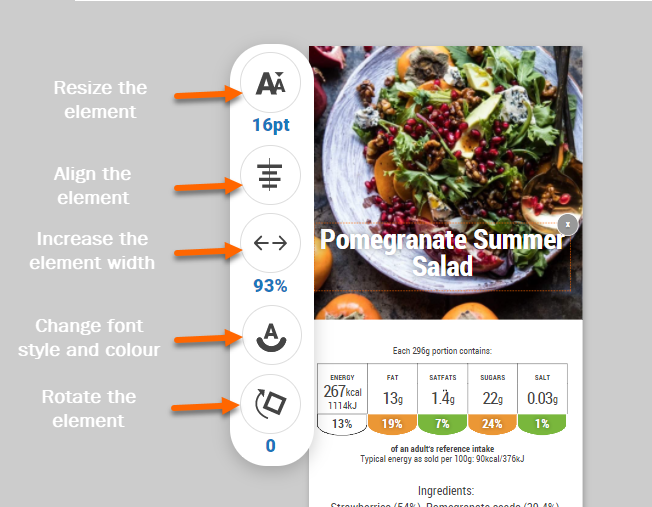
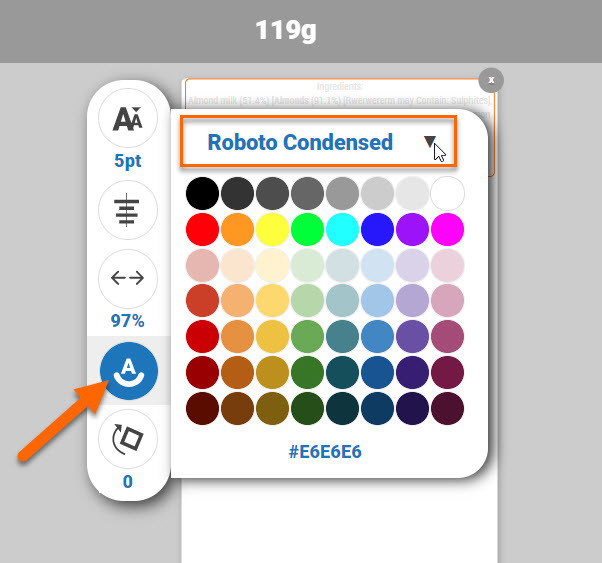
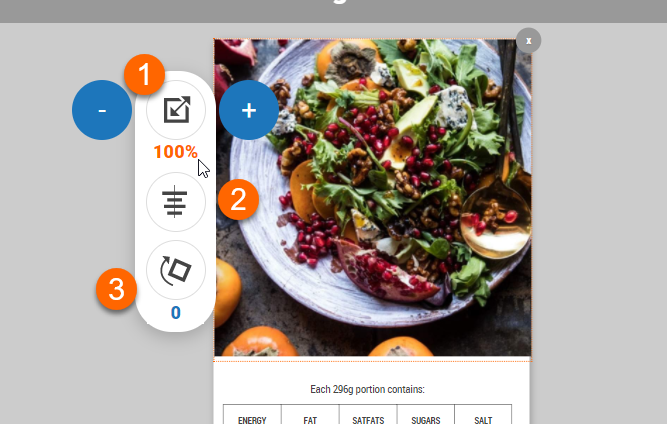
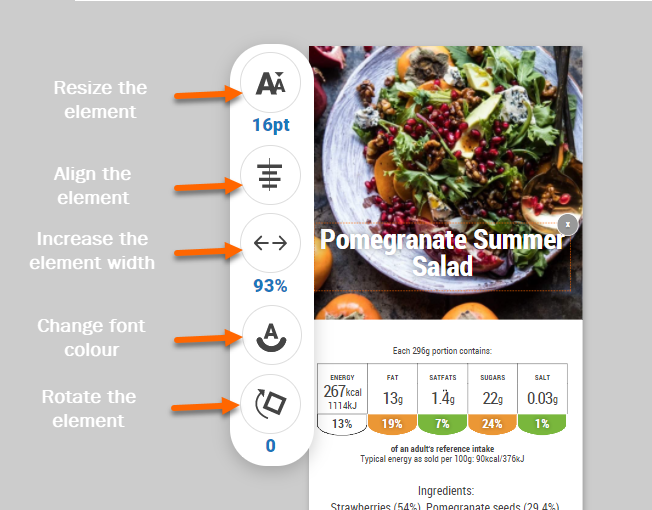
When an element is selected a formatting bar appears. From here, elements can be resized, aligned, rotated and for text elements, the width of the text box, font and font colours can be changed.
Click on the font icon in the format bar to edit the font style and colour.
Click on the ‘x’ icon to remove an element from the label.
Once you are done adding elements to the label, click back to see all elements enabled on the label.
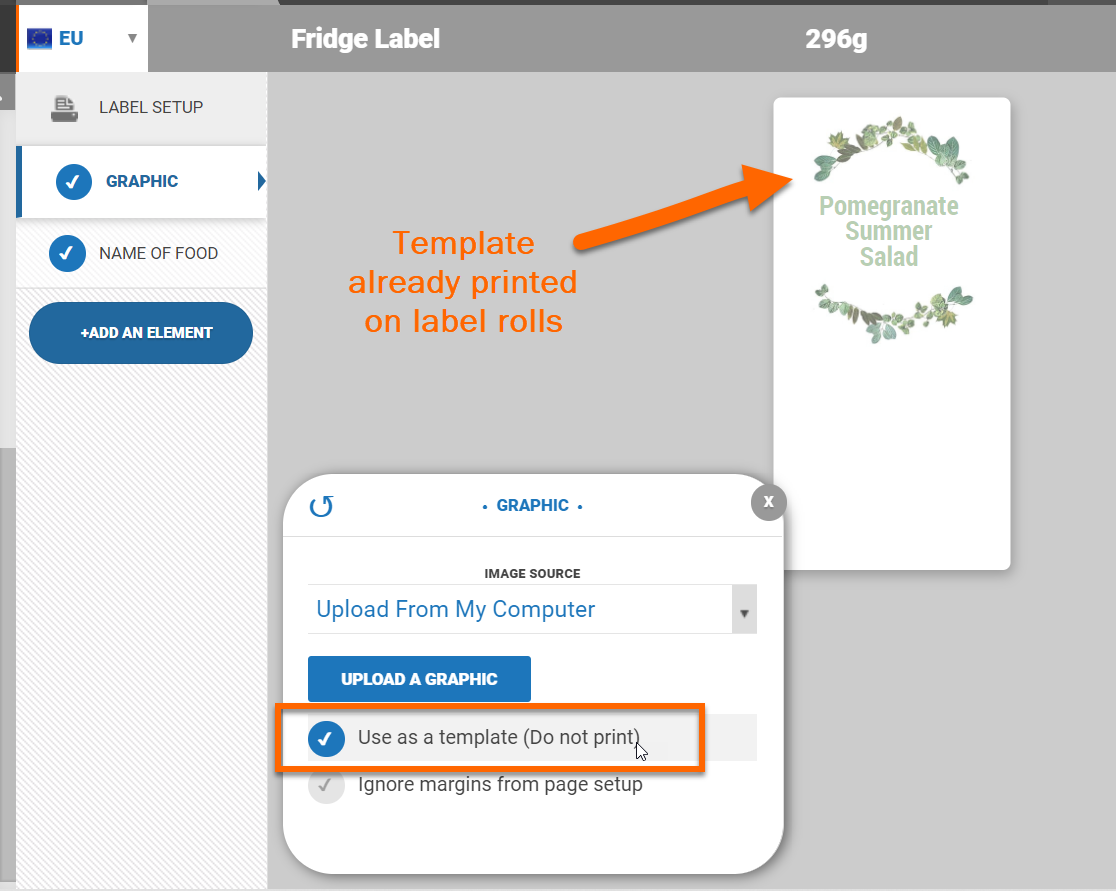
Graphics
In the graphics element, you can add your logo or upload images and templates to your label.
Click 'Use as Template' if you have pre-printed label rolls or sheets - this means the graphics won't be printed but will be shown on the label workspace so other elements can be positioned around the image.
Background templates should be the exact same aspect ratio as the finished cut label. In cases where the cut label is an irregular shape, the template should contain the entire finished cut label exactly. The image resolution is not important as it will not be printed but we recommend at least 72 pixels per inch for reasonable quality in the editor.
Also please note that the label maker does not natively support bleed, or PDF or EPS files - they must be raster graphics - png/bmp/jpg/gif/tif.
Click and drag the image on the label workspace to reposition it.
(1) Use the plus and minus buttons to resize the image, or type directly into the box to change the size.
(2)The image can be aligned by clicking on the alignment icon.
(3) The image can also be rotated by clicking on the plus and minus icons beside the rotate icon or by typing the number of degrees directly into the box.
To add more than one graphic to the label, click ‘add an element’ and then select ‘other element’ and select the graphic option from the drop-down menu.
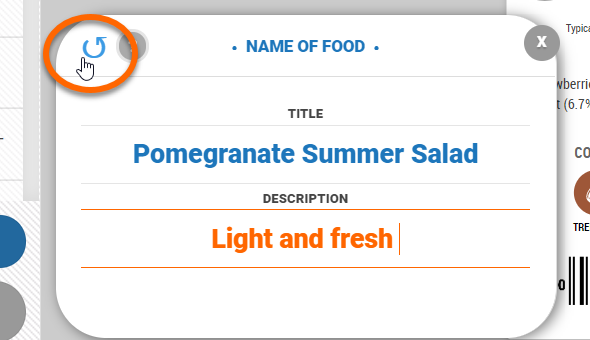
Name of food
To add the name of your product tick the ‘name of food’ element. In the panel that expands, add in the product name and an optional description. By default, Nutritics will pull in the food/recipe name as the name of the food. Changing the text here will not change the recipe details. You can refresh to the original recipe name by clicking on the round arrow.
Reposition the name of the food by clicking on it in the label workspace and dragging it into place.
The font size and text box width can be changed in the formatting bar using the plus and minus buttons or by typing directly into the box.
Change the font colour by selecting a colour from the options provided or type in a colour code. The font can also be rotated and aligned.
NET WEIGHT
Specify the weight of the product on your label using the weight element. The net weight is the weight of the product excluding packaging.
PRICE
Specify the sale price of the product in the price element.
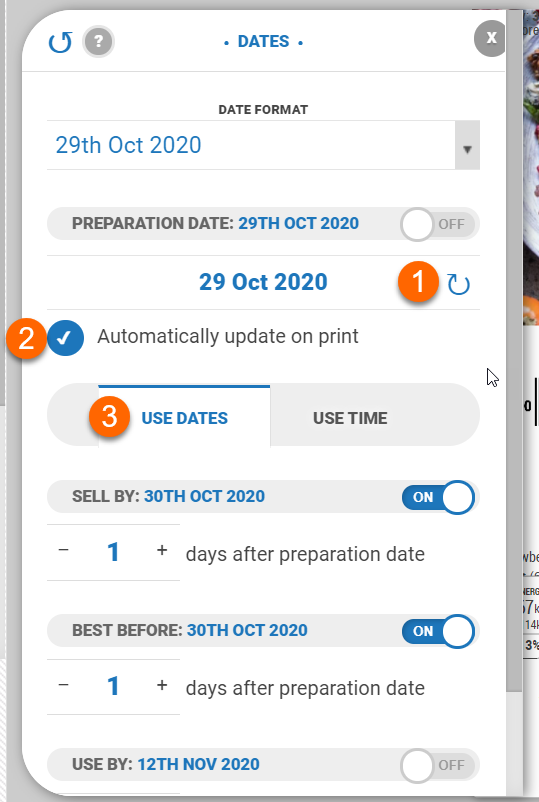
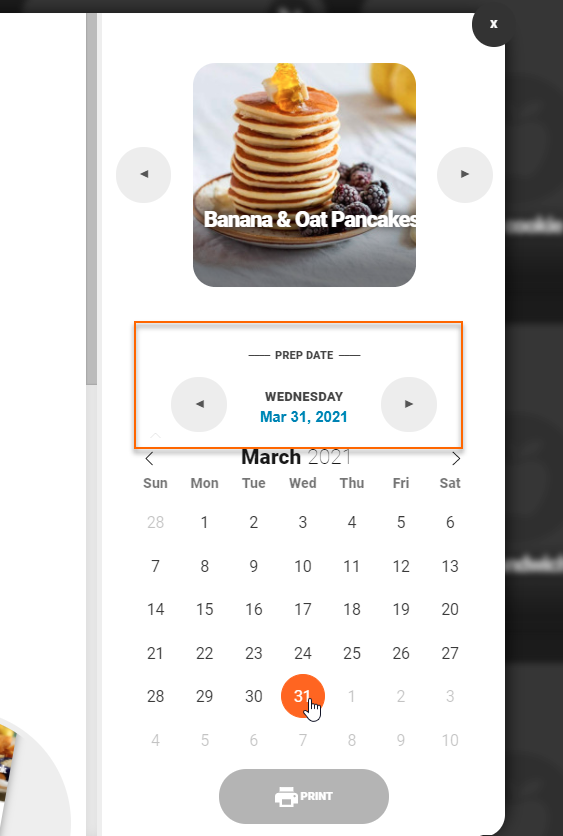
DATES
Set the date format and preparation date.
(1) Clicking the small circular arrow on the preparation date box will input today's date in the box.
(2) Tick ‘automatically update on print’ and any time you print this label, the preparation date and other dates on the label will be updated automatically.
(3) You can then specify the number of days durability for ‘sell by’, ‘best before’ and ‘use by’ for your product.
CALORIES
Toggle this element on to display calories on your label. Remember to choose a portion size option at the top of the screen.
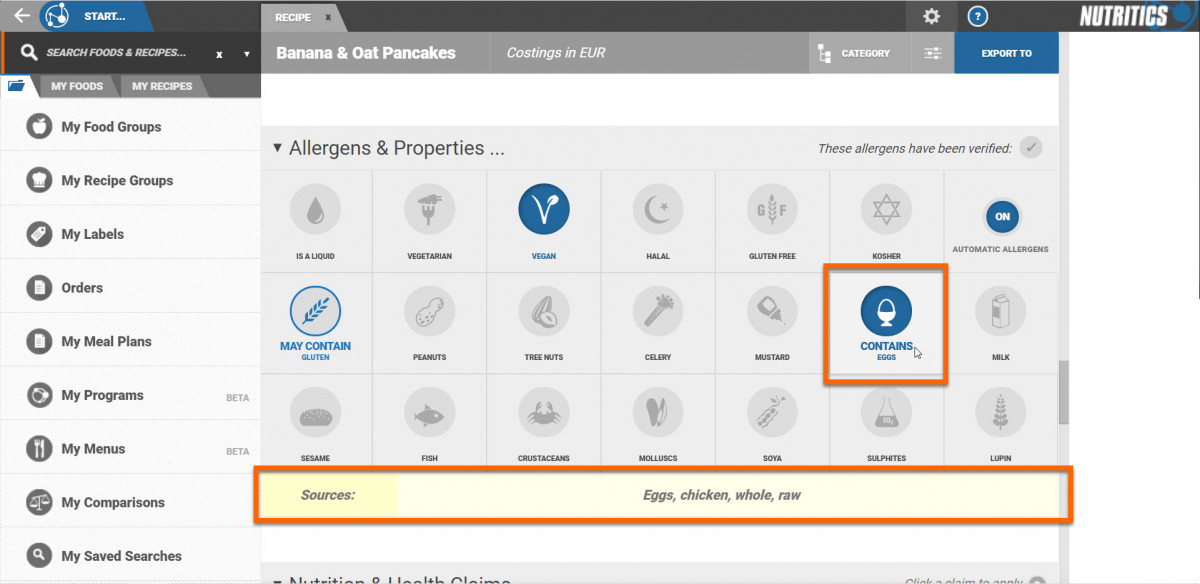
ALLERGENS
Toggle on to display allergens as text or icons on your label. Allergen information is pulled from your recipe in real-time.
CLAIMS
If Nutritics has indicated that nutrition and health claims can be made for the recipe, these can be added to the label by clicking on the claims element. Nutritics won’t indicate any claims that cannot be made for your recipe.
Nutrition
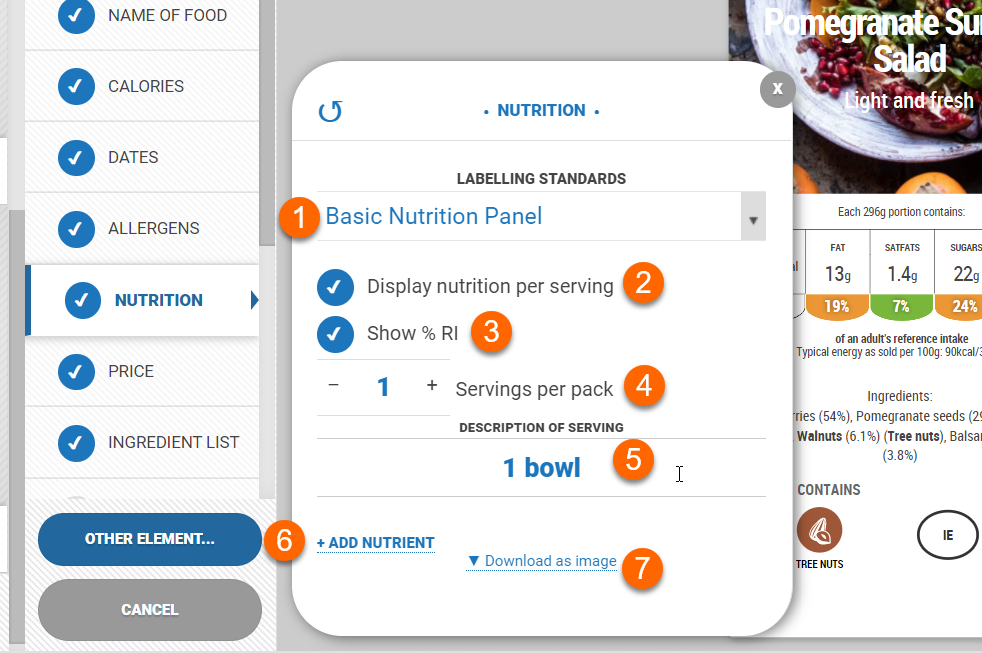
The labelling standard applied can be changed from the region dropdown.
(1) In the nutrition element, choose your style of label, either front or back of pack.
(2) Depending on the labelling standards set, tick to display the nutrition per serving along with the nutrition per 100g/100ml.
(3) Tick to display the nutrition as a percentage of the reference intake of an average adult.
(4) Specify the number of servings using the plus/minus icons or type a number directly into the box.
(5) Add a description of the serving e.g. 1 cup, 1 carton
(6) Click ‘+add nutrient’ to add additional nutrients to the nutrition panel. Note that only nutrients present in adequate amounts will show here.
(7) The nutrition panel can be downloaded as an image
Click and drag the nutrition panel in the label preview to move it. Resize, align and rotate the panel using the formatting bar.
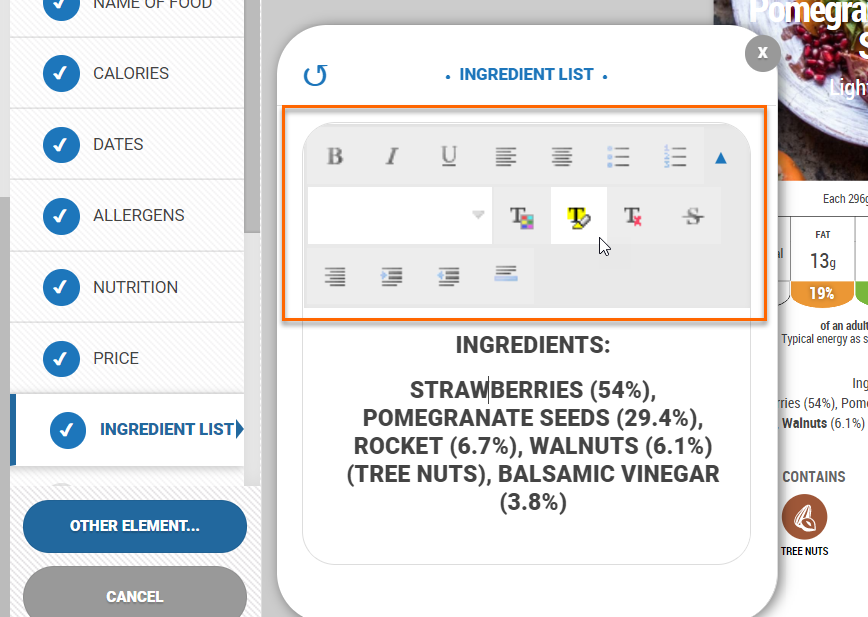
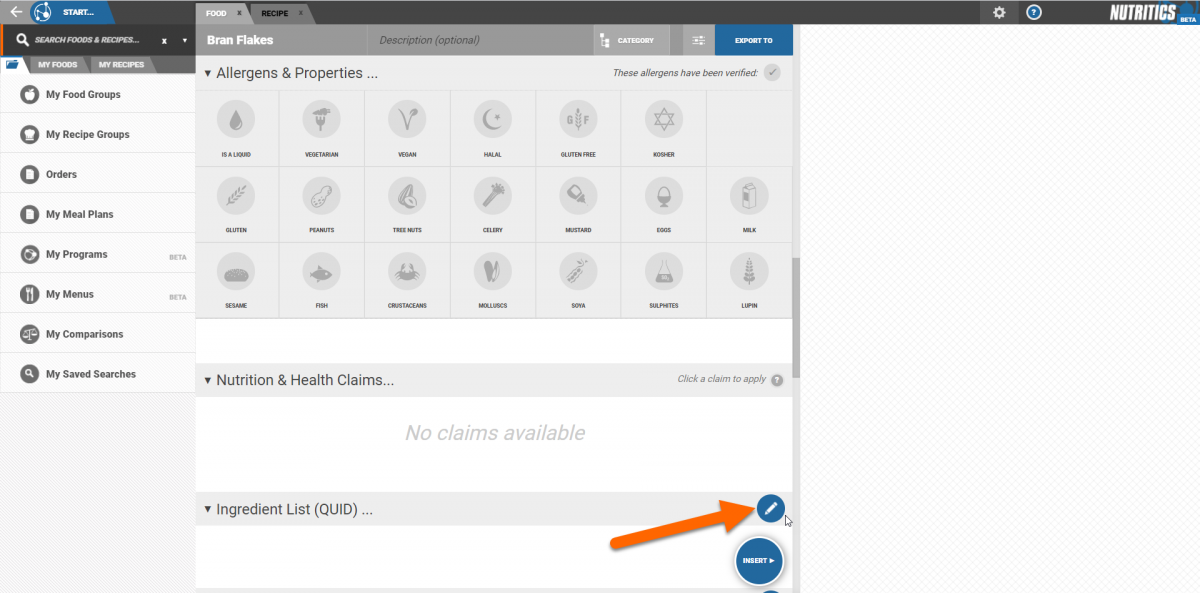
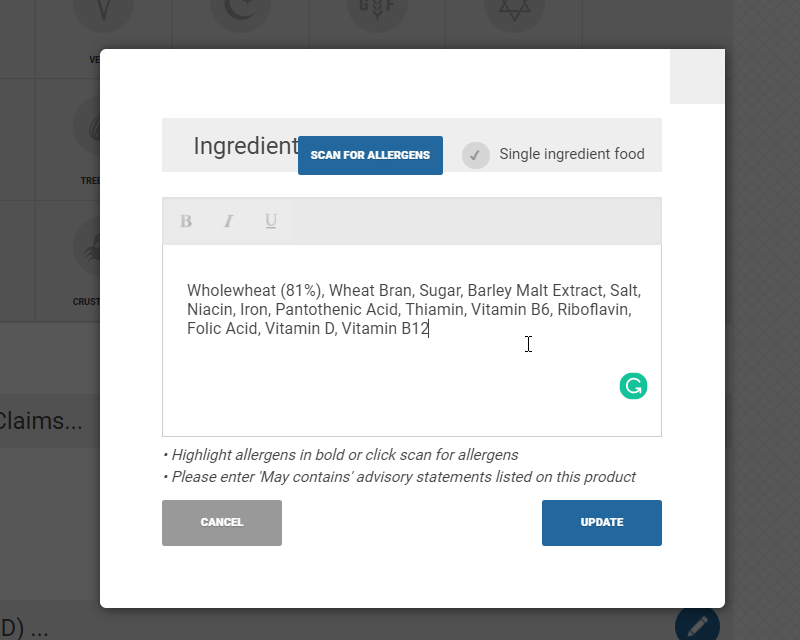
Ingredient list
This is an editable text version of the food’s ingredient list and quantities / QUID. This list pulls directly from your food/recipe.
Instead of editing the text here, we recommend that changes to the ingredient list are made on recipe ingredients (learn how to do this
here).
If necessary, untick 'sync from food/recipe' to edit the ingredient list.
Edit the text using the format options.
Adjusting the text here does not change the QUID on the food or recipe development workspace. To revert to the original ingredient list, tick 'sync from food/recipe' again and the ingredient list will refresh. The text can also be formatted in the label workspace.
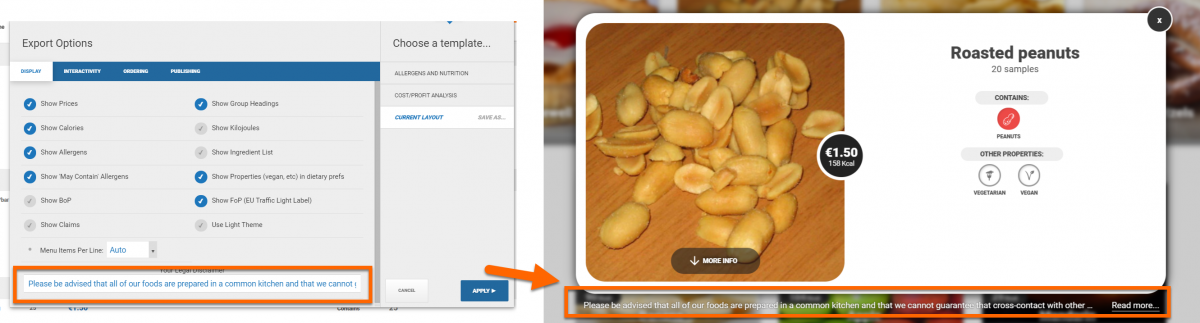
Choose to include the allergy advice statement on your ingredient list also. This will notify people of any allergens that may be contained within the product
Alcohol
Toggle this element on to indicate the alcohol by volume on your product label.
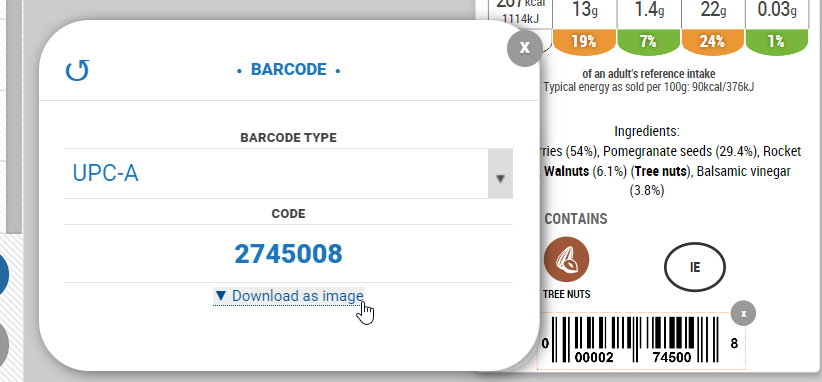
BARCODE
Choose your barcode type and input the numeric values to generate a printable barcode for your product. The barcode can also be downloaded as an image.
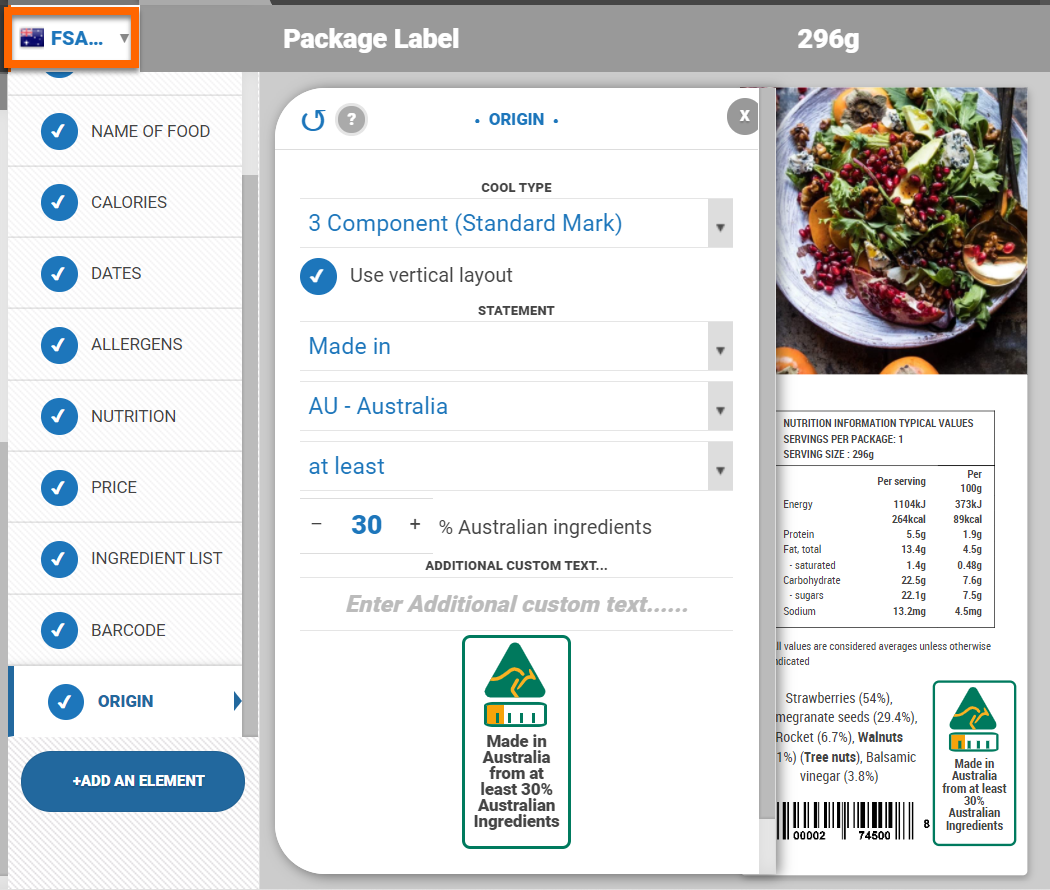
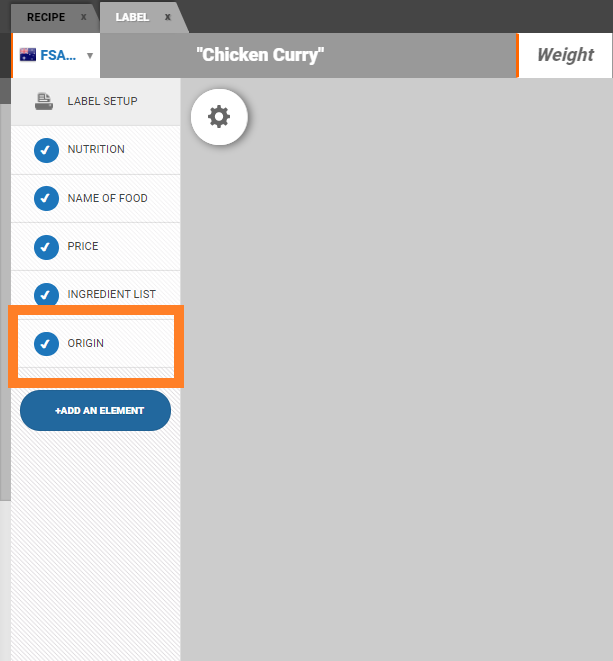
ORIGIN Specify the country of origin of your food in the ‘origin’ element. If the labelling standards are set to FSANZ, origin element facilitates the
Australian Standard Mark.
INSTRUCTIONS
This element is pre-populated with the instructions from your recipe workspace. This is not an element on foods at the moment. Editing the text here does not affect the instructions in the main recipe workspace. Use it to give the consumer additional information, such as cooking or storage instructions for the product.
Label templates
Once the label is complete, it can be saved as a template and reused for different products by clicking on the grey slider icon and clicking ‘save as’. The next time the label maker is opened, the template will be accessible from here.
Exporting Labels
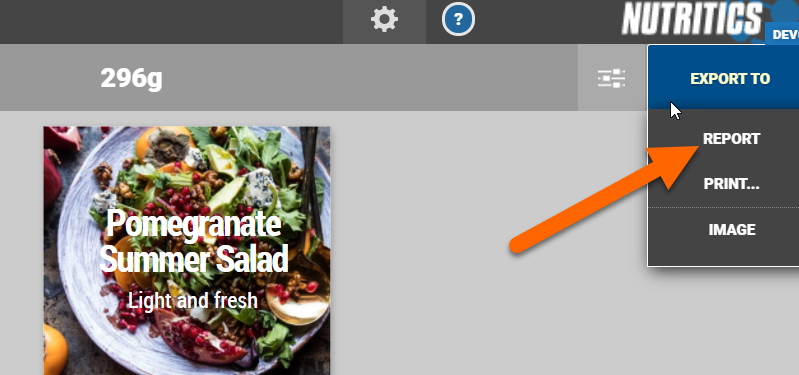
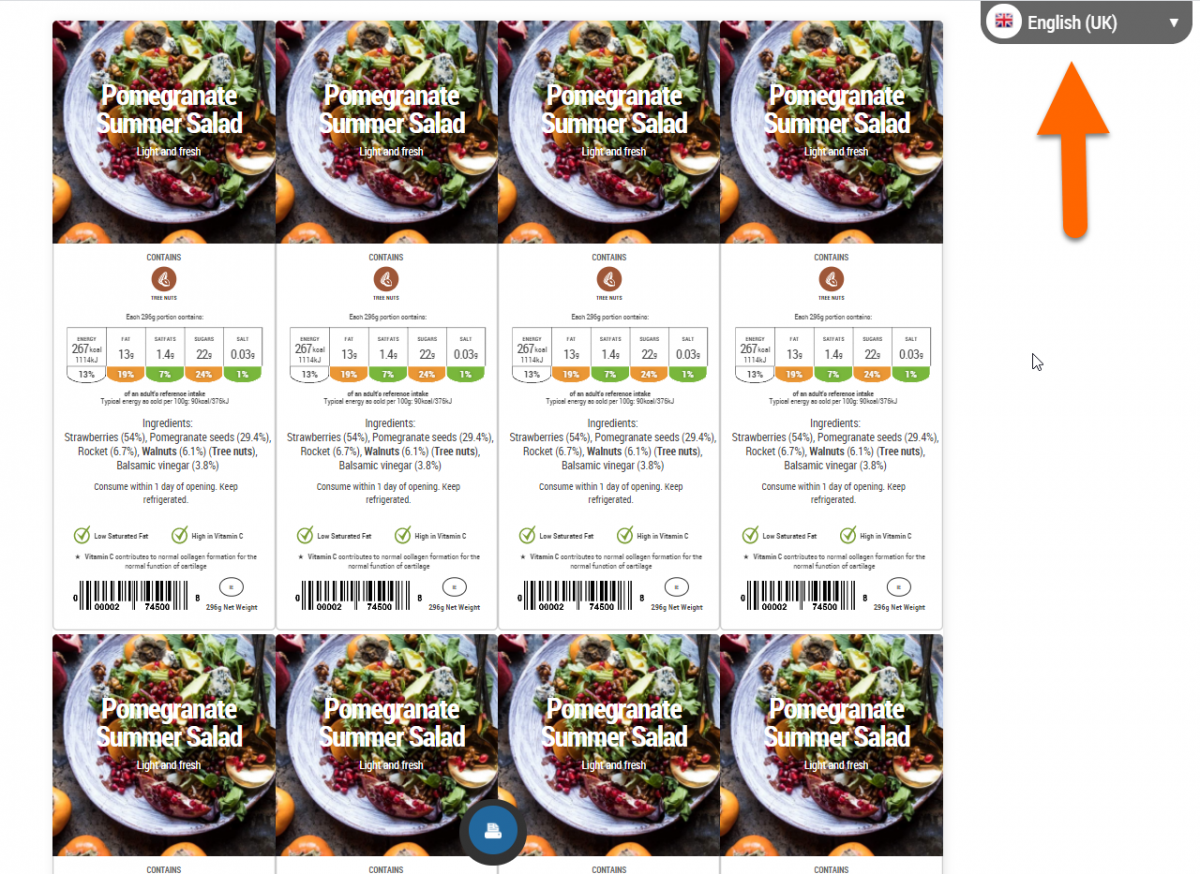
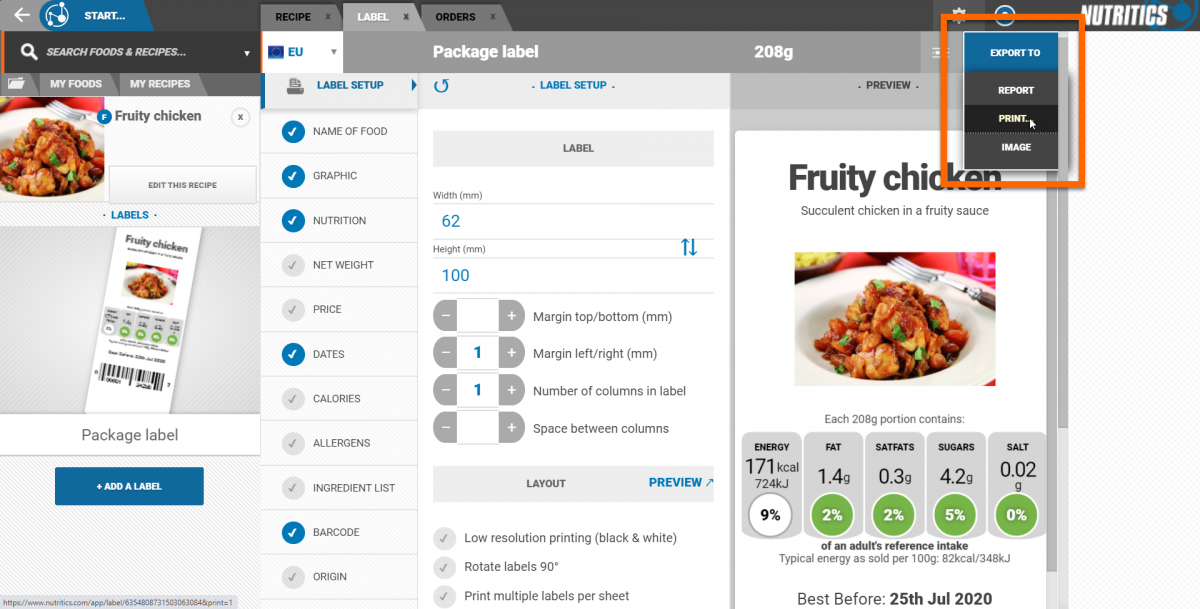
Print directly to a label printer or onto paper on any regular inkjet/thermal printer; or download your label as an image.
Export the label to a live report to preview how the final version will look.
Label headings can be translated by clicking on the language drop down in the top right corner of the label report.
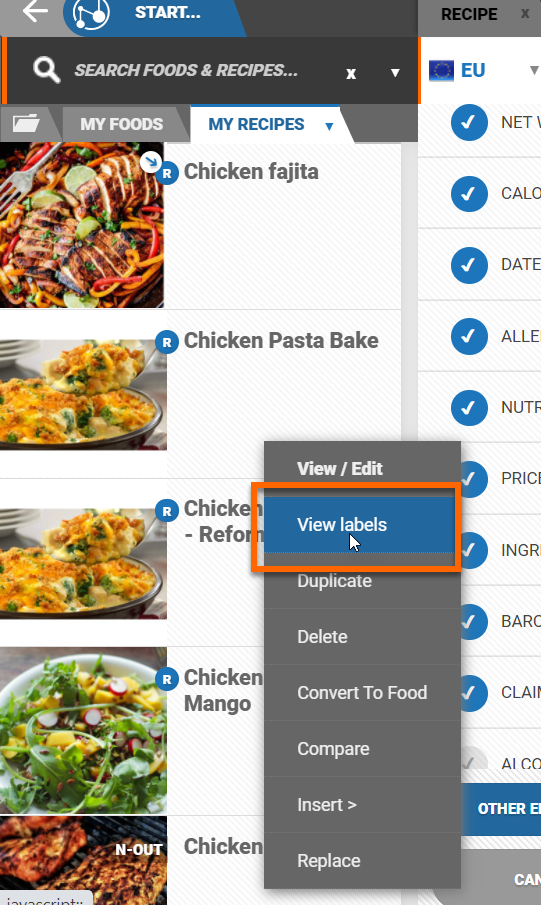
To print your labels in bulk, see our guide on LabelMagic. Accessing labels
Labels are accessed by right clicking on a recipe and selecting ‘view labels’
or from the ‘my labels’ folder in the Nutritics Explorer.
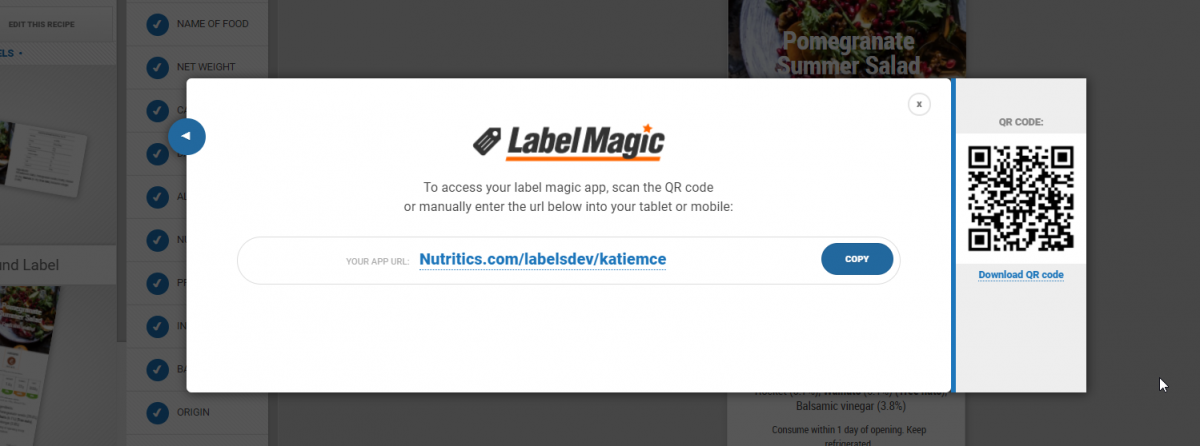
Labels can be printed in bulk using the Label Magic app. This is useful where recipes and labels are developed e.g. at a head office level, and printed by staff on site.
Label Magic is accessed from the start menu under the input/output heading.
Click on the url or scan the QR code to open the Label Magic app on a tablet, laptop or mobile.
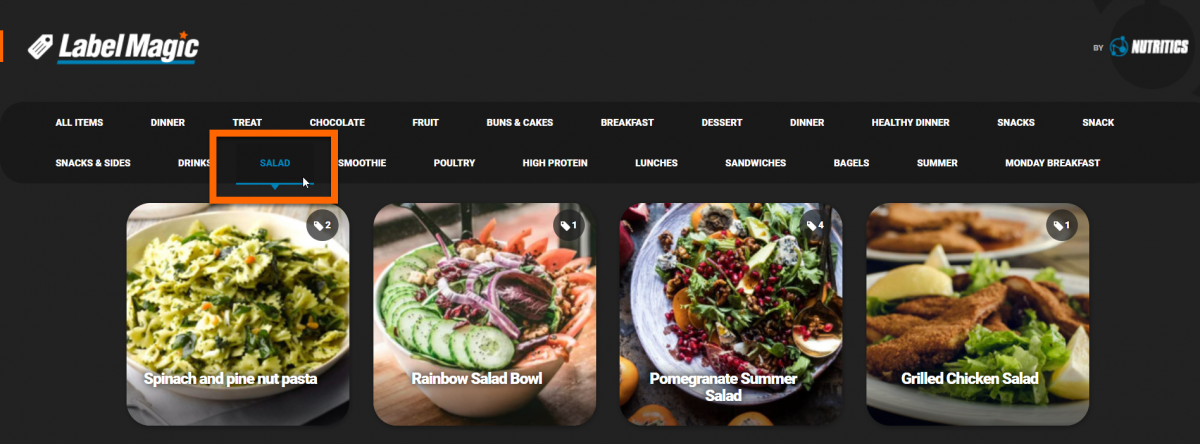
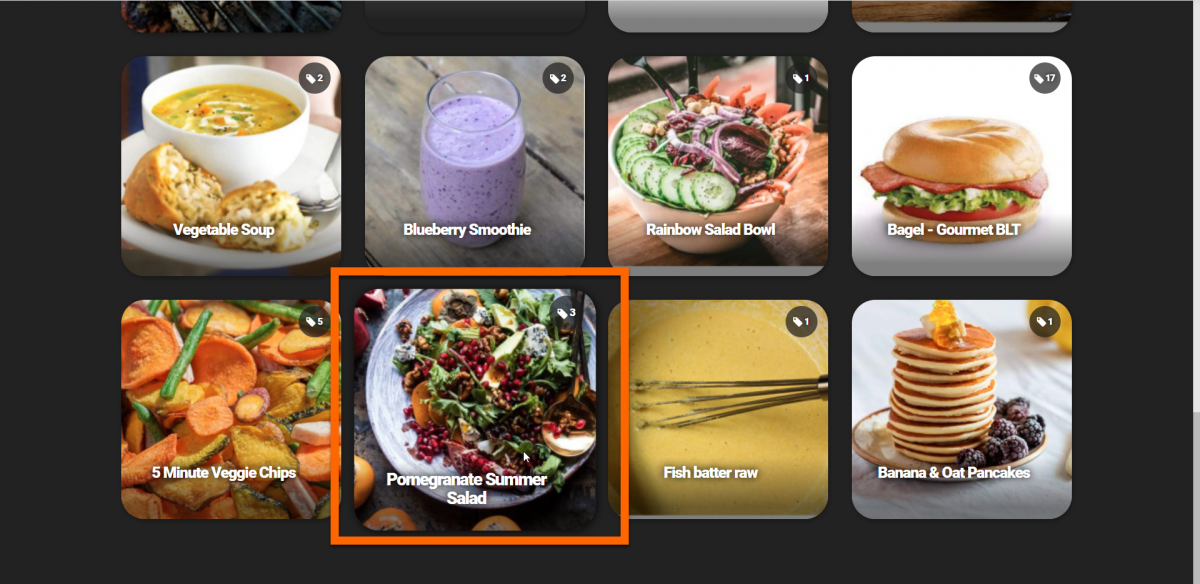
All recipes will be displayed in a tile format. The number of labels created for a recipe is displayed in the top corner of the recipe tile.
Click on the tabs at the top of the screen to filter by recipe groups.
Click on a recipe to see the available labels.
Labels created by you are shown at the top while label templates are shown underneath.
Select the label style that you would like to print.
Specify the preparation date of the product and if the label bears a use by, best before or sell by date this will update automatically.
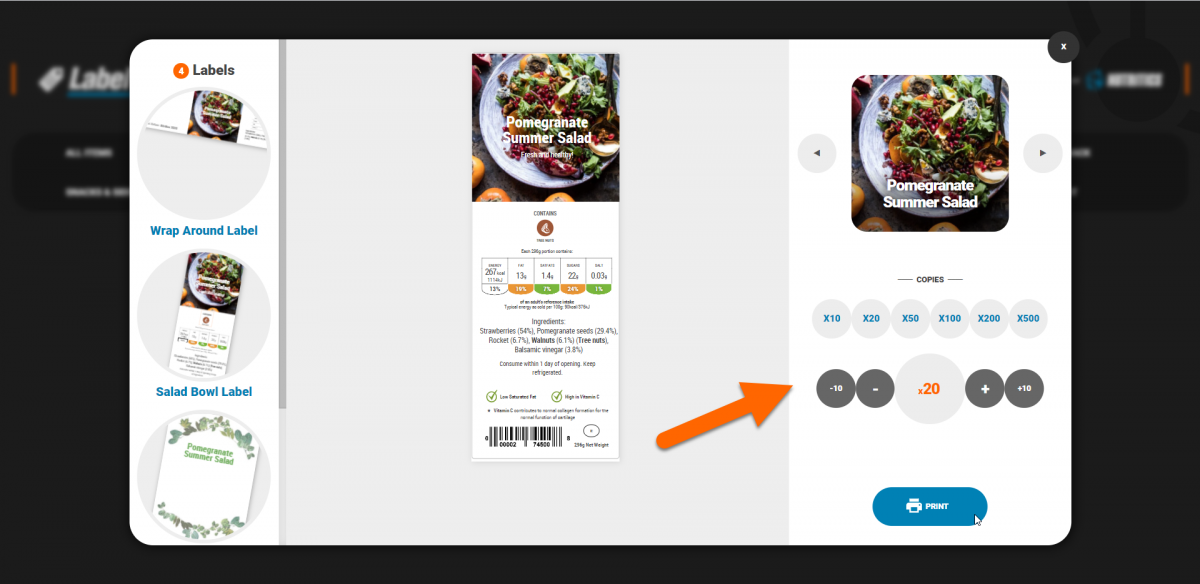
Select the desired number of copies and hit ‘print’.
Label Magic Access
Label Magic is accessed from the start menu under the input/output heading. Click on the url or scan the QR code to open the Label Magic app on a tablet, laptop or mobile. Note that you must be logged into a Nutritics account to access Label Magic this way.
On premium and enterprise accounts, a separate login or 'view only' account can be set up for Label Magic. This can be useful where staff need to be able to print labels on site but should not have access to/edit recipes in the main Nutritics account.
Staff can see and print recipe labels that have been shared with their 'view only' Label Magic account (see below to learn how to do this) but cannot edit the labels or recipes.
Staff log in at the same Label Magic url found in the Nutritics account but with a separate username and password. This account must be set up by the Nutritics team. Premium account holders can email admin@nutritics.com with the desired username and password and we will set this up for you.
Note that premium accounts can only have one view only account, so the username and password should be generic if it's going to be shared among staff. If you require more view only accounts e.g. one for each site, contact sales@nutritics.com to learn more about our enterprise rates.
Sharing labels to a 'view only' Label Magic account
To share a recipe with a 'view only' Label Magic account, open a recipe in Nutritics and scroll to the grouping and sharing section.
Under the 'remote viewers' heading, any view only accounts will be listed.
Click on the name of the account you would like to share the recipe with and an eye icon will appear indicating that that account can now view this recipe and any associated labels. Click the username again should you wish to revoke access.
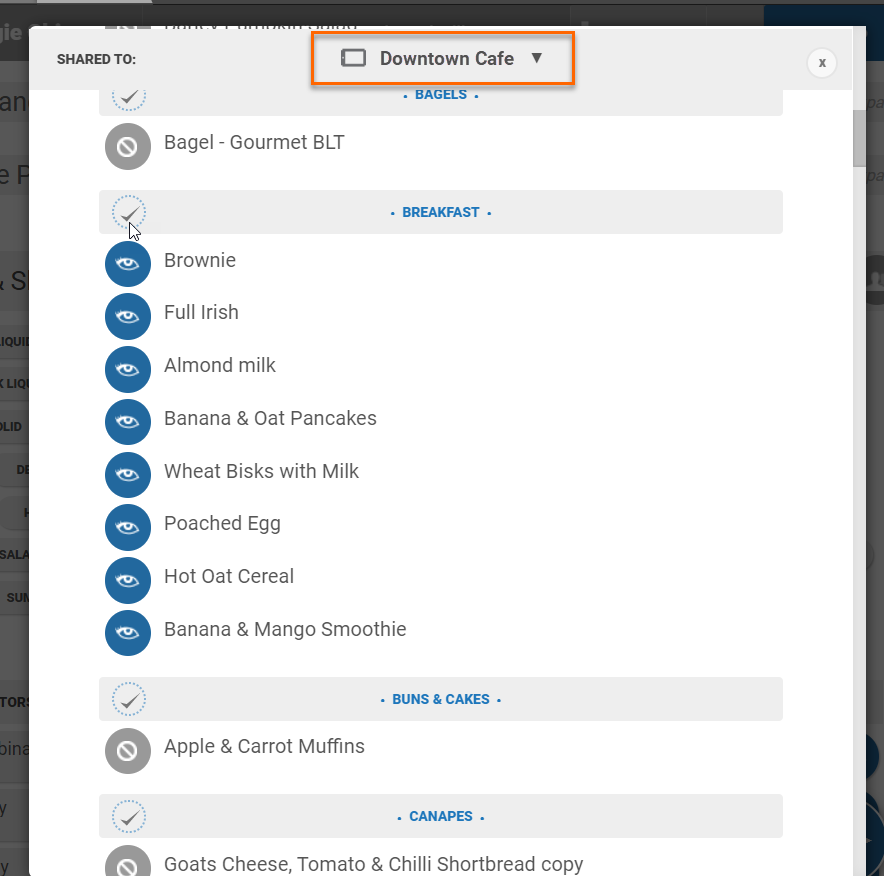
Recipes can also be shared in bulk by clicking on the button to the right of the grouping and sharing heading.
Select the name of the view only account you wish to share recipes with from the drop down at the top. Tick any recipes or recipe groups that you would like to share with the account.
The next time the view only Label Magic account is accessed, labels for any shared recipes will be visible and available for printing.
Nutritics supports the creation of food labels that are compliant with the labelling rules laid out by Food Standards Australia New Zealand (FSANZ). This includes the provision of a country of origin on food labels.
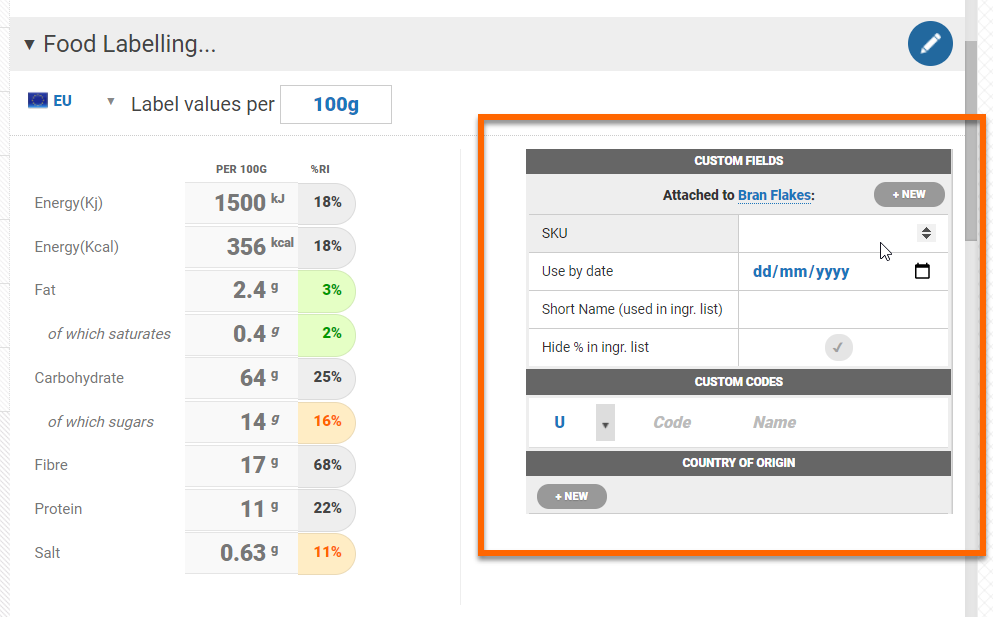
Country of Origin should be tagged on each of your recipe ingredients in Nutritics.
There are a few ways to do this:
Method 1 - Tagging on an ingredient level
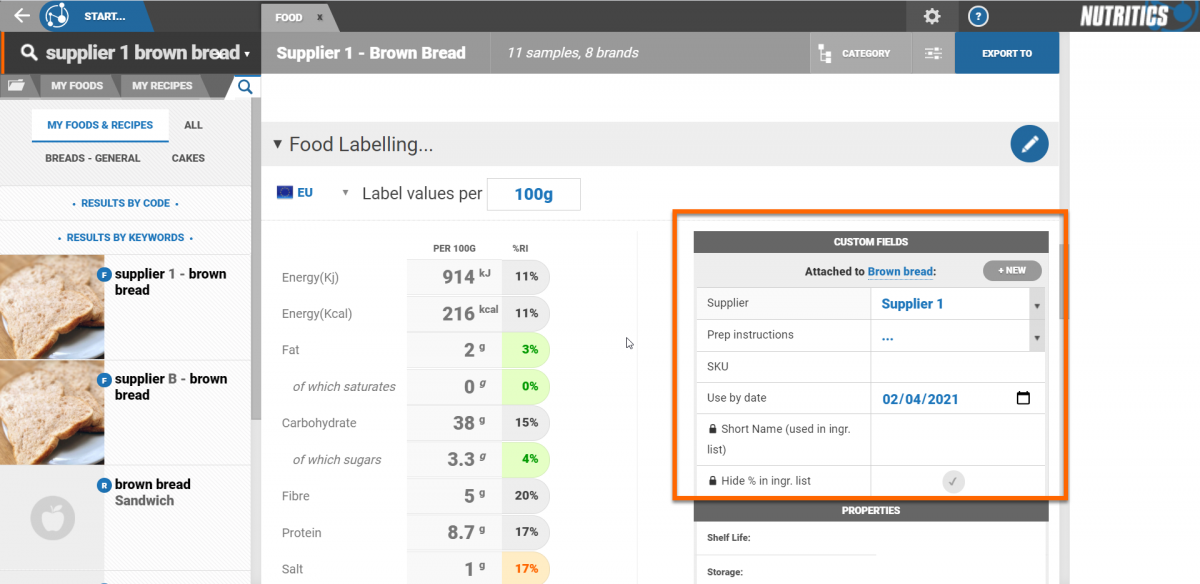
Open an ingredient and navigate to the ‘custom fields’ box under the food labelling heading. Click ‘+new’ under the country of origin heading and select the country that you would like to tag e.g. Australia. Type the percentage of the ingredient that originates from that country into the free text box. This information must be made available by the manufacturer or supplier. Once added, this data is maintained and calculated wherever the ingredient is used in Nutritics.
Method 2 - Tagging during the recipe development phase
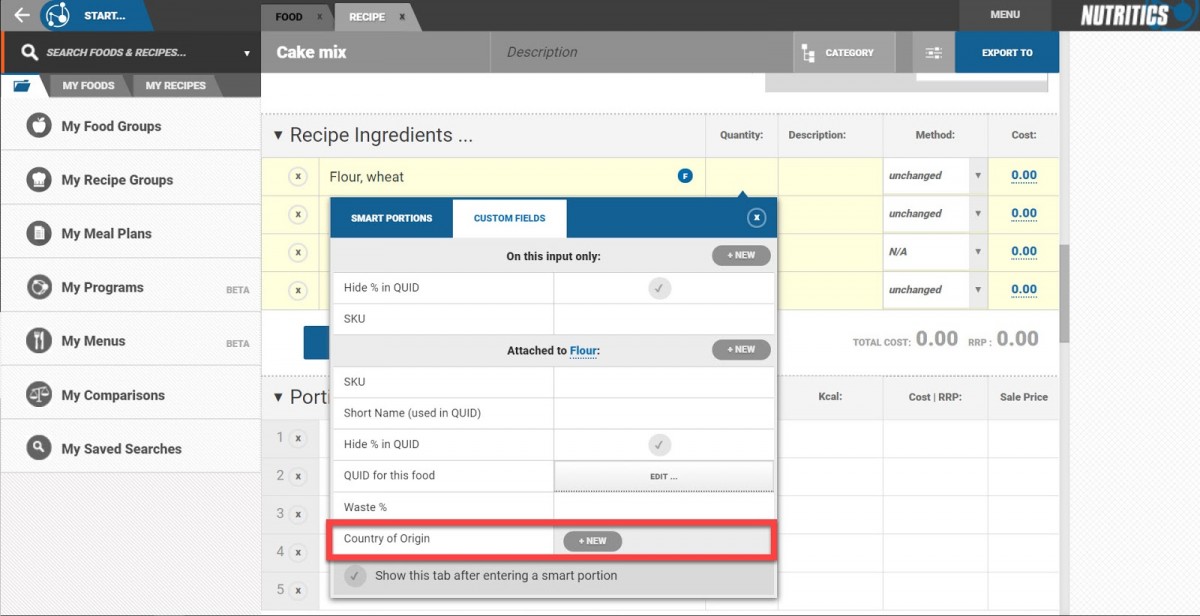
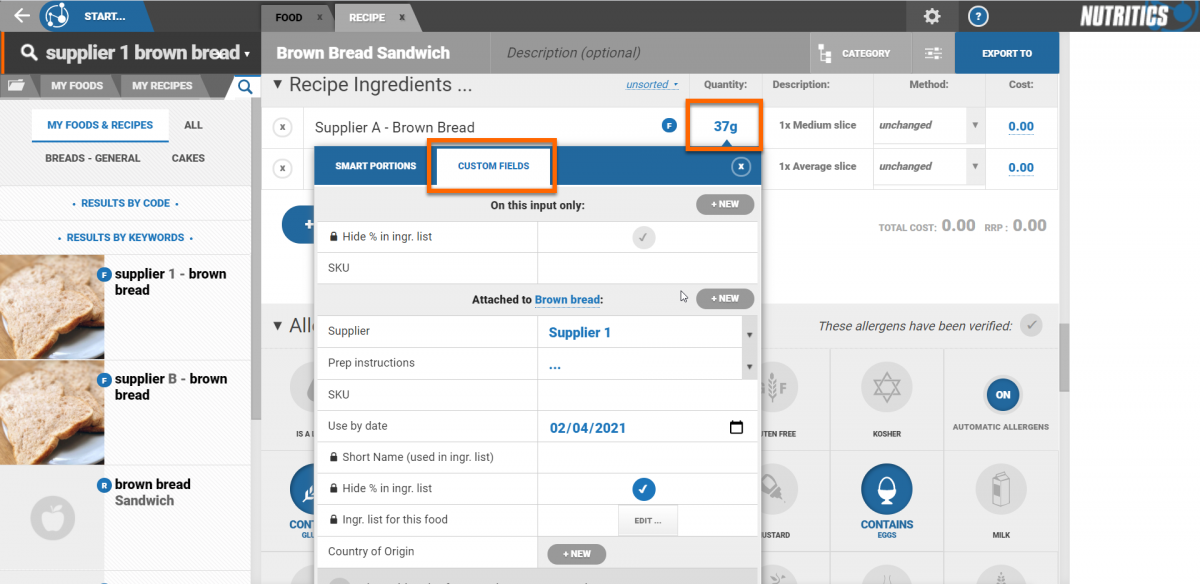
To begin, create a new recipe by clicking start > new recipe, or open and existing recipe. Add an ingredient to the recipe or use an existing ingredient. Click on the quantity box to the right of the ingredient name and open the ‘custom fields’ tab.
Here you can enter fields such as Country of Origin. Click ‘+new’ beside the country of origin heading to add a new country.
If custom data has already been tagged on an ingredient level (as in method 1), this data will be visible here.
Once the Country of Origin has been added for each ingredient, you can use Nutritics Label Maker to produce compliant Country of Origin graphics automatically, as well as a Health Star Ratings, Nutrition Information Panels, and much more.
To export your label to the label maker click the ‘export to’ button in the top right corner of the recipe workspace and
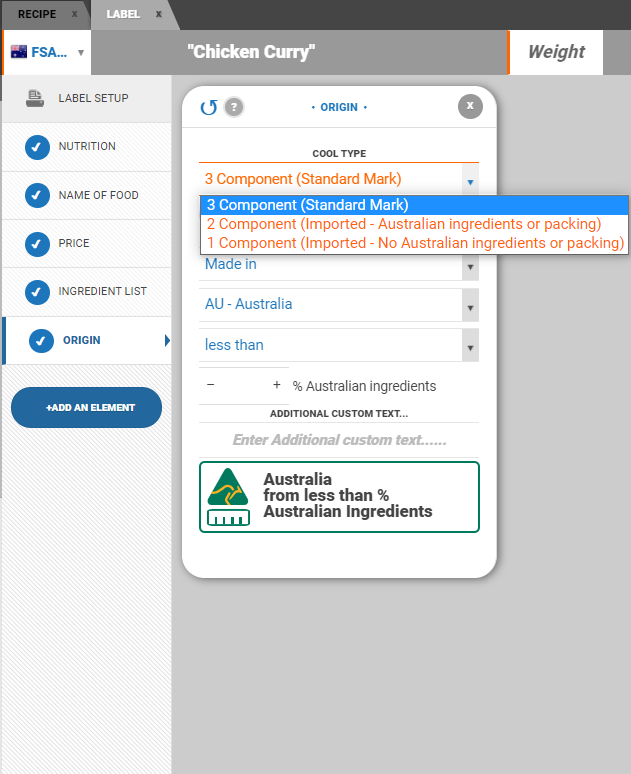
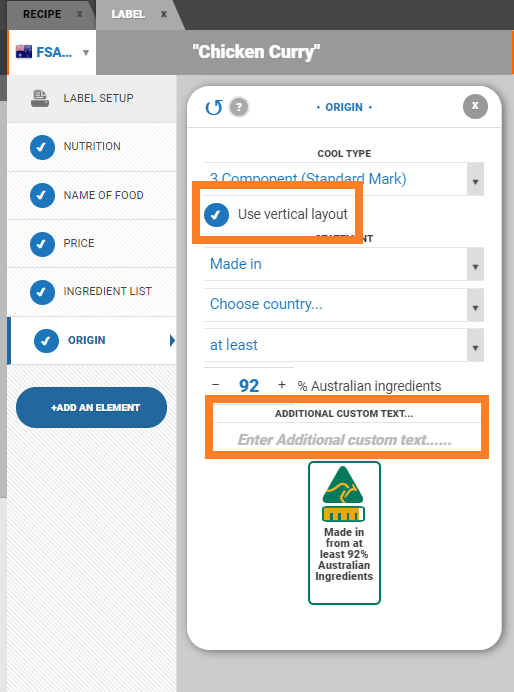
To produce the Country of Origin label, click the origin element, ensuring that your label format is set to FSANZ, then click the element 'Origin' to activate.
Next, choose the format type that suits your product.
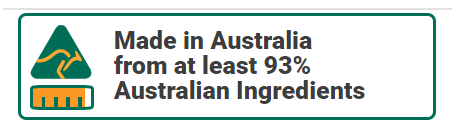
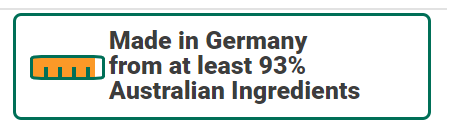
The Standard mark with 3 components includes a kangaroo logo, a barchart and explanatory text. This type is for products made, grown or produced in Australia using Australian Ingredients.
The 2 component label is for imported products, and so does not include the kangaroo logo. This option should be used on imported products that are packed in Australia, or contain Australian Ingredients. Note that the bar chart and percentage value are calculated automatically from your recipe ingredient information for both the 2 and 3 component labels.
You can alternatively just set a custom percentage using the ticker if you have this information from elsewhere. Additional custom text statements can also be added to the 2 and 3 component labels in the text box and the label can be set to vertical layout if desired.
Other imported products that do not use Australian ingredients or packing should use the 1 component, Origin Statement label.
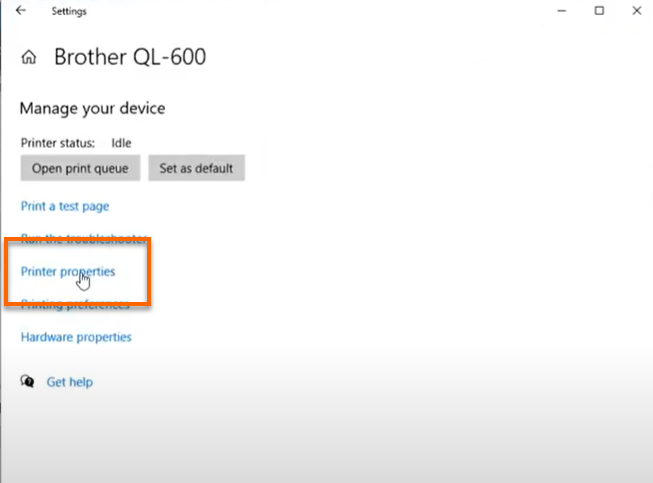
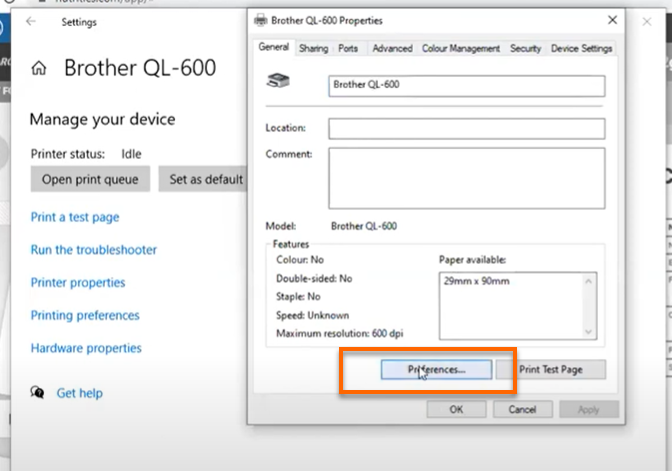
From your desktop open ‘Printers and scanners’.
Select your label printer and click ‘manage’.
Click on ‘Printer properties’.
Click on ‘Preferences’.
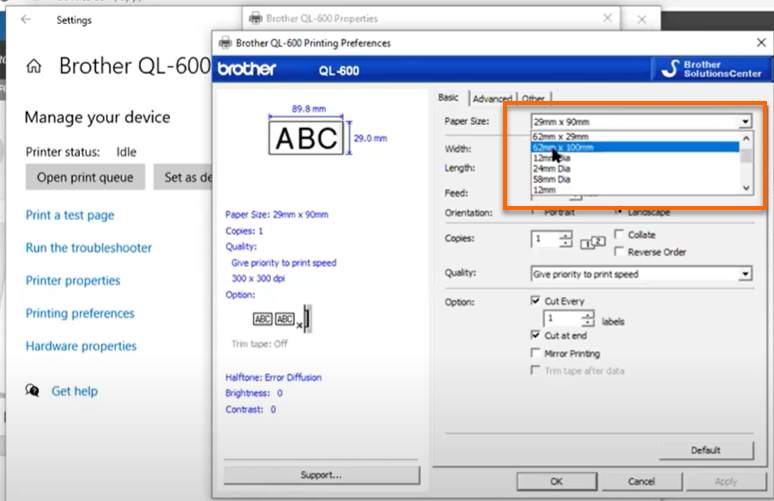
In the preferences menu, go to ‘paper size’ and make sure the selected size matches the label dimensions. Once the correct size has been selected click ‘apply’.
Open the label in Nutritics. Click on the label set up element and make sure that the dimensions here match the dimensions in the printer settings.
Once you are satisfied with your label, click on the ‘export’ menu and select ‘print’.
Make sure the correct printer and label size has been selected. Click ‘print’ to print your label.
Once finished designing a label, you can print directly or download the label as an image by clicking on the 'export' button at the top right corner of the screen.
Note that printing directly from the web browser will require you to set the specific label dimensions of your label in the printer dialogue box.
These dimensions should match those set in the label setup element. We have a separate guide on setting up the dimensions in your printer settings here.
Print quality will be improved for black only / thermal printers by selecting the 'low-res' option from the label setup.
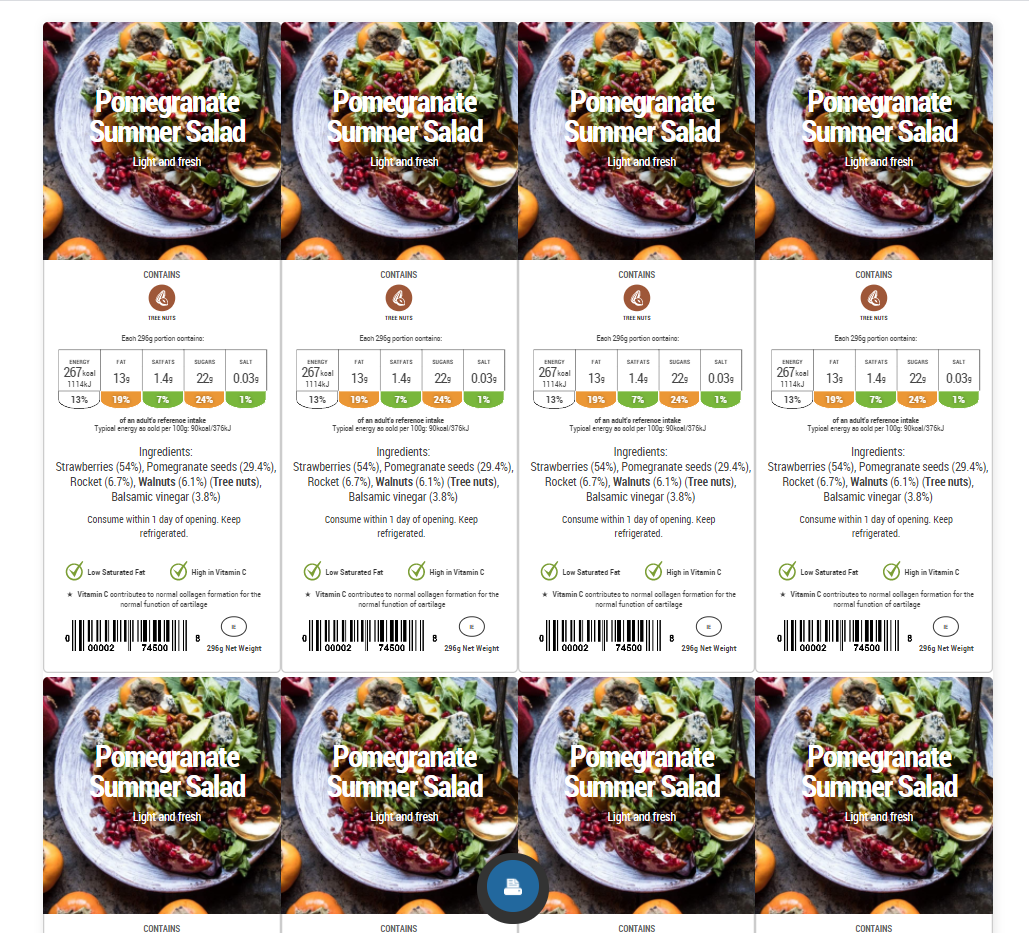
Labels can be rotated 90 degrees for printing and you can also choose to print multiple labels per sheet from here.
Click on the preview button to see how the printed label will look and click on the printer icon at the bottom of the preview screen to print.
For information on how to print labels in bulk, please see our guide on Label Magic.
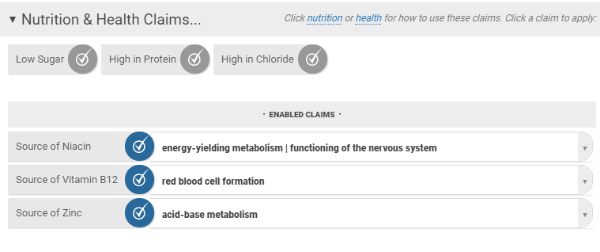
Nutritics will automatically display all applicable nutrition claims that can be made for your recipe under
Regulation (EC) No 1924/2006. Simply click on the indicators to apply the claim to your printed reports and labels. After a nutrition claim has been elected for use, the associated Health Claims for that nutrient are displayed, which can also be applied
Claims cannot be applied to recipes that are high in saturated fat, trans-fat, total sugars or salt. Claims such as ‘Reduced energy’, ‘Reduced Fat’ that require comparison across products are not available and should be consulted separately.
Nutrition & Health Claims are available on our premium and corporate packages only, or added from Menu > Add Features. Check our blog on nutrition claims and health claims for more background information, or refer to Regulation EC1924/2006
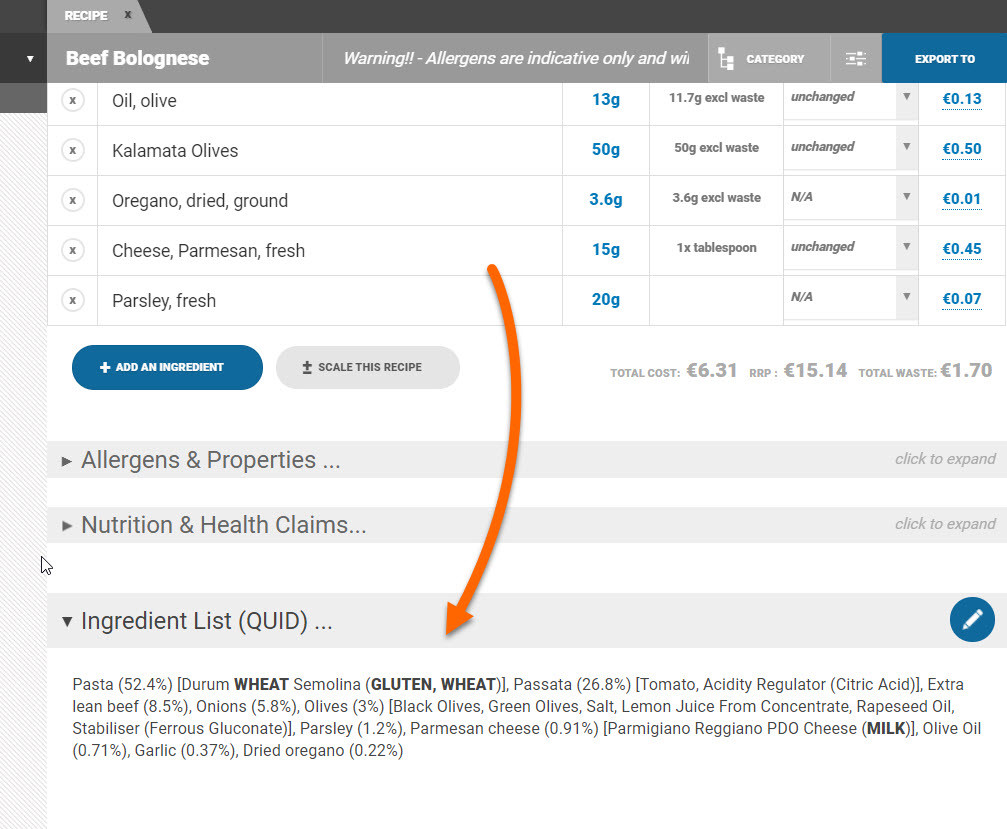
A recipe’s
QUID or ingredient list is generated automatically in Nutritics based on the ingredients in the recipe.
Managing ingredient lists on the food level
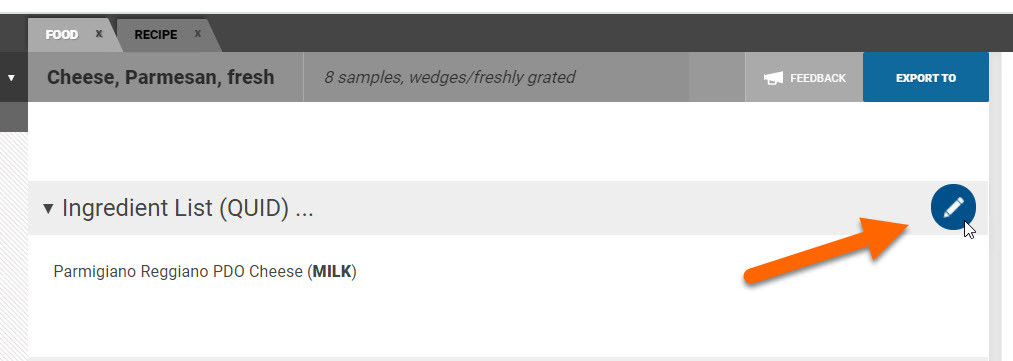
Ingredient lists are added on a food level by opening the food and clicking on the pencil icon beside the ‘Ingredient List’ heading and typing/copying and pasting the ingredient list into the text box.
For a full guide on adding a food to the database (including adding the ingredient list), see
here.
Managing ingredient lists on the recipe level
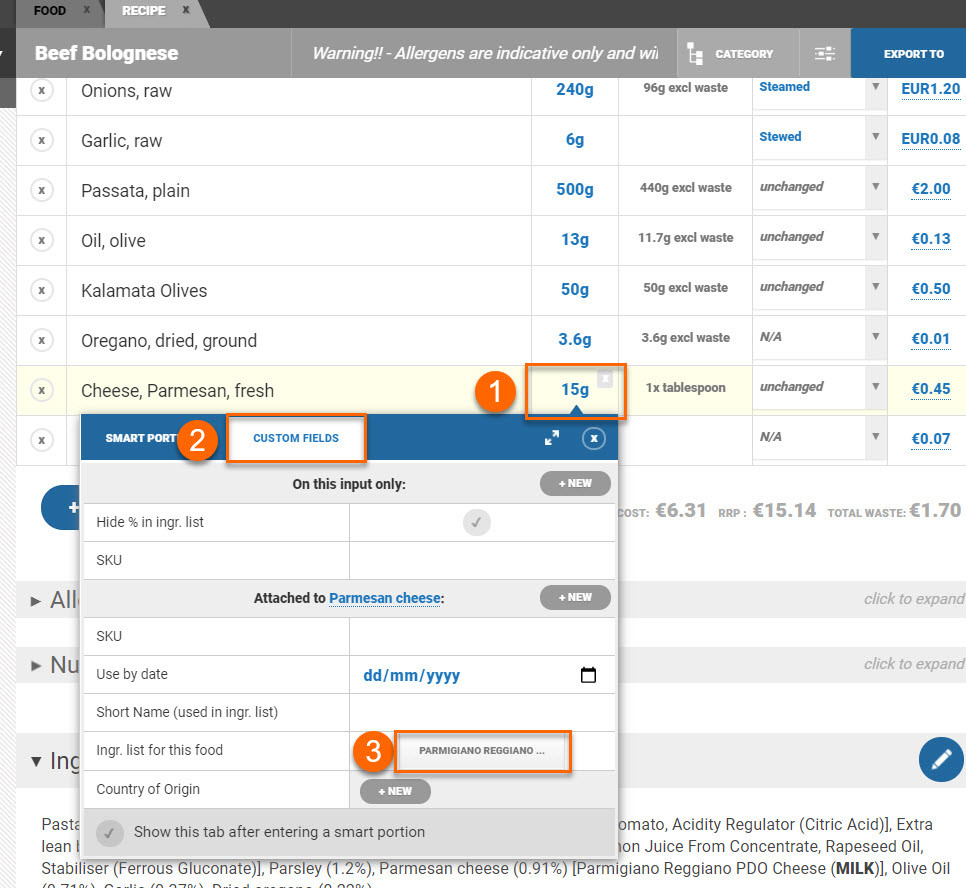
You can also easily manage the ingredient list of any food in a recipe in the recipe workspace. Any changes made will update the recipe’s ingredient list automatically. To do this:
- Click on the ingredient quantity
- Select the custom fields tab
- Click the button beside ‘Ingredient list for this food’
- If an ingredient list has already been added to the food, it will be visible here, otherwise copy and paste/type one in
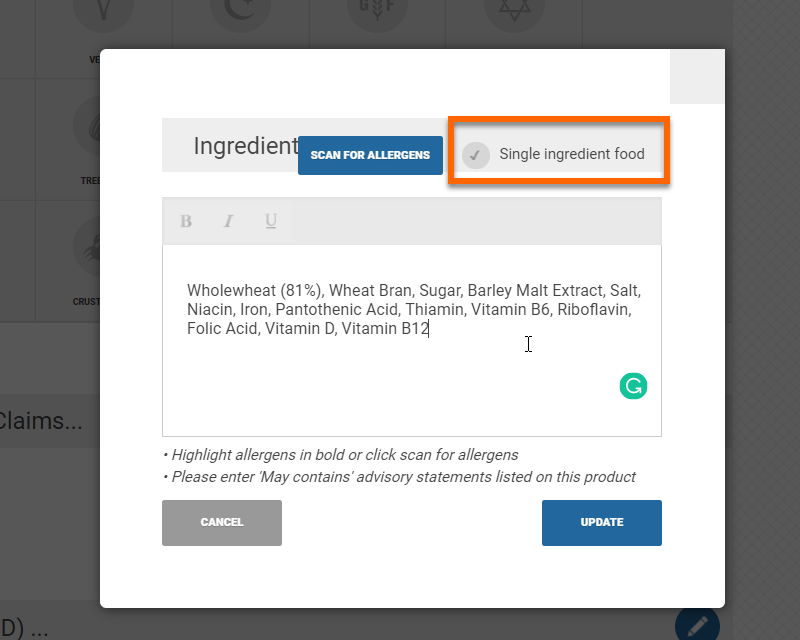
- If the food is a single ingredient item e.g. olive oil, click on the tick icon and the food name will populate as the ingredient list (an ingredient list is not required for single ingredient items where the name of the food is identical to the ingredient name or the name of the food clearly identifies the nature of the food)
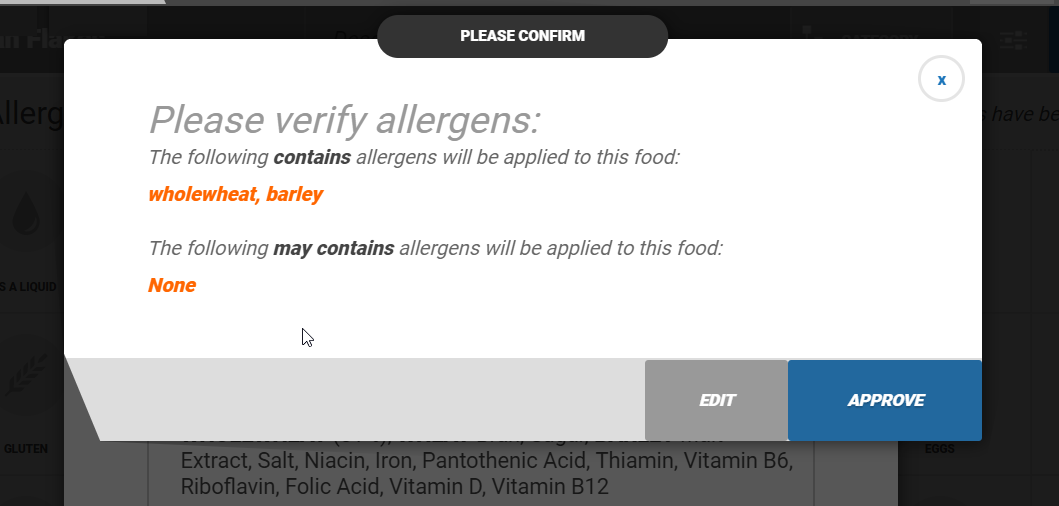
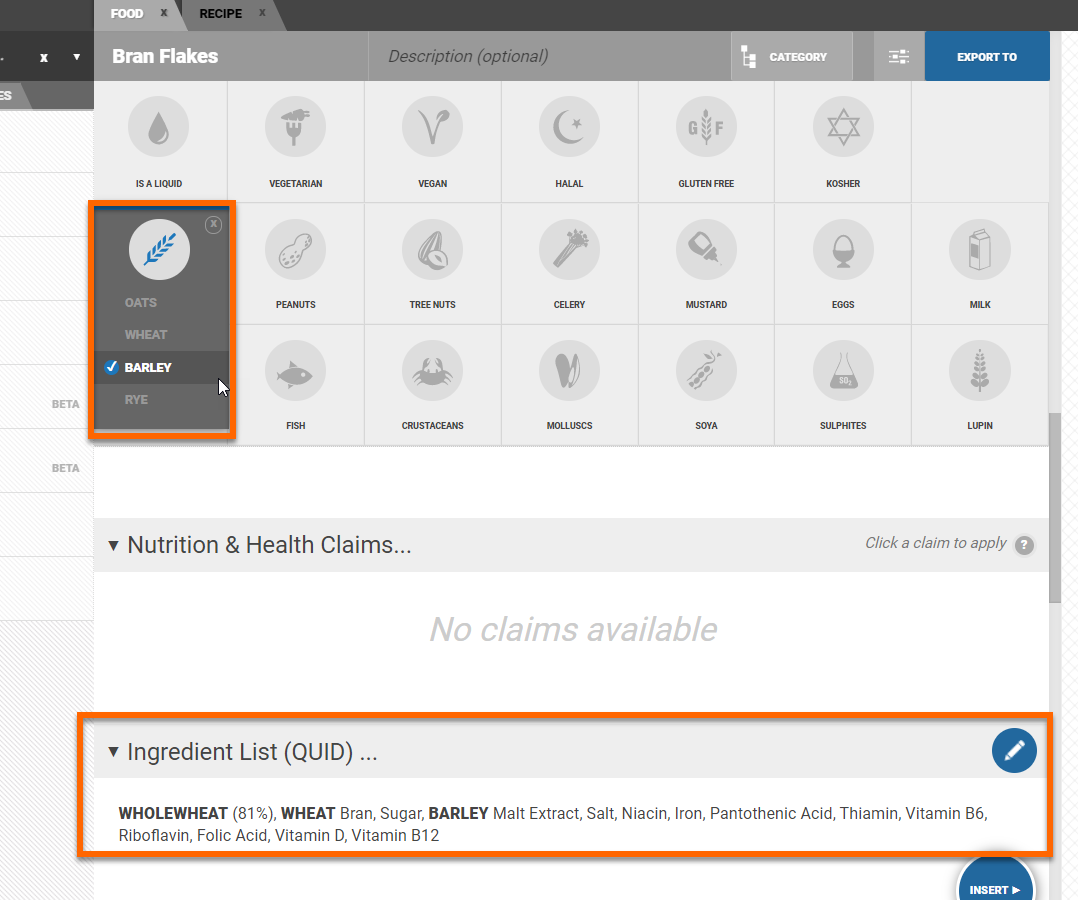
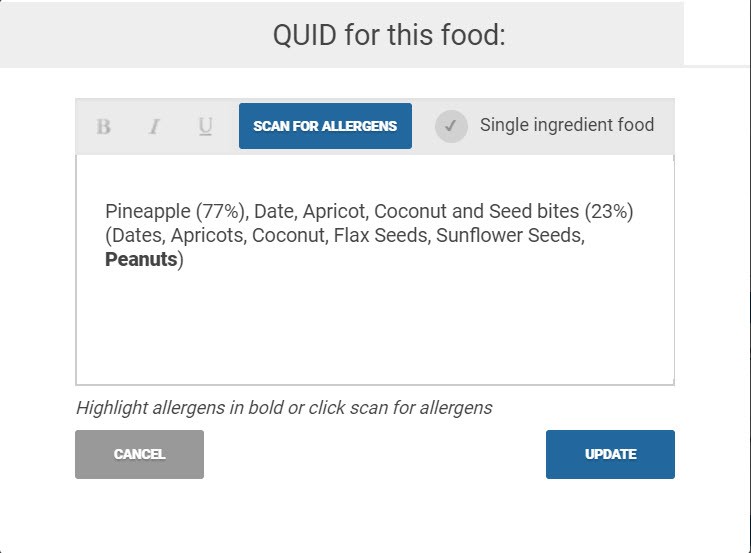
- Nutritics will automatically include the disclaimer to see allergens in CAPS & bold, as well as listing the may contains allergens
- Click scan for allergens - detected allergens will be highlighted
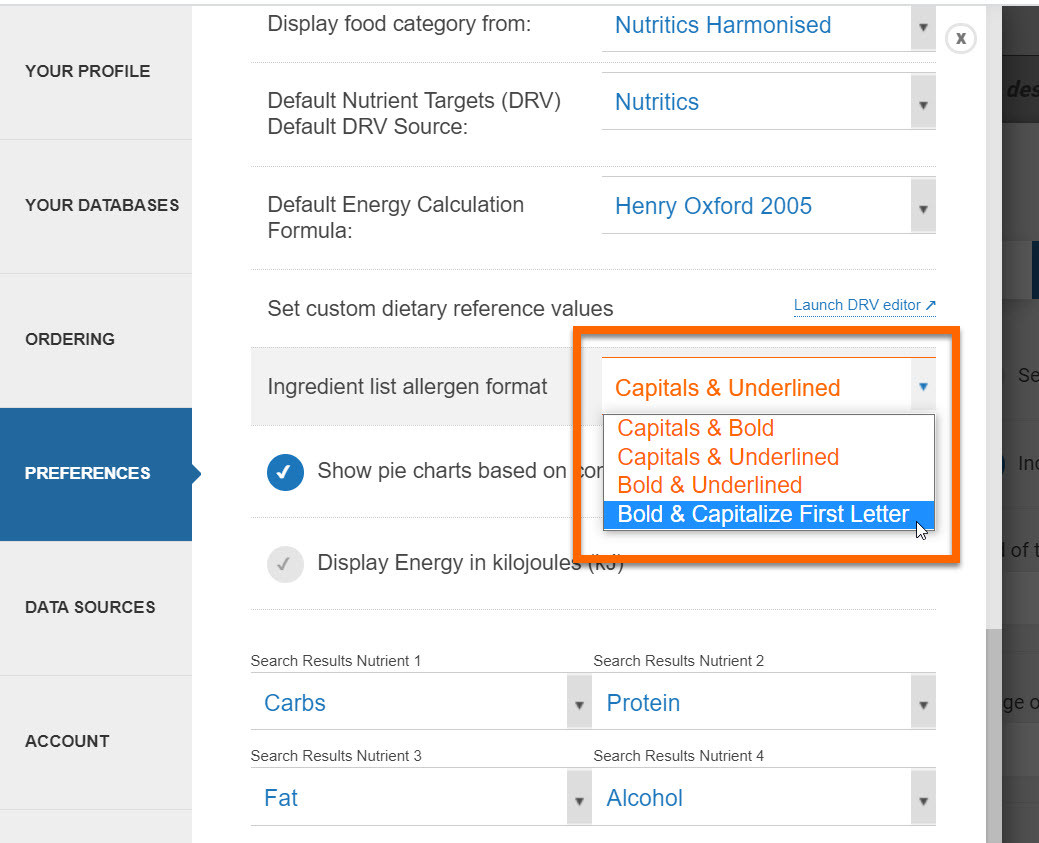
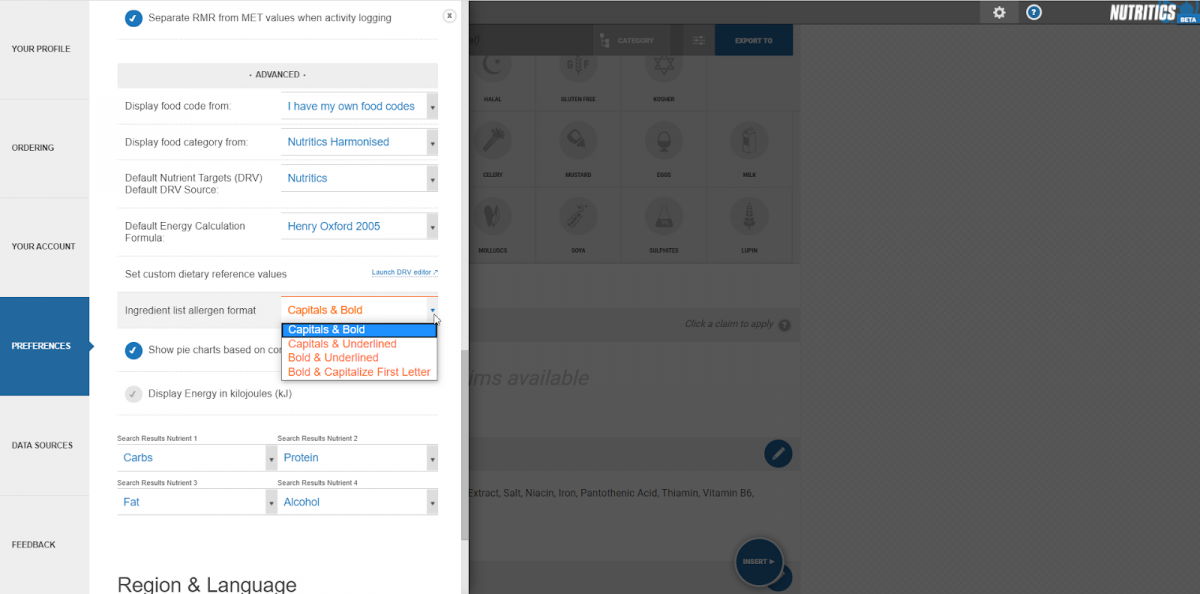
Pro tip: You can change how the allergens are formatted by going to the main menu by clicking on the cog icon in the top right corner of the screen > settings > preferences > scroll to the advanced section and choose your preference from the dropdown beside ‘Ingredient list allergen format’. - Click update
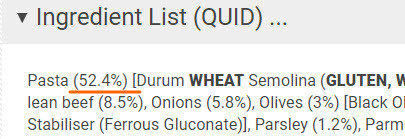
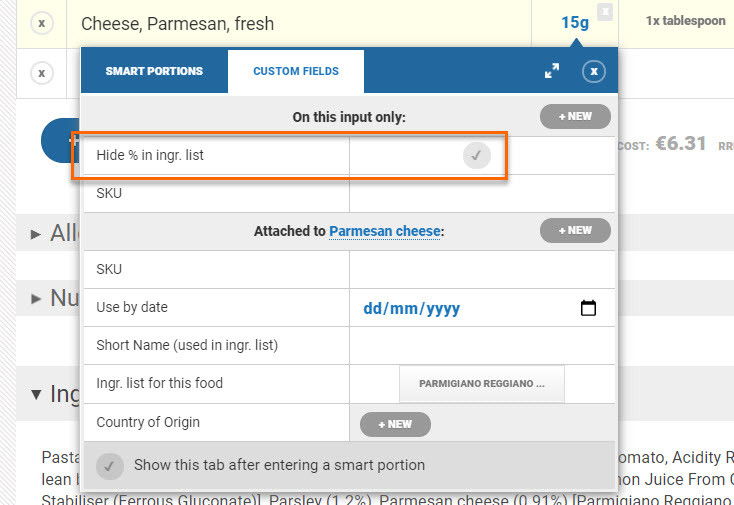
- The ingredient list can be further customised in the custom fields tab e.g. The percentage that appears after the ingredient name in the ingredient list can be removed by ticking ‘Hide % in ingr. List’
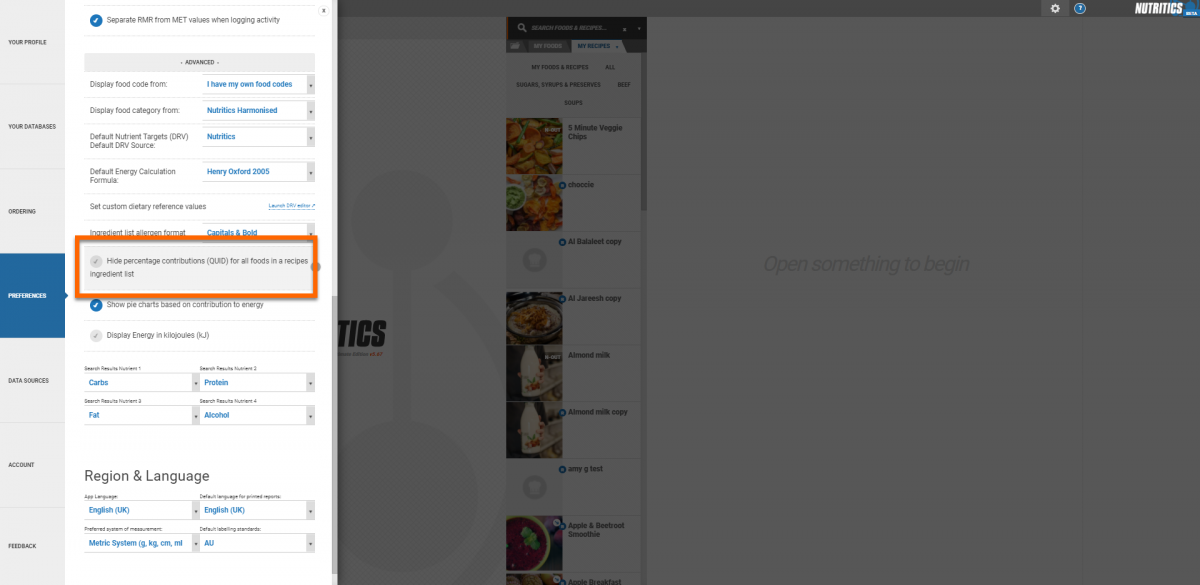
- You can choose to hide all QUID percentages across your recipes in Settings>Preferences also. This will prevent the need to do them individually
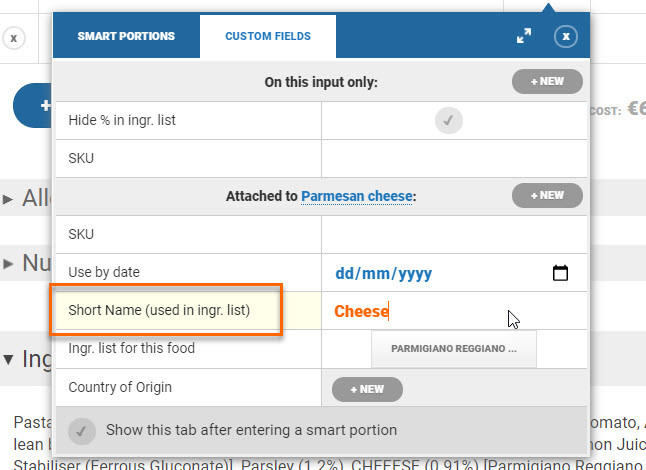
- If desired, change how the ingredient name appears in the ingredient list by typing directly into the ‘short name’ field in the custom fields tab
- Scroll down to the QUID heading in the recipe workspace to see changes
Updating an ingredient list on a product label
Any changes made to a recipe ingredient list will pull through automatically to labels made for that recipe.
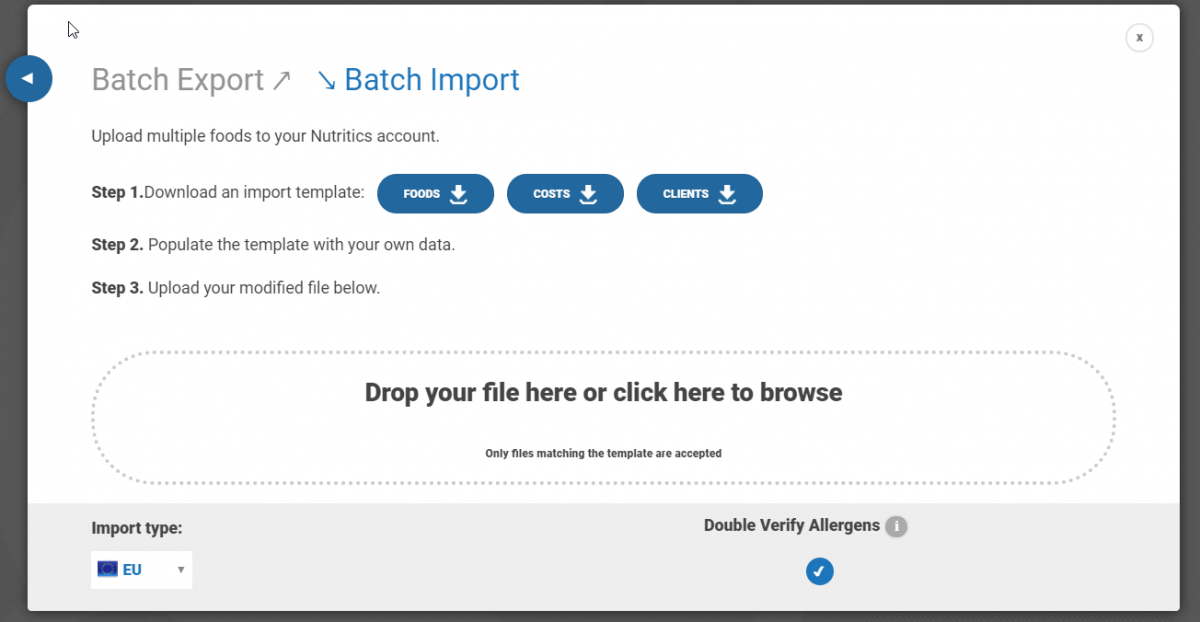
Batch import can be used to upload multiple foods, costs or clients depending on your Nutritics edition.
This is accessed from the Start menu>Batch Jobs>Batch Import
Choose what data to upload by clicking the relevant button. This will download a template to populate with the information.
Product or client information from existing spreadsheets can be copied and pasted in the respective columns on the excel sheet. The mandatory fields and respective format must be populated appropriately for the data to upload. Some columns have a dropdown selection that should be followed.
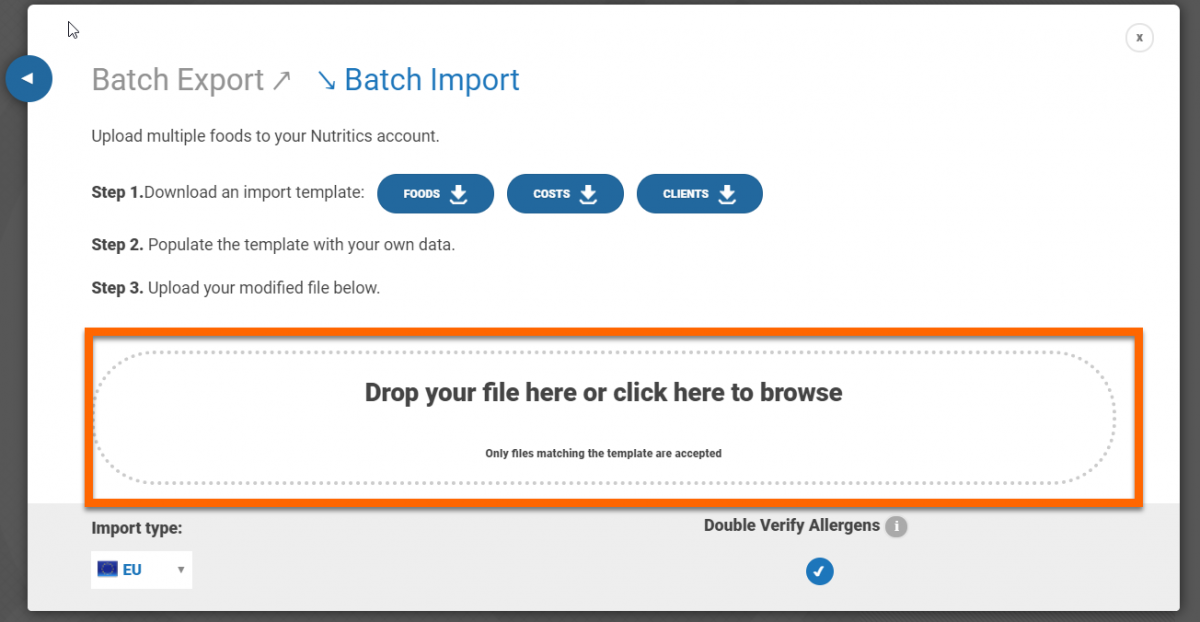
Once the file is complete, save it to your computer. Open the folder, select your file and drag and drop it to the appropriate section highlighted below.
Once uploaded, the system will flag any errors for review. With a food import, an error message may appear to say that our system has detected an allergen mismatch. Following our dual verification system, Nutritics cross references the allergen columns with the ingredient list and flags any inconsistencies. You can deselect “Double Verify Allergens” to give precedence to the allergens that were selected. Once imported you can fix any inconsistencies by updating the ingredient list.
Once uploaded, we recommend reviewing the data to ensure everything is correct.
Nutritics recipe creator can be used to combine foods from the database into a new recipe entry. Recipes can be used in diet logs, meal plans or combined with other recipes to make full meals quickly and easily. Nutritics Foodservice edition includes a cost analysis system for recipes, as well as a menu cycle builder and product reformulation engine, which makes ingredient suggestions on how to improve the nutritional profile of a dish. Recipes can also be used for the production of Nutrition Labels, digital menu board displays and allergen reports.
There are a few top tips you should know before getting started:
- Split your recipes into sub recipes, one for each 'pot' or cooking method.
- Analyse base sauces, sides, and multi-purpose / batch recipes first.
- Enter all ingredients as raw, with the exception of deep fried items and grilled fatty meats.
- When possible, weigh ingredients in their prepared form (skin, stones, bone waste removed).
- Follow the on screen prompts that appear in the lower right corner of the screen as you log.
- As you enter ingredients, the nutrition & allergen information will update in real time.
- All changes are saved automatically, except the recipe photo, which must be saved after editing.
Recipe Analysis – Step by Step
1. To open the recipe creator, click the ‘Start’ button, then click ‘New ‘recipe’:
2. Enter a title for your recipe and optional description (useful for recipe source, web link, searchable keywords etc)
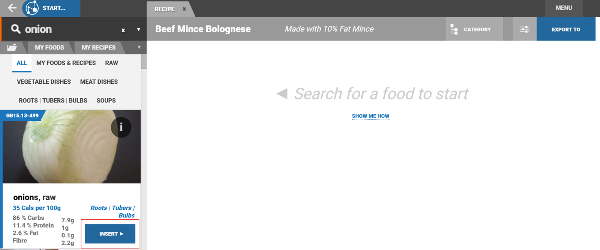
3. Search for ingredients using the search box at the top left of the screen , click the insert button to add the food to your recipe:
Pro Tip: It is best to enter the ingredients in their prepared 'ready to cook' form.
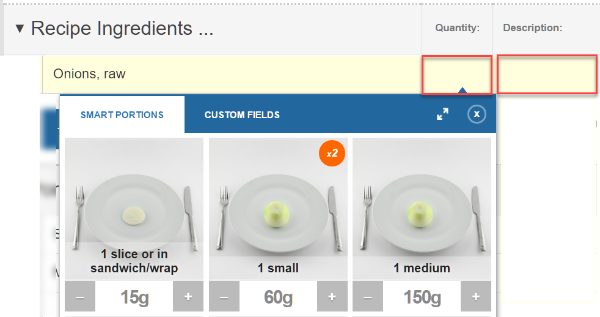
4. Click the ‘Quantity’ box to open the portion entry box. Choose one of the portion size options suggested or enter your ingredient weight directly in any unit):
5. Add any custom fields you wish to tag to the ingredient such as country of origin, shelf life or storage instructions from the custom fields setting
6. Apply a cooking method as appropriate in the ‘Method’ drop down box to account for vitamin and mineral losses on cooking, as well as fat absorption, and salt absorption. This should only be applied if your ingredients are entered as raw (or applied to cooked ingredient where they have a second cooking method or process)
Pro Tip: If your ingredient is fried in oil or boiled in salt, it is important to include the specific oil or salt in your recipes ingredient list and tag it with the same cooking method as the ingredients cooked.
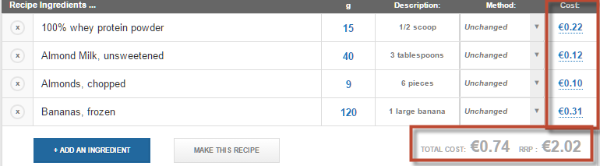
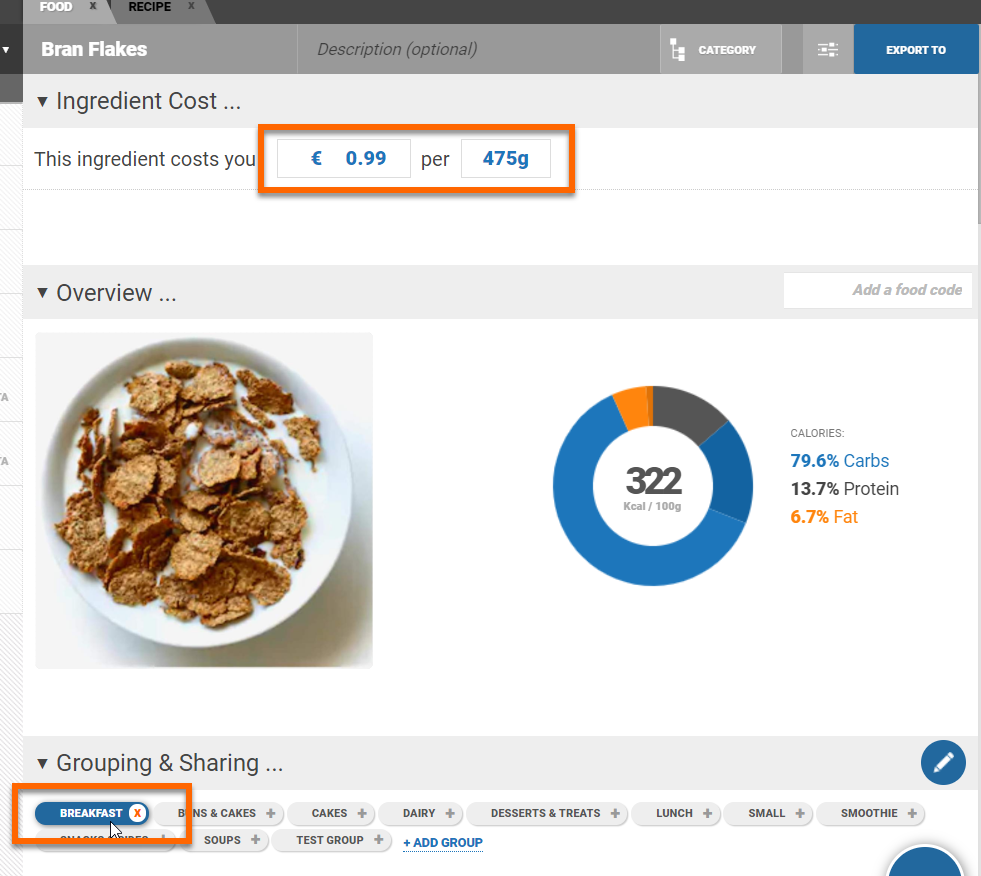
7. Input the ingredient cost to calculate the cost of your recipe batch and servings. Costs are entered manually in the box provided. Once you tag an ingredient with a cost, this amount is recalled each time you use the ingredient automatically.
Pro Tip: Generate a table showing all of your ingredients and costs from Start > Ingredient Costs
8. Repeat steps 3-7 for each ingredient.
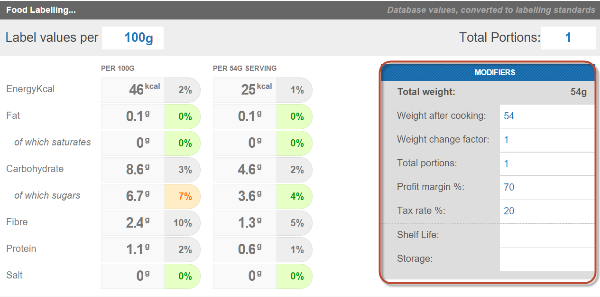
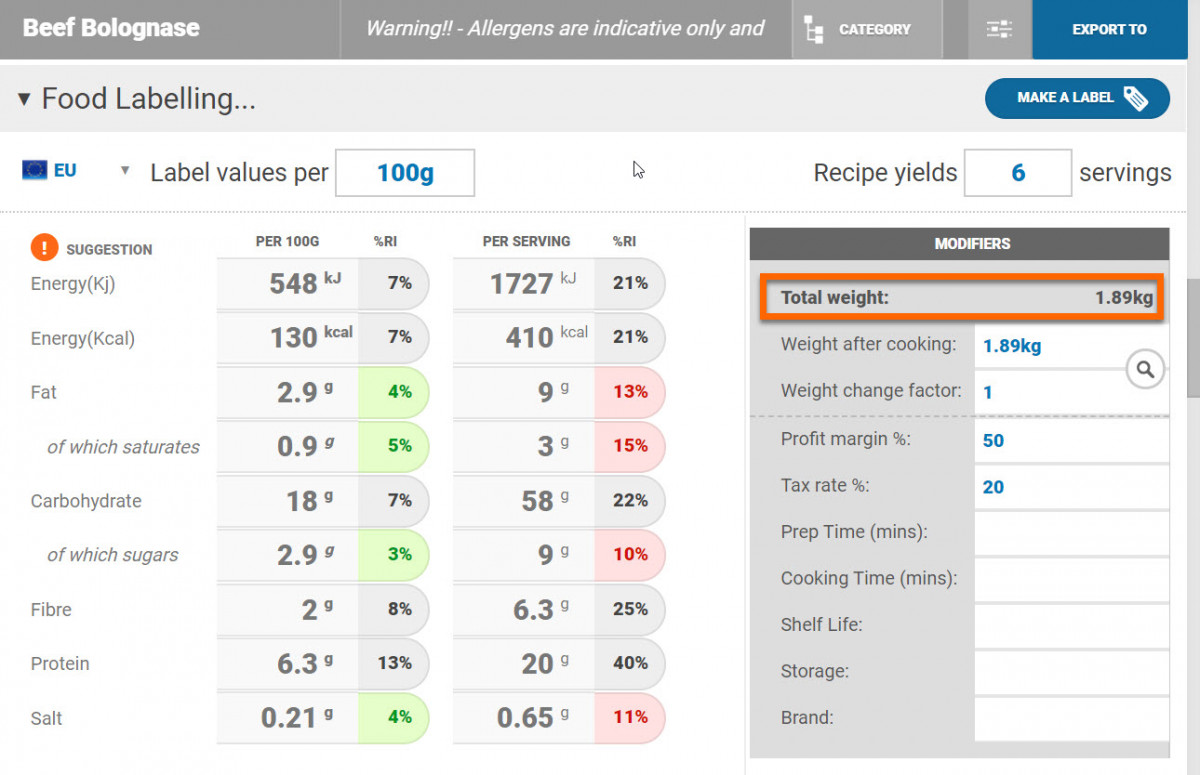
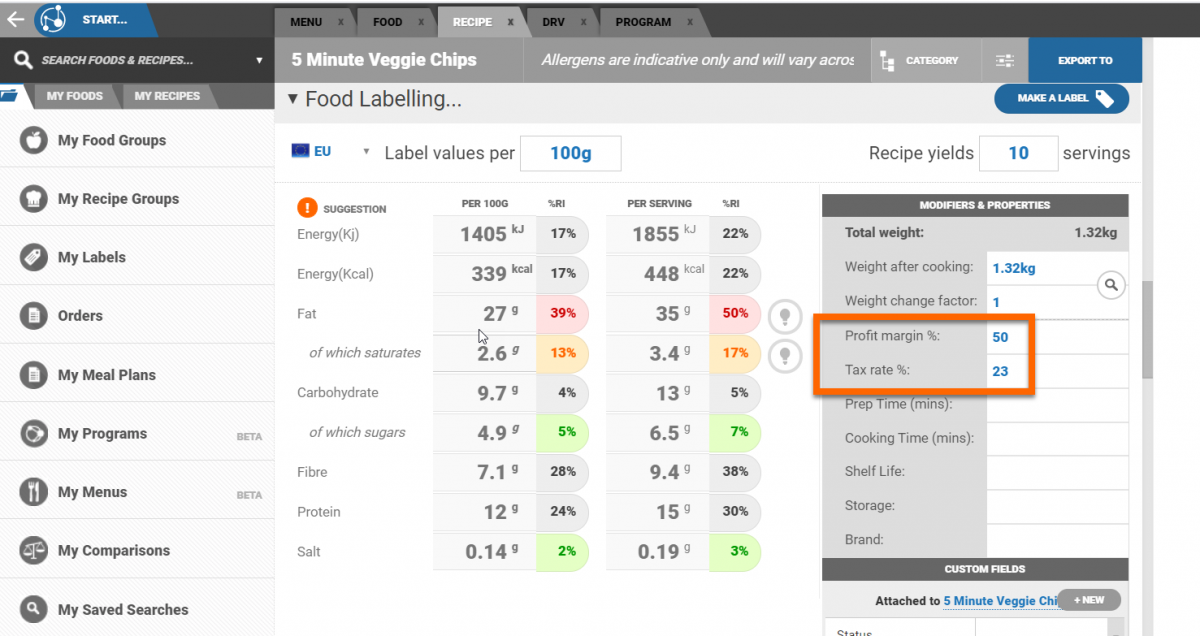
9. Scroll up the page to the food labelling section and enter the number of portions this recipe serves, ‘per serving’ label data will then be generated:
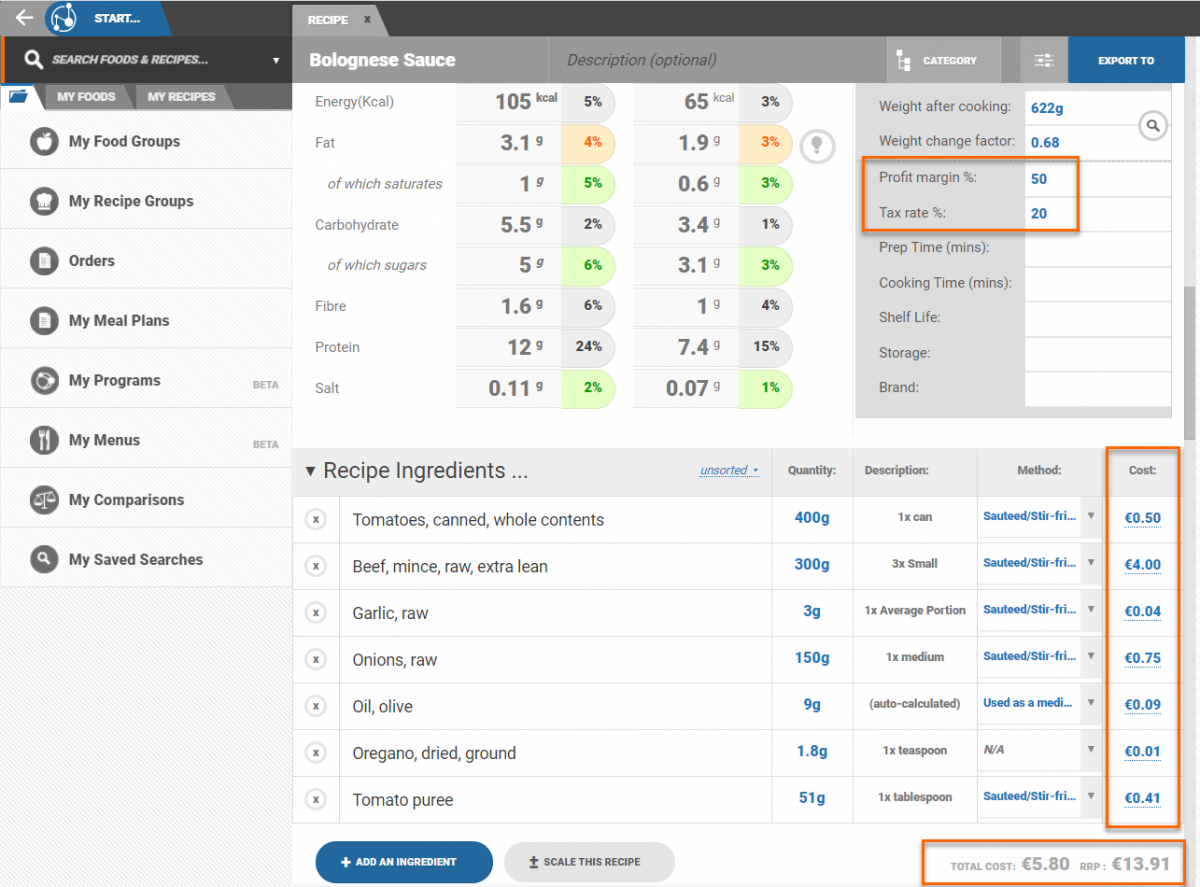
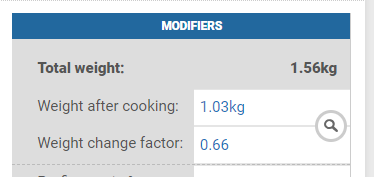
10. Input any other data on the recipe level in the ‘Modifiers’ box, such as recipe storage, weight change factors, or profit margin & tax to calculate RRP of recipes and various portions.
Pro Tip: If you intend to report nutrient values per 100g, or with reference to any unit of weight (e.g.food for label), it is important to account for weight change on cooking by either the weight yield of your recipe, or entering an appropriate weight change/ yield factor in the boxes provided. However, if you are simply reporting nutritional values 'per serving' (e.g calories on menus initiative) it is not necessary to apply a weight change factor, but the weight of the serving must not be referenced.
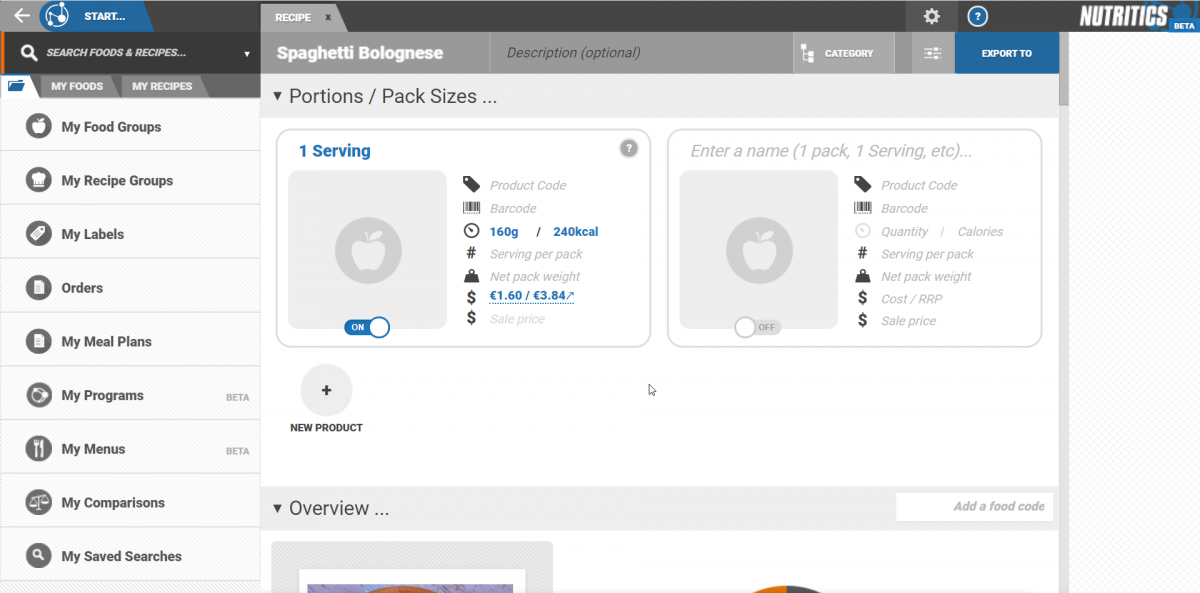
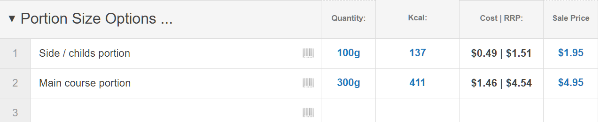
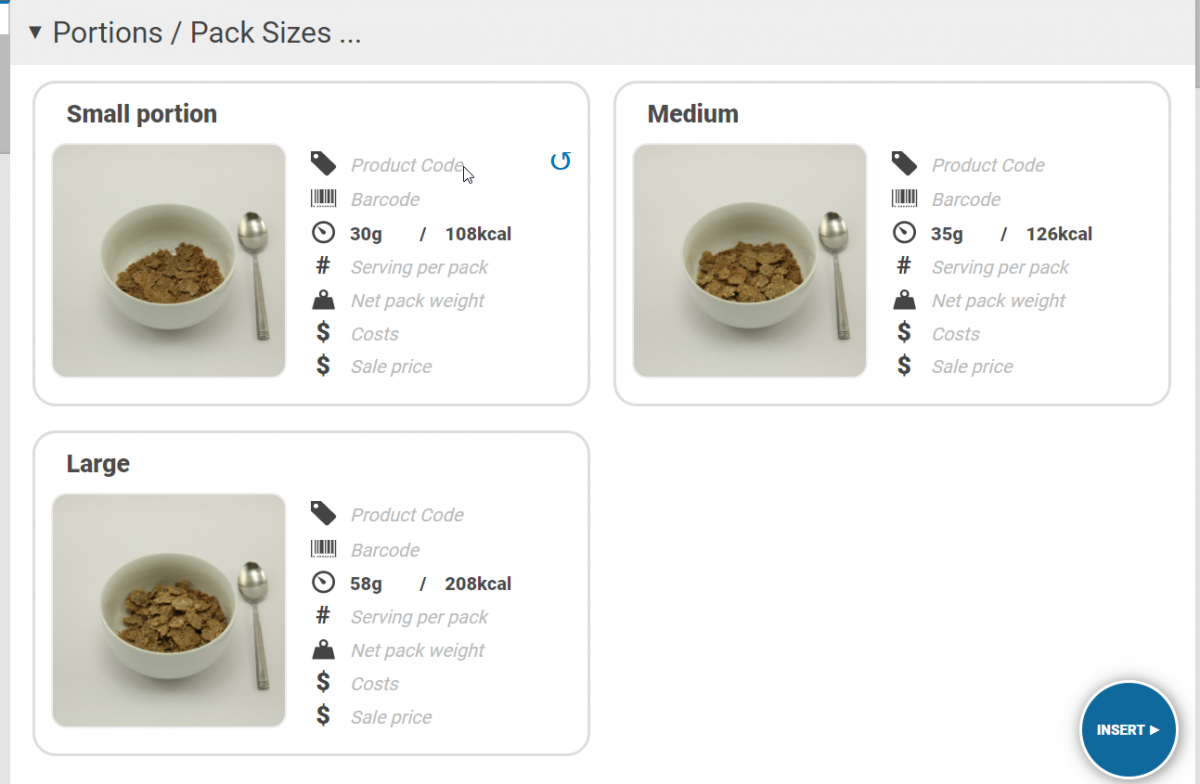
11. Add products/portion sizes under the ‘portions/Pack sizes heading’. If the number of servings the recipe yields is specified, a default of ‘1 serving’ will appear automatically. This cannot be deleted but can be edited.
- Add additional products/servings can be added by clicking ‘+new product’.
- All fields are free text boxes so simply click on them to type. Enter the name e.g. 1 pack, 1 serving, kid’s portion, 100kcal smoothie etc.
- Upload an image from your computer or enter an image url.
- Add the product/portion quantity and Nutritics will work out the energy value of that quantity. Conversely, enter the energy value and the system will work out the quantity.
Additional fields
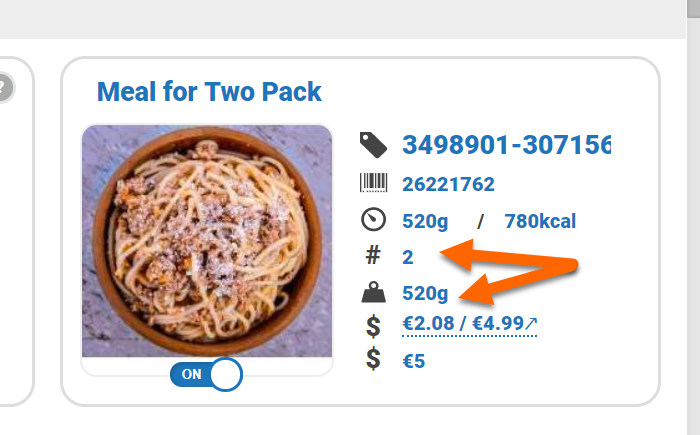
Product code/Barcode(Only visible on accounts with the label maker, digital menus or publishing panel enabled)
Enter a product code and barcode or else click on the round arrows to automatically generate codes. Codes can be used as keywords in the food/recipe search bar.
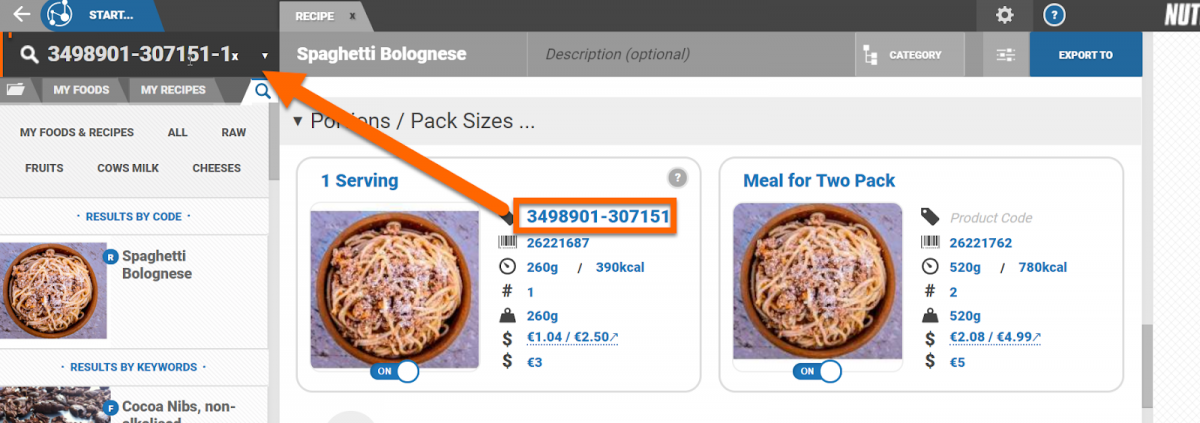
Servings per pack and net pack weight
(Only visible on accounts with the label maker, digital menus or publishing panel enabled)
Specify the number of servings in each product pack and the net weight of the pack.
Costings and sale price
(Only visible on accounts with costings enabled)
If costings are enabled and entered for the recipe ingredients, Nutritics works out the cost of the portion and the recommended retail price. Enter a sale price to appear on labels, menus etc.
Ingredient costs must be entered for the portion cost and RRP to be calculated. Nutritics will incorporate the profit margin and tax rate you set in the modifiers box of the recipe workspace when calculating the cost and RRP.
Toggle on/off
(Only visible on accounts with the publishing panel)
Toggling a portion ‘off’ means that product will not be published to your database, but this product will still be available for you to use throughout your own account e.g. to create labels, menus, as a sub recipe.
12. Add any cooking instructions and notes for your recipe in the text entry box, or photos to illustrate key steps of the preparation process
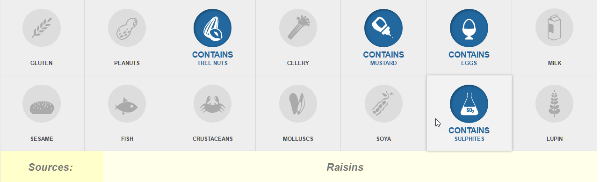
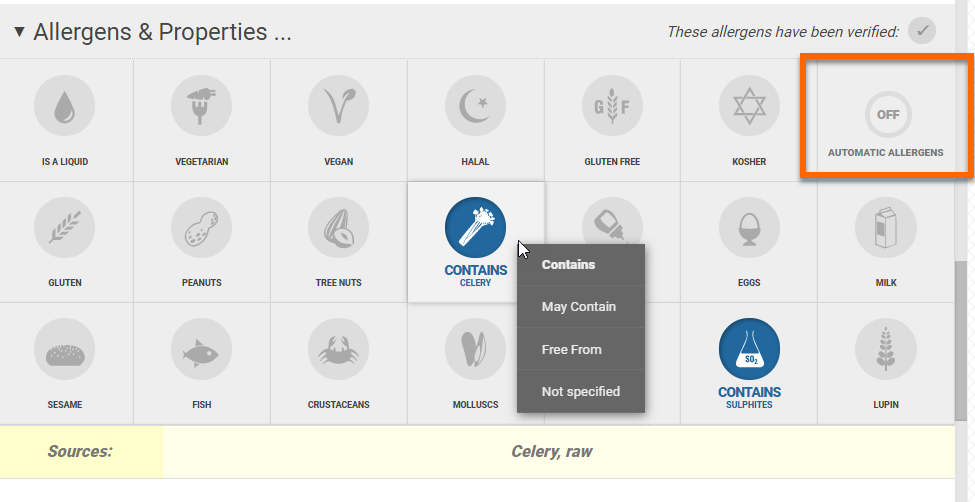
13. Scroll to the allergens & properties section. Check the allergen information indicated is appropriate for your specific ingredients.
Hover your mouse over an active allergen to see which ingredient it's coming from. This is particularly useful for developing allergens out of recipes.
The allergens presented are specific to your region. The region can be changed under the ‘food labelling’ section by clicking on the dropdown.
We highly recommend reading more on allergen management
here and more on ingredient list management
here.
The properties along the top e.g. is a liquid, vegetarian, vegan, halal etc. are customisable and can be toggled on and off by clicking on them.
14. Scroll up to the top of the page and add a photo to your recipe if desired.
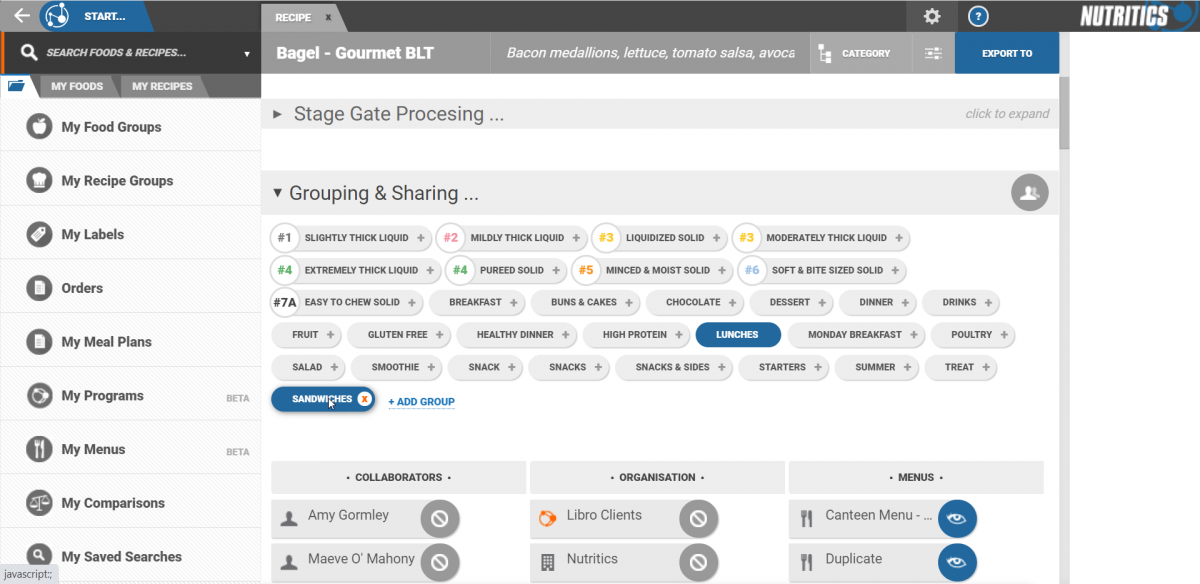
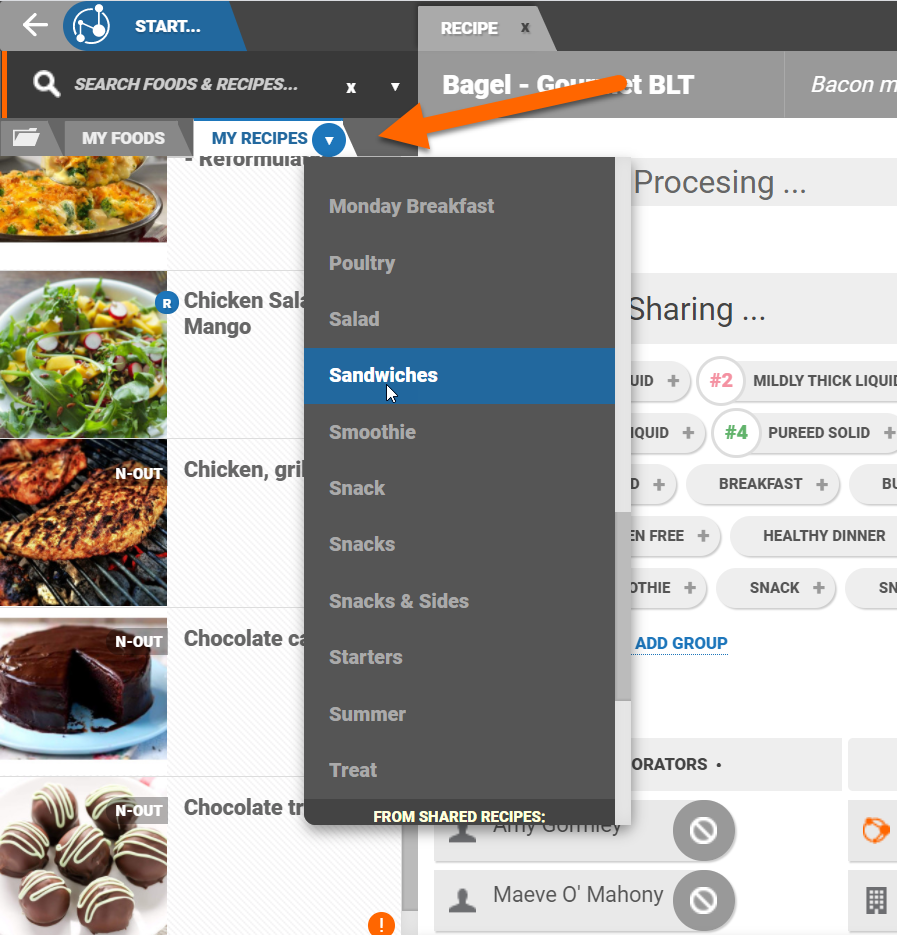
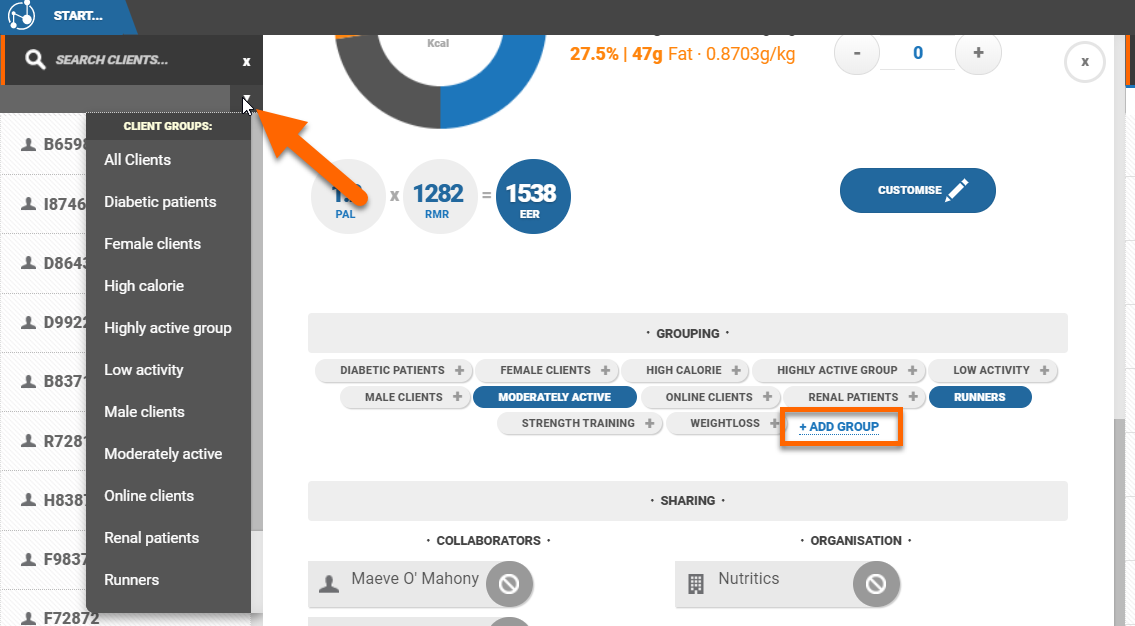
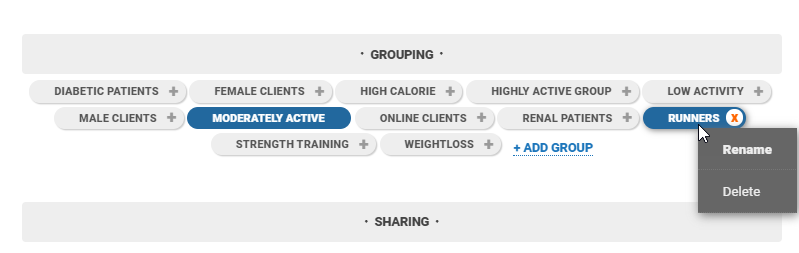
15. Under the grouping and sharing heading, recipes can be categorised into groups for easy data organisation and shared to other users. Click on '+add group' to create a new group. Click on a group name to add a recipe to that group. Recipes can be added to multiple groups.
Recipe groups can be viewed by clicking on the 'my recipes' tabs and then hovering over the arrow beside this tab.
Alternatively, you can click on 'My recipe groups' in the Nutritics explorer.
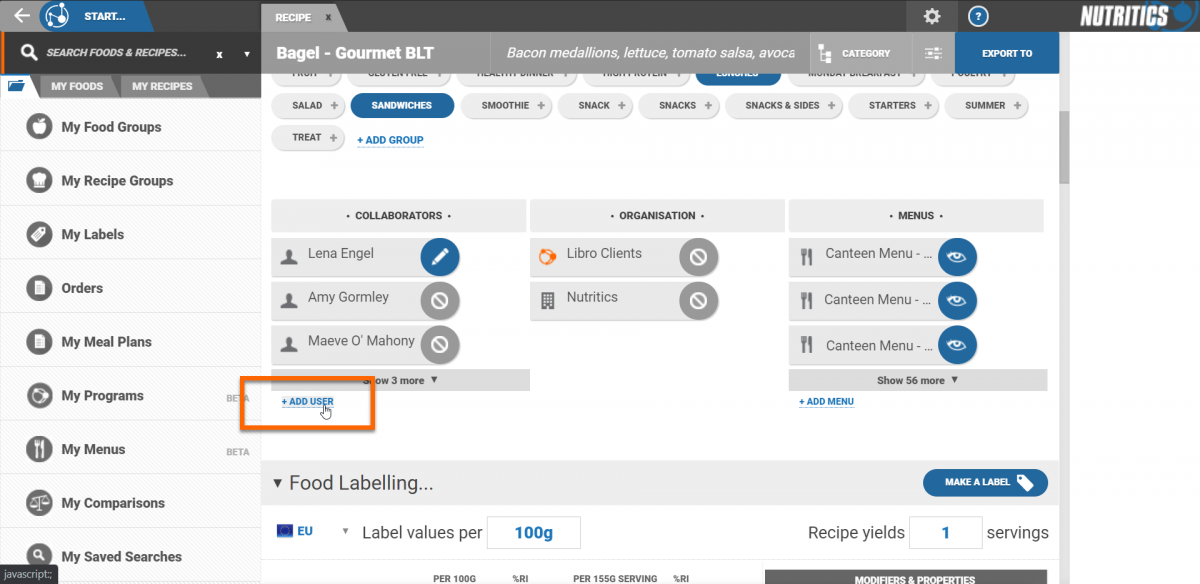
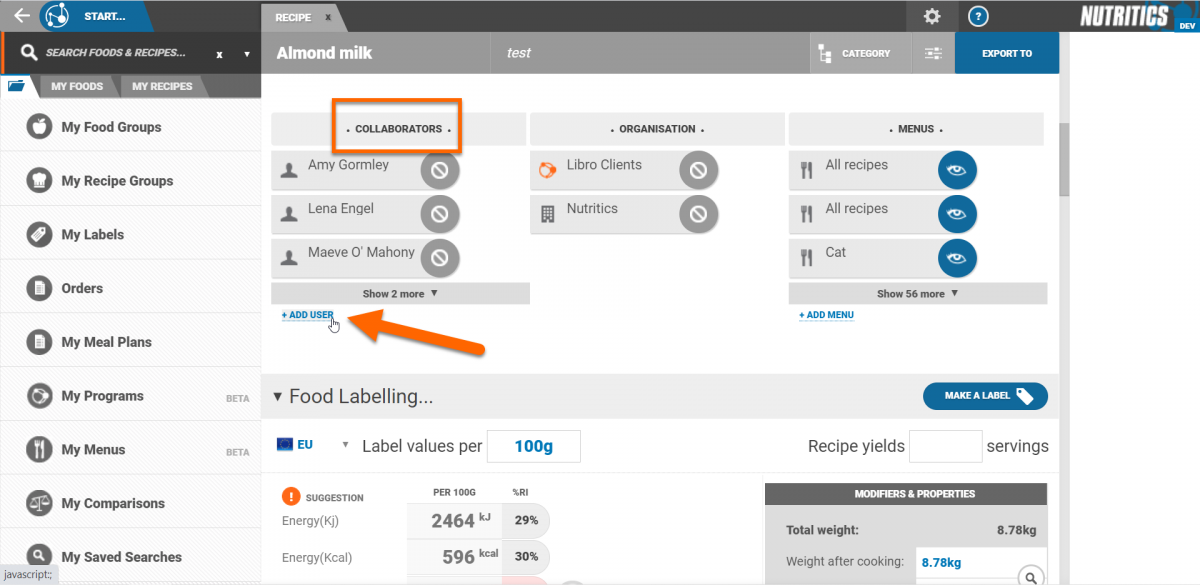
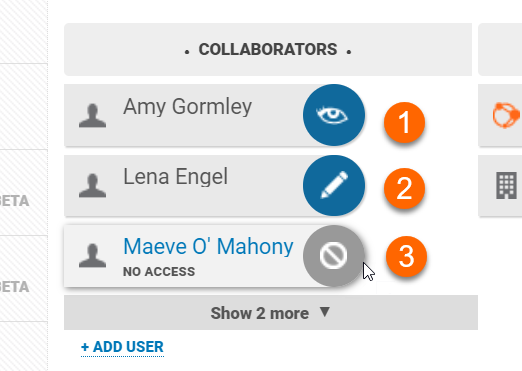
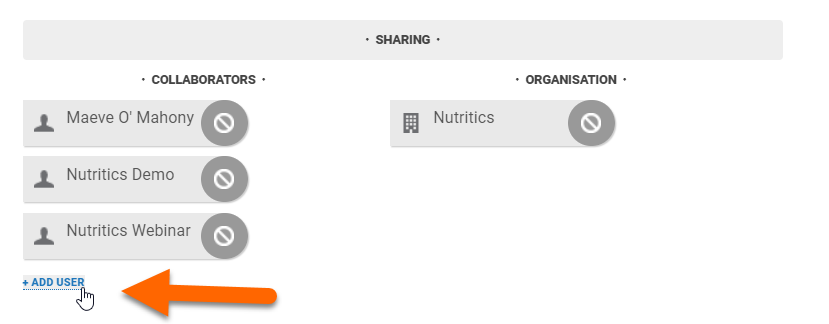
Share the recipe with other Nutritics users under the collaborators heading.
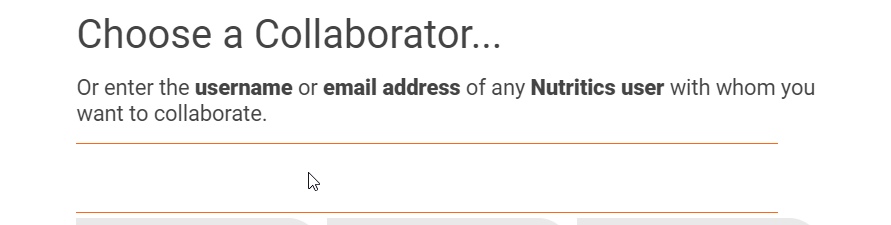
Click '+add user' and enter the username or email address of any Nutritics user you'd like to share the recipe with.
The user's Nutritics username will be added under the collaborators heading. Click on the name to share with viewing access. Click again to share with editing access and click a third time to revoke access.
Shared recipes are denoted by an R icon with and outward arrow in your list of recipes.
16. Use the Export button or Menu > Output tools to publish your recipe to various outputs
Nutritics recipe creator can be used to combine foods from the database into a new recipe entry. Recipes can be used in diet logs, meal plans or combined with other recipes to make full meals quickly and easily. Nutritics Foodservice edition includes a cost analysis system for recipes, as well as a menu cycle builder and product reformulation engine, which makes ingredient suggestions on how to improve the nutritional profile of a dish. Recipes can also be used for the production of Nutrition Labels, digital menu board displays and allergen reports.
There are a few top tips you should know before getting started:
- Split your recipes into sub recipes, one for each 'pot' or cooking method
- Analyse base sauces, sides, and multi-purpose / batch recipes first.
- Enter all ingredients as raw, with the exception of deep fried items and grilled fatty meats
- When possible, weigh ingredients in their prepared form (skin, stones, bone waste removed)
- Follow the on screen prompts that appear in the lower right corner of the screen as you log
- As you enter ingredients, the nutrition & allergen information will update in real time
- All changes are saved automatically, except the recipe photo, which must be saved after editing
Recipe Analysis – Step by Step
1. To open the recipe creator, click the ‘Start’ button, then click ‘New ‘recipe’:
2. Enter a title for your recipe and optional description (useful for recipe source, web link, searchable keywords etc)
3. Search for ingredients using the search box at the top left of the screen , click the insert button to add the food to your recipe:
Pro Tip: It is best to enter the ingredients in their prepared 'ready to cook' form.
4. Click the ‘Quantity’ box to open the portion entry box. Choose one of the portion size options suggested or enter your ingredient weight directly in any unit):
5. Add any custom fields you wish to tag to the ingredient such as country of origin, shelf life or storage instructions from the custom fields setting
6. Apply a cooking method as appropriate in the ‘Method’ drop down box to account for vitamin and mineral losses on cooking, as well as fat absorption, and salt absorption. This should only be applied if your ingredients are entered as raw (or applied to cooked ingredient where they have a second cooking method or process)
Pro Tip: If your ingredient is fried in oil or boiled in salt, it is important to include the specific oil or salt in your recipes ingredient list and tag it with the same cooking method as the ingredients cooked.
7. Input the ingredient cost to calculate the cost of your recipe batch and servings. Costs are entered manually in the box provided. Once you tag an ingredient with a cost, this amount is recalled each time you use the ingredient automatically
Pro Tip: Generate a table showing all of your ingredients and costs from Menu>Output>Tools>Ingredient Costs
8. Repeat steps 3-7 for each ingredient.
9. Scroll up the page to the food labelling section and enter the number of portions this recipe serves, ‘per serving’ label data will then be generated:
10. Input any other data on the recipe level in the ‘Modifiers’ box, such as recipe storage, weight change factors, or profit margin & tax to calculate RRP of recipes and various portions.
Pro Tip: If you intend to report nutrient values per 100g, or with reference to any unit of weight (e.g.food for label), it is important to account for weight change on cooking by either either the weight yield of your recipe, or entering an appropriate weight change / yield factor in the boxes provided. However, if you are simply reporting nutritional values 'per serving' (e.g calories on menus initiative) it is not necessary to apply a weight change factor, but the weight of the serving must not be referenced.
11. Add up to 5 portion size options in the box provided at the bottom of the screen, or type desired calories in the Kcal box and the portion weight will be calculated. Product barcodes may also be added here for use in the label maker or in API integrations.
12. Add any cooking instructions and notes for your recipe in the text entry box, or photos to illustrate key steps of the preparation process
13. Scroll up the page to double check the allergen information indicated is appropriate for your specific ingredients, and change the ‘May Contains’ indicators to ‘Unspecified’ or ‘Contains’ as required (right click an allergen to toggle the context menu)
14. Scroll up to the top of the page and add a photo to your recipe if desired.
15. Use the Export button or Menu > Output tools to publish your recipe to various outputs
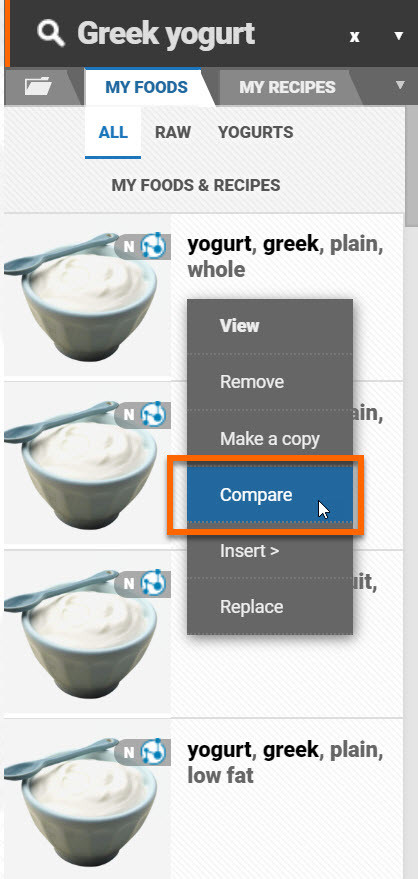
You can compare up to 6 foods or recipes at a time against EU, FDA and FSANZ Reference Intakes. Right click on a food from the search results and click the compare option from the context menu. Repeat for all foods you wish to compare.
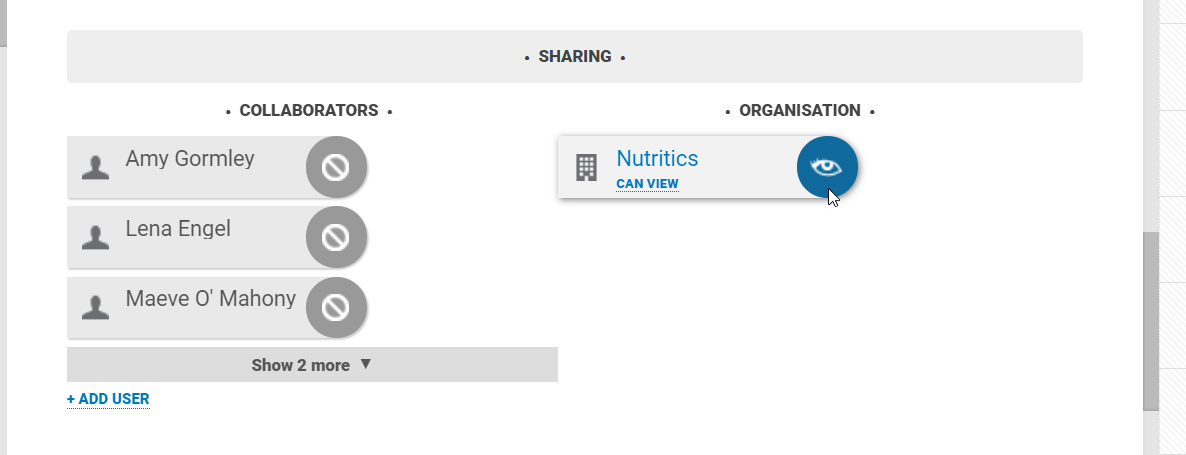
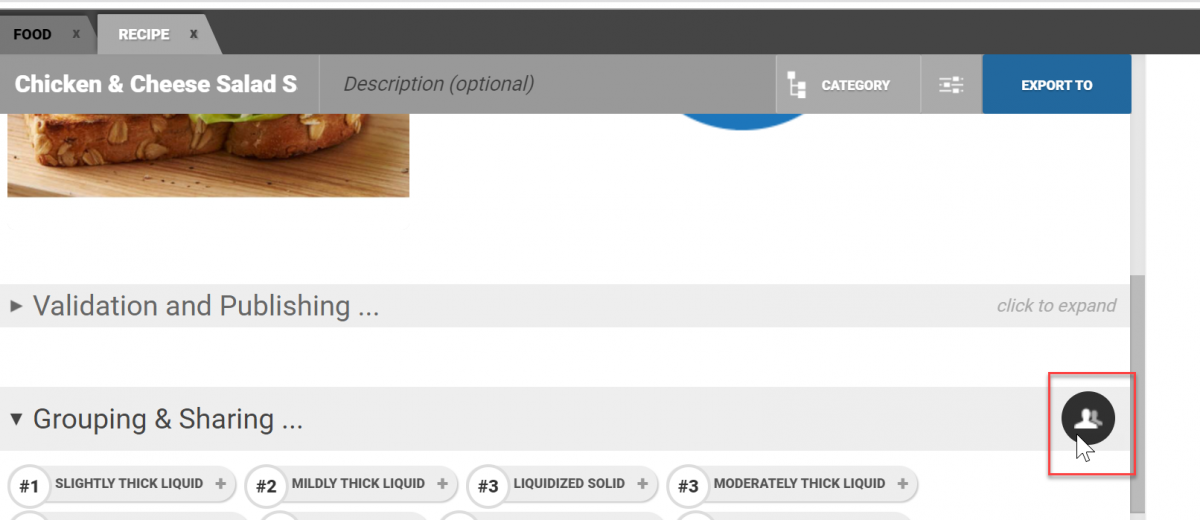
Clients, recipes, and foods can be shared with other Nutritics users. Look for the sharing and collaborators feature, located both on your foods and recipe workspaces
and in the client panel.
Click '+add user' and type in the username or email address of another Nutritics user to enable sharing with that user.
If your licences are part of an organisation or group, you will see all users of the organisation when you click ‘+add user’.
You can also choose to share with all account holders within the organisation by clicking on the name of the organisation instead of adding individual users.
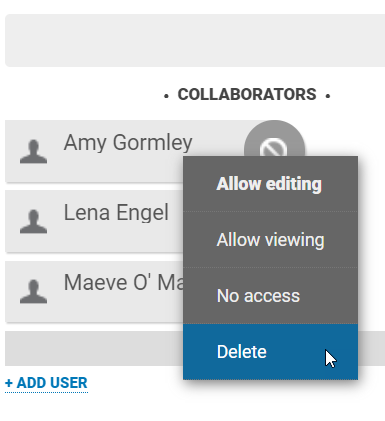
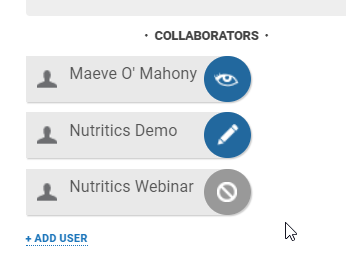
You will have the option to share with read only (1) or read and write privileges (2), or revoke access (3) after adding a collaborator.
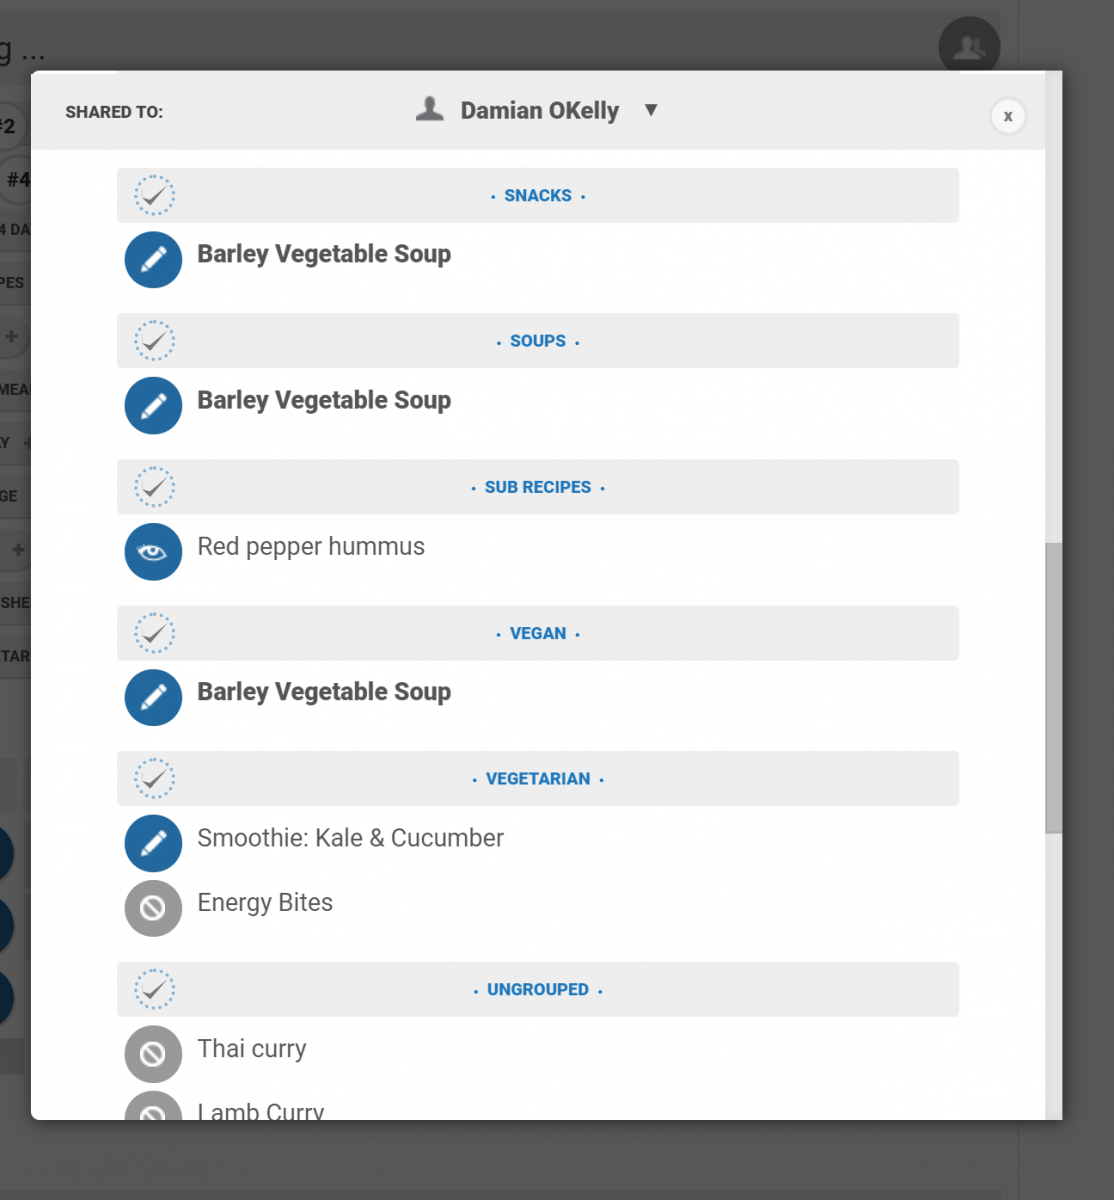
To share multiple recipes, foods or clients at once, click the icon shown on the right of the collaborators screen to access the bulk share tool:
Choose the account you'd like to share with from the drop down at the top, then click the items or the checkboxes in the list to share:
To remove a collaborator, right click on the username and select 'delete'.
Items that are shared with you have an inbound arrow and a yellow bar within the record / workspace will be shown
Items that you are sharing with other users are indicated with an outbound arrow
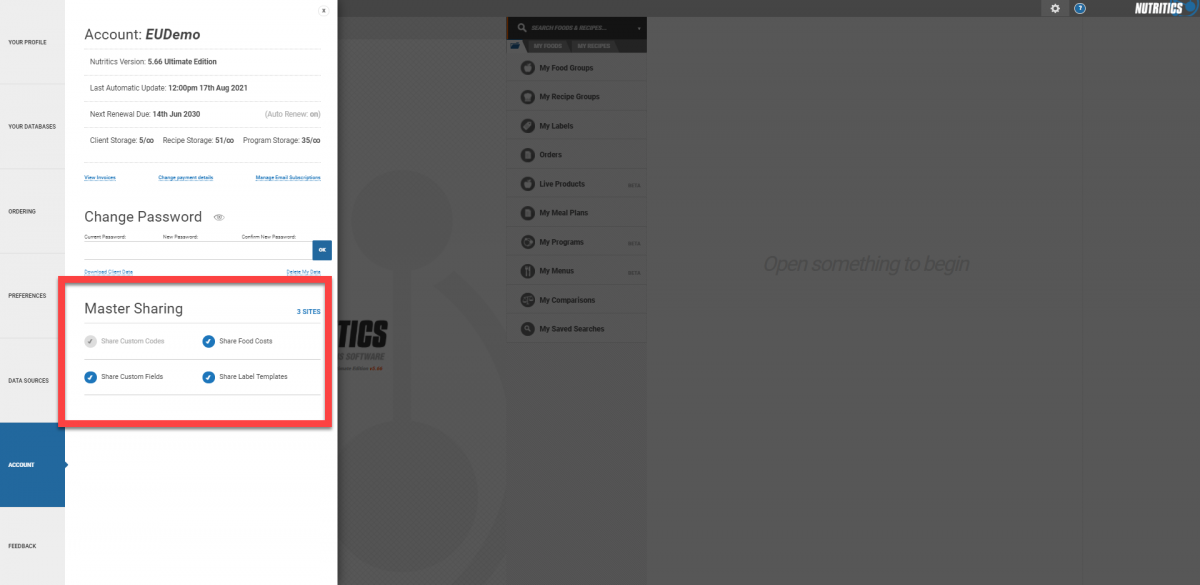
Master Sharing Functionality
If you have purchased a licence set with master sharing functionality you have the option of sharing particular data with your site accounts.
You can choose to share your custom codes, custom fields, food costs or label templates to your site licences automatically. For example, if you wanted to share recipes with your site licences, but not costs attached to the recipes you can disable this setting.
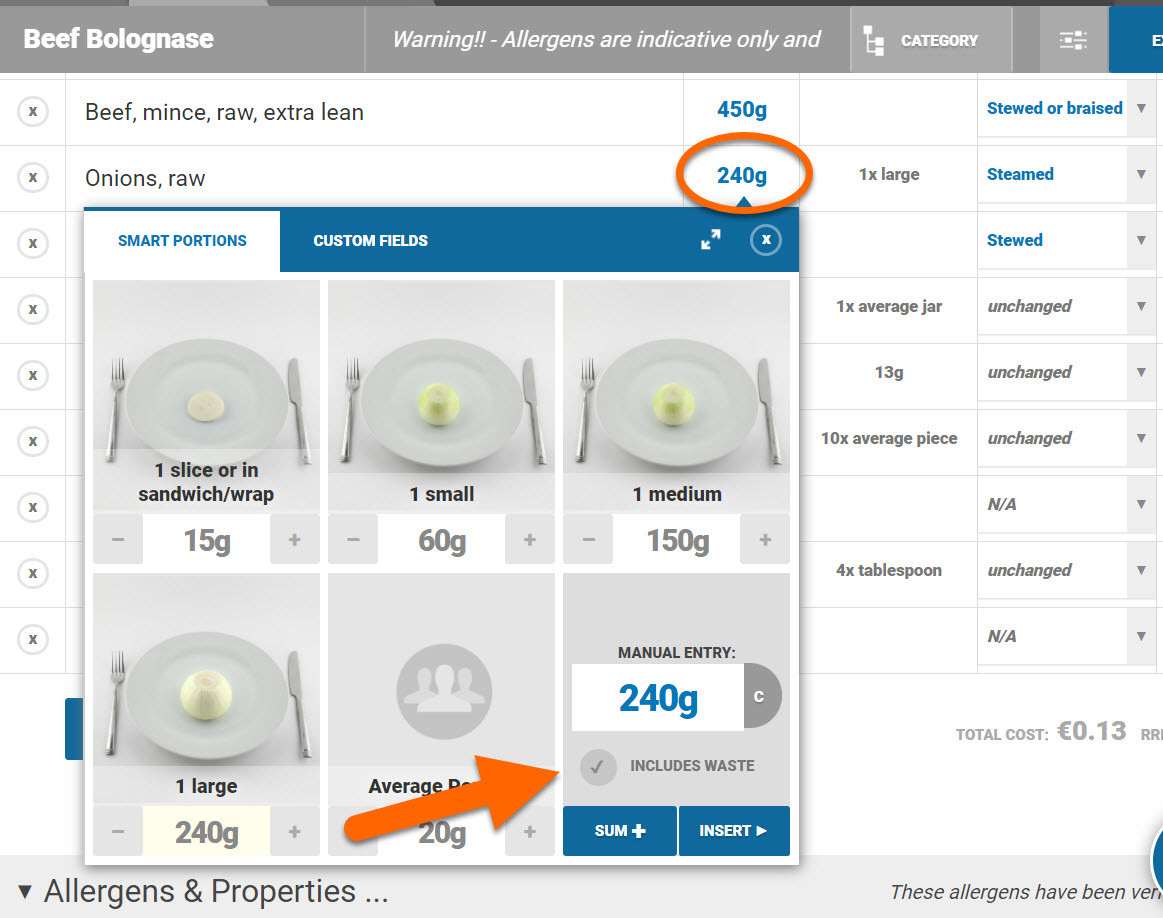
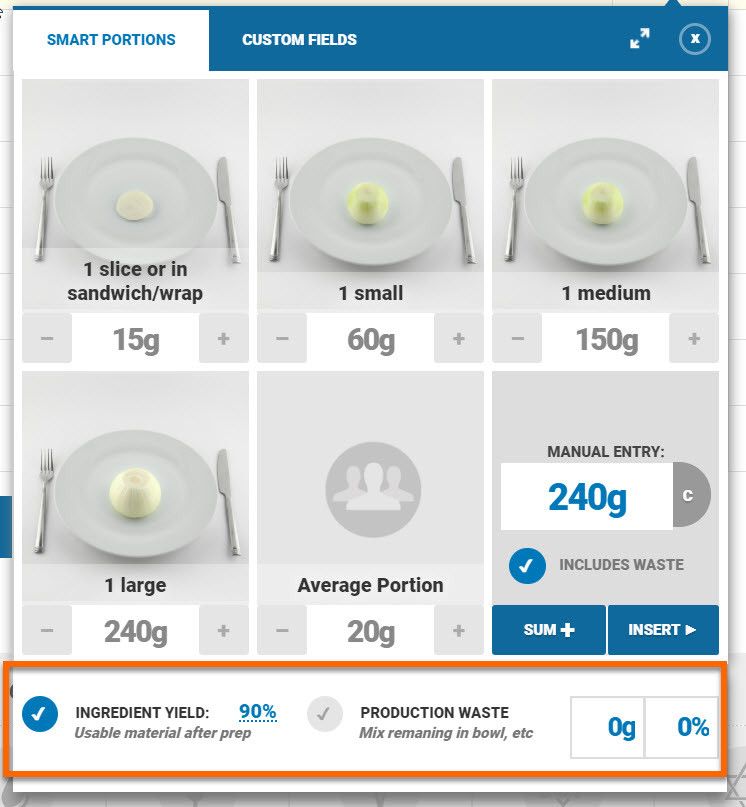
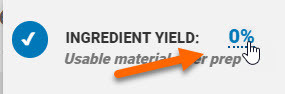
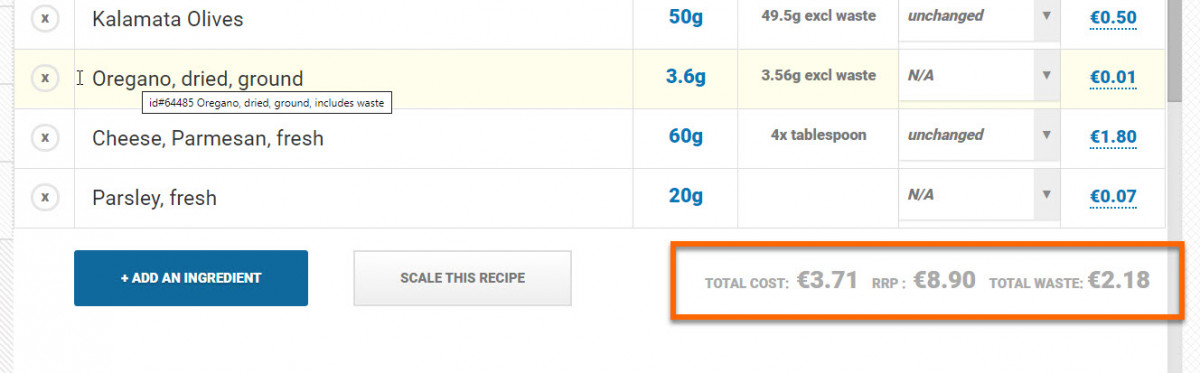
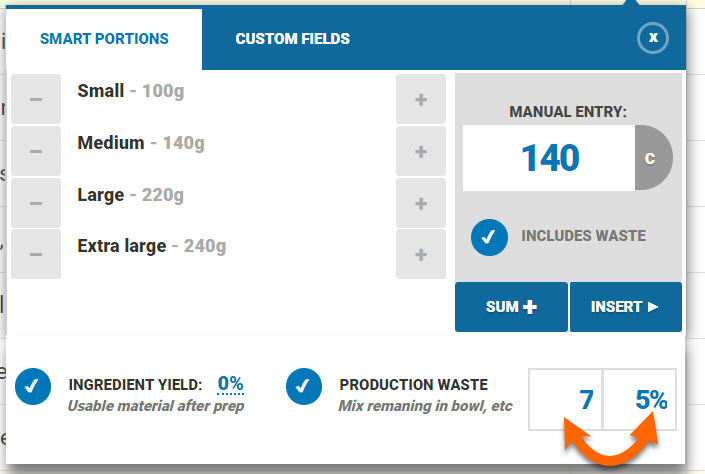
Waste can be accounted for in Nutritics at multiple levels. In the recipe workspace, if you go to your ingredient list and click to add an ingredient quantity, you will see the option to specify that the quantity ‘includes waste’.
Ticking ’includes waste’ presents 2 options, ‘Ingredient yield’ and ‘Production waste’.
1. Ingredient yield %:
This is the expected amount of usable ingredient left after the ingredient has been prepared (e.g. skin has been peeled, stones removed etc.)
For example, onions have a 90% yield after removal of the skin. If you pay for 1000g of onions, you will have 900g of usable product going in to your recipes (yet you pay for 1000g). So in this case, you would specify that the ingredient yield is 90%.
Most foods in Nutritics have a suggested yield % already that can be used, or custom values can be tagged onto foods.
To set the yield on an ingredient from the recipe workspace:
- Find the ingredient in the recipe ingredient list
- Click on the ingredient quantity
- Tick 'includes waste'
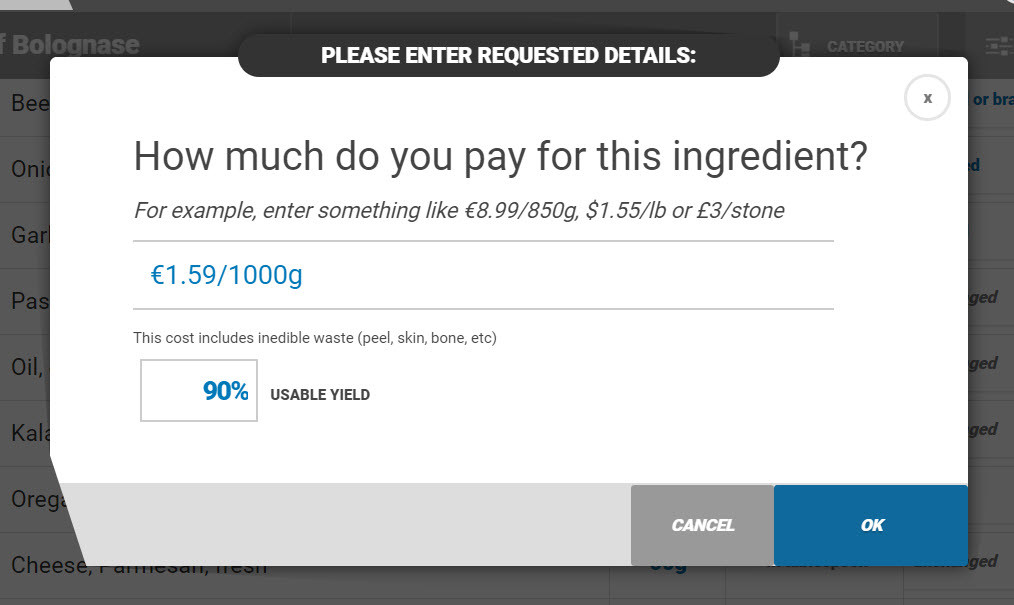
- Tick 'ingredient yield' and click on the ‘ingredient yield’ percentage to edit the yield and the cost price of the ingredient.
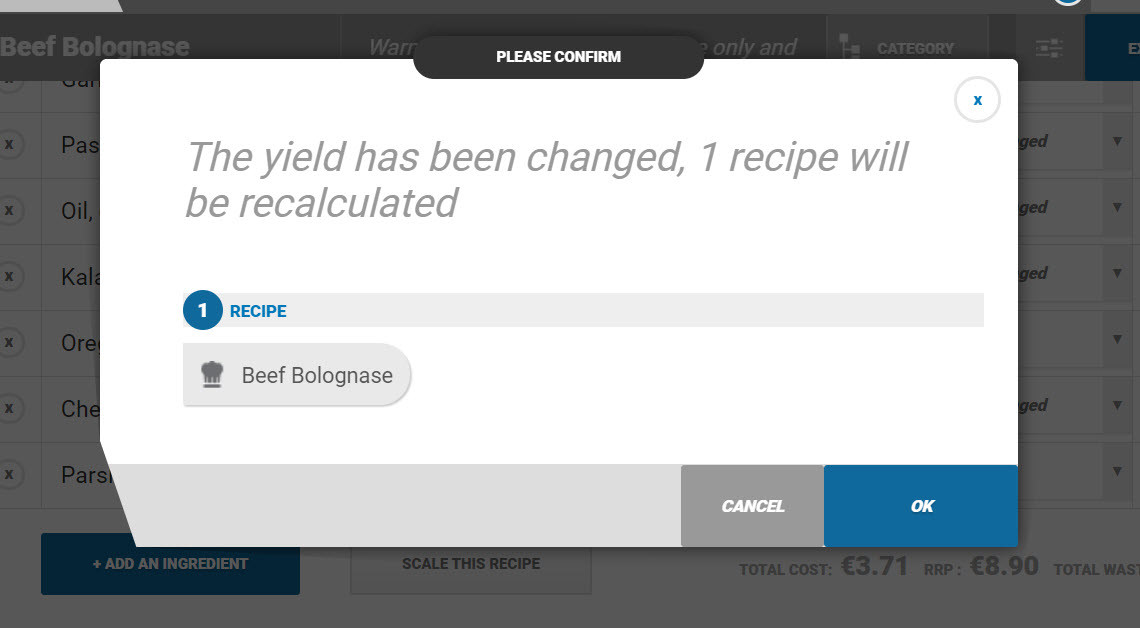
If an ingredient yield is changed, this will automatically update any other recipes in which this ingredient is used.
Note: The % usable yield can also be set when inputting ingredient costs from the recipe workspace.
Once an ingredient yield has been entered, the weight of the ingredient excluding waste will be shown in the description box to the right of the ingredient quantity.
The total recipe weight will update to reflect the weight of the ingredients excluding waste and the recipe’s nutritional information will update accordingly.
The total cost of wasted material will be shown along with the total recipe cost and RRP under the recipe ingredients if costings are enabled on the account.
Percentage yield has also been added as a column on the food importer spreadsheet and the cost uploader spreadsheet for mass updates (accessed by going to the start menu < batch jobs if this feature is included in your plan).
2. Production waste:
This accounts for waste that occurs due to the recipe production methods. This is an acceptable loss of usable material; for example, 2-3% of pancake batter may stick to the mixing bowl and utensils, or 70-80% of a marinade may be discarded after use.
To set the production waste on an ingredient from the recipe workspace:
- Find the ingredient in the recipe ingredient list
- Click on the ingredient quantity
- Tick 'includes waste'
- Tick 'production waste' and enter the waste value. Waste can be entered in grams e.g. if leftovers are weighed after production. If the gram weight of the wasted material is entered, Nutritics will work out the percentage waste and vice versa.
Similar to with the ingredient yield, specifying production waste will update the total recipe weight and the recipe’s nutritional information and costings will update accordingly.
Waste can be accounted for in Nutritics at multiple levels.
In the recipe workspace, if you go to your ingredient list and click to add an ingredient quantity, you will see the option to specify that the quantity ‘includes waste’.
If you specify that the quantity includes waste, you will see 2 options, ‘Ingredient yield’ and ‘Production waste’.
1. Ingredient yield %: This is the expected amount of usable ingredient left after the ingredient has been prepared (e.g. skin has been peeled, stones removed etc.)
For example, onions have an 85% yield after removal of the skin. If you pay for 1000g of onions, you will have 850g of usable product going in to your recipes (yet you pay for 1000g). So in this case, you would specify that the ingredient yield is 85%.
Most foods in Nutritics have a suggested yield % already that can be used, or you can alternatively tag your own value.
In Nutritics, nutrient losses and gains (NLG’s) are applied on the individual ingredient level in your recipe workspace by applying cooking methods to each ingredient.
Moisture losses are applied on the total recipe level in the modifiers box of the recipe workspace.
These factors will ensure that nutrient and weight changes on cooking are accounted for, giving you the most accurate calculations possible. See the table below for more information.
The recipe creator can calculate the cost per portion or cost per 100g for each recipe. To add ingredient costs, simply click on the ‘Cost’ box corresponding to each ingredient and enter the cost per unit of weight. You may use any variable of price and weight Eg. €5/10kg, or £3.10 per lb. Once you add a cost to one ingredient, there is no need to continue to enter the currency symbol for subsequent ingredients. Once an ingredient is tagged with a cost, this will be reflected throughout all of your recipes that use this ingredient. If you cannot see the cost column beside your recipe ingredients, it is not a standard feature on your account. It may be added from Menu > Upgrade/Downgrade or by contacting us if required.
Food outlets may also add their Gross Profit Margin and VAT rate on a recipe to calculate Recommended Retail Price. This may be added in the ‘Recipe Modifiers’ box under the food labelling heading of the recipe workspace.
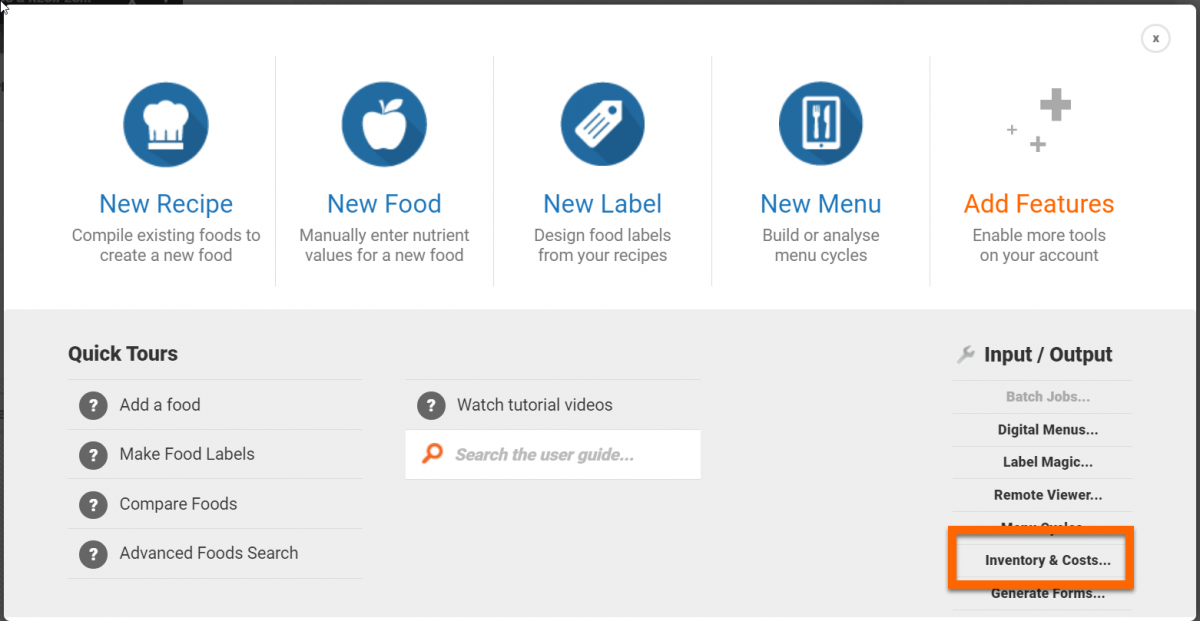
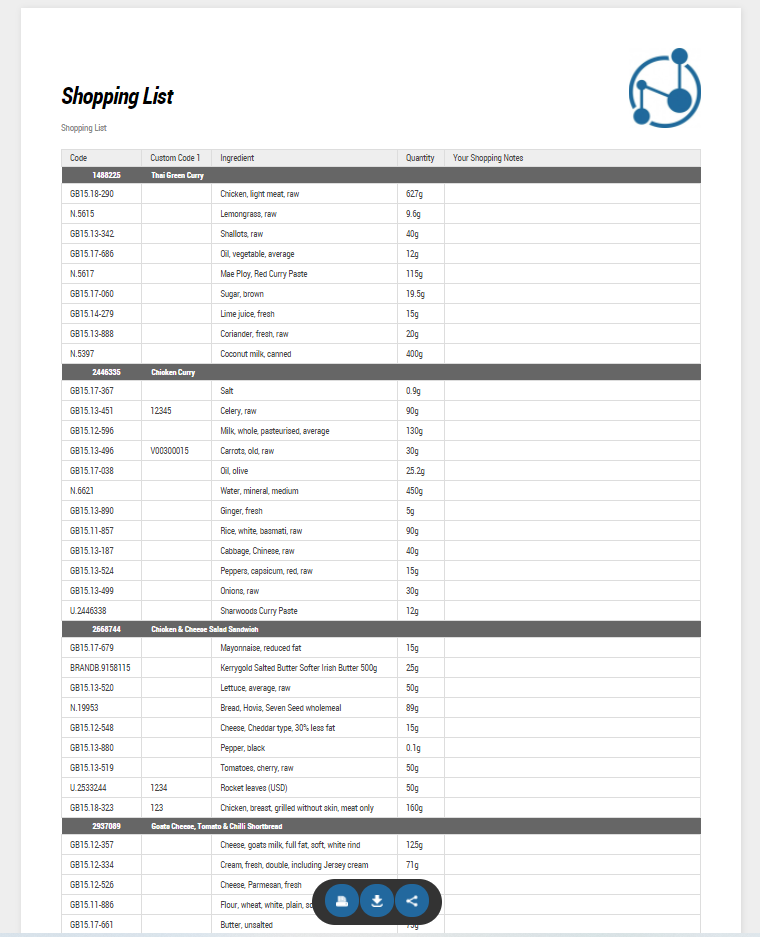
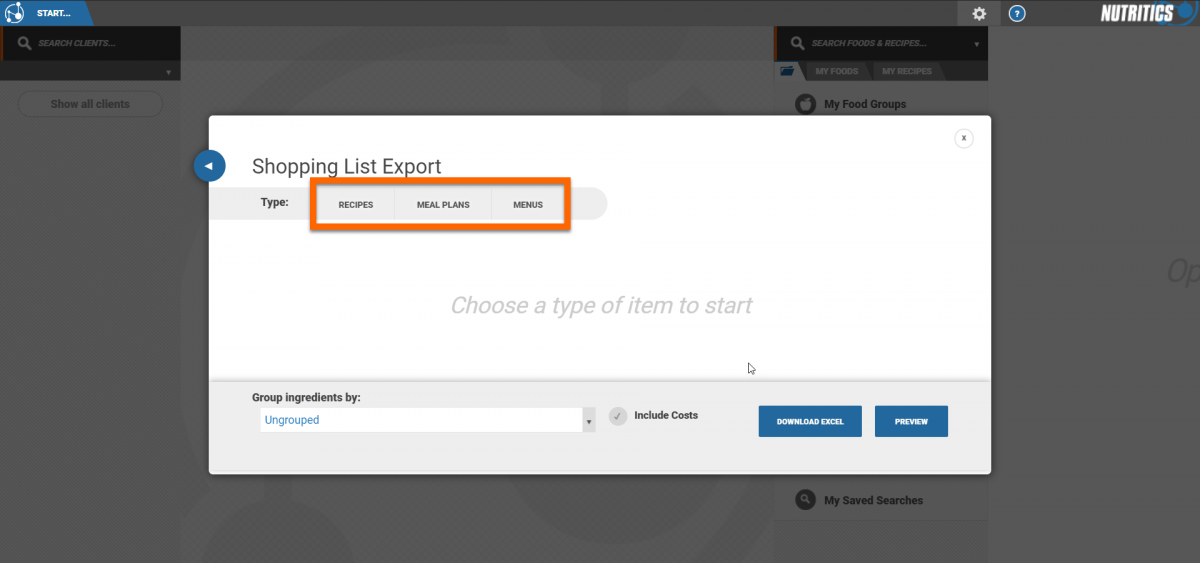
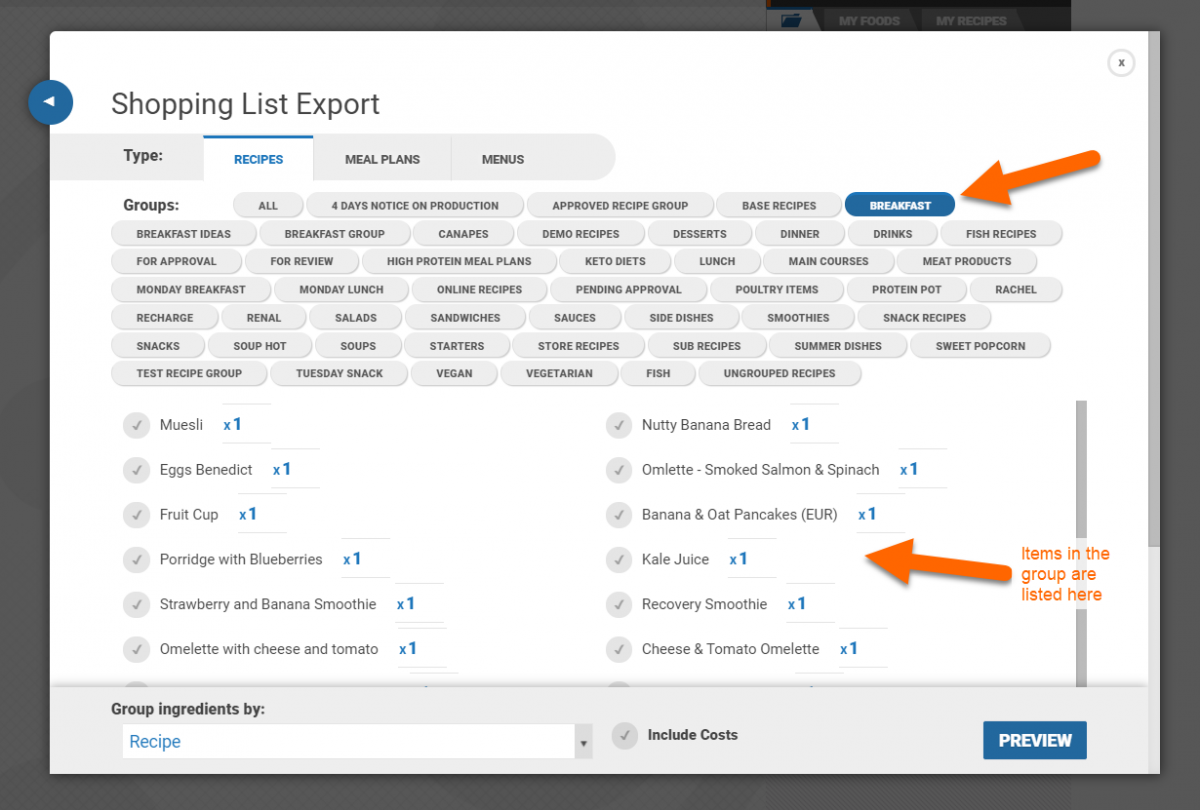
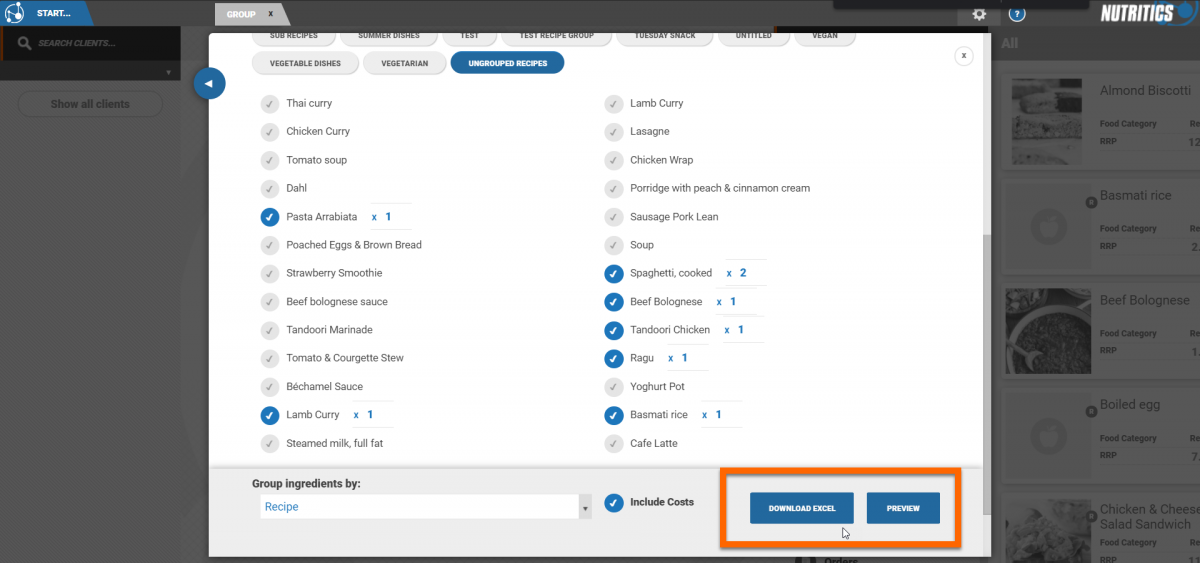
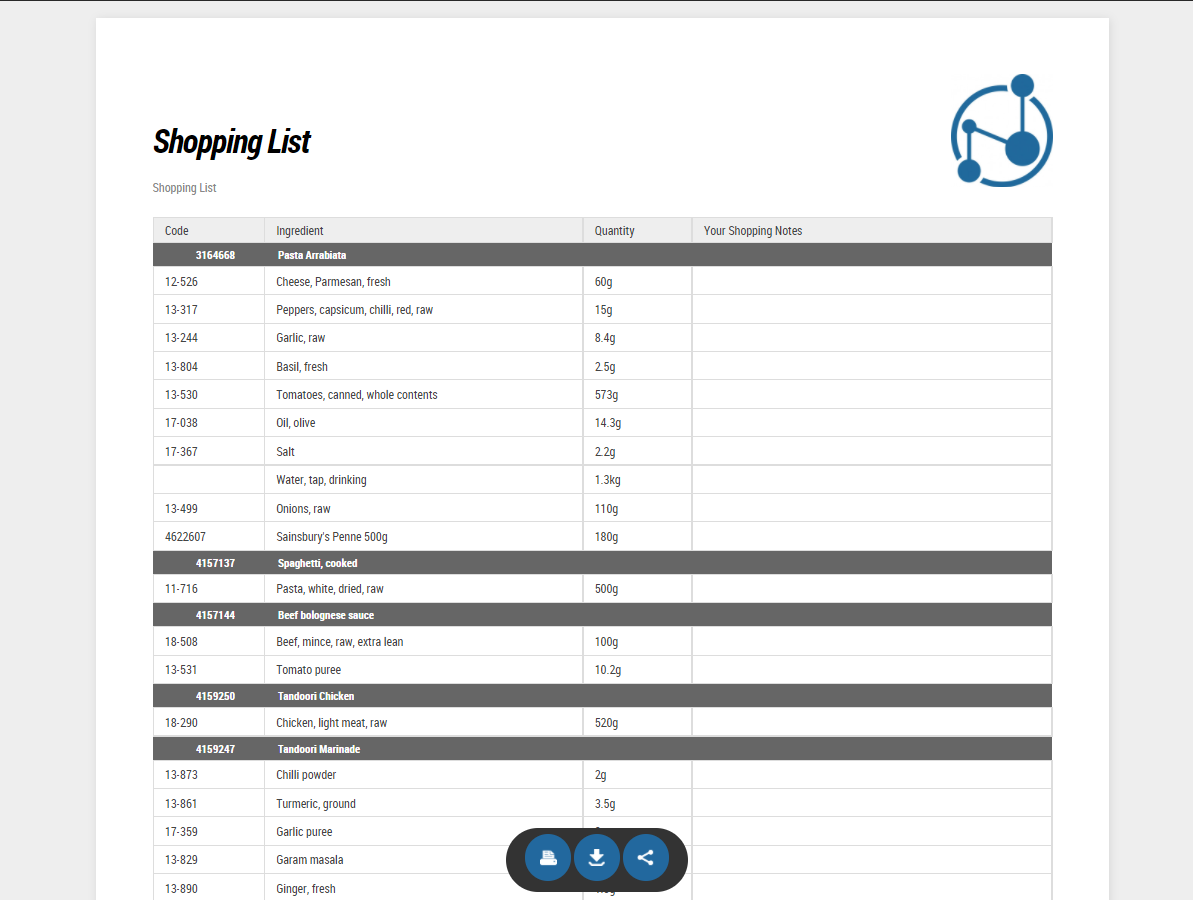
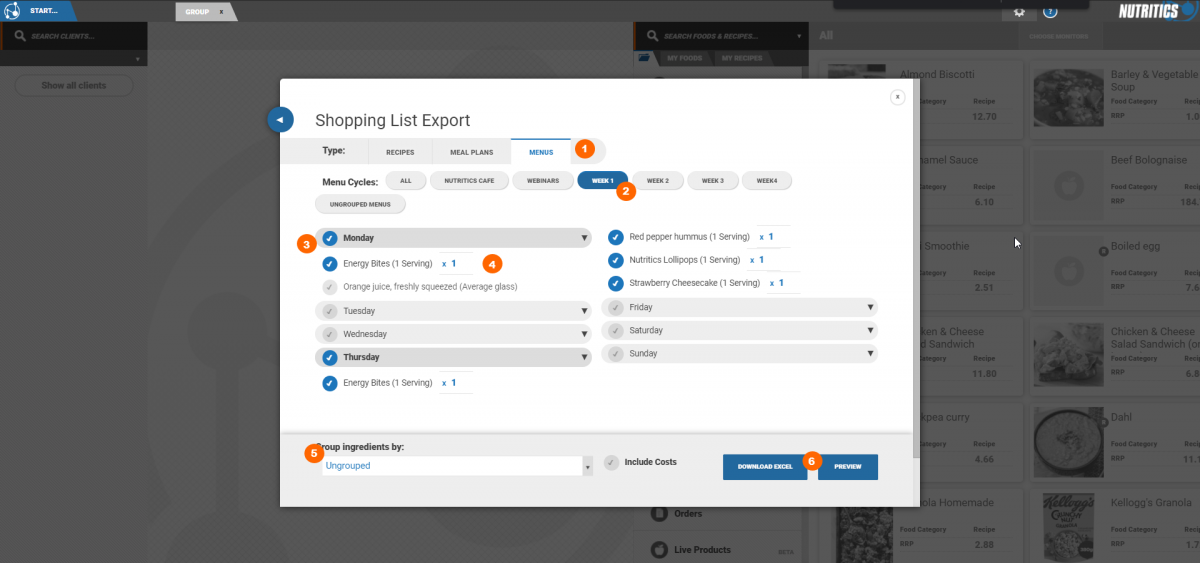
A table of all ingredient costs can be generated from Menu>Input/Output>Shopping List. For a full guide on shopping lists, see
here.
If you would like to read more about our cost calculator and how it could benefit your business, check out our
blog.
The nutritional content of your recipes is calculated in real time as ingredients are added. Move the mouse over the various label values to explore which foods are contributing most to a particular nutrient. You can then modify that ingredient to produce a more favourable nutrient profile.
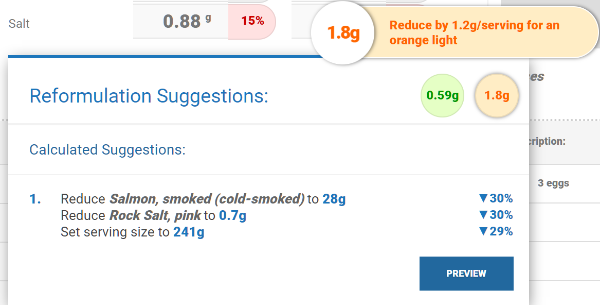
Nutritics reformulation engine can also give specific recommendations on changes you can make to your ingredients to improve nutritional profile of your recipes. This powerful feature is available on our Premium and Enterprise packages only.
In the food labelling section of the recipe workspace, any nutrients with an amber or red rating will have a light bulb icon beside them. Click on the light bulb icon beside a nutrient value to see suggestions on how to reduce that nutrient in your recipe.
Click 'preview' to see the effects of suggestions on your recipes nutrient profile. The changes can be applied to the original recipe, or a 'reformulated' copy of the recipe can be created.
Use the ‘Scale this Recipe’ function at the bottom of the recipe ingredients to calculate the stock required to produce a defined number of portions of a particular recipe.
This can be particularly useful in catering and food manufacturing at scale and can effectively reduce waste from stock surplus. Insert how many servings, or the yield that is required for scaling.
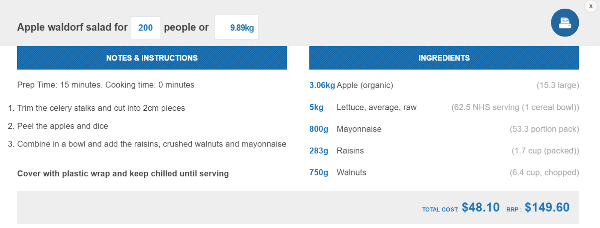
On accounts with meal ordering, recipes can be scaled from the live orders dashboard accessed via the Nutritics content explorer.
Right-click on a recipe anywhere in the dashboard to open the recipe scaling function.
The number of servings required for that order will be populated automatically, but the number of servings or weight needed can be edited as needed by typing in the quantity boxes.
The trigger food for an allergen may be identified in a recipe by moving the mouse over the specific allergen indicator. You can then right click the food from your ingredient list to view or edit the food, or you can swap it out for an alternative ingredient to engineer the allergen out of your recipe entirely.
Allergens in Nutritics are specific to the regulations selected on the food and recipe workspace. The region can be changed on an individual recipe or food from the drop down as shown below, or can be set as a new default for the account in Menu>Settings>Preferences
When building recipes using database food items, allergens are calculated automatically and indicated in the allergen tiles. If you are using your own created food items, we highly recommend adding the ingredient list and clicking 'scan for allergens' to detect allergens automatically and confirm. Once saved, this will activate the relevant allergen tiles and update the ingredient lists where this food is used - across your recipes, labels and digital menus:
Nutritics will automatically include the disclaimer to see allergens in CAPS & bold, as well as listing the may contains allergens.
It is possible, but not recommended, to turn off automatic allergens at the recipe level by toggling ‘automatic allergens’ on the recipe workspace. This is only possible on accounts that do not have the publishing panel enabled. Note that any subsequent changes to the recipe and recipe allergens will not be passed through automatically when this setting is off.
Turning off automatic allergens allows you to tag additional allergens and change the ‘May Contains’ indicators to ‘Unspecified’ or ‘Contains’ as required by right-clicking an allergen tile to toggle the context menu. Note that we highly recommend leaving automatic allergens on, and updating the allergens and may contains statements at the individual food level, instead of the recipe level. This ensures the source of the allergen is always known and can be emphasised correctly in the ingredient list, and also ensures any changes to allergens are reflected everywhere the item is used.
The trigger food for an allergen may be identified in a recipe by moving the mouse over the specific allergen indicator. You can then right-click the food from your ingredient list to view or edit the food, or you can swap it out for an alternative ingredient to engineer the allergen out of your recipe entirely.
The cost of each ingredient is listed beside the quantity box. This is input initially by the user and attached to the food for all recipes, or it is uploaded in batch from excel (this feature is currently only available on Premium plans).
It is easy to identify high cost ingredients and dishes, and swap them out for more cost effective alternatives. The cost tables from Start > Inventory & Costs can also help identify your most expensive ingredients and recipes (available on food service packages or as an add-on).
Nutritics will automatically display all applicable nutrition claims that can be made for your recipe under
Regulation (EC) No 1924/2006. Simply click on the indicators to apply the claim to your printed reports and labels. After a nutrition claim has been elected for use, the associated Health Claims for that nutrient are displayed, which can also be applied
Claims cannot be applied to recipes that are high in saturated fat, trans-fat, total sugars or salt. Claims such as ‘Reduced energy’, ‘Reduced Fat’ that require comparison across products are not available and should be consulted separately.
Nutrition & Health Claims are available on our premium and corporate packages only, or added from Menu > Add Features. Check our blog on nutrition claims and health claims for more background information, or refer to Regulation EC1924/2006
The 'find & replace' feature is available on premium, enterprise and research plans only.
With real time click and ‘replace all’ functionality, you can swap brands across recipes quickly and easily ensuring confidence that the correct information, including ingredient lists with full allergen profile is available for your customers.
To replace ingredients:
- If the substitute product is not already in the Nutritics database, add it by following our guide on adding ingredients to Nutritics (making sure the allergen information matches the substitute product).
- Open a recipe where an ingredient needs to be replaced.
- Scroll to the recipe ingredients and right click on the ingredient that needs to be replaced.
- Click ‘replace’
- A list of recipes containing that ingredient are shown (1&2).
- Tick the recipes where the ingredient should be replaced or ‘select all’ (2).
- Search for the substitute ingredient in the search bar (3).
- Tick the substitute ingredient (4) and click ‘replace’ (5).
Recipes are searchable foods like any other food in the database. Simply search for the recipe as you would normally when searching for a food and they will appear within the result listing. Your personally created recipes are marked with an 'R' icon in the search results. It may be useful to use the ‘My Foods & Recipes’ search filter after running a search, to filter the result list to a specific category.
You can also browse and add recipes from the 'My recipes' tab below the food search box.
Once you have found the recipe, click on it and press the insert button, the same way you enter foods to a log. You will be given the option to customize a recipe after it has been entered to a log, which applies to this instance of the recipe only. If you wish to edit the base recipe, you can right click on it from the log, or open the original recipe and make edits.
An
unlimited number of new foods, products, and supplements can be user added to
Nutritics from label data, International food tables, or from laboratory analysed values.
Pro Tip: Most of the foods in Nutritics are ‘average samples’ from multiple samples or brands. Thus when searching for products, it is often suitable to simply use an existing ‘best match’ food from the Nutritics database. Just be aware that the allergen information may not be specific to your branded product.
Adding an individual food:
1. To add a food, click the Start button at the top left of the screen and select the ‘New Food’ option.
2. Specify if your food data is from a product label or other data source, such as lab analysed values or an International Food Composition Database
Pro Tip: In order to include vitamin and mineral values, which are not usually available on manufacturer’s food labels, you can import the nutrition from a ‘best match’ food in the database. To do this, search for a similar food in the database and click ‘insert’ after step 1 above. You can then update and edit as per the steps below (alternatively, search for a food and right click it to duplicate and start editing the values)
3. Choose the best fit category for your food from the options presented
4. Title the food and provide a description with any additional information (for example, manufacturer, data source, flavour, searchable keywords or any other background information)
5. Check if the label/data is presented per 100g of product - adjust the box as necessary
6. Fill in the label data exactly as presented on the label, additional nutrients may be added by clicking show extended nutrients
7. Click the submit button to add the food – the system will automatically check for any input errors before showing the complete food workspace
8. Next, add the allergen information for the food. The allergens detected are specific to your region. The region can be changed under the ‘food labelling’ section by clicking on the dropdown.
To add allergen information, add the ingredient list for the product by clicking the pencil icon in the ingredient list section.
Type in the ingredient list or copy and paste it from another source.
Specify if the food is a single ingredient item e.g. olive oil
Click ‘scan for allergens’.
Any detected allergens will be highlighted.
You can change how the allergens are formatted by going to the menu by clicking on the cog icon in the top right corner of the screen > settings > preferences > scroll to the advanced section and choose your preference from the dropdown beside ‘Ingredient list allergen format’.
If any allergens have been flagged, you will be asked to approve them in order to proceed.
Allergens in the ingredient list will be flagged in the allergen tiles automatically.
9. Scroll up to add optional information such as a food photograph, the food cost and to add the food to groups.
Food groups can be accessed in the Nutritics Content Explorer -
And by clicking on the ‘my foods’ tab and hovering over the arrow that appears.
10. Add food-specific custom fields (eg. shelf life, origin, storage instructions) in the modifiers box.
11. Scroll down to the portion/pack sizes section to add portion size information. These portions will be available to choose from when adding this food to a recipe etc. later on.
12. The notes section is a free text box and files e.g. a product spec sheet, can be attached to here.
13. All data is saved automatically with each action and all foods added to your account are added to the ‘My Foods’ tab of the Nutritics Explorer.
An
unlimited number of new foods, products, and supplements can be user added to
Nutritics from label data, International food tables, or from laboratory analysed values.
Pro Tip: Most of the foods in Nutritics are ‘average samples’ from multiple samples or brands. Thus when searching for products, it is often suitable to simply use an existing ‘best match’ food from the Nutritics database. Just be aware that the allergen information may not be specific to your branded product.
Adding an individual food:
1. To add a food, click the Start button at the top left of the screen and select the ‘New Food’ option.
2. Specify if your food data is from a product label or other data source, such as lab analysed values or an International Food Composition Database
Pro Tip: In order to include vitamin and mineral values, which are not usually available on manufacturer’s food labels, you can import the nutrition from a ‘best match’ food in the database. To do this, search for a similar food in the database and click ‘insert’ after step 1 above. You can then update and edit as per the steps below (alternatively, search for a food and right click it to duplicate and start editing the values)
3. Choose the best fit category for your food from the options presented
4. Title the food and provide a description with any additional information (for example, manufacturer, data source, flavour, searchable keywords or any other background information)
5. Check if the label/data is presented per 100g of product - adjust the box

as necessary
6. Fill in the label data exactly as presented on the label, additional nutrients may be added by clicking
7. Click the submit button to add the food – the system will automatically check for any input errors before showing the complete food workspace
8. Add optional information such as a food photograph, food specific custom fields (eg. shelf life, origin, stoage instructions), allergens, notes and portion size information
9. All data is saved automatically with each action
If you have many custom foods to add, (for example, if you are moving to Nutritics from another system) or if you wish to use an International or custom data table not available in Nutritics, these can be uploaded in bulk from an excel sheet using the 'Batch Jobs' option in the start menu. The template spreadsheet from the import section must first be downloaded and filled in with the data.
If you have many custom foods to add, (for example, if you are moving to Nutritics from another system) or if you wish to use an International or custom data table not available in Nutritics, these can be uploaded in bulk from an excel sheet using the 'Batch Jobs' option in the start menu. The template spreadsheet from the import section must first be downloaded and filled in with the data.
Create and export shopping list from your recipes, meal plans or menus. Shopping lists can be created in pdf. or .csv format.
Click on the start menu and select ‘shopping list’ under the input/output heading.
Select the type of data to be exported to a shopping list by using the tabs along the top.
Any groups created in the Nutritics account will be visible and allow for easy filtering of data. Click on a group to expand it.
Tick any items to be included in the export.
Specify the number of servings the shopping list should include.
Select how the shopping list should be organised in the dropdown menu.
This will group ingredients with the same category together under category headings e.g. fruits & vegetables or nuts & seeds.
This will list your recipes in alphabetical order, with an ingredient list under each recipe heading.
This will list all ingredients in alphabetical order.
If the costing feature is enabled on your account, ingredient costs can be added to the export by ticking 'include costs'.
Exporting your shopping list
Click 'download excel' to export a shopping list in .csv format or click on ‘preview’ to generate the shopping list in a new tab. The shopping list preview can be printed, downloaded in .pdf format or shared using the buttons at the bottom of the screen.
Shopping lists include a food code column, the ingredient names, quantities and if applicable, the ingredient costs based on the quantity in the shopping list, cost per kg and waste costs.
Creating shopping lists for menus
Shopping lists can be generated for menus in a couple of different ways.
From the start menu:
- Click on the menus tab to generate shopping lists for your menus (1).
- Use the filters along the top to open a menu cycle (2).
- Click on a menu name to expand a list of menu items (3) and tick any menu items to be included on the export. Individual portion sizes are listed separately.
- Specify the number of portions to be included in the export (4).
- Select your grouping preferences and whether costs should be included in the report (5).
- Click preview to generate the shopping list (6).
From the menu workspace:
You can use the popularity and servings monitors in the menu workspace to generate a shopping list for your menus.
- Open a menu and click 'choose monitors'
- Enable the 'popularity' and 'servings' monitors
- In the menu workspace, estimate the popularity of menu items. Note the popularity of each menu group must add up to 100.
- Add the total number of servings required for the menu group and Nutritics will calculate the number of servings for each menu item.
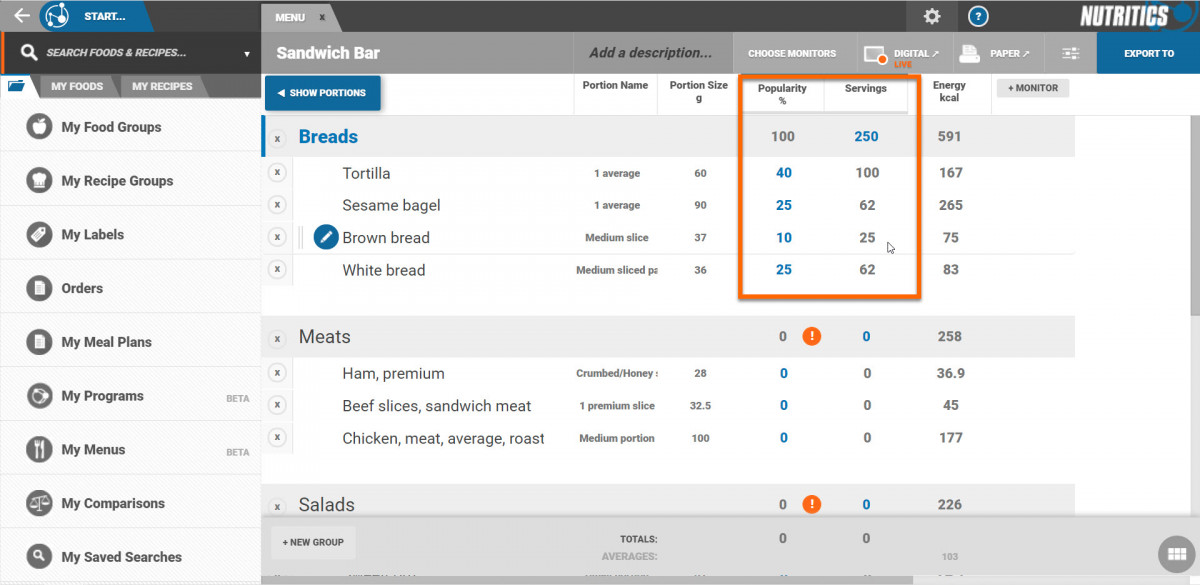
- Click 'export to' in the top right corner of the screen and select 'shopping list'.
- This will open the shopping list menu. Items in your menu will automatically be selected. You can add additional menu items by clicking on them or change the number of servings if needed.
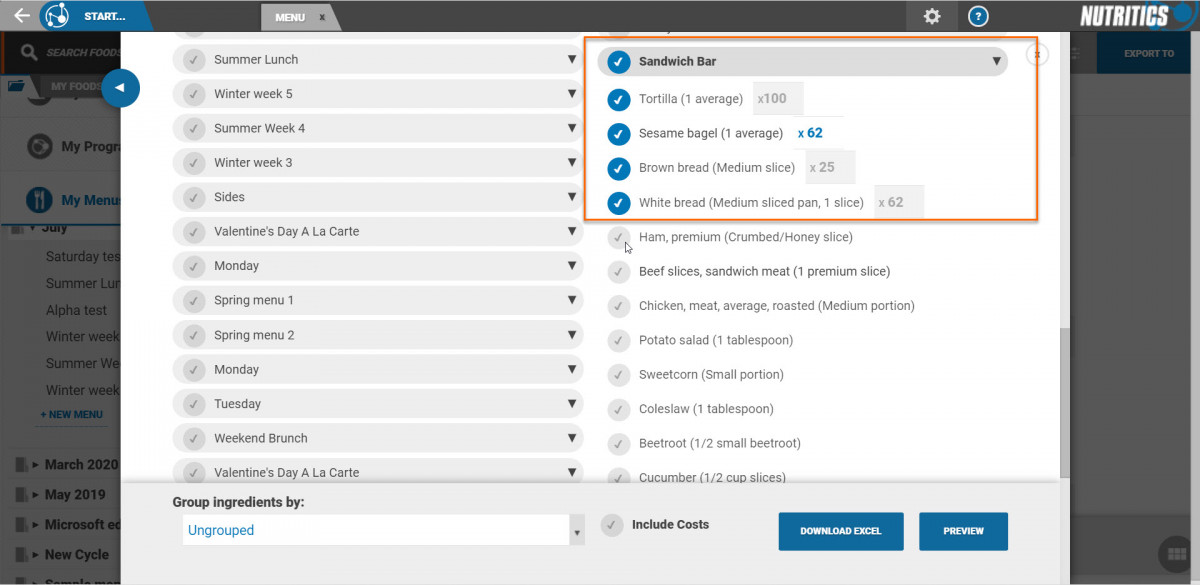
- Specify your export preferences and click preview to generate a pdf shopping list or export to excel.
From the live orders dashboard:Generate a shopping list of orders placed via your digital menus. This is useful where customers order in advance.
- Open the live orders dashboard from the Nutritics content explorer.
- Click on the 'export to' menu in the top right corner of the screen.
- This will open the shopping list menu. Items that were in the order dashboard will automatically be selected. You can add additional menu items by clicking on them or change the number of servings if needed.
A recipe’s
QUID or ingredient list is generated automatically in Nutritics based on the ingredients in the recipe.
Managing ingredient lists on the food level
Ingredient lists are added on a food level by opening the food and clicking on the pencil icon beside the ‘Ingredient List’ heading and typing/copying and pasting the ingredient list into the text box.
For a full guide on adding a food to the database (including adding the ingredient list), see
here.
Managing ingredient lists on the recipe level
You can also easily manage the ingredient list of any food in a recipe in the recipe workspace. Any changes made will update the recipe’s ingredient list automatically. To do this:
- Click on the ingredient quantity
- Select the custom fields tab
- Click the button beside ‘Ingredient list for this food’
- If an ingredient list has already been added to the food, it will be visible here, otherwise copy and paste/type one in
- If the food is a single ingredient item e.g. olive oil, click on the tick icon and the food name will populate as the ingredient list (an ingredient list is not required for single ingredient items where the name of the food is identical to the ingredient name or the name of the food clearly identifies the nature of the food)
- Nutritics will automatically include the disclaimer to see allergens in CAPS & bold, as well as listing the may contains allergens
- Click scan for allergens - detected allergens will be highlighted
Pro tip: You can change how the allergens are formatted by going to the main menu by clicking on the cog icon in the top right corner of the screen > settings > preferences > scroll to the advanced section and choose your preference from the dropdown beside ‘Ingredient list allergen format’. - Click update
- The ingredient list can be further customised in the custom fields tab e.g. The percentage that appears after the ingredient name in the ingredient list can be removed by ticking ‘Hide % in ingr. List’
- You can choose to hide all QUID percentages across your recipes in Settings>Preferences also. This will prevent the need to do them individually
- If desired, change how the ingredient name appears in the ingredient list by typing directly into the ‘short name’ field in the custom fields tab
- Scroll down to the QUID heading in the recipe workspace to see changes
Updating an ingredient list on a product label
Any changes made to a recipe ingredient list will pull through automatically to labels made for that recipe.
Create a new client
Click on ‘new client’ under your list of clients or go to the start menu and select ‘new client’.
Personal details
First, input the client’s personal details.
Any fields with an asterisk e.g. weight and height must be entered.
Weight and height-related fields may be entered in any format by simply typing your preferred units in the box, if no unit of measure is typed then the default units are used for your region (meters and kg on metric setting, ft and lbs on imperial setting).
Note: The imperial/metrics setting may be changed from the menu (accessed via the cog icon in the top right corner of the screen) > settings > preferences.
The client’s BMI and ideal body weight are calculated automatically when weight and height are entered.
Enter waist and hip measurements and the system will calculate the client’s waist to hip ratio.
An ID number can be entered and this will be displayed in your client list instead of the client’s name.
You also have the option to add an image to the client’s profile.
Lifestyle adjustments
Specify your client’s occupational and exercise activity levels. These help estimate your client’s Physical Activity Level (PAL) multiplication factor.
If your client is an athlete, specify their athletic type and Nutritics will adjust their nutrient targets based on the athletic factor selected.
If your client is female, you will see an additional lifestyle adjustment for pregnancy/lactation.
This will apply adjustments to your client’s energy and nutrient targets based on the DRV source selected e.g. selecting the UK nutrient targets will apply UK adjustments for pregnancy, selecting US nutrient targets will apply US adjustments.
Clinical adjustments
If the clinical adjustments feature is enabled on your account, clinical factors such as food and fluid modifications (IDDSI), mobility status, stress factors and fluid retention can be accounted for and recorded on the patient profile.
In addition, bed number, ward and meal delivery notes can be recorded here which are used for
Nutritics Healthcare Meal Ordering System. Note that all details of the client panel can be integrated with an Electronic Health Record for automatic synchronisation.
The fluid retention drop down allows you to specify if your patient has mild to severe peripheral odema or ascites. Adding a fluid retention factor will calculate the patients ‘dry weight’, which will subsequently be used to recalculate energy requirements and Ideal Body Weight (IBW - shown under the personal details heading at the top of the screen).
A clinical stress factor for trauma such as surgery, burns, fever and more can be looked up from the 'Stress Factor' drop down and will change the final energy requirement calculation for the patient. Many stress factor adjustments will provide a range which can be fine tuned using the slider that appears after selection. For example, in the image below, the stress factor for “Infection with persistent fever” will add on 25-45% to the individual's energy requirements:
The 'Mobility Factor' drop down provides an input to estimate the patient's activity level in the clinical setting; if they are bedbound, mobile or ventilator dependent. Once applied, energy requirements will be adjusted accordingly. Note that of a PAL value is already applied on the patient profile, it will be replaced by the mobility factor and the EER will be recalculated from the formula:
Nutrition requirements
Select the source of the client’s nutrition targets and the desired energy calculation formula under the nutrition requirements section.
Use the plus and minus buttons to add or subtract 100kcal per click to your clients’ energy target or type directly into the box.
Your client's macronutrient requirements are displayed in a pie chart.
Users with the custom DRV feature can click on the 'Customise' button to edit the nutrition targets for the client or make a new template. This will open a new tab under the nutrition requirements heading.
Right click to rename, delete or assign these targets to other clients.
Any changes to the client’s EER can be split between diet and exercise using the slider.
The energy calculations are listed below the slider. These are also free text boxes so the PAL and RMR can be added manually. Simply click on the RMR or PAL value to edit it.
Use the slider to specify your client’s macronutrient requirements. Your client’s energy target is static and will be split in the proportions you set here, for example 50% carbohydrate, 30% protein, 20% fat.
The macronutrient targets are also shown in gram weights and grams per kg body weight.
Click on the arrow to change the direction of the energy calculation. By default, the client’s estimated energy intake is split into the macronutrient proportions e.g. if your client’s energy requirement is 2000kcal and the slider is set to 50% energy from carbohydrate, your client will have a target of ~1000kcal from carbohydrate.
Clicking on the arrow reverses the calculation and your client’s energy requirement is calculated from the macronutrient targets.
Example: Setting a target of 249g carbohydrate, 124g protein and 123g fat would give an EER of 2599Kcal (worked out below)
249g CHO x 4kcal/g = 996 kcal
124g Protein x 4kcal/g = 496 kcal
123g fat x 9kcal/g = 1107 kcal
This give a total EER of 2599 Kcal
Click on ‘extended nutrients’ to edit additional nutrient targets such as your client’s micronutrient targets. Type a value directly into the boxes or use the plus and minus icons to increase/decrease the existing values.
Grouping clients
A client can be sorted into groups under the 'Grouping' heading for easy retrieval, sorting and batch analysis later.
Click the ‘Add Group’ button and type the desired group name in the pop-up box.
Clients can be added to multiple groups. Click on a group name to add the client to that group. Filter your client groups using the small icon at the top of the client list.
Right-click on a group to rename it or move it from your account altogether.
Sharing
Share your client with other Nutritics users or groups by clicking ‘Add user’.
Type in the username or email address of any Nutritics user or select a user from your organisation and click okay to share the client with that user.
Click on a user’s name to change their level of shared access.
- The eye icon means that user has viewing access only
- The pencil icon means they can edit the client
- The slashed white circle means that the user does not have access to the client profile.
Contact details
Type your client’s contact details into the free text boxes. Add your client’s email address to invite them to log their diet and exercise on the mobile app
Libro.
Dietary preferences
Click on the icons to set your client’s dietary preferences and allergies.
When entering a diet log or creating a meal plan, foods that are incompatible with your client’s allergies will be flagged with an orange exclamation mark.
Notes
This is a free text box where you can write notes as needed.
Client preview
Click 'done' or on the X icon in the top right corner of the screen to minimise the detailed client panel.
Here you can see a summary of your client’s details (click on the the 'edit profile' button to make changes) and from this panel you can invite the client to download the mobile app Libro.
Libro allows your clients to log their diet and exercise on their phone. Diet logs can then be imported instantly into Nutritics for analyses and feedback. Users on premium plans can also send nutrition and exercise programs to their clients via Libro.
Once your client is set up on Libro, you will be able to see their log in activity from the client preview panel.
Client records
Create or access diet logs, meal plans and programs for your client from the next panel.
WATCH THE VIDEO:
https://www.youtube.com/embed/orzWOAxXcm8
After you log in, click the plus button in panel 1 to set up a new client, or alternatively, click button in panel 1 to set up a new client, or alternatively, click and press ‘New Client’. A sub panel will then expand so you can input the client’s personal details, activity level, contact details and any other notes about your client. Fill in any details you wish to save. Weight and height related fields may be entered in any format by simply typing your preferred units in the box, if no unit of measure is typed then the default units are used for your region (meters and kg on metric setting, ft and lbs on imperial setting). The imperial / metric setting may be changed from Menu>Settings>Preferences.
Multiple clients can be set up at once using the batch import tool. Click  , then Import/Export and select the 'Clients's' option to download the batch import spreadsheet for completion. Once completed, upload the spreadsheet and client list will be updated.
Grouping Clients:
A client can be sorted into groups for easy retrieval, sorting and batch analysis later. Click the  button in client panel 2, below the client’s biometric details, then type the desired group name in the pop up box. Client’s can be added to multiple groups. Filter your client groups using the small icon
  at the top of the client list (panel 1).Selecting a group will filter clients by that group. Right click on a group to rename it or move it from your account altogether.
WATCH THE VIDEO:
https://www.youtube.com/embed/rBCoRSXg_bM
Pro Tip: You can generate a professional food & exercise diary from within the software to print or email to your client. Navigate to Menu > Output tools and click the ‘Generate’ tab to access the forms. Enter the number of days you require in the box in panel 3 then click the go button.
To create a diet or exercise log,
create or set up a new client, then in the panel that opens, click the + button under the 'Logs' heading. When you click 'Start from Scratch' this will take you to the log entry screen below:
1. Title your log
2. Choose the log type, either meal by meal, or day by day logging
3. Click a meal collector*– Breakfast, Lunch, Dinner or Snack, that you wish to log first
4. Search for foods and recipes in the food search box at the top left of the screen (hotkey F3)
5. Click a food from the results to review it before entering it to your log
6. If satisfied with the selection, add it to your log by clicking the blue 'Insert' button, or drag it to your desired meal
7. Clicking the white cell will open a popup box with built in portion size suggestions to choose from, you can also type any quantity in this box in grams
8. The diary is set up like an excel spreadsheet, so you can add a food to multiple days or meals by clicking the corresponding cell row, without having to search for the item each time
9. Repeat steps 3-6 until all foods have been added
10. Toggle between a food log and an exercise log using the 'food' and 'activity' buttons at the top of the log.
Please note that the Activity Log tab is not enabled on all account types, but you may add it on from Menu>Upgrade/Downgrade.
*Collectors are meal name slots – Enable more meal slots from Menu > Settings > preferences
Pro Tip: Flexible data points known as 'custom fields'can be tagged to diet log data. Examples of custom field data, includes meal time, location, mood, food cost, brand information or custom nutrient parameters. Please see the section on the 'Research Edition' for more information on how to set up and use custom fields.
Clients, recipes, and foods can be shared with other Nutritics users. Look for the sharing and collaborators feature, located both on your foods and recipe workspaces
and in the client panel.
Click '+add user' and type in the username or email address of another Nutritics user to enable sharing with that user.
If your licences are part of an organisation or group, you will see all users of the organisation when you click ‘+add user’.
You can also choose to share with all account holders within the organisation by clicking on the name of the organisation instead of adding individual users.
You will have the option to share with read only (1) or read and write privileges (2), or revoke access (3) after adding a collaborator.
To share multiple recipes, foods or clients at once, click the icon shown on the right of the collaborators screen to access the bulk share tool:
Choose the account you'd like to share with from the drop down at the top, then click the items or the checkboxes in the list to share:
To remove a collaborator, right click on the username and select 'delete'.
Items that are shared with you have an inbound arrow and a yellow bar within the record / workspace will be shown
Items that you are sharing with other users are indicated with an outbound arrow
Master Sharing Functionality
If you have purchased a licence set with master sharing functionality you have the option of sharing particular data with your site accounts.
You can choose to share your custom codes, custom fields, food costs or label templates to your site licences automatically. For example, if you wanted to share recipes with your site licences, but not costs attached to the recipes you can disable this setting.
Upload your clients to Nutritics in bulk using the batch import tool (please note this is a premium feature).
- Go to the start menu in the top left corner of the screen.
- Click 'batch jobs'
- Click on the 'batch import' tab at the top of the screen
- Download the clients import template
- Fill in the template. Note, to update existing clients add their client ID into the 'system ID' column. To see a client ID, hover over the client's name in your list of clients.
Alternatively, batch export your client list in the 'batch export' tab. The 'id' colum contains your clients' system IDs and these can be copied and pasted into the import template. - Go back to batch jobs and upload the file
Nutritics is suitable for calculating Energy Requirements for all age ranges. An individual’s Estimated Energy Requirements (EER) (also referred to as Total Daily Energy Requirements (TDEE)), can be calculated in Nutritics. An individual’s energy requirements may be calculated independently of their other nutrition requirements. There are a number of methods available to calculate energy requirements, which may be selected from the 'EER source' drop down menus within Nutritics:
1. Estimated Average Requirement (EAR) – Uses a target based on population average energy requirements based on age and gender (e.g. from the SACN guidelines in the UK). The EER target will not be customised to your client’s specific activity level, weight, or height. Use this option if you do not have weight and height information available for your client, or if you wish to compare intakes to demographic averages, which are typically used for population based research studies.
2. Formula with Physical Activity Level (PAL) – This option uses a predictive equation to first calculate RMR/BMR, and then applies a multiplication factor (PAL) to the RMR/BMR figure based on the occupational and exercise activity level selectors in the Client Profile section (panel 2). This option more specific to your client's individual energy requirements and more appropriate when working with individuals.
3. Formula with PAL and Exercise Associated Thermogenesis (EAT) – Similar to option 2 but also adds any exercise activities included in the activity log. PAL should generally be set to 1.2-1.4 manually if using this method, to account for Non Exercise Activity Thermogenesis (NEAT) and Dietary Induced Thermogenesis (DIT).
4. Formula with EAT, NEAT and DIT – Arguably the most accurate method, but requires a detailed and accurate food and 24hr activity log (to include sleeping, sitting, activities, exercise). Similar to options 2 and 3, this method uses a BMR/RMR formula, but also includes the sum of all energy expended through daily activities (NEAT) and exercise (EAT), plus the energy expenditure associated with the processes of digestion (calculated from food diary). These additional factors are normally estimated by means of the PAL multiplier, so with option 4, the PAL multiplier should not be used and PAL will be disabled automatically.
If your client is <12 months old, pregnant or lactating, the Energy Calculation formula will default to the Estimated Average Requirement from the Dietary Reference Values selected. rather than using a predictive equation.
RMR/BMR formula:
Energy requirements are estimated using an established metabolic rate formula and a Physical Activity Level (PAL) multiplier. Choose the RMR formula most appropriate to your client (or your preferred formula), in the drop down box. Note that each formula requires specific details about your client.
The following require gender, height, DOB and weight:
The below require body fat percentage and weight:
Katch McArdle 1996
Cunningham 1980
Body composition should be calculated elsewhere (from skin folds, bioimpedence, bodpod, DEXA or ultrasound methods) and the final body fat percent should be entered into this field.
It is possible to override the RMR/BMR formula and directly enter a value, if you have assessed this by other means. Simply enter the value (kcals) in the RMR box in the client profile after clicking 'Customise'. You can see a guide on creating custom targets here.
PAL
Multiplier
The ‘occupational’ and ‘exercise activity level’ drop down boxes will help you estimate your clients Physical Activity Level (PAL) multiplication factor. This is applied as a multiple to the RMR/BMR figure to calculate energy requirements. Simply choose the most appropriate activity factors from the drop down lists. You can override this multiplier if you wish by entering a PAL value in the client set up panel after clicking 'Customise'. You can see a guide on creating custom targets here also.
Athlete Type Adjustment:
Nutritics will adjust report nutrient targets based on the athletic factor selected. These guidelines are applied from current sports nutrition recommendations (see the section on Dietary Reference Values (DRV's)). Your client must be aged 18-55 years and ‘Nutritics’ must be selected as the Dietary Reference Value source to enable this feature (Nutritics is the default DRV source).
Estimated Energy Requirement Adjustment:
This field enables an adjustment to the final EER target to allow for any weight modification goal. Simply use the plus or minus buttons to add/subtract 100 kcals per click, or type directly into the box. Nutritics provides a crude calculation of the estimated weight change this modification will induce. This adjustment applies regardless of which method of calculating EER is used.
The calorie adjustment can be split between energy intake (diet) and energy expenditure (exercise) accordingly using the EER Adjustment balance.
Pregnancy/Lactating Adjustment
This modifier appears as an option if your client’s gender is set to Female. The EER and target intakes for certain nutrients often vary throughout stages of pregnancy or lactation. This adjustment applies regardless of which method of calculating EER is used (see above), but will be dependent on the individual Dietary Reference Value you have selected on the report analysis screen (Selecting the SACN DRV will apply UK adjustments as per the guideline, and the OIM DRV will apply US adjustments).
Infant Feed Type Adjustment:
This modifier appears as an option if your clients D.O.B entered is within the last 12 months. If this option is active, the energy calculation formula will automatically be set to ‘Use Dietary Reference Values for Energy’, rather than using a predictive formula based on weight and height. Note that modifiers for feed type are currently only applicable to the UK SACN 2015 / COMA and Nutritics Dietary Reference Values.
Nutritics is suitable for calculating Energy Requirements for all age ranges. An individual’s Estimated Energy Requirements (EER) (also referred to as Total Daily Energy Requirements (TDEE)), can be calculated in Nutritics. An individual’s energy requirements may be calculated independently of their other nutrition requirements. There are a number of methods available to calculate energy requirements, which may be selected from the 'EER source' drop down menus within Nutritics:
1. Estimated Average Requirement (EAR) – Uses a target based on population average energy requirements based on age and gender (e.g. from the SACN guidelines in the UK). The EER target will not be customised to your client’s specific activity level, weight, or height. Use this option if you do not have weight and height information available for your client, or if you wish to compare intakes to demographic averages, which are typically used for population based research studies.
2. Formula with Physical Activity Level(PAL) – This option uses a predictive equation to first calculate RMR/BMR, and then applies a multiplication factor (PAL) to the RMR/BMR figure based on the occupational and exercise activity level selectors in the Client Profile section (panel 2). This option more specific to your client's individual energy requirements and more appropriate when working with individuals.
3. Formula with PAL and Exercise Associated Thermogenesis (EAT) – Similar to option 2 but also adds any exercise activities included in the activity log. PAL should generally be set to 1.2-1.4 manually if using this method, to account for Non Exercise Activity Thermogenesis (NEAT) and Dietary Induced Thermogenesis (DIT).
4. Formula with EAT, NEAT and DIT – Arguably the most accurate method, but requires a detailed and accurate food and 24hr activity log (to include sleeping, sitting, activities, exercise). Similar to options 2 and 3, this method uses a BMR/RMR formula, but also includes the sum of all energy expended through daily activities (NEAT) and exercise (EAT), plus the energy expenditure associated with the processes of digestion (calculated from food diary). These additional factors are normally estimated by means of the PAL multiplier, so with option 4, the PAL multiplier should not be used and PAL will be disabled automatically.
If your client is <12 months old, pregnant or lactating, the Energy Calculation formula will default to the Estimated Average Requirement from the Dietary Reference Values selected. rather than using a predictive equation.
RMR/BMR formula:
Energy requirements are estimated using an established metabolic rate formula and a Physical Activity Level (PAL) multiplier. Choose the RMR formula most appropriate to your client (or your preferred formula), in the 
drop down box. Note that each formula requires specific details about your client:
The following require gender, height, DOB and weight:
Require body fat percentage and weight:
Katch McArdle 1996
Cunningham 1980
Body composition should be calculated elsewhere (from skin folds, bioimpedence, bodpod, DEXA or ultrasound methods) and the final body fat percent should be entered into this field.
It is possible to override the RMR/BMR formula and directly enter a value, if you have assessed this by other means. Simply enter the value (kcals) in the RMR box at the top of panel 3  and press enter. Clicking the blue arrow
  will recalculate RMR based on the client details and formula selected.
PAL
Multiplier
The ‘occupational’ and ‘exercise activity level’ drop down boxes will help you estimate your clients Physical Activity Level (PAL) multiplication factor. This is applied as a multiple to the RMR/BMR figure to calculate energy requirements. Simply choose the most appropriate activity factors from the drop down lists. You can override this multiplier if you wish by entering a PAL value in the  box at the top of panel 3 and pressing the enter key. Clicking the blue arrow will recalculate PAL based on the activity levels selected.
Athlete Type Adjustment:
Nutritics will adjust report nutrient targets based on the athletic factor selected. These guidelines are applied from current sports nutrition recommendations (see the section on Dietary Reference Values (DRV's)). Your client must be aged 18-55 years and ‘Nutritics’ must be selected as the Dietary Reference Value source to enable this feature (Nutritics is the default DRV source).
Estimated Energy Requirement Adjustment:
This field enables an adjustment to the final EER target to allow for any weight modification goal. Simply use the plus or minus buttons to add/subtract 100 kcals per click, or type directly into the box. Nutritics provides a crude calculation of the estimated weight change this modification will induce. This adjustment applies regardless of which method of calculating EER is used.
The calorie adjustment can be split between energy intake and energy expenditure accordingly using the EER Adjustment balance.
Pregnancy/Lactating Adjustment
This modifier appears as an option if your client’s gender is set to Female. The EER and target intakes for certain nutrients often vary throughout stages of pregnancy or lactation. This adjustment applies regardless of which method of calculating EER is used (see above), but will be dependent on the individual Dietary Reference Value you have selected on the report analysis screen (Selecting the SACN DRV will apply UK adjustments as per the guideline, and the OIM DRV will apply US adjustments).
Infant Feed Type Adjustment:
This modifier appears as an option if your clients D.O.B entered is within the last 12 months. If this option is active, the energy calculation formula will automatically be set to ‘Use Dietary Reference Values for Energy’, rather than using a predictive formula based on weight and height. Note that modifiers for feed type are currently only applicable to the UK SACN 2015 / COMA and Nutritics Dietary Reference Values.
'Dietary reference values' (DRV) are the umbrella term for a range of nutrient values that apply to a population or group, and typically consist of numerous components:
A Lower Reference Nutrient Intake (LRNI): Meets the nutritional requirements of only 2.5% of the population.
An Estimated Average Requirement (EAR): The average amount of nutrient or energy required. Approximately 50% of the population will require more and 50% will require less.
A Reference Nutrient Intake (RNI): The amount of a nutrient sufficient to meet the needs of 97.5% of a population (calculated from the EAR + 2 SD)
Safe Intake (SI): Used in place of RNI when there is insufficient data available to set an RNI. A safe intake is likely to meet the needs of the majority of the population without causing any adverse effects of excess intake.
Safe Upper Limit (SUL): The maximum amount of a nutrient known to be safe to intake. Habitually consuming nutrients above the SUL is not recommended and can cause toxic effects in some cases.
Source: Food and Agriculture Organisation of the United Nations
Note: DRV’s are also known as NRV’s (Nutrient Reference Values – Aus/NZ) and DRI’s (Dietary Reference Intakes – USA). RNI’s are also known as RDI’s (Recommended Dietary Intakes) or RDA’s (Recommended Dietary Allowance). SI is also known as AI (Adequate Intakes). SUL’s are also known as UL (Tolerable Upper Intake Level)…just to keep it simple!
It is important to recognize that all these values apply to populations, and not to individuals. However, a number of assumptions can be made when using DRV’s with individuals:
1. If an individual is routinely consuming the RNI for a particular nutrient, it can be assumed that their diet provides adequate amounts (or more than adequate amounts) of that nutrient.
2. If an individual is consuming less than the RNI, it cannot necessarily be assumed that the diet is inadequate, as the person may have a lower requirement than average for that particular nutrient.
3. If an individual is consistently consuming less than the LRNI for a nutrient, it can be assumed that the person is deficient in that particular nutrient, although this does not imply the person is clinically ill.
4.The DRV’s will apply to the needs of healthy people and it cannot be assumed that the needs of those who are ill or extremely active are identical.
Choose which Dietary Reference Values you wish to use from the ‘DRV source’ drop down when setting up your client. The target intakes and ranges for nutrients on the report will be based on this selection. There are numerous options from International sources built in to Nutritics. You can also set your own targets using the DRV editor (see custom DRV section).
Built-in DRV’s in Nutritics include:
UK/SACN 2015: The Committee on Nutrition Aspects of Food and Nutrition Policy (COMA) with latest updates from the Scientific Advisory Committee
EFSA 2017: European Food Safety Authority Guidelines
EU/Nordic: The Nordic Nutrition Register (NNR)
USA: The Food Nutrition Board from the Institute of Medicine (IOM)
NZ/AUS: The National Health and Medical Research Council (NHMRC)
EU: The EU Reference Intakes used in Food Labelling
FDA: The US Daily Values for labelling in the US and surrounding territories
A Nutritics recommendation which combines macronutrient guidelines from American College of Sports Medicine (ACSM) with suggested dietary micronutrient targets for reducing the risk of developing chronic disease from the NHMRC. The Nutritics recommendations also show lower intake limits from the NNR and upper intake limits from the highest value deemed safe from the above authorities.
The Food Safety Authority of Ireland (FSAI) 1999 guidelines have been deprecated in Nutritics 5.0 as of November 2017.
WATCH THE VIDEO:
https://www.youtube.com/embed/1398iohHDQ0
Nutritics meal plan creator enables the creation of custom eating plans to suit your client’s health or performance based goals.
Please note that you can currently only create a single day meal plan in Nutritics. To create a multiday meal plan, you must create these as separate days.
To create a meal plan, select a client (or set up a new client) and click the plus button on the meal plan panel.
Alternatively, go to the start menu and click 'new meal plan'.
You can also create a new meal plan from the 'My Meal Plans' section of the Nutritics explorer (1). Click on a meal plan group to open it (2) and then click on 'new meal plan' (3).
Meal Plans can be created from scratch, or you can reuse a previously created meal plan and attach it to a new client. Select the preferred option, and the meal plan creator screen will open. Give the meal plan a title and date.
Adding foods and recipes:
To begin creating the meal plan, search for a food in the food search box at the top left of the screen. Click on the food once to see more information on it and click insert to add it to the meal plan.
Foods and recipes can also be dragged and dropped onto the meal plan workspace.
Enter a quantity for each food in the 'Quantity' column. Select from predefined portions (available for most foods) or manually enter a quantity in the manual entry field.
You can also change the food and the description to more ‘client friendly’ names by clicking on the text and typing new names.
Give the meal a name in the text box above the food names.
To add a new meal to the meal plan, click the '+Add meal' button and give the meal a title.
If you click on a meal title, it will change to a bold, blue font indicating that that meal has been selected. Any foods added to the meal plan now will be added under that meal heading.
Foods and recipes can easily be rearranged in the meal plan by dragging and dropping them from one meal to another.
Continue adding meals and foods until you are satisfied with the meal plan.
As you work, you will see nutrient totals for both the meals and the overall meal plan compared with the client's targets.
You can choose the nutrients on display by clicking 'choose monitors' at the top of the workspace. We recommend ticking a maximum of 5 monitors as the max number that fit on an A4 sheet.
Adding recipes to a meal plan
Previously created recipes can also be used in a meal plan. Simply search for the recipe in the search bar and look for the icon indicating a recipe - use the ‘My foods & recipes’ tab to filters the search results to only display items you have created:
You can also browse recipes in the ‘My Recipes’ tab or filter your recipe list in groups from the small arrow beside the ‘My Recipes’ tab:
After clicking the ‘insert’ button on a recipe, you will be asked if you want to import all ingredients from the recipe. Selecting no will import the recipe name only (as a single row on the meal plan) with the nutrient totals. Selecting yes will import all the ingredients with their individual nutrient breakdown.
Once a recipe has been added to a meal plan you can specify how many servings of the recipe you want to be included in the meal plan.
You can also choose to include any cooking instructions that have been added on the recipe level in your meal plan reports.
Syncing recipes in a meal plan:
When you add a recipe to a meal plan, it’s like taking a snapshot of that recipe. If you make changes to a recipe and would like these changes to be reflected in a meal plan, click on the sync button to the right of the recipe name.
The sync button will pull through the latest version of that recipe to your meal plan.
If you do not sync a recipe in a meal plan, it will remain unchanged. This means that one recipe can be tweaked and reused multiple times based on your client's requirements.
Why not check out our guides on nutrient monitors and rearranging foods and meals in a meal plan next?
Nutrient intake in excess of the RNI’s may reduce the risk of developing chronic diseases. Specifically, a higher intake of Vitamin C, E, A (particularly β-carotene), selenium, folate, omega 3 and dietary fibre may be benficial. The Australian & New Zealand National Health and Medical Research Council have published a second set of guidelines known as "Suggested Dietary Targets (SDT's) to optimise dietary intake for reducing the risk of chronic disease”. These SDT’s have been incorporated into the Nutritics DRV source only. Where no target intake has been set by in the SDT’s, the highest RNI has been taken from all International sources combined. Furthermore, the highest safe upper intake and the highest LRNI from all International sources has been set as upper and lower RNI’s on the Nutritics source.
The macronutrient recommendations provided in the Nutritics option are adopted from International Sports Nutrition guidelines, including the American College of Sports Medicine and American Dietetics Associations position stand on Nutrition and Athletic Performance, ISSN and Australian Institute of Sport:
These are provided as guidelines only; exact requirements will vary from person to person depending on factors such as training intensity, training duration, available recovery time, and fitness status.
The guidelines for pregnancy come from the UK Scientific Advisory Committee on Nutrition (SACN) and the National Health and Medical Research Council (NHMRC) in Australia.
Nutritics allows you to set custom nutrition targets for your clients. This ‘power
feature’ allows you to set nutrient targets as precise intakes, as calculations
based on body weight (or other formula based targets) or as an acceptable
distribution range. You can also define lower and upper limits for any
nutrient.
There are 2 ways to edit your clients' nutrition targets in Nutritics.
Short method
Please note this is only available to users with the custom DRV feature.
Open up a client profile and select the source of the client’s nutrition targets and the desired energy calculation formula under the nutrition requirements section.
Click on the customise button to edit the nutrition targets for your client or make a new template.
Clicking 'for this client' will open a new tab under the nutrition requirements heading. Right click to rename the tab.
Use the plus and minus buttons to add or subtract 100kcal per click to your clients’ energy target in line with their body weight goals. Use the slider to specify the split between exercise and diet.
The energy calculations are listed below the slider. These are also free text boxes so the PAL and RMR can be added manually.
Use the slider to specify the client’s macronutrient requirements. The blue portion of the slider is the client’s carbohydrate requirements, their protein in grey and fat is in orange.
The macronutrient targets are shown as a percentage of your client's energy target and also in total grams per day and grams per kg body weight.
Click on the arrow to change the direction of the energy calculation. By default, the client’s estimated energy intake is split into the macronutrient proportions.
Clicking on the arrow reverses the calculation and your client’s energy requirement is calculated from the macronutrient targets in grams/grams per kg body weight.
Example: Setting a target of 249g carbohydrate, 124g protein and 123g fat would give an EER of 2599Kcal (worked out below)
249g CHO x 4kcal/g = 996 kcal
124g Protein x 4kcal/g = 496 kcal
123g fat x 9kcal/g = 1107 kcal
This give a total EER of 2599 Kcal
Click on extended nutrients to edit additional nutrient targets such as the client’s micronutrient targets. Use the plus and minus buttons to make adjustments or type directly into the boxes.
Once satisfied with the custom nutrition targets, these can be applied to other clients by right clicking on the custom DRV tab and selecting 'copy to' and then selecting the client you wish to attach the custom DRV to.
The DRV tab that is open in the client profile is the one that will be applied e.g. when analysing diet logs or creating meal plans for your client.
Extended method:
The DRV editor can be accessed from Menu>Settings>Preferences or by selecting ‘Custom DRV…’ from the DRV source drop down options (on the client set up, reports and meal plans)
This will open the following screen:
Creating a New Entry:
1. Click the Custom DRV button from the drop down in the client section
2. Name the DRV and provide a reference or author and description if desired.
3. Click the 'duplicate this DRV' button
4. Define the inclusion criteria that the DRV’s will apply to (gender, age range etc)
5. Define the DRV’s using the guide below
6. Changes are saved automatically
Editing an Existing Entry:
1. Select the DRV source you wish to edit from the drop down at the top left (The field “Nutritics” in the example above)
2. Click the 'Duplicate this DRV...' button
3. Rename the DRV, author, and description as desired.
4. Select the record you wish to edit from the drop down at the top right (The field “Select Record” in the example above”). This will import the existing values into the tables which can now be edited.
5. Changes are saved automatically
Type any figure in the box to set that figure as the Recommended Intake:
Add a ^ symbol (shift + 6) after the recommendation to include a lower limit.
Add a second ^ to include an upper limit:
Use a | symbol (shift + )to set a recommended intake range:
Advanced Programming:
Use basic calculator notation (addition +, multiplication *, subtraction -, division /) and nutrient keywords to program advanced formulae.
Acceptable keywords include weight, age, bodyfat, lbm (lean body mass), bmi, eer (recommended kcal intake) and pal. These are based on data from the client information panel (panels 2 and 3). Take note they are all lower case.
You can also use any nutrient in a formula by typing it in the box exactly as it appears in the DRV editor (all lower case).
Working Examples:
1. Carbohydrate
intake is 55% of kcal intake
EER is
estimated energy requirements, multiplication by .55 gives 55%. 3.75 is the
number of calories in one gram of carbohydrate, this converts the 55% of calories
into a weight in grams
2. Carbohydrate
intake is 55% of kcal intake with a lower limit of 100g
3. Carbohydrate intake is 55% of kcal intake with a lower limit of 100g and an upper limit of 75% of calorie intake
4. Protein
intake is 20% of kcal intake
4 is the
number of calories per gram of protein, this converts 20% of calories to grams.
5. Protein
intake is 1.2 times the client’s body weight
6. Protein
intake is a range from .8 -1.6 times the client’s body weight
7. Fat
intake is a range from 20-35% of kcal intake
9 is the
number of calories per gram of fat
8.
Fat intake is a range from 20-35% of kcal intake and an upper limit of 40% of
kcals.
9.
Folate intake is a range 300-600µg with a lower limit of 100 µg and an upper
limit of 1000 µg
10.
Vitamin D intake is 15µg with a lower limit of 5 µg
Please contact support@nutritics.com if you require assistance setting up
custom Dietary Reference Values.
To create a meal plan template click start < new meal plan.
Select a pre-existing meal plan or start from scratch. Selecting ‘start from scratch’ will open a blank meal plan template.
This is a master meal plan and is not attached to any clients. The meal plan can be attached to clients by clicking on the drop down menu at the top of the workspace. See below for more on attaching meal plans to client profiles.
Any changes to the master meal plan will be applied to any client copies of the meal plan. Changes to individual client copies of the meal plan will only apply to that client.
Build your meal plan (see
here for a guide on this). Once you are happy with your meal plan template, add it to a group for easy retrieval later.
To do this, click on the ‘meal plan’ folder in the Nutritics Content Explorer.
By default, all newly created meal plans are added to the ‘ungrouped’ meal plan group.
Click on the ‘ungrouped’ meal plan folder. Drag and drop the newly created meal plan into an existing group or create a new group.
Click on a meal plan group to see all meal plans within that group.
USING THE MEAL PLAN TEMPLATE
The meal plan can be attached to a client profile in a few ways.
1. When working on the master meal plan, the meal plan can be attached to clients by clicking on the dropdown menu and selecting 'add client'.
2. Alternatively, open a client profile and click on the plus button beside the meal plan heading.
Select ‘use existing’ from the options presented.
Select a meal plan from the meal plan groups and click 'attach'.
Click 'enable editing' to make an editable copy of the meal plan (any changes made will not affect the original meal plan, they will only be applied to the copy).
Nutrient intake in excess of the RNI’s may reduce the risk of developing chronic diseases. Specifically, a higher intake of Vitamin C, E, A (particularly β-carotene), selenium, folate, omega 3 and dietary fibre may be benficial. The Australian & New Zealand National Health and Medical Research Council have published a second set of guidelines known as "Suggested Dietary Targets (SDT's) to optimise dietary intake for reducing the risk of chronic disease”. These SDT’s have been incorporated into the Nutritics DRV source only. Where no target intake has been set by in the SDT’s, the highest RNI has been taken from all International sources combined. Furthermore, the highest safe upper intake and the highest LRNI from all International sources has been set as upper and lower RNI’s on the Nutritics source.
The macronutrient recommendations provided in the Nutritics option are adopted from International Sports Nutrition guidelines, including the American College of Sports Medicine and American Dietetics Associations position stand on Nutrition and Athletic Performance, ISSN and Australian Institute of Sport:
These are provided as guidelines only; exact requirements will vary from person to person depending on factors such as training intensity, training duration, available recovery time, and fitness status.
WATCH THE VIDEO:
https://www.youtube.com/embed/rBCoRSXg_bM
Pro Tip: You can generate a professional food & exercise diary from within the software to print or email to your client. Navigate to Menu > Output tools and click the ‘Generate’ tab to access the forms. Enter the number of days you require in the box in panel 3 then click the go button.
To create a diet or exercise log,
create or set up a new client, then in the panel that opens, click the + button under the 'Logs' heading. When you click 'Start from Scratch' this will take you to the log entry screen below:
1. Title your log
2. Choose the log type, either meal by meal, or day by day logging
3. Click a meal collector*– Breakfast, Lunch, Dinner or Snack, that you wish to log first
4. Search for foods and recipes in the food search box at the top left of the screen (hotkey F3)
5. Click a food from the results to review it before entering it to your log
6. If satisfied with the selection, add it to your log by clicking the blue 'Insert' button, or drag it to your desired meal
7. Clicking the white cell will open a popup box with built in portion size suggestions to choose from, you can also type any quantity in this box in grams
8. The diary is set up like an excel spreadsheet, so you can add a food to multiple days or meals by clicking the corresponding cell row, without having to search for the item each time
9. Repeat steps 3-6 until all foods have been added
10. Toggle between a food log and an exercise log using the 'food' and 'activity' buttons at the top of the log.
Please note that the Activity Log tab is not enabled on all account types, but you may add it on from Menu>Upgrade/Downgrade.
*Collectors are meal name slots – Enable more meal slots from Menu > Settings > preferences
Pro Tip: Flexible data points known as 'custom fields'can be tagged to diet log data. Examples of custom field data, includes meal time, location, mood, food cost, brand information or custom nutrient parameters. Please see the section on the 'Research Edition' for more information on how to set up and use custom fields.
You can generate a live link of any report from the 'export to' button, for email or sharing. Any changes made are reflected in the live link in real time without the need for re-sharing. Reports can also be exported to Microsoft excel (or other CSV editor), converted to a .pdf file or printed directly.
The settings toggle beside the export button enables you to customise a report, and save the layout and customisations as a templates for future use.
You can also choose from a number of Nutritics built templates for a simplified or more detailed report layout.
Nutritics generates client facing reports from a diet log. To generate a report, click the 'report' button at the top of the diet log screen.
By default, the report generated will be an average across the analysis period that was entered into the food log. You can customise the analysis period from the 'filter' button at the top toolbar of the report.
The top toolbar also allows modification of the report calculations which were originally set during client set-up. The two drop down menus, ‘EER source’ and ‘DRV source’ allow you to switch between different calculation formulae and nutrition reference values quickly.
Diet log reports are grouped into subsections under Energy, Macronutrients, Carbohydrate Components, Lipid Components, Minerals & Trace Elements, and Vitamins. Nutrient intake is represented by the black horizontal bars, while the target intake (Reference Nutrient Intake – RNI) is indicated by a blue line or a blue bar (if the recommendation is a range).
If a Lower Reference Nutrient Intake (LRNI) or Safe Upper Limit (SUL) are available, they are represented by the red bars at the lower and upper end of the bar (respectively). If the black bar is within this range, the nutrient name will appear in red font and flagged with a red arrow as shown on alcohol below.
Nutrient intake is also given in numeric form in the ‘Intake’ vertical column, while the recommended intake and limits are given in numeric form in the ‘RNI’ and ‘Limits’ columns. Hovering the mouse over the black bar will display the nutrient intake as a percentage of total of the recommended intake. You can print the percentages on the report in place of the limits by checking the option from Menu > Settings > Preferences.
Diet log reports are grouped into subsections under Energy, Macronutrients, Carbohydrate Components, Lipid Components, Minerals & Trace Elements, and Vitamins. Nutrient intake is represented by the black horizontal bars, while the target intake (Reference Nutrient Intake – RNI) is indicated by a blue line or a blue bar (if the recommendation is a range). If a Lower Reference Nutrient Intake (LRNI) Safe Upper Limit (SUL) are available, they are represented by the red bars at the lower and upper end of the bar (respectively). If the black bar is within this range, the nutrient name will appear in red font and flagged with a red arrow as shown on alcohol below.
Nutrient intake is also given in numeric form in the ‘Intake’ vertical column, while the recommended intake and limits are given in numeric form in the ‘RNI’ and ‘Limits’ columns. Hovering the mouse over the black bar will display the nutrient intake as a percentage of total of the recommended intake. You can print the percentages on the report in place of the limits by checking the option from Menu > Settings > Preferences.
You can toggle on and off a nutrient by simply clicking it. This will hide the nutrient so it will not be printed or generated in the final report.
This also works for groups of nutrients (e.g. you can toggle on/off all carbohydrate components by clicking the carbohydrate components heading).
You can add quick enhancements and provide additional information on diet log reports using the fly-out button at the end of the nutrient row.
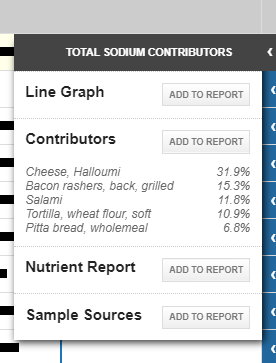
Line Graph:
Draws a simple line graph to illustrate intake over time:
If activities are logged then these are also plotted on the graph:
Contributors:
Adds a ranked breakdown of the contributing foods to a particular nutrient:
Sample Sources:
Adds a list of the top 10-12 food sources for a particular nutrient, with serving size gram weight and ‘friendly’ measure.

Nutrient Report:
Adds background information about the nutrient. Text reports are sensitive to nutrient intake in relation to recommended intake. The text report also gives details of the implications of inadequate/excess intake and provides a list of foods which are rich sources of that particular nutrient. Text reports may be switched off upon request (eg. University student licences):
References
- FSAI, 2019. The Safety of Vitamins and Minerals in Food Supplements – Establishing Tolerable Upper Intake Levels and a Risk Assessment Approach for Products Marketed in Ireland (Revision 1). Accessed online via: https://www.fsai.ie/publications/VitaminsandMineralsinFoodSupplements/
- IOM, 2006. Dietary Reference Intakes, The Essential Guide to Nutrient Requirements. Accessed online via: https://www.nal.usda.gov/sites/default/files/fnic_uploads/DRIEssentialGuideNutReq.pdf
- EFSA, 2006. Tolerable upper intake levels for vitamins and minerals. Accessed online via: http://www.efsa.europa.eu/sites/default/files/efsa_rep/blobserver_assets/ndatolerableuil.pdf
- FSAI, 2011. Scientific Recommendations for Healthy Eating Guidelines in Ireland. Accessed online via: FSAI_Healthy_Eating_Guidelines_Report_2011.pdf
- National Institute of Health (NIH), 2019. Vitamin A Fact Sheet for Health Professionals. Accessed online via: https://ods.od.nih.gov/factsheets/VitaminA-HealthProfessional/
- SACN, 2018. Draft report: Saturated fats and health. Accessed online via: https://assets.publishing.service.gov.uk/government/uploads/system/uploads/attachment_data/file/704522/Draft_report_-_SACN_Saturated_Fats_and_Health.pdf
- SACN 2015. Carbohydrates and Health. Accessed online via: https://assets.publishing.service.gov.uk/government/uploads/system/uploads/attachment_data/file/445503/SACN_Carbohydrates_and_Health.pdf
- Augustin L.S. et al,. Glycemic index, glycemic load and glycemic response: An International Scientific Consensus Summit from the International Carbohydrate Quality Consortium (ICQC). Nutr Metab Cardiovasc Dis. 2015; 25(9):795-815.
- Estruch R, et al, 2013. Primary Prevention of Cardiovascular Disease with a Mediterranean Diet. N Engl J Med 2013; 368:1279-1290. Accessed online via: https://www.ncbi.nlm.nih.gov/pmc/articles/PMC3999603/
- Bier Dennis M. et al. Nutrition for the primary care provider. Karger 2015. Accessed online via: https://www.karger.com/Article/Pdf/362287 Nutrition for the Primary Care Provider
- FSAI, 2016.Update Report on Folic Acid and the Prevention of Birth Defects in Ireland.
- WHO, 2004. Vitamin and mineral requirements in human nutrition. Second Edition. ISBN 92 4 154612 3.
- Nutrition Advisory Group, 1995. Recommendations for a food and nutrition policy for Ireland. Lenus report. Accessed online via: https://www.lenus.ie/bitstream/handle/10147/45661/8545.pdf?sequence=1
- Gibney M, et al, 2009. Introduction to Human Nutrition; Digestion & Metabolism of Carbohydrates, p74-75.
- NHS, 2018. Risks of Alcohol Misuse. Accessed online via: https://www.nhs.uk/conditions/alcohol-misuse/risks/
- https://www.ncbi.nlm.nih.gov/pmc/articles/PMC3999603/
- EFSA DRV for nutrient summary report 2017 Accessed online via: https://www.efsa.europa.eu/sites/default/files/2017_09_DRVs_summary_report.pdf
- EFSA Scientific Opinion on Dietary Reference Values for fats, including saturated fatty acids, polyunsaturated fatty acids, monounsaturated fatty acids, trans fatty acids, and cholesterol (2010). Accessed online via: https://efsa.onlinelibrary.wiley.com/doi/epdf/10.2903/j.efsa.2010.1461
- COMA (1991) Dietary Reference Values for Food Energy and Nutrients for the United Kingdom. London: HMSO. Accessed online via: https://assets.publishing.service.gov.uk/government/uploads/system/uploads/attachment_data/file/743790/Dietary_Reference_Values_-_A_Guide__1991_.pdf
- WHO Sugars intake for adults and children. Guideline. Accessed online via: https://apps.who.int/iris/bitstream/handle/10665/149782/9789241549028_eng.pdf;jsessionid=4EE2D8557918853652C49FDE9CFCADE7?sequence=1
- Santesso N et al, Eur. J. Clin. Nutr., 2012, 66 , 780 —788 Accessed online via: https://www.ncbi.nlm.nih.gov/pmc/articles/PMC3392894/
- Guoyao Wu, Dietary protein intake and human health. Foof Funct. 2016 7(3): 1251-1265.
- EU Science Hub, Health Promotion and Disease Prevention: Dietary Fibre, 2019. Accessed online via: https://ec.europa.eu/jrc/en/health-knowledge-gateway/promotion-prevention/nutrition/fibre
- HSE Training Programme for Public Health Nurses and Doctors in Child Health Screening, Surveillance and Health Promotion Unit 7 Food & Nutrition March 2006 Accessed online via: https://www.hse.ie/eng/services/publications/children/unit-7-food-and-nutrition.pdf
- Stanley M, et al , 1998. Introduction to the chemistry, ioslation, biosynthesis of methylxanthines. Accessed online via: https://books.google.co.uk/books?hl=en
You can add quick enhancements and provide additional information on diet log reports using the fly-out button at the end of the nutrient row.
Line Graph:
Draws a simple line graph to illustrate intake over time:
If activities are logged then these are also plotted on the graph:
Contributors:
Adds a ranked breakdown of the contributing foods to a particular nutrient:
Sample Sources:
Adds a list of the top 10-12 food sources for a particular nutrient, with serving size gram weight and ‘friendly’ measure.
Nutrient Report:
Adds background information about the nutrient. Text reports are sensitive to nutrient intake in relation to recommended intake. The text report also gives details of the implications of inadequate/excess intake and provides a list of foods which are rich sources of that particular nutrient. Text reports may be switched off upon request (eg. University student licences):
Text Report References
- FSAI, 2019. The Safety of Vitamins and Minerals in Food Supplements – Establishing Tolerable Upper Intake Levels and a Risk Assessment Approach for Products Marketed in Ireland (Revision 1). Accessed online via: https://www.fsai.ie/publications/VitaminsandMineralsinFoodSupplements/
- IOM, 2006. Dietary Reference Intakes, The Essential Guide to Nutrient Requirements. Accessed online via: https://www.nal.usda.gov/sites/default/files/fnic_uploads/DRIEssentialGuideNutReq.pdf
- EFSA, 2006. Tolerable upper intake levels for vitamins and minerals. Accessed online via: http://www.efsa.europa.eu/sites/default/files/efsa_rep/blobserver_assets/ndatolerableuil.pdf
- FSAI, 2011. Scientific Recommendations for Healthy Eating Guidelines in Ireland. Accessed online via: FSAI_Healthy_Eating_Guidelines_Report_2011.pdf
- National Institute of Health (NIH), 2019. Vitamin A Fact Sheet for Health Professionals. Accessed online via: https://ods.od.nih.gov/factsheets/VitaminA-HealthProfessional/
- SACN, 2018. Draft report: Saturated fats and health. Accessed online via: https://assets.publishing.service.gov.uk/government/uploads/system/uploads/attachment_data/file/704522/Draft_report_-_SACN_Saturated_Fats_and_Health.pdf
- SACN 2015. Carbohydrates and Health. Accessed online via: https://assets.publishing.service.gov.uk/government/uploads/system/uploads/attachment_data/file/445503/SACN_Carbohydrates_and_Health.pdf
- Augustin L.S. et al,. Glycemic index, glycemic load and glycemic response: An International Scientific Consensus Summit from the International Carbohydrate Quality Consortium (ICQC). Nutr Metab Cardiovasc Dis. 2015; 25(9):795-815.
- Estruch R, et al, 2013. Primary Prevention of Cardiovascular Disease with a Mediterranean Diet. N Engl J Med 2013; 368:1279-1290. Accessed online via: https://www.ncbi.nlm.nih.gov/pubmed/23432189
- Bier Dennis M. et al. Nutrition for the primary care provider. Karger 2015. Accessed online via: https://www.karger.com/Article/Pdf/362287 Nutrition for the Primary Care Provider
- FSAI, 2016.Update Report on Folic Acid and the Prevention of Birth Defects in Ireland.
- WHO, 2004. Vitamin and mineral requirements in human nutrition. Second Edition. ISBN 92 4 154612 3.
- Nutrition Advisory Group, 1995. Recommendations for a food and nutrition policy for Ireland. Lenus report. Accessed online via: https://www.lenus.ie/bitstream/handle/10147/45661/8545.pdf?sequence=1
- Gibney M, et al, 2009. Introduction to Human Nutrition; Digestion & Metabolism of Carbohydrates, p74-75.
- NHS, 2018. Risks of Alcohol Misuse. Accessed online via: https://www.nhs.uk/conditions/alcohol-misuse/risks/
- https://www.ncbi.nlm.nih.gov/pmc/articles/PMC3999603/
- EFSA DRV for nutrient summary report 2017 Accessed online via: https://www.efsa.europa.eu/sites/default/files/2017_09_DRVs_summary_report.pdf
- EFSA Scientific Opinion on Dietary Reference Values for fats, including saturated fatty acids, polyunsaturated fatty acids, monounsaturated fatty acids, trans fatty acids, and cholesterol (2010). Accessed online via: https://efsa.onlinelibrary.wiley.com/doi/epdf/10.2903/j.efsa.2010.1461
- COMA (1991) Dietary Reference Values for Food Energy and Nutrients for the United Kingdom. London: HMSO. Accessed online via: https://assets.publishing.service.gov.uk/government/uploads/system/uploads/attachment_data/file/743790/Dietary_Reference_Values_-_A_Guide__1991_.pdf
- WHO Sugars intake for adults and children. Guideline. Accessed online via: https://apps.who.int/iris/bitstream/handle/10665/149782/9789241549028_eng.pdf;jsessionid=4EE2D8557918853652C49FDE9CFCADE7?sequence=1
- Santesso N et al, Eur. J. Clin. Nutr., 2012, 66 , 780 —788 Accessed online via: https://www.ncbi.nlm.nih.gov/pmc/articles/PMC3392894/
- Guoyao Wu, Dietary protein intake and human health. Foof Funct. 2016 7(3): 1251-1265.
- EU Science Hub, Health Promotion and Disease Prevention: Dietary Fibre, 2019. Accessed online via: https://ec.europa.eu/jrc/en/health-knowledge-gateway/promotion-prevention/nutrition/fibre
- HSE Training Programme for Public Health Nurses and Doctors in Child Health Screening, Surveillance and Health Promotion Unit 7 Food & Nutrition March 2006 Accessed online via: https://www.hse.ie/eng/services/publications/children/unit-7-food-and-nutrition.pdf
- Stanley M, et al , 1998. Introduction to the chemistry, ioslation, biosynthesis of methylxanthines. Accessed online via: https://books.google.co.uk/books?hl=en
Diet log reports can be printed or shared from the 'export to' button at the top right of the screen. Note that the share link is live, and any changes you make on the report will be reflected in real time, without the need to reshare or send an email again.
Sharing a Diet Log Report to Libro
If your client is set up on Libro, reports can be shared directly to their Libro app by clicking their name at the top right of the report screen.
The eye icon here means that the report is now shared in read only format.
Your client can see this in their 'Shared Reports' section in Libro by clicking on the menu icon and navigating to the 'Reports' section.
All diet logs that have been shared can be found in the 'Shared with Me' tab.
'Dietary reference values' (DRV) are the umbrella term for a range of nutrient values that apply to a population or group, and typically consist of numerous components:
A Lower Reference Nutrient Intake (LRNI): Meets the nutritional requirements of only 2.5% of the population.
An Estimated Average Requirement (EAR): The average amount of nutrient or energy required. Approximately 50% of the population will require more and 50% will require less.
A Reference Nutrient Intake (RNI): The amount of a nutrient sufficient to meet the needs of 97.5% of a population (calculated from the EAR + 2 SD)
Safe Intake (SI): Used in place of RNI when there is insufficient data available to set an RNI. A safe intake is likely to meet the needs of the majority of the population without causing any adverse effects of excess intake.
Safe Upper Limit (SUL): The maximum amount of a nutrient known to be safe to intake. Habitually consuming nutrients above the SUL is not recommended and can cause toxic effects in some cases.
Source: Food and Agriculture Organisation of the United Nations
Note: DRV’s are also known as NRV’s (Nutrient Reference Values – Aus/NZ) and DRI’s (Dietary Reference Intakes – USA). RNI’s are also known as RDI’s (Recommended Dietary Intakes) or RDA’s (Recommended Dietary Allowance). SI is also known as AI (Adequate Intakes). SUL’s are also known as UL (Tolerable Upper Intake Level)…just to keep it simple!
It is important to recognize that all these values apply to populations, and not to individuals. However, a number of assumptions can be made when using DRV’s with individuals:
1. If an individual is routinely consuming the RNI for a particular nutrient, it can be assumed that their diet provides adequate amounts (or more than adequate amounts) of that nutrient.
2. If an individual is consuming less than the RNI, it cannot necessarily be assumed that the diet is inadequate, as the person may have a lower requirement than average for that particular nutrient.
3. If an individual is consistently consuming less than the LRNI for a nutrient, it can be assumed that the person is deficient in that particular nutrient, although this does not imply the person is clinically ill.
4.The DRV’s will apply to the needs of healthy people and it cannot be assumed that the needs of those who are ill or extremely active are identical.
Choose which Dietary Reference Values you wish to use from the ‘DRV source’ drop down when setting up your client. The target intakes and ranges for nutrients on the report will be based on this selection. There are numerous options from International sources built in to Nutritics. You can also set your own targets using the DRV editor (see custom DRV section).
Built-in DRV’s in Nutritics include:
UK/SACN 2015: The Committee on Nutrition Aspects of Food and Nutrition Policy (COMA) with latest updates from the Scientific Advisory Committee
EFSA 2017: European Food Safety Authority Guidelines
EU/Nordic: The Nordic Nutrition Register (NNR)
USA: The Food Nutrition Board from the Institute of Medicine (IOM)
NZ/AUS: The National Health and Medical Research Council (NHMRC)
EU: The EU Reference Intakes used in Food Labelling
FDA: The US Daily Values for labelling in the US and surrounding territories
A Nutritics recommendation which combines macronutrient guidelines from American College of Sports Medicine (ACSM) with suggested dietary micronutrient targets for reducing the risk of developing chronic disease from the NHMRC. The Nutritics recommendations also show lower intake limits from the NNR and upper intake limits from the highest value deemed safe from the above authorities.
The Food Safety Authority of Ireland (FSAI) 1999 guidelines have been deprecated in Nutritics 5.0 as of November 2017.
Recipes are searchable foods like any other food in the database. Simply search for the recipe as you would normally when searching for a food and they will appear within the result listing. Your personally created recipes are marked with an 'R' icon in the search results. It may be useful to use the ‘My Foods & Recipes’ search filter after running a search, to filter the result list to a specific category.
You can also browse and add recipes from the 'My recipes' tab below the food search box.
Once you have found the recipe, click on it and press the insert button, the same way you enter foods to a log. You will be given the option to customize a recipe after it has been entered to a log, which applies to this instance of the recipe only. If you wish to edit the base recipe, you can right click on it from the log, or open the original recipe and make edits.
WATCH THE VIDEO:
https://www.youtube.com/embed/1398iohHDQ0
Nutritics meal plan creator enables the creation of custom eating plans to suit your client’s health or performance based goals.
Please note that you can currently only create a single day meal plan in Nutritics. To create a multiday meal plan, you must create these as separate days.
To create a meal plan, select a client (or set up a new client) and click the plus button on the meal plan panel.
Alternatively, go to the start menu and click 'new meal plan'.
You can also create a new meal plan from the 'My Meal Plans' section of the Nutritics explorer (1). Click on a meal plan group to open it (2) and then click on 'new meal plan' (3).
Meal Plans can be created from scratch, or you can reuse a previously created meal plan and attach it to a new client. Select the preferred option, and the meal plan creator screen will open. Give the meal plan a title and date.
Adding foods and recipes:
To begin creating the meal plan, search for a food in the food search box at the top left of the screen. Click on the food once to see more information on it and click insert to add it to the meal plan.
Foods and recipes can also be dragged and dropped onto the meal plan workspace.
Enter a quantity for each food in the 'Quantity' column. Select from predefined portions (available for most foods) or manually enter a quantity in the manual entry field.
You can also change the food and the description to more ‘client friendly’ names by clicking on the text and typing new names.
Give the meal a name in the text box above the food names.
To add a new meal to the meal plan, click the '+Add meal' button and give the meal a title.
If you click on a meal title, it will change to a bold, blue font indicating that that meal has been selected. Any foods added to the meal plan now will be added under that meal heading.
Foods and recipes can easily be rearranged in the meal plan by dragging and dropping them from one meal to another.
Continue adding meals and foods until you are satisfied with the meal plan.
As you work, you will see nutrient totals for both the meals and the overall meal plan compared with the client's targets.
You can choose the nutrients on display by clicking 'choose monitors' at the top of the workspace. We recommend ticking a maximum of 5 monitors as the max number that fit on an A4 sheet.
Adding recipes to a meal plan
Previously created recipes can also be used in a meal plan. Simply search for the recipe in the search bar and look for the icon indicating a recipe - use the ‘My foods & recipes’ tab to filters the search results to only display items you have created:
You can also browse recipes in the ‘My Recipes’ tab or filter your recipe list in groups from the small arrow beside the ‘My Recipes’ tab:
After clicking the ‘insert’ button on a recipe, you will be asked if you want to import all ingredients from the recipe. Selecting no will import the recipe name only (as a single row on the meal plan) with the nutrient totals. Selecting yes will import all the ingredients with their individual nutrient breakdown.
Once a recipe has been added to a meal plan you can specify how many servings of the recipe you want to be included in the meal plan.
You can also choose to include any cooking instructions that have been added on the recipe level in your meal plan reports.
Syncing recipes in a meal plan:
When you add a recipe to a meal plan, it’s like taking a snapshot of that recipe. If you make changes to a recipe and would like these changes to be reflected in a meal plan, click on the sync button to the right of the recipe name.
The sync button will pull through the latest version of that recipe to your meal plan.
If you do not sync a recipe in a meal plan, it will remain unchanged. This means that one recipe can be tweaked and reused multiple times based on your client's requirements.
Why not check out our guides on nutrient monitors and rearranging foods and meals in a meal plan next?
Nutrient intake in excess of the RNI’s may reduce the risk of developing chronic diseases. Specifically, a higher intake of Vitamin C, E, A (particularly β-carotene), selenium, folate, omega 3 and dietary fibre may be benficial. The Australian & New Zealand National Health and Medical Research Council have published a second set of guidelines known as "Suggested Dietary Targets (SDT's) to optimise dietary intake for reducing the risk of chronic disease”. These SDT’s have been incorporated into the Nutritics DRV source only. Where no target intake has been set by in the SDT’s, the highest RNI has been taken from all International sources combined. Furthermore, the highest safe upper intake and the highest LRNI from all International sources has been set as upper and lower RNI’s on the Nutritics source.
The macronutrient recommendations provided in the Nutritics option are adopted from International Sports Nutrition guidelines, including the American College of Sports Medicine and American Dietetics Associations position stand on Nutrition and Athletic Performance, ISSN and Australian Institute of Sport:
These are provided as guidelines only; exact requirements will vary from person to person depending on factors such as training intensity, training duration, available recovery time, and fitness status.
The guidelines for pregnancy come from the UK Scientific Advisory Committee on Nutrition (SACN) and the National Health and Medical Research Council (NHMRC) in Australia.
Meals and items in a meal plan can easily be arranged by dragging and dropping items.
See the example below where the apple has been dragged from 'lunch' to the 'tea break'.
The meal plan is rearranged as below.
The client(s) assigned to a meal plan are shown in the toolbar at the top of the Meal Plan workspace. You can add/ view clients by clicking on the button:
If multiple clients are assigned to a meal plan, the meal plan will be locked for editing. Clicking the ‘Enable Editing’ button will give the options to edit the meal plan for the current user, or edit the meal plan for all users:
Meal plans can be organised from the Tree Viewer – to access, just click the folder icon in the top toolbar (beside ‘My Foods’), then click ‘My Meal Plans'. Your meal plans built as templates (or attached to multiple clients) are accessible from this panel. Click on a meal plan to edit the template or assign it to a new client.
You can choose to monitor up to 10 nutrients when creating a meal plan by clicking the ‘Choose Monitors’ button on the
top toolbar.
As you work, these monitors will update in
real time and will be compared against recommended target intakes (specific to
the current client) at the bottom of the report.
A red highlight means the current plan is above or below the lower limit or safe upper limit for that nutrient. A blue highlight indicates the nutrient is within the recommended range. You can choose a DRV source and the method of energy calculation (whether you want to use the formula calculated energy requirements or the generic values built in to the DRV source, where available).
Meal plans can be exported to a diet log or a report to assess the complete nutritional information. Simply click the 'Export to' button and select 'Report' from the drop down menu.
You can also export a meal plan directly to a diet log if you need to make additions or edits before generating a report. This is useful for improving accuracy if you provided a meal plan that was only loosely adhered to by your client. Meal plans exported to a diet log are automatically saved as new logs.
Please note that a maximum of 14 meals can be exported from a meal plan to a report or diet log. If your meal plan exceeds this, only the first 14 meals will be exported.
The meal plans can also be converted to .pdf, excel, emailed or a link can be generated for online publishing in the same way reports and recipes can.
Nutritics allows you to set custom nutrition targets for your clients. This ‘power
feature’ allows you to set nutrient targets as precise intakes, as calculations
based on body weight (or other formula based targets) or as an acceptable
distribution range. You can also define lower and upper limits for any
nutrient.
There are 2 ways to edit your clients' nutrition targets in Nutritics.
Short method
Please note this is only available to users with the custom DRV feature.
Open up a client profile and select the source of the client’s nutrition targets and the desired energy calculation formula under the nutrition requirements section.
Click on the customise button to edit the nutrition targets for your client or make a new template.
Clicking 'for this client' will open a new tab under the nutrition requirements heading. Right click to rename the tab.
Use the plus and minus buttons to add or subtract 100kcal per click to your clients’ energy target in line with their body weight goals. Use the slider to specify the split between exercise and diet.
The energy calculations are listed below the slider. These are also free text boxes so the PAL and RMR can be added manually.
Use the slider to specify the client’s macronutrient requirements. The blue portion of the slider is the client’s carbohydrate requirements, their protein in grey and fat is in orange.
The macronutrient targets are shown as a percentage of your client's energy target and also in total grams per day and grams per kg body weight.
Click on the arrow to change the direction of the energy calculation. By default, the client’s estimated energy intake is split into the macronutrient proportions.
Clicking on the arrow reverses the calculation and your client’s energy requirement is calculated from the macronutrient targets in grams/grams per kg body weight.
Example: Setting a target of 249g carbohydrate, 124g protein and 123g fat would give an EER of 2599Kcal (worked out below)
249g CHO x 4kcal/g = 996 kcal
124g Protein x 4kcal/g = 496 kcal
123g fat x 9kcal/g = 1107 kcal
This give a total EER of 2599 Kcal
Click on extended nutrients to edit additional nutrient targets such as the client’s micronutrient targets. Use the plus and minus buttons to make adjustments or type directly into the boxes.
Once satisfied with the custom nutrition targets, these can be applied to other clients by right clicking on the custom DRV tab and selecting 'copy to' and then selecting the client you wish to attach the custom DRV to.
The DRV tab that is open in the client profile is the one that will be applied e.g. when analysing diet logs or creating meal plans for your client.
Extended method:
The DRV editor can be accessed from Menu>Settings>Preferences or by selecting ‘Custom DRV…’ from the DRV source drop down options (on the client set up, reports and meal plans)
This will open the following screen:
Creating a New Entry:
1. Click the Custom DRV button from the drop down in the client section
2. Name the DRV and provide a reference or author and description if desired.
3. Click the 'duplicate this DRV' button
4. Define the inclusion criteria that the DRV’s will apply to (gender, age range etc)
5. Define the DRV’s using the guide below
6. Changes are saved automatically
Editing an Existing Entry:
1. Select the DRV source you wish to edit from the drop down at the top left (The field “Nutritics” in the example above)
2. Click the 'Duplicate this DRV...' button
3. Rename the DRV, author, and description as desired.
4. Select the record you wish to edit from the drop down at the top right (The field “Select Record” in the example above”). This will import the existing values into the tables which can now be edited.
5. Changes are saved automatically
Type any figure in the box to set that figure as the Recommended Intake:
Add a ^ symbol (shift + 6) after the recommendation to include a lower limit.
Add a second ^ to include an upper limit:
Use a | symbol (shift + )to set a recommended intake range:
Advanced Programming:
Use basic calculator notation (addition +, multiplication *, subtraction -, division /) and nutrient keywords to program advanced formulae.
Acceptable keywords include weight, age, bodyfat, lbm (lean body mass), bmi, eer (recommended kcal intake) and pal. These are based on data from the client information panel (panels 2 and 3). Take note they are all lower case.
You can also use any nutrient in a formula by typing it in the box exactly as it appears in the DRV editor (all lower case).
Working Examples:
1. Carbohydrate
intake is 55% of kcal intake
EER is
estimated energy requirements, multiplication by .55 gives 55%. 3.75 is the
number of calories in one gram of carbohydrate, this converts the 55% of calories
into a weight in grams
2. Carbohydrate
intake is 55% of kcal intake with a lower limit of 100g
3. Carbohydrate intake is 55% of kcal intake with a lower limit of 100g and an upper limit of 75% of calorie intake
4. Protein
intake is 20% of kcal intake
4 is the
number of calories per gram of protein, this converts 20% of calories to grams.
5. Protein
intake is 1.2 times the client’s body weight
6. Protein
intake is a range from .8 -1.6 times the client’s body weight
7. Fat
intake is a range from 20-35% of kcal intake
9 is the
number of calories per gram of fat
8.
Fat intake is a range from 20-35% of kcal intake and an upper limit of 40% of
kcals.
9.
Folate intake is a range 300-600µg with a lower limit of 100 µg and an upper
limit of 1000 µg
10.
Vitamin D intake is 15µg with a lower limit of 5 µg
Please contact support@nutritics.com if you require assistance setting up
custom Dietary Reference Values.
To create a meal plan template click start < new meal plan.
Select a pre-existing meal plan or start from scratch. Selecting ‘start from scratch’ will open a blank meal plan template.
This is a master meal plan and is not attached to any clients. The meal plan can be attached to clients by clicking on the drop down menu at the top of the workspace. See below for more on attaching meal plans to client profiles.
Any changes to the master meal plan will be applied to any client copies of the meal plan. Changes to individual client copies of the meal plan will only apply to that client.
Build your meal plan (see
here for a guide on this). Once you are happy with your meal plan template, add it to a group for easy retrieval later.
To do this, click on the ‘meal plan’ folder in the Nutritics Content Explorer.
By default, all newly created meal plans are added to the ‘ungrouped’ meal plan group.
Click on the ‘ungrouped’ meal plan folder. Drag and drop the newly created meal plan into an existing group or create a new group.
Click on a meal plan group to see all meal plans within that group.
USING THE MEAL PLAN TEMPLATE
The meal plan can be attached to a client profile in a few ways.
1. When working on the master meal plan, the meal plan can be attached to clients by clicking on the dropdown menu and selecting 'add client'.
2. Alternatively, open a client profile and click on the plus button beside the meal plan heading.
Select ‘use existing’ from the options presented.
Select a meal plan from the meal plan groups and click 'attach'.
Click 'enable editing' to make an editable copy of the meal plan (any changes made will not affect the original meal plan, they will only be applied to the copy).
Nutrient intake in excess of the RNI’s may reduce the risk of developing chronic diseases. Specifically, a higher intake of Vitamin C, E, A (particularly β-carotene), selenium, folate, omega 3 and dietary fibre may be benficial. The Australian & New Zealand National Health and Medical Research Council have published a second set of guidelines known as "Suggested Dietary Targets (SDT's) to optimise dietary intake for reducing the risk of chronic disease”. These SDT’s have been incorporated into the Nutritics DRV source only. Where no target intake has been set by in the SDT’s, the highest RNI has been taken from all International sources combined. Furthermore, the highest safe upper intake and the highest LRNI from all International sources has been set as upper and lower RNI’s on the Nutritics source.
The macronutrient recommendations provided in the Nutritics option are adopted from International Sports Nutrition guidelines, including the American College of Sports Medicine and American Dietetics Associations position stand on Nutrition and Athletic Performance, ISSN and Australian Institute of Sport:
These are provided as guidelines only; exact requirements will vary from person to person depending on factors such as training intensity, training duration, available recovery time, and fitness status.
Nutritics allows direct import of food and activity information from your clients Libro app. To import a food diary, select a client from your client list, then click the + button in the logs section (the same way you would create a log manually from scratch).
If Libro logs are detected, you will be presented with the screen below. The orange circles indicates days that have been logged by your client in Libro. Simply click on them to select them for import, then click the orange button 'Import from Libro'.
This will bring you to the diet log workspace with all the diet log information filled in, as entered by your client. Once imported, you can make edits and tweaks to the diet log data, note that this does not change the clients smartphone log.
If the client has created any recipes and used them in their log, these will also be imported. This can also be useful to provide your client with feedback by making simple tweaks to their existing recipes as part of the feedback process.
Create and export shopping list from your recipes, meal plans or menus. Shopping lists can be created in pdf. or .csv format.
Click on the start menu and select ‘shopping list’ under the input/output heading.
Select the type of data to be exported to a shopping list by using the tabs along the top.
Any groups created in the Nutritics account will be visible and allow for easy filtering of data. Click on a group to expand it.
Tick any items to be included in the export.
Specify the number of servings the shopping list should include.
Select how the shopping list should be organised in the dropdown menu.
This will group ingredients with the same category together under category headings e.g. fruits & vegetables or nuts & seeds.
This will list your recipes in alphabetical order, with an ingredient list under each recipe heading.
This will list all ingredients in alphabetical order.
If the costing feature is enabled on your account, ingredient costs can be added to the export by ticking 'include costs'.
Exporting your shopping list
Click 'download excel' to export a shopping list in .csv format or click on ‘preview’ to generate the shopping list in a new tab. The shopping list preview can be printed, downloaded in .pdf format or shared using the buttons at the bottom of the screen.
Shopping lists include a food code column, the ingredient names, quantities and if applicable, the ingredient costs based on the quantity in the shopping list, cost per kg and waste costs.
Creating shopping lists for menus
Shopping lists can be generated for menus in a couple of different ways.
From the start menu:
- Click on the menus tab to generate shopping lists for your menus (1).
- Use the filters along the top to open a menu cycle (2).
- Click on a menu name to expand a list of menu items (3) and tick any menu items to be included on the export. Individual portion sizes are listed separately.
- Specify the number of portions to be included in the export (4).
- Select your grouping preferences and whether costs should be included in the report (5).
- Click preview to generate the shopping list (6).
From the menu workspace:
You can use the popularity and servings monitors in the menu workspace to generate a shopping list for your menus.
- Open a menu and click 'choose monitors'
- Enable the 'popularity' and 'servings' monitors
- In the menu workspace, estimate the popularity of menu items. Note the popularity of each menu group must add up to 100.
- Add the total number of servings required for the menu group and Nutritics will calculate the number of servings for each menu item.
- Click 'export to' in the top right corner of the screen and select 'shopping list'.
- This will open the shopping list menu. Items in your menu will automatically be selected. You can add additional menu items by clicking on them or change the number of servings if needed.
- Specify your export preferences and click preview to generate a pdf shopping list or export to excel.
From the live orders dashboard:Generate a shopping list of orders placed via your digital menus. This is useful where customers order in advance.
- Open the live orders dashboard from the Nutritics content explorer.
- Click on the 'export to' menu in the top right corner of the screen.
- This will open the shopping list menu. Items that were in the order dashboard will automatically be selected. You can add additional menu items by clicking on them or change the number of servings if needed.
In this article, you can see answers to our top Libro support questions.
Do I need a Nutritics account to use it?
If you are a nutrition professional looking to use Libro with your clients, then you will need a Nutritics account to invite your clients to log their diet on Libro.
How do I log in, I don’t have a password?
Your username and password are created when you first log in to Libro. Once you have downloaded Libro, open the app. You will be prompted to enter a username and password. Whatever you type into these fields will be your log in details going forward.
Does it automatically sense activity?
No, you must log your physical activity. This is covered in our guide here.
Are targets age restricted?
Targets are based on your biometric data (e.g. weight and height) and the DRV source selected by your nutritionist.
How do I search for products?
Select ‘Go to log’ located in the bottom left hand corner of your home screen.
Click one of the orange plus buttons to search for and add foods to that meal.
Enter a keyword in search box
Alternatively, click on the Libro symbol in the bottom right corner of the screen and enter a keyword.
I'd like to report a problem or a mistake.
Open the menu, click on the settings button and navigate to the about tab. Fill in the contact form and someone will be in touch as soon as possible.
I searched for a product but Libro doesn't have it. What do I do?
See our tutorial here on adding a new food.
Where do you get your product information?
The database of foods available in Libro is comprised of official national databases and branded data from manufacturers.
How do I mute Libro?
Make sure the media volume on your phone is on silent.
How to log a food log?
See our tutorial here on how to add foods to your log in Libro.
How do I move a food to a different meal name?
See option to change meal selection before saving the foods in your basket:
How do you access logs from your Nutritics account?
See our tutorial on importing logs from Nutritics.
How do I assign a program to my clients on Libro?
You can do this by opening the program you would like to share and navigating to the drop down menu at the top of the screen. Click 'add a client' to assign that program to a client. You can toggle between the master program, and the client-specific program using the drop down menu. See our guide on using Libro Programs here.
Any More Questions?
Our user guide includes video tutorials and in-depth instructions on key tasks.
See our sales FAQs
Email us at support@nutritics.com and we will get back to you shortly.
You must have an account registered in order to sign in to the software. Registration is free on our website and includes a fully functional 7 day trial. You will be emailed a link with log in instructions after registering. If you do not receive this email, please check your spam/junk mail folder or contact us.
Nutritics can be accessed in your web browser using a stable internet connection. Your user data will be accessible automatically on each computer, and is backed up to our secure servers. On most standard licences, you can only be logged in to your account from one location at a time.
Accessing Nutritics:
There are a couple of options available to access Nutritics
1.Most modern web browsers can run Nutritics directly. We recommend the latest version of Google Chrome for the best Nutritics experience, but Microsoft Edge, Safari and Firefox for Windows are also supported. Simply navigate to our website and click the login button at the top right of the page, or type nutritics.com/app into your URL bar (you can bookmark this page)
2.If you use Google / Chrome apps, the Nutritics web app can be installed from the Chrome web store. Simply search the store or copy and paste the link below into your Chrome web browser to access install the plugin: https://chrome.google.com/webstore/detail/nutritics-dietary-analysi/haiikldmnkhailcbppkpphadlnkpkobf?hl=en-GB
If you do not have Google Chrome installed, you can get it here at no cost.
Using Nutritics on Portable Devices:
Nutritics currently supports functionality on iPad and Android tablets. To access Nutritics on your tablet, navigate to our website and click the login button, or type nutritics.com/app into your URL bar. You can change the touch settings within the program from Menu>Settings>Preferences. By default, Nutritics will detect when you are using a touchscreen device and make the interface more ‘finger friendly’. This can be adjusted from Menu>Settings>Preferences
Nutritics full professional interface is not available on smartphones. However, a report viewer is available to browse reports on the move from www.nutritics.com/explore/YourUsername. We do also have a smartphone companion app ‘Libro’, which is intended for use by your clients and restaurant guests to record their dietary intake and connect with professionals. See for more detail on Libro.
Log in to Nutritics at nutritics.com/app using the username/email address and password you registered with.
For easy access to Nutritics, we recommend bookmarking it in your web browser.
Bookmarking in Google Chrome
Go to https://www.nutritics.com/app/ in Google Chrome and click on the star icon to the right of the url at the top of the screen.
Save Nutritics to the bookmarks bar and it will always be visible when you open a new internet tab or window.
The next time you open your browser, simply click on Nutritics in the bookmark bar to log in.
Bookmarking in Safari
Go to https://www.nutritics.com/app/ in Safari and click the Share button in the toolbar, then choose 'Add Bookmark'.
Choose where to add the bookmark, and rename it if you like.
Click 'Add'.
The next time you open the Safari browser, click the Sidebar button in the toolbar, then click the Bookmarks button.
Or, choose Bookmarks > Show Bookmarks.
Bookmarking in Microsoft Edge
Go to https://www.nutritics.com/app/ in Edge and click 'Add to Favorites' in the top menu bar
Name the page, and then click 'Done
The next time you open your browser, simply click on Nutritics in the favourites bar to log in.
Log in to Nutritics at https://www.nutritics.com/app/ using the username/email address and password you registered with.
For easy access to Nutritics, we recommend bookmarking it in your web browser.
Bookmarking in Google Chrome
To bookmark Nutritics in Chrome, open Nutritics and click on the star icon to the right of the url at the top of the screen.
Save Nutritics to the bookmarks bar and it will always be visible when you open a new internet tab or window.
The next time you open your browser, simply click on Nutritics in the bookmark bar to log in.
Bookmarking in Safari
Open Nutritics in Safari and click the Share button in the toolbar, then choose Add Bookmark.
Choose where to add the bookmark, and rename it if you like.
Add this page to: Click the pop-up menu and choose a folder. The default is Favourites.
Click Add.
The next time you open the Safari browser, click the Sidebar button in the toolbar, then click the Bookmarks button .
Or, choose Bookmarks > Show Bookmarks.
Click the bookmark in the sidebar.
You can also choose it from the Bookmarks menu.
After registering for a free trial of Nutritics, you will receive an email to verify your email address and activate your account. All accounts must be activated within 24 hours of registering or else you will not be able to access your account again.
If you do not receive this email within 5 minutes (in either your main inbox or the spam folder), please contact support@nutritics.com and we will be able to manually activate your account for you.
The Menu button is available in the top right corner of the screen after logging in to Nutritics. The menu provides various support tools and account specific features such as changing your password, updating your personal details, and changing the food databases and languages of the software. Each item in the Menu is described in more detail below.
Settings
Navigating to Menu>Settings will open the settings for Nutritics. The settings menu is made up of various tabs:
Your Profile: Shows your contact information and business details that Nutritics has on file. You can edit these details from this tab. If the option is enabled on your package, you can upload a business logo or banner here to brand the reports.
Preferences: Display preferences, beta program access, settings for various other features (search, allergen preferences, languages, imperial / metric units and activity log settings). You can decide what feature will open upon log in. For example, if you primarily use Nutritics to view and analyse recipes you can choose to open on 'My Recipes':
Databases: Show and customize active databases being used in your Nutritics account.
Account: Shows the Nutritics version number, license renewal date and details of last login. You can manage your subscription, customize your package, turn off autorenewal and view past invoices here. You can also change your password, delete all client data and download your client data in .CSV format from this tab. If you wish to change your login username, please contact us directly.
Feedback: Send us your comments, suggestions and food requests.
Ordering: This is only available if you have our food ordering feature enabled on your account. This is where you attach an outlet to set up ordering.
Tutorial Videos
Click this option from the menu to access
our tutorial videos, as well as step by step instructions on how to use each
feature within Nutritics. You can also download our pdf user manual from this
link.
Support & Webinars
This menu item gives you access to support resources and the upcoming training webinar schedule. Support and webinars are included with all plans.
Add Features
This menu item is available if you are paying by debit or credit card. Here you can customise your Nutritics package, add or remove features, add collaborators and adjust account storage to suit your budget.
Manage Users
This menu item is available if you are an assigned administrator of user licenses for your organisation. Here you can view and manage users, set up accounts individually or in batch, adjust licence activation period and send reminders to Nutritics users in your organisation. See the Licence Management section for more information.
WATCH THE VIDEO:
https://www.youtube.com/embed/7QoDH62Wn1g
Nutritics uses a modern panel design with high resolution graphics and scrolling animations throughout. Nutritics is made up of panels and workspaces. There are 2 primary panels, one for client storage & management (for users on the professional, performance and education editions) and the other for management of food and recipes:
Clicking on an item from one of these panels will open a sub-panel with more detail on this item, or will scroll to a large open workspace, to allow you to view or develop that item further.
Depending on your product, your workspace panels may include:
Food & Activity diary workspace
Add new food or recipe workspace
Meal plan creator workspace
Food compare workspace
Label Maker workspace
Libro program design workspace
Menu workspace
When using any of these workspaces, the food management panel will slide to the left side of the screen, giving you a larger work area, as shown below:
Click the back arrow at the top left of the screen to return to your client related panels.
As you open various workspaces in Nutritics, tabs will appear at the top of the screen to assist easier switching between the workspaces.
The search box is an integral part of Nutritics, and is always located in the top left of the screen when logging a diet or activity diary, creating a meal plan or creating a recipe. Press F3 or click the search box to begin searching. Results are returned once at least 3 characters have been entered in the box, matching the exact character string to foods, activities, descriptions and keywords in the database. Direct matches to the search letters appear in bold while other matches appear in regular font. The search is ranked in order of popularity.
A category filter appears at the top of the search results following a search. Click on a category to refine the results to that category only:
Nutritics advanced search is accessible from the small arrow within the search box:
Here you can search for foods within specific food categories, groups, databases, or search for foods that meet specific nutrition targets and / or allergen requirements.
Example 1: List fruits with highest content of vitamin C and less than 8g of sugar per 100g:
Example 2: List the best vegetarian sources of protein that are also high in iron:
Right clicking is supported throughout Nutritics, and performs a range of advanced functionality such as duplicating recipes, foods and clients, and various other shortcuts. Right clicking on a tab displays a history of items open in that tab, enabling quick switching between recently open items.
Mac users should hold ctrl and click to enable a right click action. On touch screen devices, you can hold your finger on the screen to enable a right click action.
Nutritics Content Explorer is a structured folder view similar to Windows Explorer, which gives you an overview of all records in your account. Depending on your Nutritics edition, the content explorer will appear as a panel on the left or right hand side of your screen.
If you have the 'My Foods' or 'My Recipes' tabs open, you can click on the folder icon below the food search box to open the explorer. This view allows you to browse, organise and update your records quickly in one workspace.
Click on a heading to expand a list of folders.
Add a new folder by clicking '+new group'.
Click on a folder to display its contents on the workspace panel the right. Toggle between list and tile view using the buttons in the bottom right corner of the screen.
Click 'choose monitors' to customise the workspace display and update things like food cost, food allergens, recipe names, recipe photos and more.
Create your own custom views and export them for print or sharing from the ‘Export to’ button at the top right of the screen.
On Foodservice accounts or if you have the Foodservice add-on, the Explorer is also used to create menus and menu cycles, and also for the production of digital menus and paper calorie and allergen menus.
Summary reports of menu cycles/individual menus can be generated by right clicking on a menu cycle/menu in the content explorer and selecting 'export'.
In addition to the search functionality, a number of additional features have been implemented to assist with accurate food/activity selection. Clicking on a food from the search results will open a summary box detailing the International Food Code, category, macronutrient content (per 100g) and estimated kcal distribution (in percentage). The nutrients displayed here can be customised from the preferences menu. Similarly, clicking an activity from the list of results will show category and kcal/kJ expenditure per hour. Hovering the mouse over a search item will show additional descriptive information such as the database source, ID number and number of data points sampled, where available.
Click the 'i' button to open up the detailed profile of the food in a new tab within Nutritics
Once you have reviewed a food/ activity and are satisfied it is appropriate, click the insert button to add it to the open workspace.
Nutritics provides a large number of portion sizes for foods in the database. These are assigned to foods from various portion size resources, manufacturer’s data or from direct weighing by trained Nutritics staff. Click on the box under the corresponding entry point (day/meal/qty) to enter a portion size. A smart portions box will open if they are available for the food chosen.
Use the plus and minus buttons to modify a smart portion. A single press on + will add 1 to the portion multiplier, while a single press on – will subtract .5 from the smart portion. This enables flexible entry of smart portions. It is also possible to manually type a quantity in the box provided in any unit of measure.
Clicking the sum button will add the amount entered to the existing quantity, and clicking insert will replace the existing quantity. The grams display box also functions as a calculator if you want to add individual weights. You can add, subtract, multiply or divide by typing the symbols +, -, *, / respectively.
In addition to portion size suggestions, Nutritics also provides demographic portion size options for many foods, which have been adapted with permission from the research on the National Diet and Nutrition Survey by Wrieden & Barton, 2005. These portion sizes take account of your client’s age and gender and indicate the average portion size consumed by this demographic group.
You can compare up to 6 foods or recipes at a time against EU, FDA and FSANZ Reference Intakes. Right click on a food from the search results and click the compare option from the context menu. Repeat for all foods you wish to compare.
Everything is saved automatically upon each mouse click in Nutritics. You can close Nutritics at any time and all data will be saved automatically and backed up to our secure servers.
Delete a diet log, meal plan or recipe by clicking the small x on the log list, or by right clicking on a record and selecting delete.
Delete a client and ALL associated data by right clicking on a client, or by clicking the x beside their name in your list of clients. A warning box will confirm that you want to erase all information for this client, this cannot be undone.
Duplicate a record by right clicking on the record and selecting the relevant option from the context menu.
Clients, recipes, and foods can be shared with other Nutritics users. Look for the sharing and collaborators feature, located both on your foods and recipe workspaces
and in the client panel.
Click '+add user' and type in the username or email address of another Nutritics user to enable sharing with that user.
If your licences are part of an organisation or group, you will see all users of the organisation when you click ‘+add user’.
You can also choose to share with all account holders within the organisation by clicking on the name of the organisation instead of adding individual users.
You will have the option to share with read only (1) or read and write privileges (2), or revoke access (3) after adding a collaborator.
To share multiple recipes, foods or clients at once, click the icon shown on the right of the collaborators screen to access the bulk share tool:
Choose the account you'd like to share with from the drop down at the top, then click the items or the checkboxes in the list to share:
To remove a collaborator, right click on the username and select 'delete'.
Items that are shared with you have an inbound arrow and a yellow bar within the record / workspace will be shown
Items that you are sharing with other users are indicated with an outbound arrow
Master Sharing Functionality
If you have purchased a licence set with master sharing functionality you have the option of sharing particular data with your site accounts.
You can choose to share your custom codes, custom fields, food costs or label templates to your site licences automatically. For example, if you wanted to share recipes with your site licences, but not costs attached to the recipes you can disable this setting.
Upload your clients to Nutritics in bulk using the batch import tool (please note this is a premium feature).
- Go to the start menu in the top left corner of the screen.
- Click 'batch jobs'
- Click on the 'batch import' tab at the top of the screen
- Download the clients import template
- Fill in the template. Note, to update existing clients add their client ID into the 'system ID' column. To see a client ID, hover over the client's name in your list of clients.
Alternatively, batch export your client list in the 'batch export' tab. The 'id' colum contains your clients' system IDs and these can be copied and pasted into the import template. - Go back to batch jobs and upload the file
You can generate a live link of any report from the 'export to' button, for email or sharing. Any changes made are reflected in the live link in real time without the need for re-sharing. Reports can also be exported to Microsoft excel (or other CSV editor), converted to a .pdf file or printed directly.
The settings toggle beside the export button enables you to customise a report, and save the layout and customisations as a templates for future use.
You can also choose from a number of Nutritics built templates for a simplified or more detailed report layout.
ACSM – American College of Sports Medicine
ADA – American Dietetic Association
AI – Adequate Intake
AMDR – Acceptable Macronutrient Distribution Range
BMRACSM ACSM – American College of Sports Medicine
ADA – American Dietetic Association
AI – Adequate Intake
AMDR – Acceptable Macronutrient Distribution Range
BMR – Basal Metabolic Rate
cMET – Corrected / Compensated Metabolic Equivalent
COMA – Committee on Medical Aspects of Food and Nutrition Policy
DB – Database
DIT – Diet Induced Thermogenesis
DOB – Date of Birth
DRV- Dietary Reference Values
EAR – Estimated Average Requirement
EAT – Exercise Associated Thermogenesis
EER – Estimated Energy Requirement
FCDB – Food Composition Database
FDA – Food and Drug Administration
FSANZ – Food Standards Australia New Zealand
GDA – Guideline Daily Amounts
GI – Glycemic Index
GL– Glycemic Load
IOM – Institute of Medicine
IFC - International Food Code
LRNI – Lower Reference Nutrient Intake
MET – Metabolic Equivalent
NAE – Net Acid Load
NEAT – Non-Exercise Associated Thermogenesis
NHMRC – National Health and Medical Research Council
NNR – Nordic Nutrition Recommendations
NRV – Nutrient Reference Values
NSP – Non starch polysaccharide
PAL – Physical Activity Level
PENG – Pocket Guide to Clinical Nutrition
PRAL – Potential Renal Acid Load
RDA – Recommended Dietary Allowance
RDI – Reference Dietary Intake
RI – Reference Intakes
RMR – Resting Metabolic Rate
RNI – Reference nutrient Intake
SACN – Scientific Advisory Committee on Nutrition
SI – Safe Intake
SRC – Source
SUL – Safe Upper Limit
UL – Tolerable Upper Intake Level
How many foods does Nutritics have?
Nutritics currently contains over 772,000 foods and this is growing by the day! This includes thousands of user-requested foods and supplements which have been added by our expert dietetic team and are not found in any other nutrition analysis program.
Which food databases does Nutritics use?
Nutritics database is comprised of the official national databases for each country with vast augmented data for photos, portions, etc. Our nutritionists have manually augmented our global databases with photos, suggested portion sizes and detailed micro-nutrition for up to 300 nutrients.You won't get this data anywhere else!!
Each database is available in the local language(s) and in English. In addition, we've created a large database of universal Arabic foods and we maintain toggleable databases from brands, food suppliers, retail chains & clinical feeds so you have total control over where your data is coming from.
Our full array of current databases is listed below.
- Australia (AUSNUT 2016 (2011-13 Australian Health Study))
- Germany (2014 German Nutrient Database BLS 3.02)
- Poland (2005 Polish Food & Nutrition Institute)
- Switzerland (2015 Swiss Food Composition Database, Version 5.2)
- Netherlands (2016 NEVO online version 2016/5.0, RIVM, Bilthoven, the Netherlands)
- United Kingdom (2015 COFIDS including McCance and Widdowson 7th edition, 2015)
- Ireland (2009 Irish Food Composition Database)
- United States (English) (USDA 28 & Branded Food Products Database)
- United States (Arabic Version of USDA28)
- Bahrain
- Egypt
- Iran
- Jordan
- Kuwait
- Lebanon
- Oman
- Qatar
- Saudi Arabia
- Turkey
- United Arab Emirates
A proprietary global 'Nutritics' database from user-requested foods, including a wide range of sports supplements, health food products, supplier and restaurant data.
Foods are sourced directly from manufacturers, research papers or added by conversion from other food databases by our qualified nutritionists.
Specialised clinical feeds and nutrition products from suppliers including Nutricia, Fresenius Kabi and Abbott Nutrition.
Gluten free and low protein ranges from a wide range of suppliers.
A proprietary database of food additives such as vitamin and mineral compounds, preservatives, colourings, flavour enhancers and thickeners.
In Nutritics, the active database in your account is selected automatically based on your region.
If you would like to change the active database or access additional databases, you can change your settings by navigating to the menu> settings > databases.
Click on the drop down menu to see the different regional databases available. We have foods from both official national databases and branded foods.
Accessing multiple databases
If you would like to access multiple databases simultaneously, go to the menu > settings > databases and click on the ‘custom sources’ option from the country/region drop down menu and tick any databases you would like to activate.
Different types of data are available, depending on the source.
Label
This is basic nutrition information that is required for nutrition labelling.
Primary
All standard macro and micro-nutrients that are displayed in Nutritics (65 nutrients).
Extended
Includes data on amino acids, fatty acids, vitamin fractions or polyphenols (only visible on Excel exports).
Category
Foods have categories applied to them. Foods must have a category in order to be able to apply cooking factors to them.
Allergens
Allergen information has been added by Nutritics.
Energy value (Kcals): Calculated using the conversion factors: protein 4 kcal/g, fat 9 kcal/g, carbohydrate 4kcal/g and alcohol 7 kcal/g.
Energy value (kJ): Calculated using the conversion factors: protein 17kJ/g, fat 37 kJ/g, carbohydrate 17 kJ/g and alcohol 29 kJ/g
Amino Acids Fatty acids: Fatty acids are available via the research edition of Nutritics. Fatty acid and amino acid data are not readily available/accessible from manufacturers which would limit the extent to which Nutritics can complete food requests accurately.
Starch: Includes dextrins but excludes resistant starch, starch is expressed by weight.
Sugars: Sugars include free monosaccharides and disaccharides. In cereals the contribution from glucofructans is also included. The value does not include any contribution from oligosaccharides which are provided separately. Note that the breakdown of sugar (glucose, fructose components etc) is incomplete in the databases, and therefore should be considered for indicative purposes only. These values are hidden in the report by default and are expressed by weight.
Free Sugars: All sugars that have been added by a food manufacturer, cook or consumer to a food and include those sugars naturally found in fruit juice, honey and syrups. They do not include sugars naturally found in milk and milk products, nor in fruit and vegetables.
Non-starch polysaccharides (Englyst method) Includes insoluble fibre (cellulose, insoluble non-cellulosic polysaccharides) and soluble fibre (soluble cellulosic polysaccharides). NSP is provided in weight of the actual component and not monosaccharide equivalents.
Total dietary fibre (AOAC method): Includes substances measuring as lignin and also resistant starch by weight. Fibre by the AOAC method is not included in the UK food tables, but has been added to Nutritics from other sources.
Glycemic Index: GI data is from the International table of glycemic index and glycemic load values and the University of Sydney (Human Nutrition Unit) GI database, or imputed from similar foods if no data is available. The reference food used is glucose (GI=100). A GI of 55 or less is considered low, 56-69 is medium and 70+ is considered high. It is important to be aware that GI can vary based on cooking method, duration, ripeness, season, food combination, manufacturing process and many other factors. The GI of meals is automatically calculated and should be considered for indicative purposes only.
Glycemic Load: Glycemic load is calculated from the formula (GI*carbohydrate)/100. GL may be is more useful than GI since it accounts for both the GI and the portion size of carbohydrate consumed. (GL = GI * carbohydrate of serving / 100). One GL unit is equivalent to the glycemic effect of consuming 1g of glucose. Interventions targeting weight loss, insulin resistance and the metabolic syndrome appear to benefit from low GL dietary strategies. A meal with a GL of <10 is considered low, 11-19 is medium and >20 is considered high. A daily total GL of <80 is considered low, <120 is medium and >120 is considered high.
Additional information sources:
T.R. Fenton, M., Eliasziw, A.W. Lyon, S.C. Tough. D.A. Hanley, “Meta-analysis of the quantity of calcium excretion associated with the net acid excretion of the modern diet under the acid-ash diet hypothesis.” Am J Clin Nutr 88 : 1159–1166, 2008.
L. Frassetto, R. C. Morris, Jr. R.C. Jr., D. E. Sellmeyer, K. Todd, and A. Sebastian, “Diet, evolution and aging—the pathophysiologic effects of the post-agricultural inversion of the potassium-to-sodium and base-to-chloride ratios in the human diet,” European Journal of Nutrition, vol. 40, no. 5, pp, 200–213, 2001
J.E. Kerstetter, K.O. O'Brien, D.M. Caseria, D.E. Wall, K.L. Insogna “The impact of dietary protein on calcium absorption and kinetic measures of bone turnover in women”. J Clin Endocrinol Metab 90 : 26–31, 2005 .
S. T. Reddy, C. Y. Wang, K. Sakhaee, L. Brinkley, and C. Y. Pak, “Effect of low-carbohydrate high-protein diets on acid-base balance, stone-forming propensity, and calcium metabolism,”6 Journal of Environmental and Public Health American Journal of Kidney Diseases, vol. 40, no. 2, pp. 265–274, 2002.
T. Remer and F. Manz, “Estimation of the renal net acid excretion by adults consuming diets containing variable amounts of protein,” American Journal of Clinical Nutrition, vol. 59, no. 6, pp. 1356–1361, 1994
L.A. Spence, E.R. Lipscomb, J. Cadogan , B. Martin, M.E. Wastney, M. Peacock, C.M. Weaver. “The effect of soy protein and soy isoflavones on calcium metabolism in postmenopausal women”: A randomized crossover study. Am J Clin Nutr 81 : 916–922, 2005.
If you require any specific information on vitamins, minerals or other nutrients, please email support@nutritics.com
'Dietary reference values' (DRV) are the umbrella term for a range of nutrient values that apply to a population or group, and typically consist of numerous components:
A Lower Reference Nutrient Intake (LRNI): Meets the nutritional requirements of only 2.5% of the population.
An Estimated Average Requirement (EAR): The average amount of nutrient or energy required. Approximately 50% of the population will require more and 50% will require less.
A Reference Nutrient Intake (RNI): The amount of a nutrient sufficient to meet the needs of 97.5% of a population (calculated from the EAR + 2 SD)
Safe Intake (SI): Used in place of RNI when there is insufficient data available to set an RNI. A safe intake is likely to meet the needs of the majority of the population without causing any adverse effects of excess intake.
Safe Upper Limit (SUL): The maximum amount of a nutrient known to be safe to intake. Habitually consuming nutrients above the SUL is not recommended and can cause toxic effects in some cases.
Source: Food and Agriculture Organisation of the United Nations
Note: DRV’s are also known as NRV’s (Nutrient Reference Values – Aus/NZ) and DRI’s (Dietary Reference Intakes – USA). RNI’s are also known as RDI’s (Recommended Dietary Intakes) or RDA’s (Recommended Dietary Allowance). SI is also known as AI (Adequate Intakes). SUL’s are also known as UL (Tolerable Upper Intake Level)…just to keep it simple!
It is important to recognize that all these values apply to populations, and not to individuals. However, a number of assumptions can be made when using DRV’s with individuals:
1. If an individual is routinely consuming the RNI for a particular nutrient, it can be assumed that their diet provides adequate amounts (or more than adequate amounts) of that nutrient.
2. If an individual is consuming less than the RNI, it cannot necessarily be assumed that the diet is inadequate, as the person may have a lower requirement than average for that particular nutrient.
3. If an individual is consistently consuming less than the LRNI for a nutrient, it can be assumed that the person is deficient in that particular nutrient, although this does not imply the person is clinically ill.
4.The DRV’s will apply to the needs of healthy people and it cannot be assumed that the needs of those who are ill or extremely active are identical.
Choose which Dietary Reference Values you wish to use from the ‘DRV source’ drop down when setting up your client. The target intakes and ranges for nutrients on the report will be based on this selection. There are numerous options from International sources built in to Nutritics. You can also set your own targets using the DRV editor (see custom DRV section).
Built-in DRV’s in Nutritics include:
UK/SACN 2015: The Committee on Nutrition Aspects of Food and Nutrition Policy (COMA) with latest updates from the Scientific Advisory Committee
EFSA 2017: European Food Safety Authority Guidelines
EU/Nordic: The Nordic Nutrition Register (NNR)
USA: The Food Nutrition Board from the Institute of Medicine (IOM)
NZ/AUS: The National Health and Medical Research Council (NHMRC)
EU: The EU Reference Intakes used in Food Labelling
FDA: The US Daily Values for labelling in the US and surrounding territories
A Nutritics recommendation which combines macronutrient guidelines from American College of Sports Medicine (ACSM) with suggested dietary micronutrient targets for reducing the risk of developing chronic disease from the NHMRC. The Nutritics recommendations also show lower intake limits from the NNR and upper intake limits from the highest value deemed safe from the above authorities.
The Food Safety Authority of Ireland (FSAI) 1999 guidelines have been deprecated in Nutritics 5.0 as of November 2017.
Nutrient intake in excess of the RNI’s may reduce the risk of developing chronic diseases. Specifically, a higher intake of Vitamin C, E, A (particularly β-carotene), selenium, folate, omega 3 and dietary fibre may be benficial. The Australian & New Zealand National Health and Medical Research Council have published a second set of guidelines known as "Suggested Dietary Targets (SDT's) to optimise dietary intake for reducing the risk of chronic disease”. These SDT’s have been incorporated into the Nutritics DRV source only. Where no target intake has been set by in the SDT’s, the highest RNI has been taken from all International sources combined. Furthermore, the highest safe upper intake and the highest LRNI from all International sources has been set as upper and lower RNI’s on the Nutritics source.
The macronutrient recommendations provided in the Nutritics option are adopted from International Sports Nutrition guidelines, including the American College of Sports Medicine and American Dietetics Associations position stand on Nutrition and Athletic Performance, ISSN and Australian Institute of Sport:
These are provided as guidelines only; exact requirements will vary from person to person depending on factors such as training intensity, training duration, available recovery time, and fitness status.
The guidelines for pregnancy come from the UK Scientific Advisory Committee on Nutrition (SACN) and the National Health and Medical Research Council (NHMRC) in Australia.
Nutritics allows you to set custom nutrition targets for your clients. This ‘power
feature’ allows you to set nutrient targets as precise intakes, as calculations
based on body weight (or other formula based targets) or as an acceptable
distribution range. You can also define lower and upper limits for any
nutrient.
There are 2 ways to edit your clients' nutrition targets in Nutritics.
Short method
Please note this is only available to users with the custom DRV feature.
Open up a client profile and select the source of the client’s nutrition targets and the desired energy calculation formula under the nutrition requirements section.
Click on the customise button to edit the nutrition targets for your client or make a new template.
Clicking 'for this client' will open a new tab under the nutrition requirements heading. Right click to rename the tab.
Use the plus and minus buttons to add or subtract 100kcal per click to your clients’ energy target in line with their body weight goals. Use the slider to specify the split between exercise and diet.
The energy calculations are listed below the slider. These are also free text boxes so the PAL and RMR can be added manually.
Use the slider to specify the client’s macronutrient requirements. The blue portion of the slider is the client’s carbohydrate requirements, their protein in grey and fat is in orange.
The macronutrient targets are shown as a percentage of your client's energy target and also in total grams per day and grams per kg body weight.
Click on the arrow to change the direction of the energy calculation. By default, the client’s estimated energy intake is split into the macronutrient proportions.
Clicking on the arrow reverses the calculation and your client’s energy requirement is calculated from the macronutrient targets in grams/grams per kg body weight.
Example: Setting a target of 249g carbohydrate, 124g protein and 123g fat would give an EER of 2599Kcal (worked out below)
249g CHO x 4kcal/g = 996 kcal
124g Protein x 4kcal/g = 496 kcal
123g fat x 9kcal/g = 1107 kcal
This give a total EER of 2599 Kcal
Click on extended nutrients to edit additional nutrient targets such as the client’s micronutrient targets. Use the plus and minus buttons to make adjustments or type directly into the boxes.
Once satisfied with the custom nutrition targets, these can be applied to other clients by right clicking on the custom DRV tab and selecting 'copy to' and then selecting the client you wish to attach the custom DRV to.
The DRV tab that is open in the client profile is the one that will be applied e.g. when analysing diet logs or creating meal plans for your client.
Extended method:
The DRV editor can be accessed from Menu>Settings>Preferences or by selecting ‘Custom DRV…’ from the DRV source drop down options (on the client set up, reports and meal plans)
This will open the following screen:
Creating a New Entry:
1. Click the Custom DRV button from the drop down in the client section
2. Name the DRV and provide a reference or author and description if desired.
3. Click the 'duplicate this DRV' button
4. Define the inclusion criteria that the DRV’s will apply to (gender, age range etc)
5. Define the DRV’s using the guide below
6. Changes are saved automatically
Editing an Existing Entry:
1. Select the DRV source you wish to edit from the drop down at the top left (The field “Nutritics” in the example above)
2. Click the 'Duplicate this DRV...' button
3. Rename the DRV, author, and description as desired.
4. Select the record you wish to edit from the drop down at the top right (The field “Select Record” in the example above”). This will import the existing values into the tables which can now be edited.
5. Changes are saved automatically
Type any figure in the box to set that figure as the Recommended Intake:
Add a ^ symbol (shift + 6) after the recommendation to include a lower limit.
Add a second ^ to include an upper limit:
Use a | symbol (shift + )to set a recommended intake range:
Advanced Programming:
Use basic calculator notation (addition +, multiplication *, subtraction -, division /) and nutrient keywords to program advanced formulae.
Acceptable keywords include weight, age, bodyfat, lbm (lean body mass), bmi, eer (recommended kcal intake) and pal. These are based on data from the client information panel (panels 2 and 3). Take note they are all lower case.
You can also use any nutrient in a formula by typing it in the box exactly as it appears in the DRV editor (all lower case).
Working Examples:
1. Carbohydrate
intake is 55% of kcal intake
EER is
estimated energy requirements, multiplication by .55 gives 55%. 3.75 is the
number of calories in one gram of carbohydrate, this converts the 55% of calories
into a weight in grams
2. Carbohydrate
intake is 55% of kcal intake with a lower limit of 100g
3. Carbohydrate intake is 55% of kcal intake with a lower limit of 100g and an upper limit of 75% of calorie intake
4. Protein
intake is 20% of kcal intake
4 is the
number of calories per gram of protein, this converts 20% of calories to grams.
5. Protein
intake is 1.2 times the client’s body weight
6. Protein
intake is a range from .8 -1.6 times the client’s body weight
7. Fat
intake is a range from 20-35% of kcal intake
9 is the
number of calories per gram of fat
8.
Fat intake is a range from 20-35% of kcal intake and an upper limit of 40% of
kcals.
9.
Folate intake is a range 300-600µg with a lower limit of 100 µg and an upper
limit of 1000 µg
10.
Vitamin D intake is 15µg with a lower limit of 5 µg
Please contact support@nutritics.com if you require assistance setting up
custom Dietary Reference Values.
Refer a friend and receive 25% (or more) off your next payment if your friend subscribes to Nutritics!
To access your unique referral link, click on the gift icon* in the top right corner of the screen.
Share your referral link on social media by hovering over the share button and selecting how you would like to share your link.
If you select the email option, enter a friend or colleague’s email address into the email field, click ‘ok’ and your referral link will be emailed to the address specified.
Clicking on the link will bring your friend to your unique sign up page. Your friend must register for a 7-day free trial of Nutritics at this link for any discounts to be applied should they subscribe to Nutritics later on.
You can see how many friends have signed up for a free trial from your link in the referral program dashboard (accessed by clicking on the gift icon).
If your friend chooses to subscribe to a paid Nutritics plan, they will receive 25% off their first payment. This is automatically applied at the checkout.
A 25% discount will also be applied to your next payment. This is automatically taken off your next payment, you don’t need to do anything on your end.
The discount you receive increases depending on the number of referred friends that purchase a Nutritics plan**:
- 1 referred friend buys = you get 25% off your next payment, your friend gets 25% off their first payment
- 2 referred friends buy = you get 60% off your next payment, each friend gets 25% off their first payment
- 3 or more referred friends buy = you get 100% off your next payment, each friend gets 25% off their first payment
You can see how many friends have subscribed to Nutritics and the discount that will be applied to your next payment in the referral program dashboard.
If you have any questions, please email us at support@nutritics.com
*This offer is only available to users paying <€1000 online by card. It is not available to users on trial or on enterprise, student or other discounted plans.
**The number of referred friends refreshes at each new billing period and referrals can not be carried over.
Nutrient intake in excess of the RNI’s may reduce the risk of developing chronic diseases. Specifically, a higher intake of Vitamin C, E, A (particularly β-carotene), selenium, folate, omega 3 and dietary fibre may be benficial. The Australian & New Zealand National Health and Medical Research Council have published a second set of guidelines known as "Suggested Dietary Targets (SDT's) to optimise dietary intake for reducing the risk of chronic disease”. These SDT’s have been incorporated into the Nutritics DRV source only. Where no target intake has been set by in the SDT’s, the highest RNI has been taken from all International sources combined. Furthermore, the highest safe upper intake and the highest LRNI from all International sources has been set as upper and lower RNI’s on the Nutritics source.
The macronutrient recommendations provided in the Nutritics option are adopted from International Sports Nutrition guidelines, including the American College of Sports Medicine and American Dietetics Associations position stand on Nutrition and Athletic Performance, ISSN and Australian Institute of Sport:
These are provided as guidelines only; exact requirements will vary from person to person depending on factors such as training intensity, training duration, available recovery time, and fitness status.
There are a number of keyboard shortcuts programmed within Nutritics which can greatly speed up your workflow. These keyboard shortcuts are detailed below for reference:
If you attempt to login with an incorrect login you will have the option of resetting your password from the 'Forgotten your details?' link that appears.
Alternatively, please contact support at support@nutritics.com and we can send a reset password link to your registered email.
Your data is stored on Nutritics secure servers. All communication between your computer and the server is encrypted with bank level security (256 bit TLS). The server operator fully complies with all data protection standards. Nutritics has a comprehensive disaster recovery plan in place that is regularly tested, so your data is always safe. Please contact us as support@nutritics.com if you wish to discuss this.
Simply log into our accounts portal using your old username and password to renew your subscription. Select your chosen plan and renew. Your client profiles & data will be restored to your Nutritics account.
Any More Questions?
Our
user guide includes video tutorials and in-depth instructions on key tasks.
Sign up for a live
webinar - look over our shoulder while we demonstrate how to perform key tasks in Nutritics.
Email us at support@nutritics.com and we will get back to you shortly.
HOW DO I LOG IN TO NUTRITICS?
Your account can be accessed in a number of ways from Windows, Mac and tablet devices.
Direct browser access:
Click login at the top right of our website or navigate to www.nutritics.com/app
Firefox, Chrome, Safari and Microsoft Edge are all supported.
I FORGOT MY USERNAME/PASSWORD
If you attempt to login with an incorrect login you will have the option of resetting your password from the 'Can't login' link that appears. Alternatively, please
contact support and we can set you up a temporary password, after a security screening process.
HOW DO I CANCEL MY SUBSCRIPTION?
You may cancel at any time by logging into
your account page and clicking the "cancel my subscription" link at the bottom of the screen. Your account will remain active until the end of the current subscription period. No further charges will apply. Please note - you may be required to contact our support team to complete this process for data security purposes.
HOW CAN I ADD AN ADDITIONAL USER TO MY ACCOUNT?
If you are interested in adding an additional access point to your account please email support@nutritics.com.
NUTRITICS STOPS WORKING IF I LEAVE IT RUNNING DURING LUNCH, WHY?
Nutritics automatically signs you out after 30 minutes of inactivity for security reasons. Please login again.
I AM FINDING IT DIFFICULT TO USE A FEATURE IN NUTRITICS
Please see our
user guide which includes video tutorials of the main features of Nutritics. Book in for a free live webinar session on our
support page, or download the user manual which provides lots of detail. If you need any specific help please
contact support for assistance.
I AM GETTING AN ERROR MESSAGE WHEN I TRY TO GENERATE A REPORT , WHY?
Please check the client details (weight, height, DOB) to ensure they are entered in the correct format.
WHICH FORMULA SHOULD I USE TO CALCULATE MY CLIENTS ENERGY NEEDS?
Nutritics is intended to be used by a range of health professionals in a variety of settings. We provide many options to cover the needs and preferences of our users. Typically, formulae based on lean body mass (Cunningham and Katch McArdle) predict RMR more accurately, especially in the athletic population. These require you to enter your clients body fat percentage however, which must be assessed separately. We recommend using the Mifflin St. Jeor formula if your client is free from disease and you don't know their body fat percentage. Those in a clinical/medical setting tend to use the Henry Oxford equation and add stress factors rather than PAL values. You can read more calculating your clients' energy requirements
here.
THERE ARE NO PORTION SIZES APPEARING FOR SOME OF THE FOODS I ENTER, WHY?
Portion size data are entered manually from numerous sources, and is a time consuming process. If the food has not yet been linked to portion size information, it is likely that portion size data is unavailable. In these instances you will be prompted to type the quantity of food in the box in grams.
CAN I TRANSFER MY CLIENT DETAILS TO A DIFFERENT NUTRITIONIST/USER?
Yes. Please contact customer support and provide the name of the client you wish to transfer/copy and the username of the person you would like to transfer the client to.
Back to Top
SHOULD I ENTER THE RAW WEIGHT OR THE COOKED WEIGHT OF A FOOD?
You should enter a food 'as eaten' wherever possible. Cooking can cause chemical and weight changes to many foods.
In some cases, this may not be possible, or it may even be more accurate to use raw weights. For example, if carrying out a recipe assessment for the purposes of calorie labelling, micronutrition is not as important and it can be more practical and accurate to use raw weights only.
Similarly when designing meal plans, it may be easier for your client to replicate a raw weight, especially if the foods end weight can vary significantly depending on cooking time and ratio of food:liquid used (eg. oats/porridge, pasta and rice cooked weights can vary significantly depending on water added and cooking duration)
WHAT IS THE DEMOGRAPHIC PORTION AND WHEN SHOULD I USE IT?
The demographic portion is from the research of Wrieden, W. and Barton, K. 2005 which analysed the average portion consumed by males and females across a range of ages in the National Diet and Nutrition Survey, UK. The source is available on the FSA website
here. We suggest you use this portion size if your client has not quantified a consumed food in units eg. cups, teaspoon, pieces or grams.
WHY IS THERE A DISCREPANCY BETWEEN THE FOOD LABEL DATA AND THE PIE CHART WHEN CREATING A RECIPE?
In the food label section, the data has been converted from database standards to food labelling standards, which expresses all carbohydrates by weight at 4kcal per gram. Protein is also calculated from a set nitrogen conversion factor of 6.25. Label values include energy contributions from fibre, organic acids and sugar alcohols as defined by the territories regulations.
The pie chart data and detailed list of nutrients is in the default food database standards. All carbohydrates here are reported as their monosaccharide equivalents at 3.75kcal per gram (so 60g of starch converts to 66 grams of monosaccharide equivalents). In addition, the nitrogen conversion factor to calculate protein varies depending on the food.
Fibre is not included in either carbohydrate figure, but is expressed separately by weight (in both scenarios).
The publishing panel will allow you to publish new foods in batch, rather than make individual foods live. Once foods are uploaded individually, or via batch import, they are saved to a new group based on the upload date.
Find these foods under the ‘My Products’ tab in the Nutritics Explorer:
Here, foods will be organised into two folders or groups: unpublished items, and your database folder, where you can find live items.
Click on a date to load all foods uploaded on that date.
The system will notify you of any changes that are required to make the food live:
Any serious errors will be dictated by an orange exclamation mark. Alternatively, click on the ‘Re-check’ button in the top bar to view the errors.
Right click the food needing action, and select ‘View/Edit’ to open the food and make edits.
You can ‘choose monitors’ to include in the workspace also. This will ensure you have entered complete information for your products e.g. product code, barcode number, portion size etc.
Once the required information has been updated, click ‘Publish’ to make all foods within this group live.
Where a food is modified via an upload, it will show in that day’s upload date only i.e. the date it was most recently uploaded.
The licence management platform will show the date each user was last active. You can send an individual reminder to a user from the button beside their name, or you can send a reminder to all users who have not yet logged in from the button that appears at the top of the licence management panel.
Administrators can also send password reset emails to users that have forgotten their passwords from this menu.
Users can be added to your organisation in
3 ways:
Manual Method:
Simply fill in the blank fields in the top row of the table and click the button to set up a new account.
Batch Method:
Multiple accounts can be created at once
from an excel / .csv file upload.
1. Click the 'batch import' button.
2. Click 'download the template' to download our sample spreadsheet.
3. Fill in the spreadsheet for all users. Note that all fields are required
4. Remove the top 3 rows from the sheet
5. Save the sheet to your computer
6. Upload the modified spreadsheet by clicking "upload modified template"
7. Import the users by selecting the 'upload modified template'
Automatic Method:
Each organisation has a custom sign up page for user self-registration. To access this page, click the 'org settings' button, then click the URL that is shown.
Users can register on this page using a unique licence activation code. Up to 4 codes can be set for an organisation from within this panel, each with a unique expiry date. Once a user registers on the custom registration page, their account is activated accordingly and the user’s details appear in the licence management platform.
Users who sign up via a custom sign-up page are activated immediately upon registration. Accounts which are added manually through the license management platform are not active until you click the 'activate' button.
Inactive accounts will appear in orange in the management platform, and may be activated in batch by clicking the button at the top of the panel. Once an account has been activated by the administrator, the user will be sent an email with their login details.
The licence management platform allows you
to view, add, and manage licences under your organisation. The platform is
accessible from Menu>Manage Users for elected administrators.
The number of
licences allocated and used are shown at the top right of the panel. Note that
you may activate an account for multiple years, and only one licence will be
used.
Expiry dates are set to the end of September by default. You can change the licence activation period in years by adjusting the date in the ‘expiry’ column.
To reclaim a licence, simply set this expiry date to a year in the past, and a new licence slot will become available for redistribution. Once a licence has been expired for more than 1 year, it will be archived into a folder at the bottom of your user list. Click this folder to view archived users and to reactivate an expired account if necessary.
Users can only be deleted from your management platform if they have not yet been activated. To delete a user click the button and then click ‘Delete’.
To remove an active user from your organisation, simply set their expiry date to a date in the past, and this account will be switched off. Accounts which have been expired more than 1 year are stored in the Archived Users folder at the bottom of your user list, so they may be reactivated in the future if required.
You can search the license management platform for any user by name, email
reference field or expiry date. To do this, press Ctrl + F on your keyboard,
and type in the search term. As you type, any matches will be highlighted
automatically. Note that if the user has been archived, you will need to open the
archive folder in order to search these users.
WATCH THE VIDEO:
https://www.youtube.com/embed/YiI_aui-FkM
Nutritics for Research has a number of additional features which are useful for performing large scale project and population based investigations. See the video above for an overview of these features.
Please note, this tutorial assumes you are familiar with the standard version of Nutritics.
When performing a food search, the search results will provide a preview of the foods Energy, Carbohydrate, Protein, Fat and Alcohol per 100g as standard. The nutrients displayed in this summary box can be customised from Menu>Settings>Preferences and changing the dropdown boxes to your preferred layout. This is useful where your investigation is concerned with a particular nutrient, to ensure there are no missing values in the foods selected.
Foods can be looked up by Nutritics ID number, by typing the ID number in the food search box. If you would prefer to use the source database food code (such as the McCance & Widdowsson code), this can be set in the preferences menu.
Custom fields can be used to tag custom data to foods and recipes e.g time/location of consumption, brand, supplier name, preparation method. Please note this is a premium feature.
Custom fields on foods
To attach custom fields to a food, open the food, scroll to the custom fields box and click '+new'.
Alternatively, open a diet log or recipe containing the food. Click on the food quantity and then click on the 'custom fields' tab.
Here, a custom field can be attached to the food on this input only or to the food itself. A custom field should be attached 'on this input only' e.g when fields for date, time, or most drop down type fields are being used. These would usually be required as variable fields so they can be set for each recipe individually.
A custom field should be attached to a food where the data entered is not variable. In other words, when you want the information to be recalled each time the food is used automatically e.g if you are tagging the country of origin or shelf life or other property to the specific ingredient or food.
Use the form builder to create any type of custom field for the log.
- Text:
Suitable for free text entry to a food diary
- Number:
This field will only allow data in numeric format
- Dropdown:
You can set up a drop down list for selection
during logging. Type a list of options for your dropdown, separated by commas
(eg. Breakfast, Snack, Lunch, Dinner, Evening Snack)
- Checkbox:
Enables a checkbox on the food diary (useful to
verify peer review, for food diary entry, for example)
- Date: This field will only allow data in date format (dd/mm/yyy)
- Time: This field will only allow data in time format (24hr clock)
- Nutrient: This field is useful for adding custom nutrients to a food
diary. For example, fortified folic acid or B12 added to a product.
Custom fields on recipes
To attach custom fields to a recipe, open the recipe, scroll to the custom fields box and click '+new'.
Nutritics is used by over 80 academic institutions for teaching and research purposes. As such, we get a lot of questions asking how to reference Nutritics in scientific publications and assignments. We've put together this helpful guide to assist.
Don't forget to check your current Nutritics version number from Menu > About/Cite Nutritics in-app!
APA Style
In-text: (
Nutritics, [[:year:]]) or (
Libro, [[:year:]])
In-bibliography: Nutritics. ([[:year:]]). Research Edition (v5.64) [Computer software]. Dublin. Retrieved from
https://www.nutritics.com/p/home. Nutritics. ([[:year:]]). Libro (v.09) [Mobile application software]. Dublin. Retrieved from
https://www.nutritics.com/p/home *To check your current version please log in to Nutritics and click Menu, then choose the last item on the list 'About/Cite Nutritics'.Vancouver Style
In-text: (
1)(numeric)
In-bibliography: Nutritics, *Research Edition, v5.64, Dublin, Nutritics, [[:year:]]. Libro,*v.9, Dublin, Nutritics, [[:year:]].
*To check your current version please log in to Nutritics and click Menu, then choose the last item on the list 'About/Cite Nutritics'.
Harvard Style
In-text: (Nutritics, [[:year:]]) or (Libro, [[:year:]])
In-bibliography: Nutritics. ([[:year:]]). Dublin: Nutritics. Libro. ([[:year:]]). Dublin: Nutritics.
*To check your current version please log in to Nutritics and click Menu, then choose the last item on the list 'About/Cite Nutritics'.
'Dietary reference values' (DRV) are the umbrella term for a range of nutrient values that apply to a population or group, and typically consist of numerous components:
A Lower Reference Nutrient Intake (LRNI): Meets the nutritional requirements of only 2.5% of the population.
An Estimated Average Requirement (EAR): The average amount of nutrient or energy required. Approximately 50% of the population will require more and 50% will require less.
A Reference Nutrient Intake (RNI): The amount of a nutrient sufficient to meet the needs of 97.5% of a population (calculated from the EAR + 2 SD)
Safe Intake (SI): Used in place of RNI when there is insufficient data available to set an RNI. A safe intake is likely to meet the needs of the majority of the population without causing any adverse effects of excess intake.
Safe Upper Limit (SUL): The maximum amount of a nutrient known to be safe to intake. Habitually consuming nutrients above the SUL is not recommended and can cause toxic effects in some cases.
Source: Food and Agriculture Organisation of the United Nations
Note: DRV’s are also known as NRV’s (Nutrient Reference Values – Aus/NZ) and DRI’s (Dietary Reference Intakes – USA). RNI’s are also known as RDI’s (Recommended Dietary Intakes) or RDA’s (Recommended Dietary Allowance). SI is also known as AI (Adequate Intakes). SUL’s are also known as UL (Tolerable Upper Intake Level)…just to keep it simple!
It is important to recognize that all these values apply to populations, and not to individuals. However, a number of assumptions can be made when using DRV’s with individuals:
1. If an individual is routinely consuming the RNI for a particular nutrient, it can be assumed that their diet provides adequate amounts (or more than adequate amounts) of that nutrient.
2. If an individual is consuming less than the RNI, it cannot necessarily be assumed that the diet is inadequate, as the person may have a lower requirement than average for that particular nutrient.
3. If an individual is consistently consuming less than the LRNI for a nutrient, it can be assumed that the person is deficient in that particular nutrient, although this does not imply the person is clinically ill.
4.The DRV’s will apply to the needs of healthy people and it cannot be assumed that the needs of those who are ill or extremely active are identical.
Choose which Dietary Reference Values you wish to use from the ‘DRV source’ drop down when setting up your client. The target intakes and ranges for nutrients on the report will be based on this selection. There are numerous options from International sources built in to Nutritics. You can also set your own targets using the DRV editor (see custom DRV section).
Built-in DRV’s in Nutritics include:
UK/SACN 2015: The Committee on Nutrition Aspects of Food and Nutrition Policy (COMA) with latest updates from the Scientific Advisory Committee
EFSA 2017: European Food Safety Authority Guidelines
EU/Nordic: The Nordic Nutrition Register (NNR)
USA: The Food Nutrition Board from the Institute of Medicine (IOM)
NZ/AUS: The National Health and Medical Research Council (NHMRC)
EU: The EU Reference Intakes used in Food Labelling
FDA: The US Daily Values for labelling in the US and surrounding territories
A Nutritics recommendation which combines macronutrient guidelines from American College of Sports Medicine (ACSM) with suggested dietary micronutrient targets for reducing the risk of developing chronic disease from the NHMRC. The Nutritics recommendations also show lower intake limits from the NNR and upper intake limits from the highest value deemed safe from the above authorities.
The Food Safety Authority of Ireland (FSAI) 1999 guidelines have been deprecated in Nutritics 5.0 as of November 2017.
Nutrient intake in excess of the RNI’s may reduce the risk of developing chronic diseases. Specifically, a higher intake of Vitamin C, E, A (particularly β-carotene), selenium, folate, omega 3 and dietary fibre may be benficial. The Australian & New Zealand National Health and Medical Research Council have published a second set of guidelines known as "Suggested Dietary Targets (SDT's) to optimise dietary intake for reducing the risk of chronic disease”. These SDT’s have been incorporated into the Nutritics DRV source only. Where no target intake has been set by in the SDT’s, the highest RNI has been taken from all International sources combined. Furthermore, the highest safe upper intake and the highest LRNI from all International sources has been set as upper and lower RNI’s on the Nutritics source.
The macronutrient recommendations provided in the Nutritics option are adopted from International Sports Nutrition guidelines, including the American College of Sports Medicine and American Dietetics Associations position stand on Nutrition and Athletic Performance, ISSN and Australian Institute of Sport:
These are provided as guidelines only; exact requirements will vary from person to person depending on factors such as training intensity, training duration, available recovery time, and fitness status.
The guidelines for pregnancy come from the UK Scientific Advisory Committee on Nutrition (SACN) and the National Health and Medical Research Council (NHMRC) in Australia.
Nutritics allows you to set custom nutrition targets for your clients. This ‘power
feature’ allows you to set nutrient targets as precise intakes, as calculations
based on body weight (or other formula based targets) or as an acceptable
distribution range. You can also define lower and upper limits for any
nutrient.
There are 2 ways to edit your clients' nutrition targets in Nutritics.
Short method
Please note this is only available to users with the custom DRV feature.
Open up a client profile and select the source of the client’s nutrition targets and the desired energy calculation formula under the nutrition requirements section.
Click on the customise button to edit the nutrition targets for your client or make a new template.
Clicking 'for this client' will open a new tab under the nutrition requirements heading. Right click to rename the tab.
Use the plus and minus buttons to add or subtract 100kcal per click to your clients’ energy target in line with their body weight goals. Use the slider to specify the split between exercise and diet.
The energy calculations are listed below the slider. These are also free text boxes so the PAL and RMR can be added manually.
Use the slider to specify the client’s macronutrient requirements. The blue portion of the slider is the client’s carbohydrate requirements, their protein in grey and fat is in orange.
The macronutrient targets are shown as a percentage of your client's energy target and also in total grams per day and grams per kg body weight.
Click on the arrow to change the direction of the energy calculation. By default, the client’s estimated energy intake is split into the macronutrient proportions.
Clicking on the arrow reverses the calculation and your client’s energy requirement is calculated from the macronutrient targets in grams/grams per kg body weight.
Example: Setting a target of 249g carbohydrate, 124g protein and 123g fat would give an EER of 2599Kcal (worked out below)
249g CHO x 4kcal/g = 996 kcal
124g Protein x 4kcal/g = 496 kcal
123g fat x 9kcal/g = 1107 kcal
This give a total EER of 2599 Kcal
Click on extended nutrients to edit additional nutrient targets such as the client’s micronutrient targets. Use the plus and minus buttons to make adjustments or type directly into the boxes.
Once satisfied with the custom nutrition targets, these can be applied to other clients by right clicking on the custom DRV tab and selecting 'copy to' and then selecting the client you wish to attach the custom DRV to.
The DRV tab that is open in the client profile is the one that will be applied e.g. when analysing diet logs or creating meal plans for your client.
Extended method:
The DRV editor can be accessed from Menu>Settings>Preferences or by selecting ‘Custom DRV…’ from the DRV source drop down options (on the client set up, reports and meal plans)
This will open the following screen:
Creating a New Entry:
1. Click the Custom DRV button from the drop down in the client section
2. Name the DRV and provide a reference or author and description if desired.
3. Click the 'duplicate this DRV' button
4. Define the inclusion criteria that the DRV’s will apply to (gender, age range etc)
5. Define the DRV’s using the guide below
6. Changes are saved automatically
Editing an Existing Entry:
1. Select the DRV source you wish to edit from the drop down at the top left (The field “Nutritics” in the example above)
2. Click the 'Duplicate this DRV...' button
3. Rename the DRV, author, and description as desired.
4. Select the record you wish to edit from the drop down at the top right (The field “Select Record” in the example above”). This will import the existing values into the tables which can now be edited.
5. Changes are saved automatically
Type any figure in the box to set that figure as the Recommended Intake:
Add a ^ symbol (shift + 6) after the recommendation to include a lower limit.
Add a second ^ to include an upper limit:
Use a | symbol (shift + )to set a recommended intake range:
Advanced Programming:
Use basic calculator notation (addition +, multiplication *, subtraction -, division /) and nutrient keywords to program advanced formulae.
Acceptable keywords include weight, age, bodyfat, lbm (lean body mass), bmi, eer (recommended kcal intake) and pal. These are based on data from the client information panel (panels 2 and 3). Take note they are all lower case.
You can also use any nutrient in a formula by typing it in the box exactly as it appears in the DRV editor (all lower case).
Working Examples:
1. Carbohydrate
intake is 55% of kcal intake
EER is
estimated energy requirements, multiplication by .55 gives 55%. 3.75 is the
number of calories in one gram of carbohydrate, this converts the 55% of calories
into a weight in grams
2. Carbohydrate
intake is 55% of kcal intake with a lower limit of 100g
3. Carbohydrate intake is 55% of kcal intake with a lower limit of 100g and an upper limit of 75% of calorie intake
4. Protein
intake is 20% of kcal intake
4 is the
number of calories per gram of protein, this converts 20% of calories to grams.
5. Protein
intake is 1.2 times the client’s body weight
6. Protein
intake is a range from .8 -1.6 times the client’s body weight
7. Fat
intake is a range from 20-35% of kcal intake
9 is the
number of calories per gram of fat
8.
Fat intake is a range from 20-35% of kcal intake and an upper limit of 40% of
kcals.
9.
Folate intake is a range 300-600µg with a lower limit of 100 µg and an upper
limit of 1000 µg
10.
Vitamin D intake is 15µg with a lower limit of 5 µg
Please contact support@nutritics.com if you require assistance setting up
custom Dietary Reference Values.
To create a meal plan template click start < new meal plan.
Select a pre-existing meal plan or start from scratch. Selecting ‘start from scratch’ will open a blank meal plan template.
This is a master meal plan and is not attached to any clients. The meal plan can be attached to clients by clicking on the drop down menu at the top of the workspace. See below for more on attaching meal plans to client profiles.
Any changes to the master meal plan will be applied to any client copies of the meal plan. Changes to individual client copies of the meal plan will only apply to that client.
Build your meal plan (see
here for a guide on this). Once you are happy with your meal plan template, add it to a group for easy retrieval later.
To do this, click on the ‘meal plan’ folder in the Nutritics Content Explorer.
By default, all newly created meal plans are added to the ‘ungrouped’ meal plan group.
Click on the ‘ungrouped’ meal plan folder. Drag and drop the newly created meal plan into an existing group or create a new group.
Click on a meal plan group to see all meal plans within that group.
USING THE MEAL PLAN TEMPLATE
The meal plan can be attached to a client profile in a few ways.
1. When working on the master meal plan, the meal plan can be attached to clients by clicking on the dropdown menu and selecting 'add client'.
2. Alternatively, open a client profile and click on the plus button beside the meal plan heading.
Select ‘use existing’ from the options presented.
Select a meal plan from the meal plan groups and click 'attach'.
Click 'enable editing' to make an editable copy of the meal plan (any changes made will not affect the original meal plan, they will only be applied to the copy).
Nutrient intake in excess of the RNI’s may reduce the risk of developing chronic diseases. Specifically, a higher intake of Vitamin C, E, A (particularly β-carotene), selenium, folate, omega 3 and dietary fibre may be benficial. The Australian & New Zealand National Health and Medical Research Council have published a second set of guidelines known as "Suggested Dietary Targets (SDT's) to optimise dietary intake for reducing the risk of chronic disease”. These SDT’s have been incorporated into the Nutritics DRV source only. Where no target intake has been set by in the SDT’s, the highest RNI has been taken from all International sources combined. Furthermore, the highest safe upper intake and the highest LRNI from all International sources has been set as upper and lower RNI’s on the Nutritics source.
The macronutrient recommendations provided in the Nutritics option are adopted from International Sports Nutrition guidelines, including the American College of Sports Medicine and American Dietetics Associations position stand on Nutrition and Athletic Performance, ISSN and Australian Institute of Sport:
These are provided as guidelines only; exact requirements will vary from person to person depending on factors such as training intensity, training duration, available recovery time, and fitness status.
WATCH THE VIDEO:
https://www.youtube.com/embed/rvamr0gRFu0
Recipes and foods can be organised into menus and cost assessed in the foodservice version of Nutritics or with the foodservice add-on pack. After a menu is created, there are a number of display options available for use, including a digital interactive menu, a printable allergen & calorie summary report, and full menu cycle overview report. To create any of these reports, a menu must first be produced:
1. Click ‘Start’ then ‘New Menu’ to start creating a menu or menu cycle. Alternatively, click the folder icon below the food search box, then click 'My Menus' > 'New Menu' to create a new menu
2. Enter a name for your menu, for example, Monday's Menu, á la carte, Early Bird, Weekend Specials etc.
3. Click ‘New Group’ to add a heading to your menu (e.g. soups, sandwiches, entrees)
4. Drag and drop recipes, foods or food/recipe groups onto your menu (or use the insert button)
Pro Tip: Switch the workspace view between the tile and list mode by clicking the toggle in the bottom right of the screen.
5. Select the recipe portions that should appear on the menu from the dropdown
6. Rearrange groups or menu items by dragging and dropping
7. Click ‘Choose Monitors’ from the top toolbar to customise the detail that is available on display
If the menu will be used for ordering, use the 'sold out' monitor to add a ‘sold out’ banner over the menu item on your digital menu.
You can use the 'order limits' monitor to control the number of items customer can order.
Setting a min order means the customer must select at least this many menu items from this menu group e.g. build your own breakfast by picking at least 2 meats
Setting a max order means the customer cannot select any more than the specified number of items from this menu group e.g. make your own sandwich, choose 1 bread, 1 meat and 3 salads.
Any order limits will be displayed on the digital menu beside the menu group name.
8. Click the digital menu button in the top toolbar to preview your menu in digital format (top picture below) or click the paper menu to generate an allergen and calorie summary sheet (bottom picture below):
Menu settings
Menu settings are accessed by clicking on the grey slider icon in the top right corner of the menu workspace.
Within the settings menu, there are several tabs that allow for the customisation of the menu
Display tab
Choose the information to be displayed on paper and digital menus e.g. menu item prices, calories and allergen information, an ingredient list and front and back of pack nutrition information.
Select show the 'all items' group to allow the menu to default to all items. Alternatively, toggle this off so the menu defaults to the first recipe group available.
Choose the look of the menu e.g. apply a light or dark theme and select how many menu items or ‘tiles’ are displayed in each line.
Enter a disclaimer to be displayed on all menu items, or add a welcome message for your menu.
Interactivity tab
Choose how customers can interact with the menu.
Interactive mode allows customers to scroll through the menu and click on menu items for more information/ordering purposes and is recommended where menus are being displayed on touchscreens. Untick this option is your menu will be displayed on a digital display or TV that is not a touchscreen.
Tick ‘Allow users to go back to the list of menus’ to allow customers to exit the current menu they are viewing and browse all published menus e.g. you might want to allow your customer to exit the bar menu and look at the restaurant menu.
Tick ‘The screen resets to the list of menus’ and the menu will return to the list of published menus after a period of inactivity.
Enable a ‘featured items’ screensaver and menu items will flash on screen when the menu is left idle.
Ordering tab
For more information please see our separate guide on meal ordering
here.
Notifications
Choose what notifications you or the customer receive with ordering.
Publishing tab
Menus can be made live from the publishing tab using the drop-down.
Choose if the menu is published immediately or schedule a date and time for the menus to go live.
Live menus have an orange circle beside the menu title in the Nutritics explorer and on the the digital button in the menu workspace.
Click on the digital button to preview your digital menu.
Sharing tabChoose how the menu will be accessed by customers in the ‘sharing’ tab.
Libro is an app designed to track diet, exercise and lifestyle goals. Libro users log their diet and exercise on the app and receive analysis reports and feedback from their nutrition professional directly to their phone. Publish menus to Libro to allow Libro users to browse the menu on their smartphone.
Tick 'enable sharing' and copy and paste the menu URL to display the menu on a website, on a tablet or other displays; embed the menu on a website using the code provided or display the QR code online or at an outlet for customers to scan.
Save as template
Menu settings can be saved as a template and applied to other menus. Click ‘save as’, name your template and the template will be saved for reuse.
To apply a template, click on the template name and select apply. Right-click on the template name to set it as the default menu layout, to update the template or to rename or delete the template.
Multiple Menus can be grouped together to produce a full scheduled plan for any number of weeks. Click the ‘New Menu Cycle’ button at the bottom of My Menus.
Existing Menus can now be added to this folder by dragging and dropping, or a new menu can be created, nestled within this cycle by clicking the +New Menu button.
Drag and drop menus within a menu cycle to rearrange the order they are in within in the folder.
A Meal Summary Report can subsequently be produced from a menu cycle. Right click the Menu Cycle name heading (Week 1 in the screenshot above) and click export to generate this report:
Pro Tip: If the same menu appears in mutliple Menu Cycles (eg. week 1, week 3 and week 5) it can be copied by holding the ctrl key while dragging it in to the new location, or assigned to mutliple cycles from the settings button at the top right of the My Menus workspace
The Nutritics Digital Menu display is intended for use by Food Businesses, providing a front-of-house view where your customers can browse your menu and make better informed meal choices very efficiently without staff involvement. Click
here to see a sample digital menu now designed for tablets and tvs.
The digital menu is updated in real time as you make changes to your recipes, thus avoiding versioning issues associated with printed menus and allergen lists. They can be displayed on your own on-site tablets or TV’s, or they can be accessed on the customers own smartphone by scanning a unique QR code. Customers can filter menus by their dietary requirements and menus can be translated to different languages.
1. In order to create a digital display, you will first need to create a menu by following the steps in our guide on
creating a menu. Your digital menu display is based on the content of your menus created during this step.
Pro Tip: It is a good idea to add photos to recipes that will be used on your customer facing digital menus. This will ensure there is a strong visual element to your menu
2. Open your menu and click the slider icon in the top right corner of the page to manage the display options and settings for the menu.
Within the settings menu, there are several tabs that allow for the customisation of the menu:
Display tab
- Choose the information to be displayed on paper and digital menus e.g. menu item prices, calories and allergen information, an ingredient list and front and back of pack nutrition information.
- Choose the look of the menu e.g. apply a light or dark theme and select how many menu items or ‘tiles’ are displayed in each line.
- Enter a disclaimer to be displayed on all menu items.
Interactivity tab
- Choose how customers can interact with the menu.
- Interactive mode allows customers to scroll through the menu and click on menu items for more information and is recommended where menus are being displayed on touchscreens. Untick this option is your menu will be displayed on a digital display or TV that is not a touchscreen.
- Tick ‘Allow users to go back to the list of menus’ to allow customers to exit the current menu they are viewing and browse all published menus e.g. you might want to allow your customer to exit the bar menu and look at the restaurant menu.
- Tick ‘The screen resets to the list of menus’ and the menu will return to the list of published menus after a period of inactivity. Enable a ‘featured items’ screensaver and menu items will flash on screen when the menu is left idle.
Ordering tab (only applicable to users with the ordering add on)
- Select the type of orders accepted, i.e. delivery, eat-in and take-away
- Set the default order type (this will be the first option loaded by default when the customer is placing their order) and select the contact information required from the customer to complete their order.
- For more on ordering for the food industry see here, and for ordering in a clinical setting see here.
Notifications tab
Choose what notifications you and the customer receive with ordering.
Publishing tab
- Choose if the menu is published immediately or schedule a date and time for the menus to go live.
- Live menus have an orange circle beside the menu title in the Nutritics explorer and on the the digital button in the menu workspace.
- Choose how the menu will be accessed by customers in the ‘sharing’ tab. Libro is an app designed to track diet, exercise and lifestyle goals. Libro users log their diet and exercise on the app and receive analysis reports and feedback from their nutrition professional directly to their phone. Publish menus to Libro to allow Libro users to browse the menu on their smartphone.
Pro Tip: Attaching your Google Maps business location to your profile from Menu>Settings>Your Profile will make your live published menus available to public users who use Libro smartphone app. your dishes and menus will be presented as local suggestions that suit their dietary and nutrition requirements.
3. Once satisfied, click the 'digital' button in the toolbar at the top of the page to preview how the digital menu will look
4. Click on the menu name in the digital menu view to go back to a list of live published menus and all the inactive menus previously created.
Alternatively, access this list by entering the URL www.nutritics.com/menu/USERNAME on any device.
Menus can moved from live to inactive by drag and drop. Your customers won’t see menus in the ‘Other Menus’ section.
Pro Tip: Add a background image of your store or kitchen to give your digital menus display a more professional finish – just click the ‘Add Background Image’ button at the bottom right of the screen.
All menu sharing options are available from the 'sharing' tab of the menu settings.
Menu settings can be accessed by opening a menu from the Nutritics content explorer, clicking on the slider icon in the top right corner of the screen. Sharing options are accessed by clicking on the 'sharing' tab.
From within the sharing tab, there are a number of ways in which your menus can be displayed.
QR Code:
Intended for display on customers own smartphone devices.
Accessed by customer by scanning a barcode which can be printed / stuck onto your printed menus, or printed as a ‘tent’ display for the table (or any other location).
Generate your QR code by opening the menu from the content explorer, navigating to the menu settings and clicking on the 'sharing' tab
Allows customers to browse your menu even if they are not ‘on-site’.
Direct Access Link:
Intended for display on any device – provides access to one specific menu only.
Most useful for enhancing your website online – simply add the direct access link to your website to provide instant access to an interactive menu.
Copy and paste the access link from the 'sharing' tab of the menu settings.
Embed Code:
- Useful for enhancing your website.
- Copy and paste the code onto your website to embed the menu.
Publish to Libro:
- Please see a separate guide on this here.
Access all menus:
Intended for display on an on-site kiosk or table side tablet / menu.
Paper Menus provide a summary table displaying a list of meals on your created menu (see our guide on menu creation), complete with calorie and allergen information:
Just click the ‘Paper’ icon at the top toolbar of ‘My Menus’ to generate a paper menu. The display options can also be customised from the settings, accessed by clicking on the slider icon in right of the top toolbar.
Create and export shopping list from your recipes, meal plans or menus. Shopping lists can be created in pdf. or .csv format.
Click on the start menu and select ‘shopping list’ under the input/output heading.
Select the type of data to be exported to a shopping list by using the tabs along the top.
Any groups created in the Nutritics account will be visible and allow for easy filtering of data. Click on a group to expand it.
Tick any items to be included in the export.
Specify the number of servings the shopping list should include.
Select how the shopping list should be organised in the dropdown menu.
This will group ingredients with the same category together under category headings e.g. fruits & vegetables or nuts & seeds.
This will list your recipes in alphabetical order, with an ingredient list under each recipe heading.
This will list all ingredients in alphabetical order.
If the costing feature is enabled on your account, ingredient costs can be added to the export by ticking 'include costs'.
Exporting your shopping list
Click 'download excel' to export a shopping list in .csv format or click on ‘preview’ to generate the shopping list in a new tab. The shopping list preview can be printed, downloaded in .pdf format or shared using the buttons at the bottom of the screen.
Shopping lists include a food code column, the ingredient names, quantities and if applicable, the ingredient costs based on the quantity in the shopping list, cost per kg and waste costs.
Creating shopping lists for menus
Shopping lists can be generated for menus in a couple of different ways.
From the start menu:
- Click on the menus tab to generate shopping lists for your menus (1).
- Use the filters along the top to open a menu cycle (2).
- Click on a menu name to expand a list of menu items (3) and tick any menu items to be included on the export. Individual portion sizes are listed separately.
- Specify the number of portions to be included in the export (4).
- Select your grouping preferences and whether costs should be included in the report (5).
- Click preview to generate the shopping list (6).
From the menu workspace:
You can use the popularity and servings monitors in the menu workspace to generate a shopping list for your menus.
- Open a menu and click 'choose monitors'
- Enable the 'popularity' and 'servings' monitors
- In the menu workspace, estimate the popularity of menu items. Note the popularity of each menu group must add up to 100.
- Add the total number of servings required for the menu group and Nutritics will calculate the number of servings for each menu item.
- Click 'export to' in the top right corner of the screen and select 'shopping list'.
- This will open the shopping list menu. Items in your menu will automatically be selected. You can add additional menu items by clicking on them or change the number of servings if needed.
- Specify your export preferences and click preview to generate a pdf shopping list or export to excel.
From the live orders dashboard:Generate a shopping list of orders placed via your digital menus. This is useful where customers order in advance.
- Open the live orders dashboard from the Nutritics content explorer.
- Click on the 'export to' menu in the top right corner of the screen.
- This will open the shopping list menu. Items that were in the order dashboard will automatically be selected. You can add additional menu items by clicking on them or change the number of servings if needed.
Libro is an app designed to track diet, exercise and lifestyle goals. Libro users log their diet and exercise on the app and receive analysis reports and feedback from their nutrition professional directly to their phone.
Libro users log what they eat by choosing items from our extensive database of foods and recipes. Users can also choose to browse and log menu items from restaurants in their area.
If you have the foodservice edition of Nutritics and would like to publish your menu so it is available to Libro users, follow the steps below:
In your Nutritics account, navigate to the menu in the top right corner of the screen and click on ‘settings’.
In the ‘ordering’ tab, search in the search bar and select your outlet from the list. Please note only one outlet can be attached to each Nutritics account. If you have multiple locations and would like more than one to appear in Libro, you will need a Nutritics account for each location that you would like to appear in the app. If you need more outlets or are interested in our meal ordering system, contact our sales team.
Upload your company logo in the 'Your Profile' tab of the settings heading as this will appear in Libro.
Create a menu and make it live. We have separate guides on creating menus here and on digital menus here.
Pro tips:
You should ensure that you have prices and pictures for all menu items.
Try and add various portion sizes under one recipe for the best experience for your customers. For example, small/medium/large fries should be portions in under one food/recipe instead of having different recipe for each portion size.
Open a menu and navigate to the menu settings (open a menu and click on the grey slider icon in the top right corner of the screen)
Click on the sharing tab and tick 'publish this menu to Libro smartphone app'
When Libro users log in near your outlet, they will be able to browse through your menu and add items to their food diary.
When Libro users log in near your outlet, they will be able to browse through your menu and add items to their food diary.
WATCH THE VIDEO:
https://www.youtube.com/embed/RDNxZ2f_TU8
If you are interested in adding meal ordering to your Nutritics account, please contact sales@nutritics.com
This guide will show you:
- how to set up your food outlet in Nutritics
- how to publish your existing menus and enable ordering
- the customer facing side of the ordering system
- how to manage your orders in the orders dashboard
If you have not already built up your menus in Nutritics, please see our guide on menu creation here.
Outlet set up
To enable ordering on your account, you must first set up your outlet in Nutritics.
- Click on the cog icon in the top right corner of the screen, click on ‘settings’ then ‘ordering’.
- Search in the search bar and select your outlet from the list.
- Add in your outlet details.
- Add your outlet’s social media accounts in order to be able to share your menus to your social media platforms directly from within your menu settings.
- Set the width of your thermal paper rolls used for docket and receipt printing. Dockets and receipts can be printed from the orders dashboard.
- Tick the days that your outlet is open. If ordering is enabled on your menus, customers will only be able to order on days you are open. Use the calendar to mark any holidays that your outlet is closed. Customers will not be able to place orders for those days.
- Under the meal services heading, specify how your customers can receive their orders, e.g. take away, delivery.
- If desired, share your outlet with other Nutritics users. Type a Nutritics username or email address to enable sharing with the user. If your licences are part of an organisation or group, you will see all users of the organisation when you click ‘add user’. You can also choose to share with all account holders within the organisation. You will have the option to share the outlet with read only or read & write privileges after adding a collaborator.
- Payments
Allow customers to pay for their order directly from your digital menus.
Payments will be collected by Nutritics payment partner Stripe. Follow the instructions on screen to connect Stripe with your Nutritics account and add details including where payout from orders should be deposited. By default, payouts will be made to your bank account daily.
Once your Stripe account is connected, it can be accessed from the main menu > settings > ordering.

- Next, set up the waiting staff, areas and tables. This information will be visible on ‘eat-in’ orders in the ordering dashboard.
- Add the staff members. If desired, staff members can be assigned pin codes that they will need to enter to gain access to menus. If staff members log into a menu and then a customer orders from that menu, you will be able to see the staff member associated with the order in the orders dashboard.
Menu settings and publishing
Once the menus and the outlet have been set up, open the menu you would like to publish from the Nutritics content explorer and review the menu settings. If you have not already created your menus in Nutritics, please see our guide on menu creation here.
Menu settings are accessed by clicking on the grey slider icon in the top right corner of the menu workspace.
Within the settings menu, there are several tabs that allow for the customisation of the menu:
Display tab
Choose the information to be displayed on paper and digital menus
- Enable menu item prices, calories and allergen information, an ingredient list and front and back of pack nutrition information.
- Choose the look of the menu e.g. apply a light or dark theme and select how many menu items or ‘tiles’ are displayed in each line.
- Enter a disclaimer to be displayed on all menu items, or add a welcome message for your menu.
- Type in a welcome message/instructions to display to customers when the menu is loaded. Use the toolbar to format the text. Click on the picture frame icon to upload an image.
Interactivity tab
Choose how customers can interact with the menu.
- Interactive mode allows customers to scroll through the menu and click on menu items for more information/ordering purposes and is recommended where menus are being displayed on touchscreens. Untick this option is your menu will be displayed on a digital display or TV that is not a touchscreen.
- Tick ‘Allow users to go back to the list of menus’ to allow customers to exit the current menu they are viewing and browse all published menus e.g. you might want to allow your customer to exit the bar menu and look at the restaurant menu. Tick ‘The screen resets to the list of menus’ and the menu will return to the list of published menus after a period of inactivity.
- Enable a ‘featured items’ screensaver and menu items will flash on screen when the menu is left idle.
Ordering tab
Enable ordering to allow customers to place orders from the digital menu. Orders will appear in the ‘Orders’ folder in the Nutritics content explorer.

- Enable card payments from this tab.
- Max advance orders per day: This allows orders to be booked for subsequent days. Define how many advance orders can be booked each day.
- Min lead time: Set the minimum amount of time and order can be placed before it’s due i.e. the minimum lead time it will take the kitchen to produce an order for this menu. For example, if the lead time is set to 15 minutes and a customer tries to place an order at 3pm, the earliest ‘due time’ slot will be 3:15pm.
The lead time for orders can be controlled in 2 places:
1) In the ordering tab of individual menu settings as described above.
2) The minimum lead time can also be controlled by the kitchen in the live orders dashboard.
Click on the meal service type e.g. delivery and use the plus or minus icons to edit the due time.
Note the due time can only be increased here and cannot go below the due time set on an individual menu e.g if the lead time of a menu is set to 20 minutes but the kitchen is busy and needs more time to fulfill the orders, they could set the lead time from the dashboard to 30 minutes and this lead time will be applied. If the kitchen is quiet however and wants to decrease the lead time e.g. to 15 minutes, this would need to be changed in the individual menu settings.
- Allow orders for specific meal/time slots: This should be used where meal times are at a set times e.g. breakfast is served at 8am, lunch is at 12pm and dinner at 6pm.
- Allow orders at custom times: Allows customers to choose their order ‘due time’ from automatically calculated time slots. Define how many orders the kitchen can handle in a set amount of time.
This will determine the amount of due time slots that are visible to the customer when ordering from your menu.
Pro tip: make sure your opening days and any days you are closed for holidays are set in your main ordering settings so they will not appear in the calendar view. These are accessed by going to the main menu in the top right corner of the screen (cog icon) > settings > ordering.- Set the default order type (this will be the first option shown to customers when selecting how they wish to receive their order).
- Set the service operating hours for each order type e.g table service is available all day but delivery is only from 5-9pm (or leave this blank to accept orders at all times).
- Set and optional fee for orders.
Note that card payments will need to be enabled for this to work (scroll to the top of the ordering tab to enable payments). - Select what information is required from the customer e.g. name, address, phone number (this must be ticked to enabled SMS notification to customers that their order has been received).
Notifications
- Choose to be notified via email each time a new order is submitted.
- Choose to send customers an SMS message confirming their order. Note you will need to collect customer phone numbers (enabled from the ordering tab of your menu settings) for this to work.
- Send customers a confirmation email summarising their order.
Publishing tab
Publish your menus so staff and customers can view and interact with your menus on a digital display.
- Staff login can be enabled from this tab. Staff members can be assigned pin codes that grant them access to menus. Pin codes can be assigned by clicking on the 'add staff' shortcut or from the outlet settings accessed by clicking on the cog icon in the top right corner of the screen < settings < ordering.
- Menus are made live from the publishing tab tab using the drop-down. Choose if the menu is published immediately or schedule a date and time for the menus to go live. Click here for more information on scheduling menus.
- Live menus have an orange circle beside the menu title in the Nutritics explorer and on the the digital button in the menu workspace.
- Click on the digital button to preview your digital menu.
Sharing tabChoose how the menu will be accessed by customers in the ‘sharing’ tab.
- Libro is an app designed to track diet, exercise and lifestyle goals. Libro users log their diet and exercise on the app and receive analysis reports and feedback from their nutrition professional directly to their phone. Publish menus to Libro to allow Libro users to browse the menu on their smartphone
- Copy and paste the menu URL to display the menu on a website, on a tablet or other displays; embed the menu on a website using the code provided or display the QR code online or at an outlet for customers to scan.

- To see your full menu list, click ‘get main menu url’. This will provide you with a link to a list of all active and inactive digital menus in your Nutritics account.
Menu settings can be saved as a template and applied to other menus. Click ‘save as’, name your template and the template will be saved for reuse.
To apply a template, click on the template name and select apply. Right-click on the template name to set it as the default menu layout, to update the template or to rename or delete the template.
Templates can be applied to an individual menu, a menu 'folder' group or all menus across your account by selecting the relevant option from the drop down shown above.
Limiting items ordered on menus
To limit the amount of items that can be ordered from a menu, click on the monitors button from your menu workspace.
Order limits can be set using the monitors under the 'administration' heading.
Sold out: Enable this monitor and tick any items that are no longer available. The item will still appear on your digital menu, but will bear a 'sold out' banner.
Min and max order: Setting a min order means the customer must select at least this many menu items from this menu group e.g. create your own breakfast by selecting 2 meats.
Setting a max order means the customer cannot select any more than the specified number of items from this menu group e.g. make your own sandwich, choose 1 bread, 1 meat and 3 salads.
Any order limits will be displayed on the digital menu beside the menu group name.
Customer view
If a menu is password protected, a staff member will be required to log in to see the menu.
Enter the name and pin assigned to the staff member in your outlet settings.
Menu items are shown in a tile format.
Customers can click on the language dropdown at the top of the screen to translate the menu into their preferred language.
Customers can scroll through and filter the menu by clicking on the tabs along the top.
Customers can also filter by their dietary preferences and allergies by clicking on the drop-down menu at the top of the screen.
Clicking on a menu item will open it (the information on display e.g. calories, pricing etc. can be controlled from the menu settings).
Specify the desired number of servings and any notes for the kitchen.
Items are added to a basket at the bottom of the screen.
Depending on the menu set up, customers can choose to eat in, take away or have their order delivered by following the prompts on screen.
If payments are enabled, customers will be prompted to enter their card details to complete their order.
Customers will receive on-screen confirmation of their order.
Order Dashboard
The order dashboard is accessed via the Nutritics Content Explorer. Click ‘Orders’ then ‘Live Orders’.
- A summary of all orders is shown in the first panel. Items are organised into the food and recipe groups set up in the Nutritics account.
- The number of times an item has been ordered is shown beside the item name.
- Individual orders are shown to the right of the summary panel.
- Order information includes an icon displaying if the order is for sit in, take-away or delivery
- Also shown is the order number; the time the order is due; customer details; and the order items organised into groups.
- Click on the paperclip icon beside a customer name to see more information on the customer.
Toggle a condensed view of the orders or enable fullscreen mode using the icons in the top right corner of the screen.
In the condensed view, click on an order to see more information on it.
Control the minimum lead time for orders directly from the orders dashboard. Click on the due time and use the plus / minus icons to increase/decrease the lead time. This is useful for ensuring the kitchen is not overloaded with orders.
Click on an item in the order summary panel to view all orders containing that item. In the panel that expands, you will see if any orders require a modified version of that item, for example if the customer has added any notes to their order. Click on the item again in the order summary panel to go back to viewing all orders.
Right-click on an item to view the cooking instructions and ingredient list. You can adjust the number of servings required and the ingredient list will update automatically.
Keep track of order progress by clicking on order items to tick them off.
Change the status of an order using the drop-up menu on individual orders, or set order status in bulk from the order summary panel.
Print a receipt or docket for an order by clicking on the printer icon on individual orders. Note that the width of the thermal rolls used for printing must be specified in your outlet settings accessed by going to the menu in the top right corner of the screen > settings > ordering. Print dockets in bulk based on their status by clicking on the printer icon in the order summary panel.
Filter your orders using the search tool.
Orders can be filtered by:
- Due time
- Date the order was placed or days offset e.g. days in advance, setting this to 0 will show today’s orders, setting this to 1 will show orders for tomorrow, setting it to 2 will show orders for 2 days time and so on
- Area where the customer is sitting (if applicable)
- The menu the customer ordered from e.g. bar menu, main restaurant menu
- Staff member (if staff login is enabled on menus)
- Order status e.g. pending, ready for collection
- Table number
- Meal groups e.g. starters, pastries
Save commonly used searches by setting your search criteria and clicking ‘save’. Give the search a title. Saved searches appear to the left when the search dropdown is open.
New orders can be placed directly from the order dashboard by clicking on ‘new order’. This will open a list of menus. Select the relevant menu and order as normal.
WATCH THE VIDEO:
https://www.youtube.com/embed/RDNxZ2f_TU8
This guide will show you:
- how to set up your food outlet in Nutritics
- how to publish your existing menus and enable ordering
- the customer facing side of the ordering system
- how to manage your orders in the orders dashboard
If you have not already built up your menus in Nutritics, please see our guide on menu creation here.
Outlet set up
To enable ordering on your account you must first set up your outlet on Nutritics.
- Click on the cog icon in the top right corner of the screen, click on ‘settings’ then ‘ordering’.
- Search in the search bar and select your outlet from the list.
- Add in your outlet details.
- Next, set up the waiting staff, areas and tables. This information will be visible on ‘eat-in’ orders in the ordering dashboard.
- Add the staff members. If desired, staff members can be assigned pin codes that they will need to enter to gain access to menus. If staff members log into a menu and then a customer orders from that menu, you will be able to see the staff member associated with the order in the orders dashboard.
Menu settings and publishing
Once the menus and the outlet have been set up, open the menu you would like to publish from the Nutritics content explorer and review the menu settings.
Menu settings are accessed by clicking on the grey slider icon in the top right corner of the menu workspace.
Within the settings menu, there are several tabs that allow for the customisation of the menu:
Display tab
Choose the information to be displayed on paper and digital menus
- e.g. Enable menu item prices, calories and allergen information, an ingredient list and front and back of pack nutrition information.
- Choose the look of the menu e.g. apply a light or dark theme and select how many menu items or ‘tiles’ are displayed in each line.
- Enter a disclaimer to be displayed on all menu items.
Choose how customers can interact with the menu.
- Interactive mode allows customers to scroll through the menu and click on menu items for more information/ordering purposes and is recommended where menus are being displayed on touchscreens. Untick this option is your menu will be displayed on a digital display or TV that is not a touchscreen.
- Tick ‘Allow users to go back to the list of menus’ to allow customers to exit the current menu they are viewing and browse all published menus e.g. you might want to allow your customer to exit the bar menu and look at the restaurant menu.
- Tick ‘The screen resets to the list of menus’ and the menu will return to the list of published menus after a period of inactivity.
- Enable a ‘featured items’ screensaver and menu items will flash on screen when the menu is left idle.
Ordering tabEnable ordering to allow customers to place orders from the digital menu. Orders will appear in the ‘Orders’ folder in the Nutritics content explorer.
Select the type of orders accepted, i.e. delivery, eat-in and take-away; set the default order type (this will be the first option loaded by default when the customer is placing their order) and select the contact information required from the customer to complete their order.
Publish your menus so staff and customers can view and interactive with your menus on a digital display.
Staff login can be enabled from this tab. Staff members can be assigned pin codes that grant them access to menus. Pin codes can be assigned by clicking on the 'add staff' shortcut or from the outlet settings accessed by clicking on the cog icon in the top right corner of the screen < settings < ordering.
Menus can also be made live from the publishing tab tab using the drop-down. Choose if the menu is published immediately or schedule a date and time for the menus to go live.
Live menus have an orange circle beside the menu title in the Nutritics explorer and on the the digital button in the menu workspace.
Click on the digital button to preview your digital menu.
Sharing tabChoose how the menu will be accessed by customers in the ‘sharing’ tab.
Libro is an app designed to track diet, exercise and lifestyle goals. Libro users log their diet and exercise on the app and receive analysis reports and feedback from their nutrition professional directly to their phone. Publish menus to Libro to allow Libro users to browse the menu on their smartphone.
Menu templatesMenu settings can be saved as a template and applied to other menus. Click ‘save as’, name your template and the template will be saved for reuse.
To apply a template, click on the template name and select apply. Right-click on the template name to set it as the default menu layout, to update the template or to rename or delete the template.
Customer view
If a menu is password protected, a staff member will be required to log in to see the menu.
Enter the name and pin assigned to the staff member in your outlet settings.
Menu items are shown in a tile format. Customers can scroll through and filter the menu by clicking on the tabs along the top.
Customers can also filter by their dietary preferences and allergies by clicking on the drop-down menu at the top of the screen.
Clicking on a menu item will open it (the information on display e.g. calories, pricing etc. can be controlled from the menu settings).
Specify the desired number of servings and any notes for the kitchen.
Items are added to a basket at the bottom of the screen.
Depending on the menu set up, customers can choose to eat in, take away or have their order delivered by following the prompts on screen.
Customers will receive on-screen confirmation of their order.
Order Dashboard
The order dashboard is accessed via the Nutritics Content Explorer. Click ‘Orders’ then ‘Live Orders’.
A summary of all orders is shown in the first panel. Items are organised into the food and recipe groups set up in the Nutritics account.
The number of servings is written beside the menu item in orange.
Individual orders are shown to the right of the summary panel.
Order information includes an icon displaying if the order is for sit in, take-away or delivery; the order number; the time the order is due; customer details; and the order items organised into groups.
Click on the paperclip icon beside a customer name to see more information on the customer.
Toggle a condensed view of the orders or enable fullscreen mode using the icons in the top right corner of the screen.
In the condensed view, click on an order to see more information on it.
Click on an item in the order summary panel to view all orders containing that item.
Right-click on an item to view the cooking instructions and ingredient list. You can adjust the number of servings required and the ingredient list will update automatically.
Keep track of order progress by clicking on order items to tick them off.
Change the status of an order using the drop-up menu on individual orders, or set order status in bulk from the order summary panel.
Filter your orders using the search tool. Orders can be filtered by:
- Due time
- Date the order was placed
- Area where the customer is sitting (if applicable)
- The menu the customer ordered from e.g. bar menu, main restaurant menu
- Staff member (if staff login is enabled on menus)
- Order status e.g. pending, ready for collection
- Table number
- Meal groups e.g. starters, pastries
Save commonly used searches by setting your search criteria and clicking ‘save’. Give the search a title. Saved searches appear to the left when the search dropdown is open.
New orders can be placed directly from the order dashboard by clicking on ‘new order’. This will open a list of menus. Select the relevant menu and order as normal.
By enabling interaction tracking on your menu, each menu click and item view will be recorded. This information combined with time stamps within Nutritics or your own sales data can help to provide valuable insights into customer preferences and menu choices.
To enable interaction tracking on a menu:
- Open a menu from the Nutritics content explorer
- Click on the slider icon to open the menu settings and open the interactivity tab
- Tick 'enable interaction tracking'
The interactions can be accessed by clicking Menu > Digital Menus > View Activity and are presented in a tabular format which can be exported for further analysis.
WATCH THE VIDEO:
https://www.youtube.com/embed/RDNxZ2f_TU8
This guide will show you:
- How to set up your outlet in Nutritics
- How to set up your patients profiles for meal ordering
- How to publish your existing menus and enable ordering the customer facing side of the ordering system
- How to manage your orders in the orders dashboard
If you have not already built up your menus in Nutritics, please see our guide on menu creation here.
If you have not already created a patient profile in Nutritics, please see our guide on this here.
Outlet set up
To enable ordering on your account you must first set up your outlet on Nutritics.
Click on the cog icon in the top right corner of the screen, click on ‘settings’ then ‘ordering’.
- Search in the search bar and select your outlet from the list.
- Add in your outlet details.
- Set the width of your thermal paper rolls used for docket and receipt printing. Dockets and receipts can be printed from the orders dashboard.
- Choose how your outlet is set up i.e. beds and wards or rooms and floors.
- If desired, share your outlet. Type a Nutritics username or email address to enable sharing with the user. If your licences are part of an organisation or group, you will see all users of the organisation when you click ‘add user’. You can also choose to share with all account holders within the organisation. You will have the option to share the outlet with read only or read & write privileges after adding a collaborator.
- Next, set up the waiting staff, areas and tables. This information will be visible on ‘eat-in’ orders in the ordering dashboard.
- If required, allow patients to pay for their order directly from your digital menus. Payments can be enabled on an individual menu basis from within the menu settings. Payments will be collected by Nutritics payment partner Stripe. Follow the instructions on screen to connect Stripe with your Nutritics account.
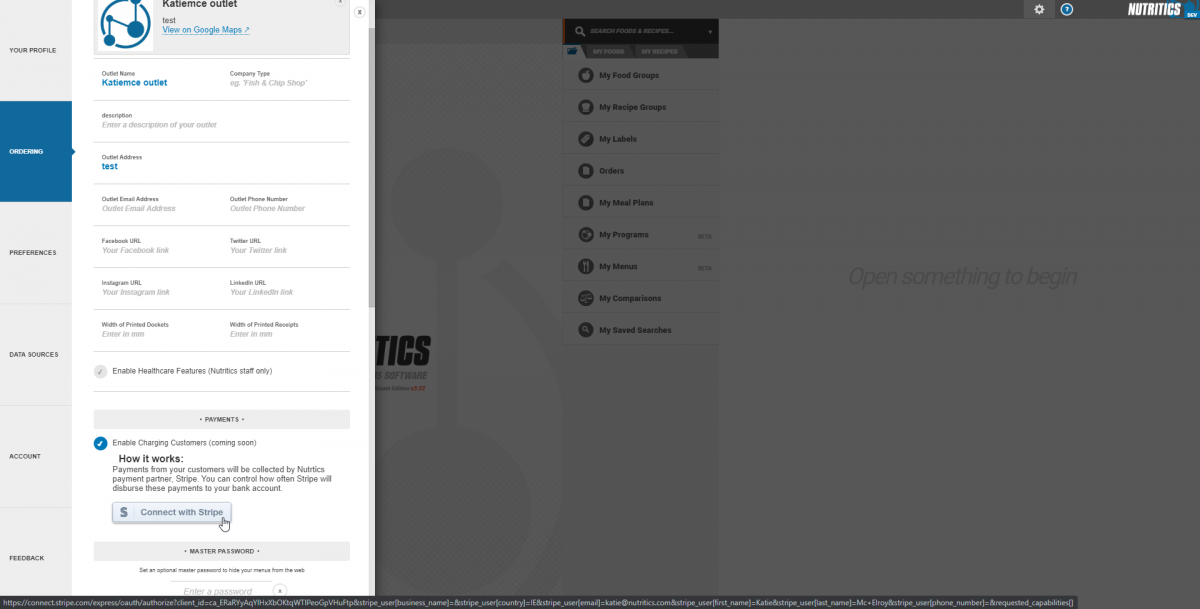
Add details including where payout from orders should be deposited. By default, payouts will be made to your bank account daily. Once your Stripe account is connected, it can be accessed from the main menu in Nutritics > settings > ordering.
- Add a master password to password protect the main menus list.
- Set up the staff and beds/wards or rooms/floors. If desired, staff members can be assigned pin codes that they will need to enter to gain access to menus. If staff members log into a menu and then a patient orders from that menu, you will be able to see the staff member associated with the order in the orders dashboard.
Specify the beds/wards or rooms/floors.
Pro tip: A bed/room and ward/floor can be assigned to a patient in the patient profile.
When ordering a meal, the menu can be filtered by bed/room number and the patient’s dietary requirements including allergies* and texture grade requirements** will be taken into account and any unsuitable meal options will be removed from the menu.
*Allergies and other dietary preferences can be specified in the dietary preferences/allergies section of the patient profile. 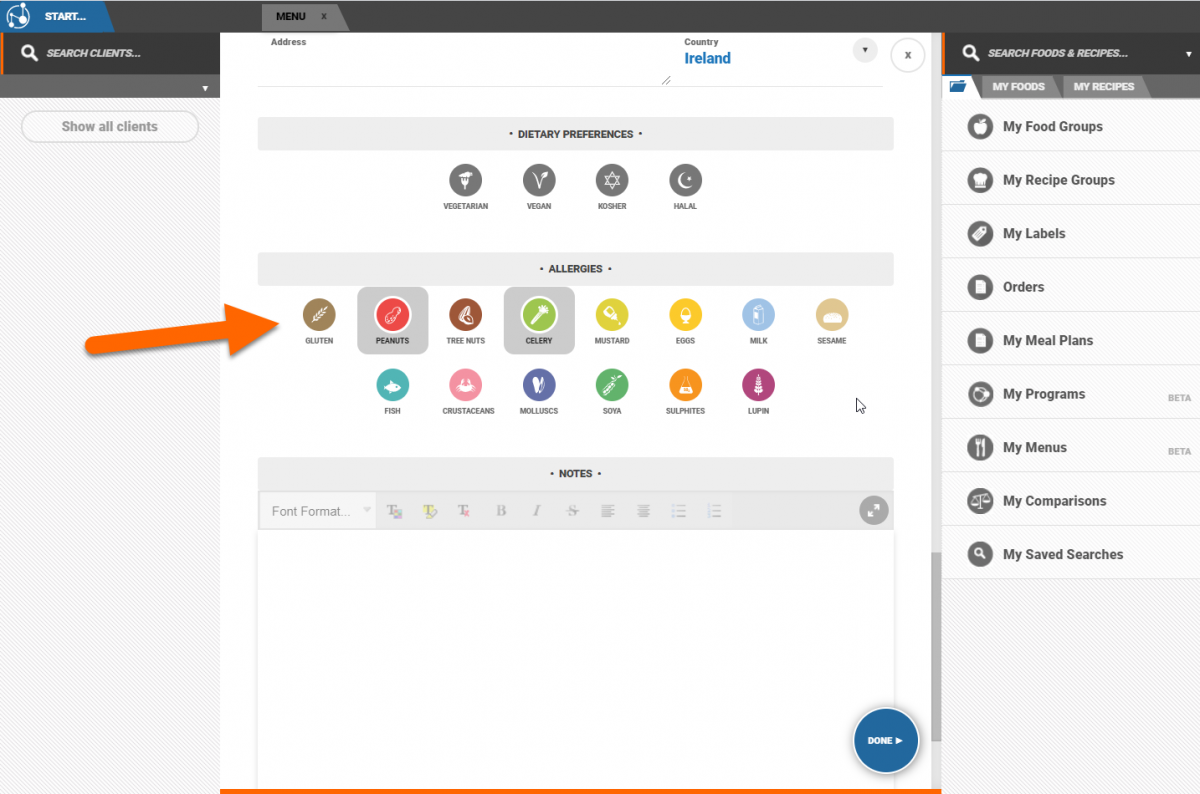
**If a patient is suffering from dysphagia, their texture grade requirements can be specified under the grouping section of the patient profile. Menu item texture grades can be tagged by opening a recipe, scrolling to the grouping section and clicking on the appropriate texture grade. Menu settings and publishing
Once the menus and the outlet have been set up, open the menu you would like to publish from the Nutritics content explorer and review the menu settings. If you haven’t already created your menus in Nutritics, please see our guide on menu creation here.
Menu settings are accessed by clicking on the grey slider icon in the top right corner of the menu workspace.
Within the settings menu, there are several tabs that allow for the customisation of the menu:
Display tab
Choose the information to be displayed on paper and digital menus
- e.g. Enable menu item prices, calories and allergen information, an ingredient list and front and back of pack nutrition information.
- Choose the look of the menu e.g. apply a light or dark theme and select how many menu items or ‘tiles’ are displayed in each line.
- Enter a disclaimer to be displayed on all menu items.
Interactivity tab
Choose how patients can interact with the menu.
- Interactive mode allows customers to scroll through the menu and click on menu items for more information/ordering purposes and is recommended where menus are being displayed on touchscreens. Untick this option is your menu will be displayed on a digital display or TV that is not a touchscreen.
- Tick ‘Allow users to go back to the list of menus’ to allow patients to exit the current menu they are viewing and browse all published menus. Tick ‘The screen resets to the list of menus’ and the menu will return to the list of published menus after a period of inactivity.
- Enable a ‘featured items’ screensaver and menu items will flash on screen when the menu is left idle.
Ordering tab
Enable ordering to allow patients to place orders from the digital menu. Orders will appear in the ‘Orders’ folder in the Nutritics content explorer.
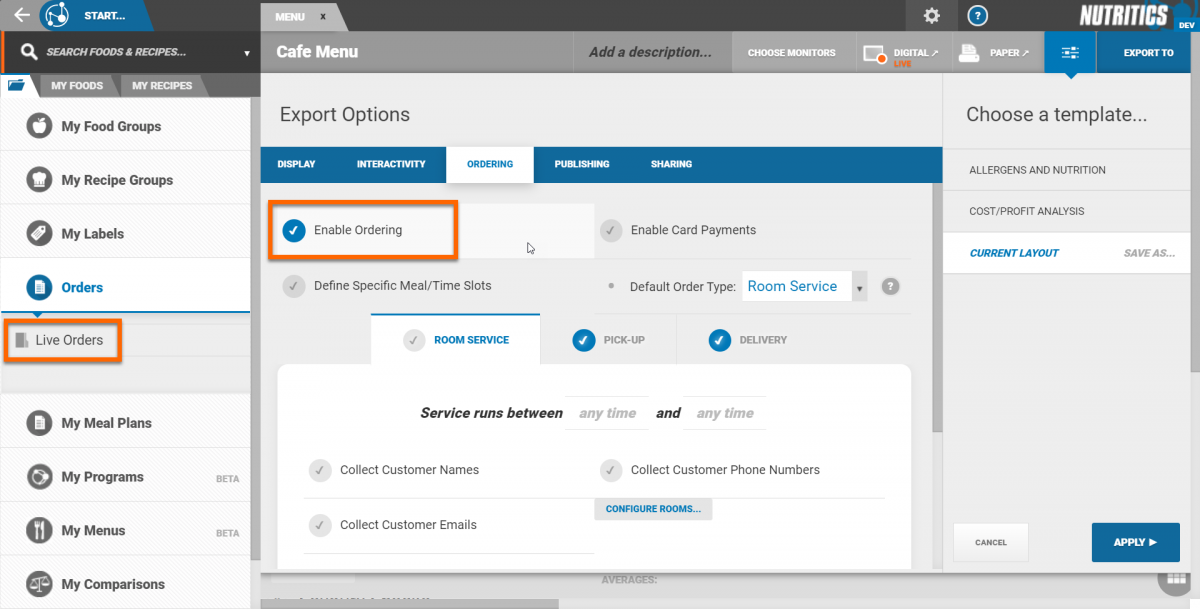
- Enable card payments and patients will be able to pay for their order from the digital menu.
- Set the default order type (this will be the first option shown to patients when selecting how they wish to receive their order).
- Set the service operating hours for each order type e.g bed service is available from 8am to 4pm (or leave this blank to accept orders at all times) and select what information is required from the patients e.g. name, number.
- Tick ‘Define specific meal/ times slots’ to specify set meal times. This should be used where mealtimes are at a set times e.g. breakfast is served at 8am, lunch is at 12pm and dinner at 6pm.
The ‘days offset’ field determines how many days in advance patients can order for. 0 days offset means they can order 0 days in advance (i.e. orders placed are for today), 1 day offset means patients can order one day in advance (i.e orders placed are for tomorrow) and so on.
For example, if breakfast is served at 8am every day and you would like patients to be able to order their breakfast for today and tomorrow, create two meal slots called breakfast, set the time to 8am and add 0 and 1 respectively in the offset column.
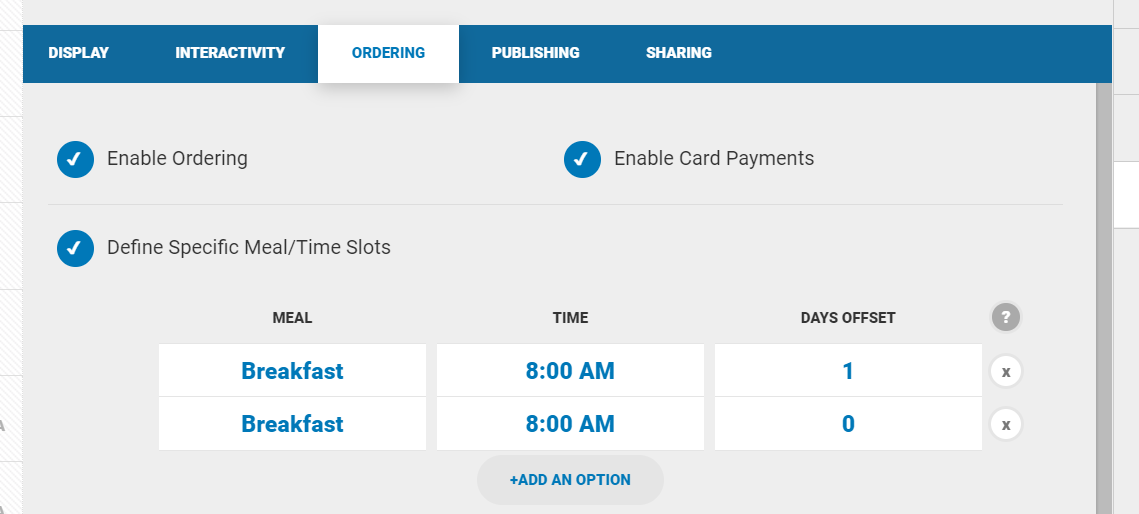
Tick ‘allow ASAP’ orders to accept orders requested for as soon as possible.
Publishing tab
Publish your menus to make them ‘live’ i.e. staff and patients can view and interactive with your menus on a digital display.
- Staff login can be enabled from this tab. Staff members can be assigned pin codes that grant them access to menus. Pin codes can be assigned by clicking on the 'add users’ shortcut or from the outlet settings accessed by clicking on the cog icon in the top right corner of the screen .
- Menus are made live from the publishing tab tab using the drop-down. Choose if the menu is published immediately or schedule a date and time for the menus to go live.
Live menus have an orange circle beside the menu title in the Nutritics explorer and on the the digital button in the menu workspace.
Click on the digital button to preview your digital menu.
Sharing tabChoose how the menu will be accessed by patients in the ‘sharing’ tab.
- Libro is an app designed to track diet, exercise and lifestyle goals. Libro users log their diet and exercise on the app and receive analysis reports and feedback from their nutrition professional directly to their phone. Publish menus to Libro to allow Libro users to browse the menu on their smartphone
- Copy and paste the menu URL to display the menu on a website, on a tablet or other displays; embed the menu on a website using the code provided or display the QR code online or at an outlet for patients to scan.
- To see your full menu list, click ‘get main menu url’. This will provide you with a link to a list of all active and inactive digital menus in your Nutritics account.
Menu templates
Menu settings can be saved as a template and applied to other menus. Click ‘save as’, name your template and the template will be saved for reuse.
To apply a template, click on the template name and select apply. Right-click on the template name to set it as the default menu layout, to update the template or to rename or delete the template.
Patient view
If a menu is password protected, a staff member will be required to log in to see the menu.
Enter the pin assigned to the staff member in your outlet settings.
Menu items are shown in a tile format. Patients can scroll through and filter the menu by clicking on the tabs along the top.
Patients can also filter by their dietary preferences and allergies by clicking on the drop-down menu at the top of the screen. Clicking on the ‘choose’ button allows for the selection of a specific ward/floor and bed/room.
The patient’s dietary requirements including allergies and texture grade requirements will be taken into account and any unsuitable meal options will be removed from the menu.
Clicking on a menu item will open it (the information on display e.g. calories, pricing etc. can be controlled from the menu settings).
Specify the desired number of servings and any notes for the kitchen.
Items are added to a basket at the bottom of the screen.
Depending on the menu set up, patients can choose bed service, pick up or delivery by following the prompts on screen.
If payments are enabled, patients will be prompted to enter their card details to complete their order.
Order Dashboard
The order dashboard is accessed via the Nutritics Content Explorer. Click ‘Orders’ then ‘Live Orders’.
A summary of all orders is shown in the first panel. Items are organised into the food and recipe groups set up in the Nutritics account.
The number of servings is written beside the menu item name.
Individual orders are shown to the right of the summary panel.
Order information includes an icon displaying if the order is for bed service, pick up or delivery; the order number; the time the order is due; patient details including allergies, texture grade requirements, bed number; and the order items organised into groups.
Click on the paperclip icon beside a customer name to see more information on the customer.
Toggle a condensed view of the orders or enable fullscreen mode using the icons in the top right corner of the screen.
In the condensed view, click on an order to see more information on it.
Click on an item in the order summary panel to view all orders containing that item.
Right-click on an item to view the cooking instructions and ingredient list. You can adjust the number of servings required and the ingredient list will update automatically.
Keep track of order progress by clicking on order items to tick them off.
Change the status of an order using the drop-up menu on individual orders, or set order status in bulk from the order summary panel.
Filter your orders using the search tool. Orders can be filtered by:
- Due time
- Date the order was placed
- Area where the customer is sitting (if applicable)
- The menu the customer ordered from e.g. bar menu, main restaurant menu
- Staff member (if staff login is enabled on menus)
- Order status e.g. pending, ready for collection
- Table number
- Meal groups e.g. starters, pastries
Save commonly used searches by setting your search criteria and clicking ‘save’. Give the search a title. Saved searches appear to the left when the search dropdown is open.
New orders can be placed directly from the order dashboard by clicking on ‘new order’. This will open a list of menus. Select the relevant menu and order as normal.
If you are interested in adding meal ordering to your Nutritics account, please contact sales@nutritics.com
This guide will show you:
If you have not already built up your menus in Nutritics, please see our guide on menu creation here.
If you have not already created a patient profile in Nutritics, please see our guide on this here.
Outlet Setup
To enable ordering on your account you must first set up your outlet on Nutritics.
Click on the cog icon in the top right corner of the screen, click on ‘settings’ then ‘ordering’.
- Search in the search bar and select your outlet from the list.
- Add in your outlet details.
- Set the width of your thermal paper rolls used for docket and receipt printing. Dockets and receipts can be printed from the orders dashboard.
- Tick the days that your outlet is open to take orders. If ordering is enabled on your menus, patients will only be able to order on days the outlet is open. Use the calendar to mark any holidays on which the outlet is closed. Patients will not be able to place orders for those days.
- Under the meal services heading, specify how your customers can receive their orders, e.g. bed service, pick up.
- Choose how your outlet is set up i.e. beds and wards or rooms and floors.
- If desired, share your outlet - type a Nutritics username or email address to enable sharing with the user. If your licences are part of an organisation or group, you will see all users of the organisation when you click ‘add user’. You can also choose to share with all account holders within the organisation. You will have the option to share the outlet with read only or read & write privileges after adding a collaborator.
- Payments
If required, allow patients to pay for their order directly from your digital menus. Payments will be collected by Nutritics payment partner Stripe. Follow the instructions on screen to connect Stripe with your Nutritics account.
Once your Stripe account is connected, it can be accessed from the main menu in Nutritics > settings > ordering.
Patient and room setup
- Set up the waiting staff, areas and tables. This information will be visible on ‘eat-in’ orders in the ordering dashboard.
- Set up the staff and beds/wards or rooms/floors. If desired, staff members can be assigned pin codes that they will need to enter to gain access to menus. If staff members log into a menu and then a patient orders from that menu, you will be able to see the staff member associated with the order in the orders dashboard.
Specify the beds/wards or rooms/floors.
Pro tip: A bed/room and ward/floor can be assigned to a patient in the patient profile.
When ordering a meal, the menu can be filtered by bed/room number and the patient’s dietary requirements including allergies* and texture grade requirements** will be taken into account and any unsuitable meal options will be removed from the menu.
*Allergies and other dietary preferences can be specified in the dietary preferences/allergies section of the patient profile.
**If a patient is suffering from dysphagia, their texture grade requirements can be specified under the grouping section of the patient profile.
Menu item texture grades can be tagged by opening a recipe, scrolling to the grouping section and clicking on the appropriate texture grade. Menu settings and publishing
Once the menus and the outlet have been set up, open the menu you would like to publish from the Nutritics content explorer and review the menu settings. If you haven’t already created your menus in Nutritics, please see our guide on menu creation here.
Menu settings are accessed by clicking on the grey slider icon in the top right corner of the menu workspace.
Within the settings menu, there are several tabs that allow for the customisation of the menu:
Display tab
Choose the information to be displayed on paper and digital menus
- Enable calories and allergen information, an ingredient list and front and back of pack nutrition information.
- Choose the look of the menu e.g. apply a light or dark theme and select how many menu items or ‘tiles’ are displayed in each line.
- Enter a disclaimer to be displayed on all menu items, or add a welcome message for your menu.
- Type in a welcome message/instructions to display to customers when the menu is loaded. Use the toolbar to format the text. Click on the picture frame icon to upload an image.
Interactivity tab
Choose how patients can interact with the menu.
- Interactive mode allows customers to scroll through the menu and click on menu items for more information/ordering purposes and is recommended where menus are being displayed on touchscreens. Untick this option is your menu will be displayed on a digital display or TV that is not a touchscreen.
- Tick ‘Allow users to go back to the list of menus’ to allow patients to exit the current menu they are viewing and browse all published menus. Tick ‘The screen resets to the list of menus’ and the menu will return to the list of published menus after a period of inactivity.
- Enable a ‘featured items’ screensaver and menu items will flash on screen when the menu is left idle.
Ordering tab
Enable ordering to allow patients to place orders from the digital menu. Orders will appear in the ‘Orders’ folder in the Nutritics content explorer.
- Enable card payments from this tab.
- Max advance orders per day: This allows orders to be booked for subsequent days. Define how many advance orders can be booked each day.
- Min lead time: Set the minimum amount of time and order can be placed before it’s due i.e. the minimum lead time it will take the kitchen to produce an order for this menu. For example, if the lead time is set to 15 minutes and a patient tries to place an order at 3pm, the earliest ‘due time’ slot will be 3:15pm.
The lead time for orders can be controlled in 2 places:
1) In the ordering tab of individual menu settings as described above.
2) The minimum lead time can also be controlled by the kitchen in the live orders dashboard.
Click on the meal service type e.g. bed service and use the plus or minus icons to edit the due time. Note the due time can only be increased here and cannot go below the due time set on an individual menu e.g if the lead time of a menu is set to 20 minutes but the kitchen is busy and needs more time to fulfill the orders, they could set the lead time from the dashboard to 30 minutes and this lead time will be applied. If the kitchen is quiet however and wants to decrease the lead time e.g. to 15 minutes, this would need to be changed in the individual menu settings.
- Allow orders for specific meal/time slots: This should be used where meal times are at a set times e.g. breakfast is served at 8am, lunch is at 12pm and dinner at 6pm.
- Allow orders at custom times: Allows patients to choose their order ‘due time’ from automatically calculated time slots. Define how many orders the kitchen can handle in a set amount of time.
- This will determine the amount of due time slots that are visible to the customer when ordering from your menu.
- Set the default order type (this will be the first option shown to patients when selecting how they wish to receive their order).
- Set the service operating hours for each order type (or leave this blank to accept orders at all times).
- Set an optional fee for orders. Note that card payments will need to be enabled for this to work (scroll to the top of the ordering tab to enable payments).
- Select what information is required from the patient e.g. name, address, phone number (this must be ticked to enabled SMS notification to patients that their order has been received).
Notifications
- Choose to be notified via email each time a new order is submitted.
- Choose to send patients an SMS message confirming their order. Note you will need to collect patient phone numbers (enabled from the ordering tab of your menu settings) for this to work.
- Send patients a confirmation email summarising their order.
Publishing tab
Publish your menus to make them ‘live’ i.e. staff and patients can view and interactive with your menus on a digital display.
- Staff login can be enabled from this tab. Staff members can be assigned pin codes that grant them access to menus. Pin codes can be assigned by clicking on the 'add users’ shortcut or from the outlet settings accessed by clicking on the cog icon in the top right corner of the screen .
- Menus are made live from the publishing tab tab using the drop-down. Choose if the menu is published immediately or schedule a date and time for the menus to go live. Click here for more information on scheduling menus.
- Live menus have an orange circle beside the menu title in the Nutritics explorer and on the the digital button in the menu workspace.
- Click on the digital button to preview your digital menu.
Sharing tabChoose how the menu will be accessed by patients in the ‘sharing’ tab.
- Libro is an app designed to track diet, exercise and lifestyle goals. Libro users log their diet and exercise on the app and receive analysis reports and feedback from their nutrition professional directly to their phone. Publish menus to Libro to allow Libro users to browse the menu on their smartphone
- Copy and paste the menu URL to display the menu on a website, on a tablet or other displays; embed the menu on a website using the code provided or display the QR code online or at an outlet for patients to scan.
- To see your full menu list, click ‘get main menu url’. This will provide you with a link to a list of all active and inactive digital menus in your Nutritics account.
Pro tip: You can insert '#' followed by a ward name at the end of your share link and bookmark. This will allow ward staff to open the menu directly showing their bed layout.
Menu templates
Menu settings can be saved as a template and applied to other menus. Click ‘save as’, name your template and the template will be saved for reuse.
To apply a template, click on the template name and select apply. Right-click on the template name to set it as the default menu layout, to update the template or to rename or delete the template.
Templates can be applied to an individual menu, a menu 'folder' group or all menus across your account by selecting the relevant option from the drop down shown above.
Limiting items ordered on menus
To limit the amount of items that can be ordered from a menu, click on the monitors button from your menu workspace.
Order limits can be set using the monitors under the 'administration' heading.
Sold out: Enable this monitor and tick any items that are no longer available. The item will still appear on your digital menu, but will bear a 'sold out' banner.
Min and max order: Setting a min order means the customer must select at least this many menu items from this menu group e.g. create your own breakfast by selecting 2 meats.
Setting a max order means the customer cannot select any more than the specified number of items from this menu group e.g. make your own sandwich, choose 1 bread, 1 meat and 3 salads.
Any order limits will be displayed on the digital menu beside the menu group name.
Patient view
If a menu is password protected, a staff member will be required to log in to see the menu.
Enter the pin assigned to the staff member in your outlet settings.
Menu items are shown in a tile format.
Patients can click on the language dropdown at the top of the screen to translate the menu into their preferred language.
Patients can scroll through and filter the menu by clicking on the tabs along the top.
Patients can also filter by their dietary preferences and allergies by clicking on the drop-down menu at the top of the screen. Clicking on the ‘choose’ button allows for the selection of a specific ward/floor and bed/room.
The patient’s dietary requirements including allergies and texture grade requirements will be taken into account and any unsuitable meal options will be removed from the menu.
Clicking on a menu item will open it (the information on display e.g. calories, pricing etc. can be controlled from the menu settings).
Specify the desired number of servings and any notes for the kitchen.
Items are added to a basket at the bottom of the screen.
Depending on the menu set up, patients can choose bed service, pick up or delivery by following the prompts on screen.
If payments are enabled, patients will be prompted to enter their card details to complete their order.
Patients will receive on-screen confirmation of their order.
Staff area
Staff can use the 'staff area' on menus to review and place orders for patients. For more information on how to enable the staff area please see
here.
Order Dashboard
The order dashboard is accessed via the Nutritics Content Explorer. Click ‘Orders’ then ‘Live Orders’.
A summary of all orders is shown in the first panel. Items are organised into the food and recipe groups set up in the Nutritics account.
The number of servings is written beside the menu item name.
Individual orders are shown to the right of the summary panel.
Order information includes an icon displaying if the order is for bed service, pick up or delivery; the order number; the time the order is due; patient details including allergies, bed number; and the order items organised into groups.
Click on the paperclip icon beside a patient name to see more information on the patient.
Toggle a condensed view of the orders or enable fullscreen mode using the icons in the top right corner of the screen.
In the condensed view, click on an order to see more information on it.
Control the minimum lead time for orders directly from the orders dashboard. Click on the due time and use the plus / minus icons to increase/decrease the lead time. This is useful for ensuring the kitchen is not overloaded with orders.
Click on an item in the order summary panel to view all orders containing that item. In the panel that expands, you will see if any orders require a modified version of that item, for example if the patient has added any notes to their order.
Right-click on an item to view the cooking instructions and ingredient list. You can adjust the number of servings required and the ingredient list will update automatically.
Keep track of order progress by clicking on order items to tick them off.
Change the status of an order using the drop-up menu on individual orders, or set order status in bulk from the order summary panel.
Print a receipt or docket for an order by clicking on the printer icon on individual orders. Note that the width of the thermal rolls used for printing must be specified in your outlet settings accessed by going to the menu in the top right corner of the screen > settings > ordering.
Print dockets in bulk based on their status by clicking on the printer icon in the order summary panel.
New orders can be placed directly from the order dashboard by clicking on ‘new order’. This will open a list of menus.
Select the relevant menu and order as normal.
Filtering Orders
Filter orders using the search bar at the top of the screen. Orders can be filtered by:
- Due time
- Date the order was placed or days offset e.g. days in advance, setting this to 0 will show today’s orders, setting this to 1 will show orders for tomorrow, setting it to 2 will show orders for 2 days time and so on
- Ward/floor and room/bed number
- The menu the customer ordered from e.g. bar menu, main restaurant menu
- Fluid and solid texture grades
- Menu Staff member (if staff login is enabled on menus)
- Order status e.g. pending, ready for collection
- Meal groups e.g. breakfast, soups, salads
Save commonly used searches by setting your search criteria and clicking ‘save’. Give the search a title. Saved searches appear to the left when the search dropdown is open.
To schedule menus to go live in advance, open a menu and click on the settings icon in the top right corner of the screen.
Click on the publishing tab and select ‘publish on scheduled dates’ from the dropdown menu.
First, specify the time that you would like the menu to be live each day e.g a breakfast menu might run from 9-11am.
This is optional and if the menu should be live all day, leave this blank.
To set start and end time, click on a time field to open a clock. First select the hour and then select the minutes. Switch from am to pm using the slider and tick to confirm the time.
Next select the days of the week the menu will be live. At least one day must be selected e.g. if your menu should be live next Monday, tick ‘M’ for Monday. If your menu should be live at the weekend, tick ‘S’ for Saturday and ‘S’ for Sunday.
Specify if your menu should repeat - this section is optional and if your menu should only be live once, this can be left blank. If your menu does repeat, click on the tick icon and specify how often your menu repeats e.g a weekend menu would repeat every 1 week, a daily menu that’s part of a 3 week menu cycle would repeat every 3 weeks.
Finally add an option start and end date. For example, a spring menu might run every week from February to May.
Click apply to save your settings and an orange banner will appear summarising your menu settings.
Schedules can be saved as templates and reused on other menus by clicking 'save as'.
Live menus have an orange circle beside the menu title in the Nutritics explorer and on the the digital button in the menu workspace.
Worked Examples
Sample 1 - Publish a menu over a range of dates
e.g. Morning breakfast menu, live every Mon-Fri throughout January
Sample 2 - Publish a menu on a recurring cycle
e.g A Monday menu on a 3 week cycle
Sample 3 - Publish a menu as a once off (not recurring)
e.g. Valentine's Day à la carte menu
Sample 4 - Publish a menu on recurring days of the week
e.g. Weekend brunch menu, repeating every weekend
The ‘staff area’ is used to provide staff with an overview of all beds and wards and to allow them to place and edit patient orders as needed.
To access the staff area on a menu you must have:
- Bed service enabled on the menu. This is enabled by opening the menu from your ‘my menus folder’ (1), navigating to the settings (2), clicking on the ‘ordering’ tab (3) and ticking ‘bed service’ (4)
- Staff pins assigned in your ordering settings and staff login enabled on the menu. This can also be enabled from the ordering tab in the menu settings by clicking on ‘configure beds’
Pin protection must be enabled for each menu individually in the ‘publishing’ tab of the menu settings.
- It’s also recommended to have patients assigned to beds and wards. A bed and ward can be assigned to a patient by opening the patient profile from your list of patients and scrolling to the 'clinical adjustments' heading.
The staff area is opened automatically when a menu is loaded after a staff member has entered their pin.
(1) By default, the staff area gives a summary of the current day but you can use the arrows to navigate between days e.g. to review orders placed on previous days or add/edit orders for future days.
(2) If specific meal slots have been defined you can filter by meal slot here e.g to see all lunch orders.
(3) You can filter by bed/ward here.
(4) All beds are shown below.
Click on a bed to open it. Details will be shown including:
(1) The current date (use the arrows to see previous/future days)
(2) Bed number
(3) The date the patient was assigned this bed
(4) The patient name. Use the arrows to navigate between beds
(5) Available meal slots (configured in the ordering tab of the menu settings) and an option to place an order for those slots. Note that if it is past a defined meal/time slot e.g breakfast is defined as 9am but you open the staff area at 10am, it will appear as ‘closed’.
If an order has been placed - the order details will be shown along with the option to delete or edit the order. Note that if preparation has started on an order, i.e. order status is not 'pending' in the kitchen dashboard or if it's too close to the order due time you will be unable to delete an order.
Once an order is submitted, a menu will appear prompting the staff member to:
(1) Order the next meal for the same bed
(2) Move on and place an order for the next bed
(3) Go back to the bed overview
Click on the X icon in the top left corner to close this menu.
The bed overview can be reopened at any time by clicking here.
WATCH THE VIDEO:
https://www.youtube.com/embed/orzWOAxXcm8
After you log in, click the plus button in panel 1 to set up a new client, or alternatively, click button in panel 1 to set up a new client, or alternatively, click and press ‘New Client’. A sub panel will then expand so you can input the client’s personal details, activity level, contact details and any other notes about your client. Fill in any details you wish to save. Weight and height related fields may be entered in any format by simply typing your preferred units in the box, if no unit of measure is typed then the default units are used for your region (meters and kg on metric setting, ft and lbs on imperial setting). The imperial / metric setting may be changed from Menu>Settings>Preferences.
Multiple clients can be set up at once using the batch import tool. Click , then Import/Export and select the 'Clients's' option to download the batch import spreadsheet for completion. Once completed, upload the spreadsheet and client list will be updated.
Grouping Clients:
A client can be sorted into groups for easy retrieval, sorting and batch analysis later. Click the button in client panel 2, below the client’s biometric details, then type the desired group name in the pop up box. Client’s can be added to multiple groups. Filter your client groups using the small icon at the top of the client list (panel 1).Selecting a group will filter clients by that group. Right click on a group to rename it or move it from your account altogether.
Create a new client
Click on ‘new client’ under your list of clients or go to the start menu and select ‘new client’.
Personal details
First, input the client’s personal details.
Any fields with an asterisk e.g. weight and height must be entered.
Weight and height-related fields may be entered in any format by simply typing your preferred units in the box, if no unit of measure is typed then the default units are used for your region (meters and kg on metric setting, ft and lbs on imperial setting).
Note: The imperial/metrics setting may be changed from the menu (accessed via the cog icon in the top right corner of the screen) > settings > preferences.
The client’s BMI and ideal body weight are calculated automatically when weight and height are entered.
Enter waist and hip measurements and the system will calculate the client’s waist to hip ratio.
An ID number can be entered and this will be displayed in your client list instead of the client’s name.
You also have the option to add an image to the client’s profile.
Lifestyle adjustments
Specify your client’s occupational and exercise activity levels. These help estimate your client’s Physical Activity Level (PAL) multiplication factor.
If your client is an athlete, specify their athletic type and Nutritics will adjust their nutrient targets based on the athletic factor selected.
If your client is female, you will see an additional lifestyle adjustment for pregnancy/lactation.
This will apply adjustments to your client’s energy and nutrient targets based on the DRV source selected e.g. selecting the UK nutrient targets will apply UK adjustments for pregnancy, selecting US nutrient targets will apply US adjustments.
Clinical adjustments
If the clinical adjustments feature is enabled on your account, clinical factors such as food and fluid modifications (IDDSI), mobility status, stress factors and fluid retention can be accounted for and recorded on the patient profile.
In addition, bed number, ward and meal delivery notes can be recorded here which are used for
Nutritics Healthcare Meal Ordering System. Note that all details of the client panel can be integrated with an Electronic Health Record for automatic synchronisation.
The fluid retention drop down allows you to specify if your patient has mild to severe peripheral odema or ascites. Adding a fluid retention factor will calculate the patients ‘dry weight’, which will subsequently be used to recalculate energy requirements and Ideal Body Weight (IBW - shown under the personal details heading at the top of the screen).
A clinical stress factor for trauma such as surgery, burns, fever and more can be looked up from the 'Stress Factor' drop down and will change the final energy requirement calculation for the patient. Many stress factor adjustments will provide a range which can be fine tuned using the slider that appears after selection. For example, in the image below, the stress factor for “Infection with persistent fever” will add on 25-45% to the individual's energy requirements:
The 'Mobility Factor' drop down provides an input to estimate the patient's activity level in the clinical setting; if they are bedbound, mobile or ventilator dependent. Once applied, energy requirements will be adjusted accordingly. Note that of a PAL value is already applied on the patient profile, it will be replaced by the mobility factor and the EER will be recalculated from the formula:
Nutrition requirements
Select the source of the client’s nutrition targets and the desired energy calculation formula under the nutrition requirements section.
Use the plus and minus buttons to add or subtract 100kcal per click to your clients’ energy target or type directly into the box.
Your client's macronutrient requirements are displayed in a pie chart.
Users with the custom DRV feature can click on the 'Customise' button to edit the nutrition targets for the client or make a new template. This will open a new tab under the nutrition requirements heading.
Right click to rename, delete or assign these targets to other clients.
Any changes to the client’s EER can be split between diet and exercise using the slider.
The energy calculations are listed below the slider. These are also free text boxes so the PAL and RMR can be added manually. Simply click on the RMR or PAL value to edit it.
Use the slider to specify your client’s macronutrient requirements. Your client’s energy target is static and will be split in the proportions you set here, for example 50% carbohydrate, 30% protein, 20% fat.
The macronutrient targets are also shown in gram weights and grams per kg body weight.
Click on the arrow to change the direction of the energy calculation. By default, the client’s estimated energy intake is split into the macronutrient proportions e.g. if your client’s energy requirement is 2000kcal and the slider is set to 50% energy from carbohydrate, your client will have a target of ~1000kcal from carbohydrate.
Clicking on the arrow reverses the calculation and your client’s energy requirement is calculated from the macronutrient targets.
Example: Setting a target of 249g carbohydrate, 124g protein and 123g fat would give an EER of 2599Kcal (worked out below)
249g CHO x 4kcal/g = 996 kcal
124g Protein x 4kcal/g = 496 kcal
123g fat x 9kcal/g = 1107 kcal
This give a total EER of 2599 Kcal
Click on ‘extended nutrients’ to edit additional nutrient targets such as your client’s micronutrient targets. Type a value directly into the boxes or use the plus and minus icons to increase/decrease the existing values.
Grouping clients
A client can be sorted into groups under the 'Grouping' heading for easy retrieval, sorting and batch analysis later.
Click the ‘Add Group’ button and type the desired group name in the pop-up box.
Clients can be added to multiple groups. Click on a group name to add the client to that group. Filter your client groups using the small icon at the top of the client list.
Right-click on a group to rename it or move it from your account altogether.
Sharing
Share your client with other Nutritics users or groups by clicking ‘Add user’.
Type in the username or email address of any Nutritics user or select a user from your organisation and click okay to share the client with that user.
Click on a user’s name to change their level of shared access.
- The eye icon means that user has viewing access only
- The pencil icon means they can edit the client
- The slashed white circle means that the user does not have access to the client profile.
Contact details
Type your client’s contact details into the free text boxes. Add your client’s email address to invite them to log their diet and exercise on the mobile app
Libro.
Dietary preferences
Click on the icons to set your client’s dietary preferences and allergies.
When entering a diet log or creating a meal plan, foods that are incompatible with your client’s allergies will be flagged with an orange exclamation mark.
Notes
This is a free text box where you can write notes as needed.
Client preview
Click 'done' or on the X icon in the top right corner of the screen to minimise the detailed client panel.
Here you can see a summary of your client’s details (click on the the 'edit profile' button to make changes) and from this panel you can invite the client to download the mobile app Libro.
Libro allows your clients to log their diet and exercise on their phone. Diet logs can then be imported instantly into Nutritics for analyses and feedback. Users on premium plans can also send nutrition and exercise programs to their clients via Libro.
Once your client is set up on Libro, you will be able to see their log in activity from the client preview panel.
Client records
Create or access diet logs, meal plans and programs for your client from the next panel.
Nutritics recipe creator can be used to combine foods from the database into a new recipe entry. Recipes can be used in diet logs, meal plans or combined with other recipes to make full meals quickly and easily. Nutritics Foodservice edition includes a cost analysis system for recipes, as well as a menu cycle builder and product reformulation engine, which makes ingredient suggestions on how to improve the nutritional profile of a dish. Recipes can also be used for the production of Nutrition Labels, digital menu board displays and allergen reports.
There are a few top tips you should know before getting started:
- Split your recipes into sub recipes, one for each 'pot' or cooking method.
- Analyse base sauces, sides, and multi-purpose / batch recipes first.
- Enter all ingredients as raw, with the exception of deep fried items and grilled fatty meats.
- When possible, weigh ingredients in their prepared form (skin, stones, bone waste removed).
- Follow the on screen prompts that appear in the lower right corner of the screen as you log.
- As you enter ingredients, the nutrition & allergen information will update in real time.
- All changes are saved automatically, except the recipe photo, which must be saved after editing.
Recipe Analysis – Step by Step
1. To open the recipe creator, click the ‘Start’ button, then click ‘New ‘recipe’:
2. Enter a title for your recipe and optional description (useful for recipe source, web link, searchable keywords etc)
3. Search for ingredients using the search box at the top left of the screen , click the insert button to add the food to your recipe:
Pro Tip: It is best to enter the ingredients in their prepared 'ready to cook' form.
4. Click the ‘Quantity’ box to open the portion entry box. Choose one of the portion size options suggested or enter your ingredient weight directly in any unit):
5. Add any custom fields you wish to tag to the ingredient such as country of origin, shelf life or storage instructions from the custom fields setting
6. Apply a cooking method as appropriate in the ‘Method’ drop down box to account for vitamin and mineral losses on cooking, as well as fat absorption, and salt absorption. This should only be applied if your ingredients are entered as raw (or applied to cooked ingredient where they have a second cooking method or process)
Pro Tip: If your ingredient is fried in oil or boiled in salt, it is important to include the specific oil or salt in your recipes ingredient list and tag it with the same cooking method as the ingredients cooked.
7. Input the ingredient cost to calculate the cost of your recipe batch and servings. Costs are entered manually in the box provided. Once you tag an ingredient with a cost, this amount is recalled each time you use the ingredient automatically.
Pro Tip: Generate a table showing all of your ingredients and costs from Start > Ingredient Costs
8. Repeat steps 3-7 for each ingredient.
9. Scroll up the page to the food labelling section and enter the number of portions this recipe serves, ‘per serving’ label data will then be generated:
10. Input any other data on the recipe level in the ‘Modifiers’ box, such as recipe storage, weight change factors, or profit margin & tax to calculate RRP of recipes and various portions.
Pro Tip: If you intend to report nutrient values per 100g, or with reference to any unit of weight (e.g.food for label), it is important to account for weight change on cooking by either the weight yield of your recipe, or entering an appropriate weight change/ yield factor in the boxes provided. However, if you are simply reporting nutritional values 'per serving' (e.g calories on menus initiative) it is not necessary to apply a weight change factor, but the weight of the serving must not be referenced.
11. Add products/portion sizes under the ‘portions/Pack sizes heading’. If the number of servings the recipe yields is specified, a default of ‘1 serving’ will appear automatically. This cannot be deleted but can be edited.
- Add additional products/servings can be added by clicking ‘+new product’.
- All fields are free text boxes so simply click on them to type. Enter the name e.g. 1 pack, 1 serving, kid’s portion, 100kcal smoothie etc.
- Upload an image from your computer or enter an image url.
- Add the product/portion quantity and Nutritics will work out the energy value of that quantity. Conversely, enter the energy value and the system will work out the quantity.
Additional fields
Product code/Barcode(Only visible on accounts with the label maker, digital menus or publishing panel enabled)
Enter a product code and barcode or else click on the round arrows to automatically generate codes. Codes can be used as keywords in the food/recipe search bar.
Servings per pack and net pack weight
(Only visible on accounts with the label maker, digital menus or publishing panel enabled)
Specify the number of servings in each product pack and the net weight of the pack.
Costings and sale price
(Only visible on accounts with costings enabled)
If costings are enabled and entered for the recipe ingredients, Nutritics works out the cost of the portion and the recommended retail price. Enter a sale price to appear on labels, menus etc.
Ingredient costs must be entered for the portion cost and RRP to be calculated. Nutritics will incorporate the profit margin and tax rate you set in the modifiers box of the recipe workspace when calculating the cost and RRP.
Toggle on/off
(Only visible on accounts with the publishing panel)
Toggling a portion ‘off’ means that product will not be published to your database, but this product will still be available for you to use throughout your own account e.g. to create labels, menus, as a sub recipe.
12. Add any cooking instructions and notes for your recipe in the text entry box, or photos to illustrate key steps of the preparation process
13. Scroll to the allergens & properties section. Check the allergen information indicated is appropriate for your specific ingredients.
Hover your mouse over an active allergen to see which ingredient it's coming from. This is particularly useful for developing allergens out of recipes.
The allergens presented are specific to your region. The region can be changed under the ‘food labelling’ section by clicking on the dropdown.
We highly recommend reading more on allergen management
here and more on ingredient list management
here.
The properties along the top e.g. is a liquid, vegetarian, vegan, halal etc. are customisable and can be toggled on and off by clicking on them.
14. Scroll up to the top of the page and add a photo to your recipe if desired.
15. Under the grouping and sharing heading, recipes can be categorised into groups for easy data organisation and shared to other users. Click on '+add group' to create a new group. Click on a group name to add a recipe to that group. Recipes can be added to multiple groups.
Recipe groups can be viewed by clicking on the 'my recipes' tabs and then hovering over the arrow beside this tab.
Alternatively, you can click on 'My recipe groups' in the Nutritics explorer.
Share the recipe with other Nutritics users under the collaborators heading.
Click '+add user' and enter the username or email address of any Nutritics user you'd like to share the recipe with.
The user's Nutritics username will be added under the collaborators heading. Click on the name to share with viewing access. Click again to share with editing access and click a third time to revoke access.
Shared recipes are denoted by an R icon with and outward arrow in your list of recipes.
16. Use the Export button or Menu > Output tools to publish your recipe to various outputs
Nutritics recipe creator can be used to combine foods from the database into a new recipe entry. Recipes can be used in diet logs, meal plans or combined with other recipes to make full meals quickly and easily. Nutritics Foodservice edition includes a cost analysis system for recipes, as well as a menu cycle builder and product reformulation engine, which makes ingredient suggestions on how to improve the nutritional profile of a dish. Recipes can also be used for the production of Nutrition Labels, digital menu board displays and allergen reports.
There are a few top tips you should know before getting started:
- Split your recipes into sub recipes, one for each 'pot' or cooking method
- Analyse base sauces, sides, and multi-purpose / batch recipes first.
- Enter all ingredients as raw, with the exception of deep fried items and grilled fatty meats
- When possible, weigh ingredients in their prepared form (skin, stones, bone waste removed)
- Follow the on screen prompts that appear in the lower right corner of the screen as you log
- As you enter ingredients, the nutrition & allergen information will update in real time
- All changes are saved automatically, except the recipe photo, which must be saved after editing
Recipe Analysis – Step by Step
1. To open the recipe creator, click the ‘Start’ button, then click ‘New ‘recipe’:
2. Enter a title for your recipe and optional description (useful for recipe source, web link, searchable keywords etc)
3. Search for ingredients using the search box at the top left of the screen , click the insert button to add the food to your recipe:
Pro Tip: It is best to enter the ingredients in their prepared 'ready to cook' form.
4. Click the ‘Quantity’ box to open the portion entry box. Choose one of the portion size options suggested or enter your ingredient weight directly in any unit):
5. Add any custom fields you wish to tag to the ingredient such as country of origin, shelf life or storage instructions from the custom fields setting
6. Apply a cooking method as appropriate in the ‘Method’ drop down box to account for vitamin and mineral losses on cooking, as well as fat absorption, and salt absorption. This should only be applied if your ingredients are entered as raw (or applied to cooked ingredient where they have a second cooking method or process)
Pro Tip: If your ingredient is fried in oil or boiled in salt, it is important to include the specific oil or salt in your recipes ingredient list and tag it with the same cooking method as the ingredients cooked.
7. Input the ingredient cost to calculate the cost of your recipe batch and servings. Costs are entered manually in the box provided. Once you tag an ingredient with a cost, this amount is recalled each time you use the ingredient automatically
Pro Tip: Generate a table showing all of your ingredients and costs from Menu>Output>Tools>Ingredient Costs
8. Repeat steps 3-7 for each ingredient.
9. Scroll up the page to the food labelling section and enter the number of portions this recipe serves, ‘per serving’ label data will then be generated:
10. Input any other data on the recipe level in the ‘Modifiers’ box, such as recipe storage, weight change factors, or profit margin & tax to calculate RRP of recipes and various portions.
Pro Tip: If you intend to report nutrient values per 100g, or with reference to any unit of weight (e.g.food for label), it is important to account for weight change on cooking by either either the weight yield of your recipe, or entering an appropriate weight change / yield factor in the boxes provided. However, if you are simply reporting nutritional values 'per serving' (e.g calories on menus initiative) it is not necessary to apply a weight change factor, but the weight of the serving must not be referenced.
11. Add up to 5 portion size options in the box provided at the bottom of the screen, or type desired calories in the Kcal box and the portion weight will be calculated. Product barcodes may also be added here for use in the label maker or in API integrations.
12. Add any cooking instructions and notes for your recipe in the text entry box, or photos to illustrate key steps of the preparation process
13. Scroll up the page to double check the allergen information indicated is appropriate for your specific ingredients, and change the ‘May Contains’ indicators to ‘Unspecified’ or ‘Contains’ as required (right click an allergen to toggle the context menu)
14. Scroll up to the top of the page and add a photo to your recipe if desired.
15. Use the Export button or Menu > Output tools to publish your recipe to various outputs
WATCH THE VIDEO:
https://www.youtube.com/embed/7QoDH62Wn1g
Nutritics uses a modern panel design with high resolution graphics and scrolling animations throughout. Nutritics is made up of panels and workspaces. There are 2 primary panels, one for client storage & management (for users on the professional, performance and education editions) and the other for management of food and recipes:
Clicking on an item from one of these panels will open a sub-panel with more detail on this item, or will scroll to a large open workspace, to allow you to view or develop that item further.
Depending on your product, your workspace panels may include:
Food & Activity diary workspace
Add new food or recipe workspace
Meal plan creator workspace
Food compare workspace
Label Maker workspace
Libro program design workspace
Menu workspace
When using any of these workspaces, the food management panel will slide to the left side of the screen, giving you a larger work area, as shown below:
Click the back arrow at the top left of the screen to return to your client related panels.
As you open various workspaces in Nutritics, tabs will appear at the top of the screen to assist easier switching between the workspaces.
WATCH THE VIDEO:
https://www.youtube.com/embed/rBCoRSXg_bM
Pro Tip: You can generate a professional food & exercise diary from within the software to print or email to your client. Navigate to Menu > Output tools and click the ‘Generate’ tab to access the forms. Enter the number of days you require in the box in panel 3 then click the go button.
To create a diet or exercise log,
create or set up a new client, then in the panel that opens, click the + button under the 'Logs' heading. When you click 'Start from Scratch' this will take you to the log entry screen below:
1. Title your log
2. Choose the log type, either meal by meal, or day by day logging
3. Click a meal collector*– Breakfast, Lunch, Dinner or Snack, that you wish to log first
4. Search for foods and recipes in the food search box at the top left of the screen (hotkey F3)
5. Click a food from the results to review it before entering it to your log
6. If satisfied with the selection, add it to your log by clicking the blue 'Insert' button, or drag it to your desired meal
7. Clicking the white cell will open a popup box with built in portion size suggestions to choose from, you can also type any quantity in this box in grams
8. The diary is set up like an excel spreadsheet, so you can add a food to multiple days or meals by clicking the corresponding cell row, without having to search for the item each time
9. Repeat steps 3-6 until all foods have been added
10. Toggle between a food log and an exercise log using the 'food' and 'activity' buttons at the top of the log.
Please note that the Activity Log tab is not enabled on all account types, but you may add it on from Menu>Upgrade/Downgrade.
*Collectors are meal name slots – Enable more meal slots from Menu > Settings > preferences
Pro Tip: Flexible data points known as 'custom fields'can be tagged to diet log data. Examples of custom field data, includes meal time, location, mood, food cost, brand information or custom nutrient parameters. Please see the section on the 'Research Edition' for more information on how to set up and use custom fields.
You can update and manage your products via the supplier portal. When you log into your secure portal, you will see your existing foods or recipes can be viewed on the left hand side.
To add a new product to your supplier portal, click the start button located in the top left corner of the screen. This will open the start menu. Click on ‘New food’ to add a new product to your database. You can add data from a products nutrition label, or from other sources (laboratory analysis or specification sheets). For this example, we are going to add label data.
First, name the product and provide an optional description. These also act as search terms when looking for the product later. Next, choose a category for the product from the options presented. The category chosen will determine the cooking methods available if the product is used in a recipe. Add the key nutrients that appear on the product's label. The label format will default to the labelling standards and requirements of the region set in your account. This can be changed via the black drop down arrow. If your product is a liquid, you can enter the nutritional information in mls by clicking the black drop down arrow.
Click ‘show extended nutrients’ to enter any other details such as fat subcomponents (such as mono or poly unsaturated) or micronutrient information. Click ‘submit label values’ when finished. If you chose to enter the nutrition information from ‘other sources’, the database values will be stored as entered and will also be converted to labelling standards.
Once the nutrient information has been submitted, you will be required to add some other mandatory pieces of information before you can publish your product to your database. By scrolling to the publishing panel, you will see what is required.
The mandatory information will be flagged in orange and will include product name, category, ingredient list, at least one portion or pack size and its’ unique code. To add or update any of these fields, you can click on the fix this button and you will be brought to the appropriate section. Additional but not mandatory information will be flagged with a blue exclamation mark eg. cover photos.
To add the ingredient list for the product, click the fix this button and you’ll be directed to edit this in the appropriate section. The ingredient list can be typed in or copied and pasted from another source. You can choose to bold any allergens or click ‘scan for allergens’ before clicking update. If any allergens have been flagged, you will be asked to approve them in order to proceed.
The allergens detected are specific to your region. The region can be changed under the ‘food labelling’ section by clicking on the dropdown.
You can change how the allergens are formatted by going to the menu by clicking on the cog icon in the top right corner of the screen > settings > preferences > scroll to the advanced section and choose your preference from the dropdown beside ‘Ingredient list allergen format’.
Allergens in the ingredient list will be flagged in the allergen tiles automatically.
Now when we return to the publishing panel and click re-check, the only outstanding piece of information is a product / portion size and its unique code. Clicking 'fix this' will allow you to add product names or portion sizes (eg. small, medium , large or 150g, 500g, 750g), their unique codes and images.
- All fields are free text boxes so simply click on them to type.
- Add additional products/servings can be added by clicking ‘+new product’.
- It is important to note that a product / portion code is required for publishing. The code can be manually entered or if your product doesn’t have a code, you can choose to have one auto-generated by clicking on the round arrow.
- Toggling a portion ‘off’ means that product will not be published to your database, but this product will still be available for you to use throughout your own account e.g. to create labels, menus, as a sub recipe.
When all of the mandatory information has been added, the re-check button will update to a publish button. Clicking this button will publish the food to your database. Once a product has been published, it will be available to your customers to search, view and use.
All the foods published to your database are stored in the ‘my foods’ tab. You can make any edits or updates to a published product by updating the appropriate section and re-publishing. However if the product has been reformulated and has different nutrition or allergen information, you will be required to publish this food with a different product code.
WATCH THE VIDEO:
https://www.youtube.com/embed/PReqYf8Am8Y
If the label maker tool is not available on your account, it is available as an add-on from Menu > Add Features.
The label maker can be used to create food labels quickly and easily for your products and recipes. It can be accessed in a couple of different ways.
Option 1: Open a food or recipe and select export to > label maker
Option 2: Open a food or recipe and click on ‘make a label’ in the food labelling section
Option 3: Click on the start menu and select ‘new label’ then choose the food or recipe you would like to make a label for
Option 4: In the Nutritics Explorer click on ‘My labels’. Expand the food or recipe that you would like to make a label for and click on ‘+new label’
In the label maker, select a pre-made label template and customise this as needed, or start from scratch.
(1) Your region can be changed here - this will determine the labelling standards applied to the label.
(2) Give the label a name.
(3) Enter the weight of the product.
The label maker is set up in a series of side-by-side panels, similar to the main Nutritics interface.
Panel 1: This is a list of labels created for this recipe or food. Additional labels can be created for this recipe by clicking ‘+add label’.
Panel 2: Add elements to the label from this panel. Elements include graphics, text, nutrition facts panels etc.
Panel 3: Customise elements from the panel that expands when an element is selected from the list of elements. Click on the 'x' icon to close this panel. It can be reopened by clicking on the cog icon that appears.
Panel 4: Finally we have the label workspace. Elements can be resized and repositioned here and clicking on an element here will open a format bar where elements can be further customised.
Set the label dimensions in the ‘label setup’ panel. Set the width and height of the label and the margins to the left and right.
It’s important to make sure that the dimensions set up in the Nutritics label maker match label rolls the labels will be printed on and the dimensions in your printer settings. You can set the printer dimensions by opening your printer properties and going to the printing preferences. We have a separate guide on this here.
Tick ‘low-resolution printing’ to print in black & white; determine if you want your labels to be flipped 90 degrees for printing or, if printing e.g. on an A4 sheet, you can set how many labels will be printed on a sheet.
Adding elements to your label
Click ‘+add an element’ to get started. Click on any element to add it to the label.
Elements can be customized in the panel that expands. Click on the ‘X’ icon to close the panel. Click on the cog icon to expand it again.
Elements can be arranged on the label by clicking on them on the label workspace and dragging them into position.
When an element is selected a formatting bar appears. From here, elements can be resized, aligned, rotated and for text elements, the width of the text box, font and font colours can be changed.
Click on the font icon in the format bar to edit the font style and colour.
Click on the ‘x’ icon to remove an element from the label.
Once you are done adding elements to the label, click back to see all elements enabled on the label.
Graphics
In the graphics element, you can add your logo or upload images and templates to your label.
Click 'Use as Template' if you have pre-printed label rolls or sheets - this means the graphics won't be printed but will be shown on the label workspace so other elements can be positioned around the image.
Background templates should be the exact same aspect ratio as the finished cut label. In cases where the cut label is an irregular shape, the template should contain the entire finished cut label exactly. The image resolution is not important as it will not be printed but we recommend at least 72 pixels per inch for reasonable quality in the editor.
Also please note that the label maker does not natively support bleed, or PDF or EPS files - they must be raster graphics - png/bmp/jpg/gif/tif.
Click and drag the image on the label workspace to reposition it.
(1) Use the plus and minus buttons to resize the image, or type directly into the box to change the size.
(2)The image can be aligned by clicking on the alignment icon.
(3) The image can also be rotated by clicking on the plus and minus icons beside the rotate icon or by typing the number of degrees directly into the box.
To add more than one graphic to the label, click ‘add an element’ and then select ‘other element’ and select the graphic option from the drop-down menu.
Name of food
To add the name of your product tick the ‘name of food’ element. In the panel that expands, add in the product name and an optional description. By default, Nutritics will pull in the food/recipe name as the name of the food. Changing the text here will not change the recipe details. You can refresh to the original recipe name by clicking on the round arrow.
Reposition the name of the food by clicking on it in the label workspace and dragging it into place.
The font size and text box width can be changed in the formatting bar using the plus and minus buttons or by typing directly into the box.
Change the font colour by selecting a colour from the options provided or type in a colour code. The font can also be rotated and aligned.
NET WEIGHT
Specify the weight of the product on your label using the weight element. The net weight is the weight of the product excluding packaging.
PRICE
Specify the sale price of the product in the price element.
DATES
Set the date format and preparation date.
(1) Clicking the small circular arrow on the preparation date box will input today's date in the box.
(2) Tick ‘automatically update on print’ and any time you print this label, the preparation date and other dates on the label will be updated automatically.
(3) You can then specify the number of days durability for ‘sell by’, ‘best before’ and ‘use by’ for your product.
CALORIES
Toggle this element on to display calories on your label. Remember to choose a portion size option at the top of the screen.
ALLERGENS
Toggle on to display allergens as text or icons on your label. Allergen information is pulled from your recipe in real-time.
CLAIMS
If Nutritics has indicated that nutrition and health claims can be made for the recipe, these can be added to the label by clicking on the claims element. Nutritics won’t indicate any claims that cannot be made for your recipe.
Nutrition
The labelling standard applied can be changed from the region dropdown.
(1) In the nutrition element, choose your style of label, either front or back of pack.
(2) Depending on the labelling standards set, tick to display the nutrition per serving along with the nutrition per 100g/100ml.
(3) Tick to display the nutrition as a percentage of the reference intake of an average adult.
(4) Specify the number of servings using the plus/minus icons or type a number directly into the box.
(5) Add a description of the serving e.g. 1 cup, 1 carton
(6) Click ‘+add nutrient’ to add additional nutrients to the nutrition panel. Note that only nutrients present in adequate amounts will show here.
(7) The nutrition panel can be downloaded as an image
Click and drag the nutrition panel in the label preview to move it. Resize, align and rotate the panel using the formatting bar.
Ingredient list
This is an editable text version of the food’s ingredient list and quantities / QUID. This list pulls directly from your food/recipe.
Instead of editing the text here, we recommend that changes to the ingredient list are made on recipe ingredients (learn how to do this
here).
If necessary, untick 'sync from food/recipe' to edit the ingredient list.
Edit the text using the format options.
Adjusting the text here does not change the QUID on the food or recipe development workspace. To revert to the original ingredient list, tick 'sync from food/recipe' again and the ingredient list will refresh. The text can also be formatted in the label workspace.
Choose to include the allergy advice statement on your ingredient list also. This will notify people of any allergens that may be contained within the product
Alcohol
Toggle this element on to indicate the alcohol by volume on your product label.
BARCODE
Choose your barcode type and input the numeric values to generate a printable barcode for your product. The barcode can also be downloaded as an image.
ORIGIN Specify the country of origin of your food in the ‘origin’ element. If the labelling standards are set to FSANZ, origin element facilitates the
Australian Standard Mark.
INSTRUCTIONS
This element is pre-populated with the instructions from your recipe workspace. This is not an element on foods at the moment. Editing the text here does not affect the instructions in the main recipe workspace. Use it to give the consumer additional information, such as cooking or storage instructions for the product.
Label templates
Once the label is complete, it can be saved as a template and reused for different products by clicking on the grey slider icon and clicking ‘save as’. The next time the label maker is opened, the template will be accessible from here.
Exporting Labels
Print directly to a label printer or onto paper on any regular inkjet/thermal printer; or download your label as an image.
Export the label to a live report to preview how the final version will look.
Label headings can be translated by clicking on the language drop down in the top right corner of the label report.
To print your labels in bulk, see our guide on LabelMagic. Accessing labels
Labels are accessed by right clicking on a recipe and selecting ‘view labels’
or from the ‘my labels’ folder in the Nutritics Explorer.
Nutritics supports the creation of food labels that are compliant with the labelling rules laid out by Food Standards Australia New Zealand (FSANZ). This includes the provision of a country of origin on food labels.
Country of Origin should be tagged on each of your recipe ingredients in Nutritics.
There are a few ways to do this:
Method 1 - Tagging on an ingredient level
Open an ingredient and navigate to the ‘custom fields’ box under the food labelling heading. Click ‘+new’ under the country of origin heading and select the country that you would like to tag e.g. Australia. Type the percentage of the ingredient that originates from that country into the free text box. This information must be made available by the manufacturer or supplier. Once added, this data is maintained and calculated wherever the ingredient is used in Nutritics.
Method 2 - Tagging during the recipe development phase
To begin, create a new recipe by clicking start > new recipe, or open and existing recipe. Add an ingredient to the recipe or use an existing ingredient. Click on the quantity box to the right of the ingredient name and open the ‘custom fields’ tab.
Here you can enter fields such as Country of Origin. Click ‘+new’ beside the country of origin heading to add a new country.
If custom data has already been tagged on an ingredient level (as in method 1), this data will be visible here.
Once the Country of Origin has been added for each ingredient, you can use Nutritics Label Maker to produce compliant Country of Origin graphics automatically, as well as a Health Star Ratings, Nutrition Information Panels, and much more.
To export your label to the label maker click the ‘export to’ button in the top right corner of the recipe workspace and
To produce the Country of Origin label, click the origin element, ensuring that your label format is set to FSANZ, then click the element 'Origin' to activate.
Next, choose the format type that suits your product.
The Standard mark with 3 components includes a kangaroo logo, a barchart and explanatory text. This type is for products made, grown or produced in Australia using Australian Ingredients.
The 2 component label is for imported products, and so does not include the kangaroo logo. This option should be used on imported products that are packed in Australia, or contain Australian Ingredients. Note that the bar chart and percentage value are calculated automatically from your recipe ingredient information for both the 2 and 3 component labels.
You can alternatively just set a custom percentage using the ticker if you have this information from elsewhere. Additional custom text statements can also be added to the 2 and 3 component labels in the text box and the label can be set to vertical layout if desired.
Other imported products that do not use Australian ingredients or packing should use the 1 component, Origin Statement label.
WATCH THE VIDEO:
https://www.youtube.com/embed/rvamr0gRFu0
Recipes and foods can be organised into menus and cost assessed in the foodservice version of Nutritics or with the foodservice add-on pack. After a menu is created, there are a number of display options available for use, including a digital interactive menu, a printable allergen & calorie summary report, and full menu cycle overview report. To create any of these reports, a menu must first be produced:
1. Click ‘Start’ then ‘New Menu’ to start creating a menu or menu cycle. Alternatively, click the folder icon below the food search box, then click 'My Menus' > 'New Menu' to create a new menu
2. Enter a name for your menu, for example, Monday's Menu, á la carte, Early Bird, Weekend Specials etc.
3. Click ‘New Group’ to add a heading to your menu (e.g. soups, sandwiches, entrees)
4. Drag and drop recipes, foods or food/recipe groups onto your menu (or use the insert button)
Pro Tip: Switch the workspace view between the tile and list mode by clicking the toggle in the bottom right of the screen.
5. Select the recipe portions that should appear on the menu from the dropdown
6. Rearrange groups or menu items by dragging and dropping
7. Click ‘Choose Monitors’ from the top toolbar to customise the detail that is available on display
If the menu will be used for ordering, use the 'sold out' monitor to add a ‘sold out’ banner over the menu item on your digital menu.
You can use the 'order limits' monitor to control the number of items customer can order.
Setting a min order means the customer must select at least this many menu items from this menu group e.g. build your own breakfast by picking at least 2 meats
Setting a max order means the customer cannot select any more than the specified number of items from this menu group e.g. make your own sandwich, choose 1 bread, 1 meat and 3 salads.
Any order limits will be displayed on the digital menu beside the menu group name.
8. Click the digital menu button in the top toolbar to preview your menu in digital format (top picture below) or click the paper menu to generate an allergen and calorie summary sheet (bottom picture below):
Menu settings
Menu settings are accessed by clicking on the grey slider icon in the top right corner of the menu workspace.
Within the settings menu, there are several tabs that allow for the customisation of the menu
Display tab
Choose the information to be displayed on paper and digital menus e.g. menu item prices, calories and allergen information, an ingredient list and front and back of pack nutrition information.
Select show the 'all items' group to allow the menu to default to all items. Alternatively, toggle this off so the menu defaults to the first recipe group available.
Choose the look of the menu e.g. apply a light or dark theme and select how many menu items or ‘tiles’ are displayed in each line.
Enter a disclaimer to be displayed on all menu items, or add a welcome message for your menu.
Interactivity tab
Choose how customers can interact with the menu.
Interactive mode allows customers to scroll through the menu and click on menu items for more information/ordering purposes and is recommended where menus are being displayed on touchscreens. Untick this option is your menu will be displayed on a digital display or TV that is not a touchscreen.
Tick ‘Allow users to go back to the list of menus’ to allow customers to exit the current menu they are viewing and browse all published menus e.g. you might want to allow your customer to exit the bar menu and look at the restaurant menu.
Tick ‘The screen resets to the list of menus’ and the menu will return to the list of published menus after a period of inactivity.
Enable a ‘featured items’ screensaver and menu items will flash on screen when the menu is left idle.
Ordering tab
For more information please see our separate guide on meal ordering
here.
Notifications
Choose what notifications you or the customer receive with ordering.
Publishing tab
Menus can be made live from the publishing tab using the drop-down.
Choose if the menu is published immediately or schedule a date and time for the menus to go live.
Live menus have an orange circle beside the menu title in the Nutritics explorer and on the the digital button in the menu workspace.
Click on the digital button to preview your digital menu.
Sharing tabChoose how the menu will be accessed by customers in the ‘sharing’ tab.
Libro is an app designed to track diet, exercise and lifestyle goals. Libro users log their diet and exercise on the app and receive analysis reports and feedback from their nutrition professional directly to their phone. Publish menus to Libro to allow Libro users to browse the menu on their smartphone.
Tick 'enable sharing' and copy and paste the menu URL to display the menu on a website, on a tablet or other displays; embed the menu on a website using the code provided or display the QR code online or at an outlet for customers to scan.
Save as template
Menu settings can be saved as a template and applied to other menus. Click ‘save as’, name your template and the template will be saved for reuse.
To apply a template, click on the template name and select apply. Right-click on the template name to set it as the default menu layout, to update the template or to rename or delete the template.
The licence management platform allows you
to view, add, and manage licences under your organisation. The platform is
accessible from Menu>Manage Users for elected administrators.
The number of
licences allocated and used are shown at the top right of the panel. Note that
you may activate an account for multiple years, and only one licence will be
used.
WATCH THE VIDEO:
https://www.youtube.com/embed/YiI_aui-FkM
Nutritics for Research has a number of additional features which are useful for performing large scale project and population based investigations. See the video above for an overview of these features.
Please note, this tutorial assumes you are familiar with the standard version of Nutritics.
In the short video below you will learn how to:
- Navigate through the app
- Add nutrient trackers to your home screen
- Add foods and exercise to your diet log
- Interact with a program assigned to you by your nutrition professional
For more detailed tutorials, please check out the rest of the Libro section of our support center. WATCH THE VIDEO:
https://www.youtube.com/embed/DtdRh3Z9FVM
WATCH THE VIDEO:
https://www.youtube.com/embed/1398iohHDQ0
Nutritics meal plan creator enables the creation of custom eating plans to suit your client’s health or performance based goals.
Please note that you can currently only create a single day meal plan in Nutritics. To create a multiday meal plan, you must create these as separate days.
To create a meal plan, select a client (or set up a new client) and click the plus button on the meal plan panel.
Alternatively, go to the start menu and click 'new meal plan'.
You can also create a new meal plan from the 'My Meal Plans' section of the Nutritics explorer (1). Click on a meal plan group to open it (2) and then click on 'new meal plan' (3).
Meal Plans can be created from scratch, or you can reuse a previously created meal plan and attach it to a new client. Select the preferred option, and the meal plan creator screen will open. Give the meal plan a title and date.
Adding foods and recipes:
To begin creating the meal plan, search for a food in the food search box at the top left of the screen. Click on the food once to see more information on it and click insert to add it to the meal plan.
Foods and recipes can also be dragged and dropped onto the meal plan workspace.
Enter a quantity for each food in the 'Quantity' column. Select from predefined portions (available for most foods) or manually enter a quantity in the manual entry field.
You can also change the food and the description to more ‘client friendly’ names by clicking on the text and typing new names.
Give the meal a name in the text box above the food names.
To add a new meal to the meal plan, click the '+Add meal' button and give the meal a title.
If you click on a meal title, it will change to a bold, blue font indicating that that meal has been selected. Any foods added to the meal plan now will be added under that meal heading.
Foods and recipes can easily be rearranged in the meal plan by dragging and dropping them from one meal to another.
Continue adding meals and foods until you are satisfied with the meal plan.
As you work, you will see nutrient totals for both the meals and the overall meal plan compared with the client's targets.
You can choose the nutrients on display by clicking 'choose monitors' at the top of the workspace. We recommend ticking a maximum of 5 monitors as the max number that fit on an A4 sheet.
Adding recipes to a meal plan
Previously created recipes can also be used in a meal plan. Simply search for the recipe in the search bar and look for the icon indicating a recipe - use the ‘My foods & recipes’ tab to filters the search results to only display items you have created:
You can also browse recipes in the ‘My Recipes’ tab or filter your recipe list in groups from the small arrow beside the ‘My Recipes’ tab:
After clicking the ‘insert’ button on a recipe, you will be asked if you want to import all ingredients from the recipe. Selecting no will import the recipe name only (as a single row on the meal plan) with the nutrient totals. Selecting yes will import all the ingredients with their individual nutrient breakdown.
Once a recipe has been added to a meal plan you can specify how many servings of the recipe you want to be included in the meal plan.
You can also choose to include any cooking instructions that have been added on the recipe level in your meal plan reports.
Syncing recipes in a meal plan:
When you add a recipe to a meal plan, it’s like taking a snapshot of that recipe. If you make changes to a recipe and would like these changes to be reflected in a meal plan, click on the sync button to the right of the recipe name.
The sync button will pull through the latest version of that recipe to your meal plan.
If you do not sync a recipe in a meal plan, it will remain unchanged. This means that one recipe can be tweaked and reused multiple times based on your client's requirements.
Why not check out our guides on nutrient monitors and rearranging foods and meals in a meal plan next?
An
unlimited number of new foods, products, and supplements can be user added to
Nutritics from label data, International food tables, or from laboratory analysed values.
Pro Tip: Most of the foods in Nutritics are ‘average samples’ from multiple samples or brands. Thus when searching for products, it is often suitable to simply use an existing ‘best match’ food from the Nutritics database. Just be aware that the allergen information may not be specific to your branded product.
Adding an individual food:
1. To add a food, click the Start button at the top left of the screen and select the ‘New Food’ option.
2. Specify if your food data is from a product label or other data source, such as lab analysed values or an International Food Composition Database
Pro Tip: In order to include vitamin and mineral values, which are not usually available on manufacturer’s food labels, you can import the nutrition from a ‘best match’ food in the database. To do this, search for a similar food in the database and click ‘insert’ after step 1 above. You can then update and edit as per the steps below (alternatively, search for a food and right click it to duplicate and start editing the values)
3. Choose the best fit category for your food from the options presented
4. Title the food and provide a description with any additional information (for example, manufacturer, data source, flavour, searchable keywords or any other background information)
5. Check if the label/data is presented per 100g of product - adjust the box as necessary
6. Fill in the label data exactly as presented on the label, additional nutrients may be added by clicking show extended nutrients
7. Click the submit button to add the food – the system will automatically check for any input errors before showing the complete food workspace
8. Next, add the allergen information for the food. The allergens detected are specific to your region. The region can be changed under the ‘food labelling’ section by clicking on the dropdown.
To add allergen information, add the ingredient list for the product by clicking the pencil icon in the ingredient list section.
Type in the ingredient list or copy and paste it from another source.
Specify if the food is a single ingredient item e.g. olive oil
Click ‘scan for allergens’.
Any detected allergens will be highlighted.
You can change how the allergens are formatted by going to the menu by clicking on the cog icon in the top right corner of the screen > settings > preferences > scroll to the advanced section and choose your preference from the dropdown beside ‘Ingredient list allergen format’.
If any allergens have been flagged, you will be asked to approve them in order to proceed.
Allergens in the ingredient list will be flagged in the allergen tiles automatically.
9. Scroll up to add optional information such as a food photograph, the food cost and to add the food to groups.
Food groups can be accessed in the Nutritics Content Explorer -
And by clicking on the ‘my foods’ tab and hovering over the arrow that appears.
10. Add food-specific custom fields (eg. shelf life, origin, storage instructions) in the modifiers box.
11. Scroll down to the portion/pack sizes section to add portion size information. These portions will be available to choose from when adding this food to a recipe etc. later on.
12. The notes section is a free text box and files e.g. a product spec sheet, can be attached to here.
13. All data is saved automatically with each action and all foods added to your account are added to the ‘My Foods’ tab of the Nutritics Explorer.
An
unlimited number of new foods, products, and supplements can be user added to
Nutritics from label data, International food tables, or from laboratory analysed values.
Pro Tip: Most of the foods in Nutritics are ‘average samples’ from multiple samples or brands. Thus when searching for products, it is often suitable to simply use an existing ‘best match’ food from the Nutritics database. Just be aware that the allergen information may not be specific to your branded product.
Adding an individual food:
1. To add a food, click the Start button at the top left of the screen and select the ‘New Food’ option.
2. Specify if your food data is from a product label or other data source, such as lab analysed values or an International Food Composition Database
Pro Tip: In order to include vitamin and mineral values, which are not usually available on manufacturer’s food labels, you can import the nutrition from a ‘best match’ food in the database. To do this, search for a similar food in the database and click ‘insert’ after step 1 above. You can then update and edit as per the steps below (alternatively, search for a food and right click it to duplicate and start editing the values)
3. Choose the best fit category for your food from the options presented
4. Title the food and provide a description with any additional information (for example, manufacturer, data source, flavour, searchable keywords or any other background information)
5. Check if the label/data is presented per 100g of product - adjust the box
as necessary
6. Fill in the label data exactly as presented on the label, additional nutrients may be added by clicking
7. Click the submit button to add the food – the system will automatically check for any input errors before showing the complete food workspace
8. Add optional information such as a food photograph, food specific custom fields (eg. shelf life, origin, stoage instructions), allergens, notes and portion size information
9. All data is saved automatically with each action
Nutritics programs enable you to plan and schedule content for delivery to your clients via their own smartphones. Programs are built from a series of items delivered across multiple days or even months. These will appear as a checklist in Libro for your clients to complete each day.
WATCH THE VIDEO:
https://www.youtube.com/embed/5ylDHSztvtk
Program Setup:
- Click Start > New Program. Programs are also accessible from the Nutritics Explorer (the folder icon beside ‘My Foods’)
- Name the program, and set the number of days it will run for using the +/- ticker, or by typing the days. Additional days can be added later, even after the program has commenced.
- You can define a Master Profile in the popup box. The Master Profile should be as broad as possible, but still be specific to the target audience for your program.
- Click the wrench icon to define the trackers and permissions for the program:
- Additional sub-profiles can be setup under the Master later to enable alternate programming pathways for different groups or individuals (e.g. Males / females, age groups, or based on client categorisation). Click 'New Pathway' under the master profile to set these up.
Trackers:
Specify which nutrients, exercises and other tracking monitors should be active by default on this program
Meal collector slots:
Specify which meals are available on the clients phone, specific to the program
Fixed Start Date:
If your program is bound to calendar dates and events (eg. when managing sports teams or research project groups), this option should be selected, and a start date input. All clients on the program will then receive the same content on the same days. Any client added late to the program will join in with the group (and miss the previous days of the program)
If the program is not bound to a specific start date (as per the default setting), then clients that are added to the program will always receive day 1, and progress sequentially through the program without missing any days.
Other Options:
Blind Mode – Nutritional information and reports are hidden from the client
Client Diet Trackers – Specify if the user may add nutrition-type trackers that are not part of the program
Client activity Trackers – Specify if the user may add activity-type trackers that are not part of the program
Client Health Trackers - Specify if the user may add other health related trackers such as sleep, blood pressure, that are not part of the program
Client may swipe ahead on programs - Allow your clients to swipe ahead in their program to log future days
Require Micros – Disable sources of data that are known to be missing vitamins and minerals (typically branded food items which have label nutrients only)
Official Sources - You can hide foods in your client's Libro that are not verified, or from our published database
Adding content to a program:
After setting up the program parameters click ‘New Item’ at the bottom of any day tile.
This will present various item types which can be added to the program:
Headings – provide structure to the program by grouping similar items together (e.g. a series of foods for a meal, or series of exercises within a gym program)
Exercise – specify an exercise with steps or video instruction
Meals – select a food or recipe from your Nutritics account for the program
Meeting – schedule an appointment with your client, in person or call / video call.
Give your call a title, select the meeting type. If the meeting is a video call, add in the meeting URL so your client can join the call from Libro.
Article – provide an article or presentation for your client to read
Form – request that your client completes an online form
Video – provide a video for your client to watch
Notification – trigger a popup on your clients phone as a reminder
Pro tip: Using online URLs rather than uploading static files is great because you can freely change the form at any time in the future, and you don’t need to update the URL or make any changes to your program.
Adding pathways / clients:
Pathways allow you to create a different journey for different groups of people.
Click on 'new pathway' in the pathway box to create a new pathway. For example, you might have a master profile for renal patients, and then 2 different pathways depending on if they are male or female.
You can switch between the master profile and the new pathways by clicking on them in the pathways box. Any program items created in the master profile will be visible in the new pathways, shown in grey (these can be hidden if needed by clicking on the item). Items added within a pathway will only be visible in that pathway (not the master pathway) and are shown in blue.
Once you have created all your pathways, you can assign programs to clients. You can do this by opening the program you would like to share and navigating to the drop down menu at the top of the screen.
Click 'add a client' to assign that program to a client.
You can toggle between the master program, and the client-specific program using the drop down menu.
To start a client's program, open the program (making sure the client's name is shown in the drop down) and click 'start'.
WATCH THE VIDEO:
https://www.youtube.com/embed/RDNxZ2f_TU8
This guide will show you:
- how to set up your food outlet in Nutritics
- how to publish your existing menus and enable ordering
- the customer facing side of the ordering system
- how to manage your orders in the orders dashboard
If you have not already built up your menus in Nutritics, please see our guide on menu creation here.
Outlet set up
To enable ordering on your account you must first set up your outlet on Nutritics.
- Click on the cog icon in the top right corner of the screen, click on ‘settings’ then ‘ordering’.
- Search in the search bar and select your outlet from the list.
- Add in your outlet details.
- Next, set up the waiting staff, areas and tables. This information will be visible on ‘eat-in’ orders in the ordering dashboard.
- Add the staff members. If desired, staff members can be assigned pin codes that they will need to enter to gain access to menus. If staff members log into a menu and then a customer orders from that menu, you will be able to see the staff member associated with the order in the orders dashboard.
Menu settings and publishing
Once the menus and the outlet have been set up, open the menu you would like to publish from the Nutritics content explorer and review the menu settings.
Menu settings are accessed by clicking on the grey slider icon in the top right corner of the menu workspace.
Within the settings menu, there are several tabs that allow for the customisation of the menu:
Display tab
Choose the information to be displayed on paper and digital menus
- e.g. Enable menu item prices, calories and allergen information, an ingredient list and front and back of pack nutrition information.
- Choose the look of the menu e.g. apply a light or dark theme and select how many menu items or ‘tiles’ are displayed in each line.
- Enter a disclaimer to be displayed on all menu items.
Choose how customers can interact with the menu.
- Interactive mode allows customers to scroll through the menu and click on menu items for more information/ordering purposes and is recommended where menus are being displayed on touchscreens. Untick this option is your menu will be displayed on a digital display or TV that is not a touchscreen.
- Tick ‘Allow users to go back to the list of menus’ to allow customers to exit the current menu they are viewing and browse all published menus e.g. you might want to allow your customer to exit the bar menu and look at the restaurant menu.
- Tick ‘The screen resets to the list of menus’ and the menu will return to the list of published menus after a period of inactivity.
- Enable a ‘featured items’ screensaver and menu items will flash on screen when the menu is left idle.
Ordering tabEnable ordering to allow customers to place orders from the digital menu. Orders will appear in the ‘Orders’ folder in the Nutritics content explorer.
Select the type of orders accepted, i.e. delivery, eat-in and take-away; set the default order type (this will be the first option loaded by default when the customer is placing their order) and select the contact information required from the customer to complete their order.
Publish your menus so staff and customers can view and interactive with your menus on a digital display.
Staff login can be enabled from this tab. Staff members can be assigned pin codes that grant them access to menus. Pin codes can be assigned by clicking on the 'add staff' shortcut or from the outlet settings accessed by clicking on the cog icon in the top right corner of the screen < settings < ordering.
Menus can also be made live from the publishing tab tab using the drop-down. Choose if the menu is published immediately or schedule a date and time for the menus to go live.
Live menus have an orange circle beside the menu title in the Nutritics explorer and on the the digital button in the menu workspace.
Click on the digital button to preview your digital menu.
Sharing tabChoose how the menu will be accessed by customers in the ‘sharing’ tab.
Libro is an app designed to track diet, exercise and lifestyle goals. Libro users log their diet and exercise on the app and receive analysis reports and feedback from their nutrition professional directly to their phone. Publish menus to Libro to allow Libro users to browse the menu on their smartphone.
Menu templatesMenu settings can be saved as a template and applied to other menus. Click ‘save as’, name your template and the template will be saved for reuse.
To apply a template, click on the template name and select apply. Right-click on the template name to set it as the default menu layout, to update the template or to rename or delete the template.
Customer view
If a menu is password protected, a staff member will be required to log in to see the menu.
Enter the name and pin assigned to the staff member in your outlet settings.
Menu items are shown in a tile format. Customers can scroll through and filter the menu by clicking on the tabs along the top.
Customers can also filter by their dietary preferences and allergies by clicking on the drop-down menu at the top of the screen.
Clicking on a menu item will open it (the information on display e.g. calories, pricing etc. can be controlled from the menu settings).
Specify the desired number of servings and any notes for the kitchen.
Items are added to a basket at the bottom of the screen.
Depending on the menu set up, customers can choose to eat in, take away or have their order delivered by following the prompts on screen.
Customers will receive on-screen confirmation of their order.
Order Dashboard
The order dashboard is accessed via the Nutritics Content Explorer. Click ‘Orders’ then ‘Live Orders’.
A summary of all orders is shown in the first panel. Items are organised into the food and recipe groups set up in the Nutritics account.
The number of servings is written beside the menu item in orange.
Individual orders are shown to the right of the summary panel.
Order information includes an icon displaying if the order is for sit in, take-away or delivery; the order number; the time the order is due; customer details; and the order items organised into groups.
Click on the paperclip icon beside a customer name to see more information on the customer.
Toggle a condensed view of the orders or enable fullscreen mode using the icons in the top right corner of the screen.
In the condensed view, click on an order to see more information on it.
Click on an item in the order summary panel to view all orders containing that item.
Right-click on an item to view the cooking instructions and ingredient list. You can adjust the number of servings required and the ingredient list will update automatically.
Keep track of order progress by clicking on order items to tick them off.
Change the status of an order using the drop-up menu on individual orders, or set order status in bulk from the order summary panel.
Filter your orders using the search tool. Orders can be filtered by:
- Due time
- Date the order was placed
- Area where the customer is sitting (if applicable)
- The menu the customer ordered from e.g. bar menu, main restaurant menu
- Staff member (if staff login is enabled on menus)
- Order status e.g. pending, ready for collection
- Table number
- Meal groups e.g. starters, pastries
Save commonly used searches by setting your search criteria and clicking ‘save’. Give the search a title. Saved searches appear to the left when the search dropdown is open.
New orders can be placed directly from the order dashboard by clicking on ‘new order’. This will open a list of menus. Select the relevant menu and order as normal.
WATCH THE VIDEO:
https://www.youtube.com/embed/RDNxZ2f_TU8
If you are interested in adding meal ordering to your Nutritics account, please contact sales@nutritics.com
This guide will show you:
- how to set up your food outlet in Nutritics
- how to publish your existing menus and enable ordering
- the customer facing side of the ordering system
- how to manage your orders in the orders dashboard
If you have not already built up your menus in Nutritics, please see our guide on menu creation here.
Outlet set up
To enable ordering on your account, you must first set up your outlet in Nutritics.
- Click on the cog icon in the top right corner of the screen, click on ‘settings’ then ‘ordering’.
- Search in the search bar and select your outlet from the list.
- Add in your outlet details.
- Add your outlet’s social media accounts in order to be able to share your menus to your social media platforms directly from within your menu settings.
- Set the width of your thermal paper rolls used for docket and receipt printing. Dockets and receipts can be printed from the orders dashboard.
- Tick the days that your outlet is open. If ordering is enabled on your menus, customers will only be able to order on days you are open. Use the calendar to mark any holidays that your outlet is closed. Customers will not be able to place orders for those days.
- Under the meal services heading, specify how your customers can receive their orders, e.g. take away, delivery.
- If desired, share your outlet with other Nutritics users. Type a Nutritics username or email address to enable sharing with the user. If your licences are part of an organisation or group, you will see all users of the organisation when you click ‘add user’. You can also choose to share with all account holders within the organisation. You will have the option to share the outlet with read only or read & write privileges after adding a collaborator.
- Payments
Allow customers to pay for their order directly from your digital menus.
Payments will be collected by Nutritics payment partner Stripe. Follow the instructions on screen to connect Stripe with your Nutritics account and add details including where payout from orders should be deposited. By default, payouts will be made to your bank account daily.
Once your Stripe account is connected, it can be accessed from the main menu > settings > ordering.
- Next, set up the waiting staff, areas and tables. This information will be visible on ‘eat-in’ orders in the ordering dashboard.
- Add the staff members. If desired, staff members can be assigned pin codes that they will need to enter to gain access to menus. If staff members log into a menu and then a customer orders from that menu, you will be able to see the staff member associated with the order in the orders dashboard.
Menu settings and publishing
Once the menus and the outlet have been set up, open the menu you would like to publish from the Nutritics content explorer and review the menu settings. If you have not already created your menus in Nutritics, please see our guide on menu creation here.
Menu settings are accessed by clicking on the grey slider icon in the top right corner of the menu workspace.
Within the settings menu, there are several tabs that allow for the customisation of the menu:
Display tab
Choose the information to be displayed on paper and digital menus
- Enable menu item prices, calories and allergen information, an ingredient list and front and back of pack nutrition information.
- Choose the look of the menu e.g. apply a light or dark theme and select how many menu items or ‘tiles’ are displayed in each line.
- Enter a disclaimer to be displayed on all menu items, or add a welcome message for your menu.
- Type in a welcome message/instructions to display to customers when the menu is loaded. Use the toolbar to format the text. Click on the picture frame icon to upload an image.
Interactivity tab
Choose how customers can interact with the menu.
- Interactive mode allows customers to scroll through the menu and click on menu items for more information/ordering purposes and is recommended where menus are being displayed on touchscreens. Untick this option is your menu will be displayed on a digital display or TV that is not a touchscreen.
- Tick ‘Allow users to go back to the list of menus’ to allow customers to exit the current menu they are viewing and browse all published menus e.g. you might want to allow your customer to exit the bar menu and look at the restaurant menu. Tick ‘The screen resets to the list of menus’ and the menu will return to the list of published menus after a period of inactivity.
- Enable a ‘featured items’ screensaver and menu items will flash on screen when the menu is left idle.
Ordering tab
Enable ordering to allow customers to place orders from the digital menu. Orders will appear in the ‘Orders’ folder in the Nutritics content explorer.
- Enable card payments from this tab.
- Max advance orders per day: This allows orders to be booked for subsequent days. Define how many advance orders can be booked each day.
- Min lead time: Set the minimum amount of time and order can be placed before it’s due i.e. the minimum lead time it will take the kitchen to produce an order for this menu. For example, if the lead time is set to 15 minutes and a customer tries to place an order at 3pm, the earliest ‘due time’ slot will be 3:15pm.
The lead time for orders can be controlled in 2 places:
1) In the ordering tab of individual menu settings as described above.
2) The minimum lead time can also be controlled by the kitchen in the live orders dashboard.
Click on the meal service type e.g. delivery and use the plus or minus icons to edit the due time.
Note the due time can only be increased here and cannot go below the due time set on an individual menu e.g if the lead time of a menu is set to 20 minutes but the kitchen is busy and needs more time to fulfill the orders, they could set the lead time from the dashboard to 30 minutes and this lead time will be applied. If the kitchen is quiet however and wants to decrease the lead time e.g. to 15 minutes, this would need to be changed in the individual menu settings.
- Allow orders for specific meal/time slots: This should be used where meal times are at a set times e.g. breakfast is served at 8am, lunch is at 12pm and dinner at 6pm.
- Allow orders at custom times: Allows customers to choose their order ‘due time’ from automatically calculated time slots. Define how many orders the kitchen can handle in a set amount of time.
This will determine the amount of due time slots that are visible to the customer when ordering from your menu.
Pro tip: make sure your opening days and any days you are closed for holidays are set in your main ordering settings so they will not appear in the calendar view. These are accessed by going to the main menu in the top right corner of the screen (cog icon) > settings > ordering.- Set the default order type (this will be the first option shown to customers when selecting how they wish to receive their order).
- Set the service operating hours for each order type e.g table service is available all day but delivery is only from 5-9pm (or leave this blank to accept orders at all times).
- Set and optional fee for orders.
Note that card payments will need to be enabled for this to work (scroll to the top of the ordering tab to enable payments). - Select what information is required from the customer e.g. name, address, phone number (this must be ticked to enabled SMS notification to customers that their order has been received).
Notifications
- Choose to be notified via email each time a new order is submitted.
- Choose to send customers an SMS message confirming their order. Note you will need to collect customer phone numbers (enabled from the ordering tab of your menu settings) for this to work.
- Send customers a confirmation email summarising their order.
Publishing tab
Publish your menus so staff and customers can view and interact with your menus on a digital display.
- Staff login can be enabled from this tab. Staff members can be assigned pin codes that grant them access to menus. Pin codes can be assigned by clicking on the 'add staff' shortcut or from the outlet settings accessed by clicking on the cog icon in the top right corner of the screen < settings < ordering.
- Menus are made live from the publishing tab tab using the drop-down. Choose if the menu is published immediately or schedule a date and time for the menus to go live. Click here for more information on scheduling menus.
- Live menus have an orange circle beside the menu title in the Nutritics explorer and on the the digital button in the menu workspace.
- Click on the digital button to preview your digital menu.
Sharing tabChoose how the menu will be accessed by customers in the ‘sharing’ tab.
- Libro is an app designed to track diet, exercise and lifestyle goals. Libro users log their diet and exercise on the app and receive analysis reports and feedback from their nutrition professional directly to their phone. Publish menus to Libro to allow Libro users to browse the menu on their smartphone
- Copy and paste the menu URL to display the menu on a website, on a tablet or other displays; embed the menu on a website using the code provided or display the QR code online or at an outlet for customers to scan.
- To see your full menu list, click ‘get main menu url’. This will provide you with a link to a list of all active and inactive digital menus in your Nutritics account.
Menu settings can be saved as a template and applied to other menus. Click ‘save as’, name your template and the template will be saved for reuse.
To apply a template, click on the template name and select apply. Right-click on the template name to set it as the default menu layout, to update the template or to rename or delete the template.
Templates can be applied to an individual menu, a menu 'folder' group or all menus across your account by selecting the relevant option from the drop down shown above.
Limiting items ordered on menus
To limit the amount of items that can be ordered from a menu, click on the monitors button from your menu workspace.
Order limits can be set using the monitors under the 'administration' heading.
Sold out: Enable this monitor and tick any items that are no longer available. The item will still appear on your digital menu, but will bear a 'sold out' banner.
Min and max order: Setting a min order means the customer must select at least this many menu items from this menu group e.g. create your own breakfast by selecting 2 meats.
Setting a max order means the customer cannot select any more than the specified number of items from this menu group e.g. make your own sandwich, choose 1 bread, 1 meat and 3 salads.
Any order limits will be displayed on the digital menu beside the menu group name.
Customer view
If a menu is password protected, a staff member will be required to log in to see the menu.
Enter the name and pin assigned to the staff member in your outlet settings.
Menu items are shown in a tile format.
Customers can click on the language dropdown at the top of the screen to translate the menu into their preferred language.
Customers can scroll through and filter the menu by clicking on the tabs along the top.
Customers can also filter by their dietary preferences and allergies by clicking on the drop-down menu at the top of the screen.
Clicking on a menu item will open it (the information on display e.g. calories, pricing etc. can be controlled from the menu settings).
Specify the desired number of servings and any notes for the kitchen.
Items are added to a basket at the bottom of the screen.
Depending on the menu set up, customers can choose to eat in, take away or have their order delivered by following the prompts on screen.
If payments are enabled, customers will be prompted to enter their card details to complete their order.
Customers will receive on-screen confirmation of their order.
Order Dashboard
The order dashboard is accessed via the Nutritics Content Explorer. Click ‘Orders’ then ‘Live Orders’.
- A summary of all orders is shown in the first panel. Items are organised into the food and recipe groups set up in the Nutritics account.
- The number of times an item has been ordered is shown beside the item name.
- Individual orders are shown to the right of the summary panel.
- Order information includes an icon displaying if the order is for sit in, take-away or delivery
- Also shown is the order number; the time the order is due; customer details; and the order items organised into groups.
- Click on the paperclip icon beside a customer name to see more information on the customer.
Toggle a condensed view of the orders or enable fullscreen mode using the icons in the top right corner of the screen.
In the condensed view, click on an order to see more information on it.
Control the minimum lead time for orders directly from the orders dashboard. Click on the due time and use the plus / minus icons to increase/decrease the lead time. This is useful for ensuring the kitchen is not overloaded with orders.
Click on an item in the order summary panel to view all orders containing that item. In the panel that expands, you will see if any orders require a modified version of that item, for example if the customer has added any notes to their order. Click on the item again in the order summary panel to go back to viewing all orders.
Right-click on an item to view the cooking instructions and ingredient list. You can adjust the number of servings required and the ingredient list will update automatically.
Keep track of order progress by clicking on order items to tick them off.
Change the status of an order using the drop-up menu on individual orders, or set order status in bulk from the order summary panel.
Print a receipt or docket for an order by clicking on the printer icon on individual orders. Note that the width of the thermal rolls used for printing must be specified in your outlet settings accessed by going to the menu in the top right corner of the screen > settings > ordering. Print dockets in bulk based on their status by clicking on the printer icon in the order summary panel.
Filter your orders using the search tool.
Orders can be filtered by:
- Due time
- Date the order was placed or days offset e.g. days in advance, setting this to 0 will show today’s orders, setting this to 1 will show orders for tomorrow, setting it to 2 will show orders for 2 days time and so on
- Area where the customer is sitting (if applicable)
- The menu the customer ordered from e.g. bar menu, main restaurant menu
- Staff member (if staff login is enabled on menus)
- Order status e.g. pending, ready for collection
- Table number
- Meal groups e.g. starters, pastries
Save commonly used searches by setting your search criteria and clicking ‘save’. Give the search a title. Saved searches appear to the left when the search dropdown is open.
New orders can be placed directly from the order dashboard by clicking on ‘new order’. This will open a list of menus. Select the relevant menu and order as normal.
You can update and manage your products via the supplier portal. When you log into your secure portal, you will see your existing foods or recipes can be viewed on the left hand side.
To add a new product to your supplier portal, click the start button located in the top left corner of the screen. This will open the start menu. Click on ‘New food’ to add a new product to your database. You can add data from a products nutrition label, or from other sources (laboratory analysis or specification sheets). For this example, we are going to add label data.
First, name the product and provide an optional description. These also act as search terms when looking for the product later. Next, choose a category for the product from the options presented. The category chosen will determine the cooking methods available if the product is used in a recipe. Add the key nutrients that appear on the product's label. The label format will default to the labelling standards and requirements of the region set in your account. This can be changed via the black drop down arrow. If your product is a liquid, you can enter the nutritional information in mls by clicking the black drop down arrow.
Click ‘show extended nutrients’ to enter any other details such as fat subcomponents (such as mono or poly unsaturated) or micronutrient information. Click ‘submit label values’ when finished. If you chose to enter the nutrition information from ‘other sources’, the database values will be stored as entered and will also be converted to labelling standards.
Once the nutrient information has been submitted, you will be required to add some other mandatory pieces of information before you can publish your product to your database. By scrolling to the publishing panel, you will see what is required.
The mandatory information will be flagged in orange and will include product name, category, ingredient list, at least one portion or pack size and its’ unique code. To add or update any of these fields, you can click on the fix this button and you will be brought to the appropriate section. Additional but not mandatory information will be flagged with a blue exclamation mark eg. cover photos.
To add the ingredient list for the product, click the fix this button and you’ll be directed to edit this in the appropriate section. The ingredient list can be typed in or copied and pasted from another source. You can choose to bold any allergens or click ‘scan for allergens’ before clicking update. If any allergens have been flagged, you will be asked to approve them in order to proceed.
The allergens detected are specific to your region. The region can be changed under the ‘food labelling’ section by clicking on the dropdown.
You can change how the allergens are formatted by going to the menu by clicking on the cog icon in the top right corner of the screen > settings > preferences > scroll to the advanced section and choose your preference from the dropdown beside ‘Ingredient list allergen format’.
Allergens in the ingredient list will be flagged in the allergen tiles automatically.
Now when we return to the publishing panel and click re-check, the only outstanding piece of information is a product / portion size and its unique code. Clicking 'fix this' will allow you to add product names or portion sizes (eg. small, medium , large or 150g, 500g, 750g), their unique codes and images.
- All fields are free text boxes so simply click on them to type.
- Add additional products/servings can be added by clicking ‘+new product’.
- It is important to note that a product / portion code is required for publishing. The code can be manually entered or if your product doesn’t have a code, you can choose to have one auto-generated by clicking on the round arrow.
- Toggling a portion ‘off’ means that product will not be published to your database, but this product will still be available for you to use throughout your own account e.g. to create labels, menus, as a sub recipe.
When all of the mandatory information has been added, the re-check button will update to a publish button. Clicking this button will publish the food to your database. Once a product has been published, it will be available to your customers to search, view and use.
All the foods published to your database are stored in the ‘my foods’ tab. You can make any edits or updates to a published product by updating the appropriate section and re-publishing. However if the product has been reformulated and has different nutrition or allergen information, you will be required to publish this food with a different product code.